Hello subscribers!
It's bad weather outside, but maybe the sun is shining? It doesn't matter, because we have an unforgettable time of year ahead of us. It will be in colorful paints and with many surprises, because autumn always gives us its gifts. But, besides this, it also reveals its natural riches to us. That is why in schools and kindergartens they immediately make crafts from natural materials, together with other components. These can be vegetables, as well as paper or plasticine, and many others. other.
Children, well, just love all this creative work, because they get different funny toys that they can then play with.
Besides all this, you can even take autumn leaves and from them put together masterpieces or bouquets and insert them into or make something. Well, that's not all, cool souvenirs come from ordinary cones. So, if you are interested, stop for a minute and scroll through the entire note from beginning to end. I'm sure you'll find plenty interesting ideas what can be made from natural materials.
Well, if you have your own thoughts on this topic, please share below the article and write your reviews and comments.
I would like to start this conversation with the fact that you don’t even mean and can’t imagine that everything is much simpler than you think. It turns out that to make masterpieces you can take the most ordinary sticks, twigs, or maybe you have pebbles or shells. In general, we always have all this at hand, so why not take advantage of it.
I suggest focusing on stone products, which are always available in any area. If you were somewhere on vacation, you could bring these with you. It is advisable to take, of course, smooth pebbles. Take a log or plank and carefully glue the intended composition using a glue gun. Here you can make flowers, for example. To make the craft brighter and more aesthetically pleasing, paint it using acrylic paints.

A product in the shape of a hedgehog is quite popular, take a look. In my opinion, there is still not enough mushrooms or autumn leaves. So it's easy to fix, take it colored paper and cut out the desired image.

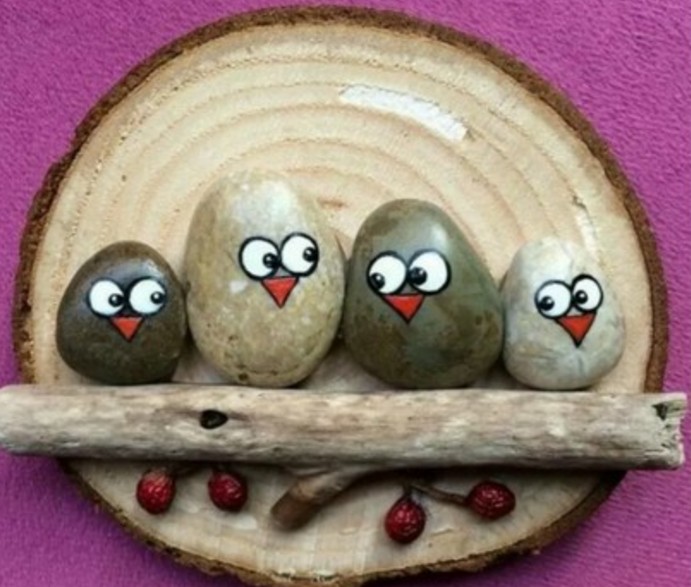
You can decorate a whole picture, make such a cheerful family in the form of birds on wood. As you can see, regular sticks are also involved here.
Oh, and by the way, do a still life.

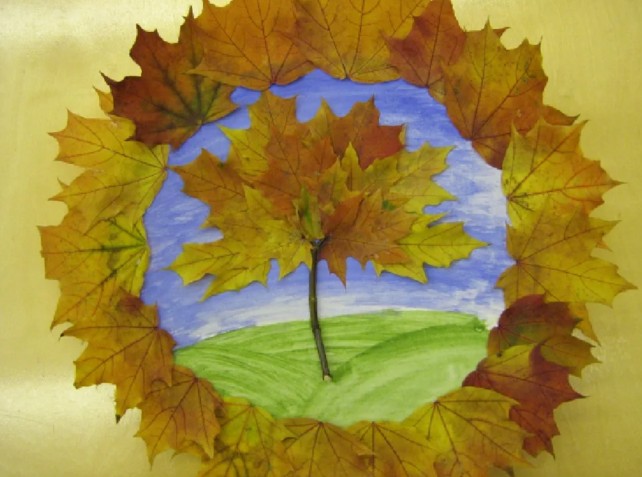
For the youngest children, take the following composition as a basis. Draw a maple leaf or some other leaf on a piece of cardboard or A4 and then decorate it with multi-colored stones.

And if it’s even simpler, then choose a minimalist picture like this. Which don’t forget to decorate with colorful paints.

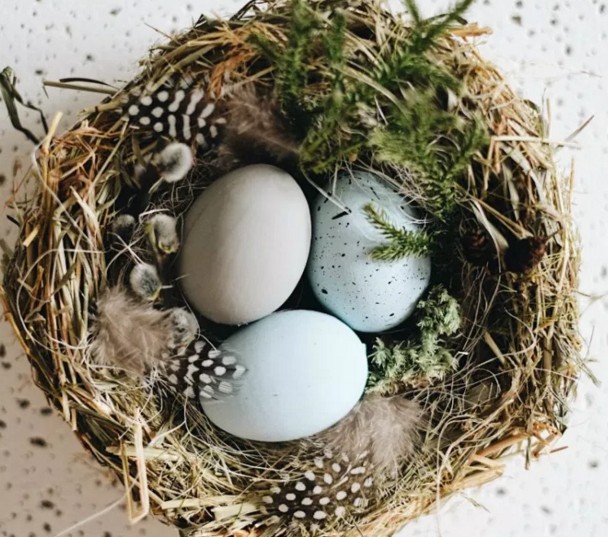
A straw bird's nest could be a great idea. You need to cut a circle out of cardboard.

And twist a flagellum out of straw.

And then twist a nest out of it along the diameter of the circle and secure the ends with threads.

In this way, wind it in a spiral so that you end up with a cup-shaped bed, and glue the straw onto the glue.


Then fill the souvenir with down or feathers and place eggs and pine cones.
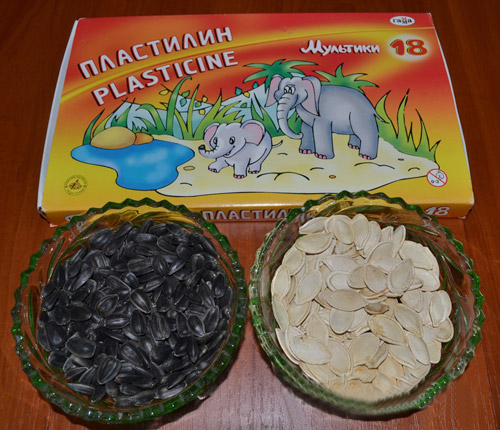
If you are a fan of pumpkin or sunflower seeds, then you can create something absolutely fantastically beautiful. Take a quick look at this photo. It was awesome! The author took and decorated the hedgehog, and its thorns with ordinary seeds and painted autumn.

And here they were used pumpkin seeds, by the way, you can come up with a lot of all kinds of masterpieces from them. I have already shown you several such works. Now I'll show you this one. Who knows, the seeds are painted with paints, gouache or acrylic, and then glued.

Here the artist did not use glue, but placed everything on plasticine. The tree trunk is made of buckwheat grains.


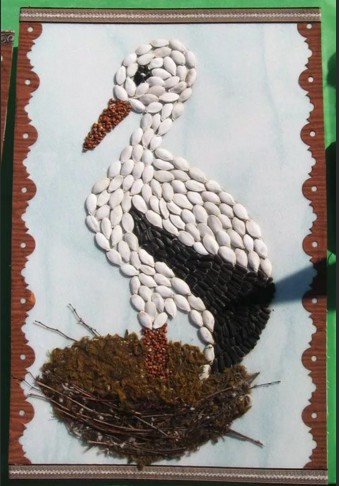
They also make a stork from pumpkin seeds, this is a panel that comes out, or hang it on the wall like a painting and admire it.
I was shocked by another amazing and cool craft, I mean a chicken made from different seeds that the author made. For this masterpiece you need pumpkin and sunflower seeds, as well as plasticine.
1. From plasticine, sculpt the base, that is, the head and body of the bird.

2. Then start decorating the chicken by sticking seeds one by one, as shown in the picture. First there will be the wings.

3. And then the ponytail. It already looks funny.
Do everything carefully and take your time, it is from your efforts that success will await you.


5. Make the crest from red plasticine, and the beak from yellow.


I also really liked these trees made from beans and watermelon seeds.

There are also several types natural material connect and get a picture. For example, how oats are also used here, and the rim is made from corn kernels.

Do you remember when you were a child they used to fly airplanes, so I also recommend making souvenirs from them. I mean maple ones.

This also includes crafts made from dry materials. The sun is so radiant.

Or a clearing and a forest.

Above all, use straw or acorns.

You will get not only pictures, but also people and insects from chestnuts.

At school, I remember they always made people like this during labor lessons.

Well, if you have a handful of pistachios lying around, or rather peels, then imagine you can become a real decorator. Make a topiary like this.

Well, or a vase and insert dried or fresh flowers into it.

Well, in conclusion to this chapter, I want to amaze you. I found a fun pattern that you can easily make. All you need is a board, nails and woolen threads.
Trace a maple leaf on the plywood and drive in nails along the outline.

Walk along the outline with an orange thread.

Then begin to confuse them in a chaotic manner, as if you were drawing patterns, a spider’s web. Great, did you do it?

I also like this funny story, in which the author took ordinary logs and laid out these birds.

These friends are somewhat reminiscent of snowmen.

Crafts for elementary school “What autumn gave us”
Of course, to make compositions on this topic, it is enough to have everything you need at hand. This means you need natural material and available means. Plus your desire, imagination and of course fantasy. If it’s really difficult and inspiration doesn’t come, then take these ideas and create.
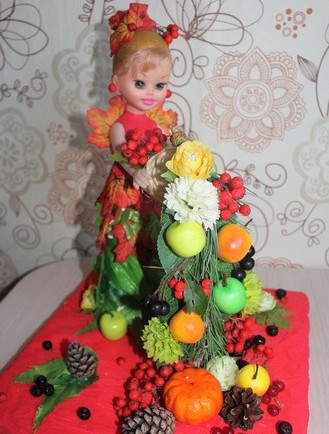
I suggest the girls take their favorite doll and decorate her with such a golden outfit.

This is how it turns out you can go to the park and pick up dry leaves and you are already a magician).


Brilliant, isn't it? Such a queen emerged from an ordinary toy.

Do this work using physalis.

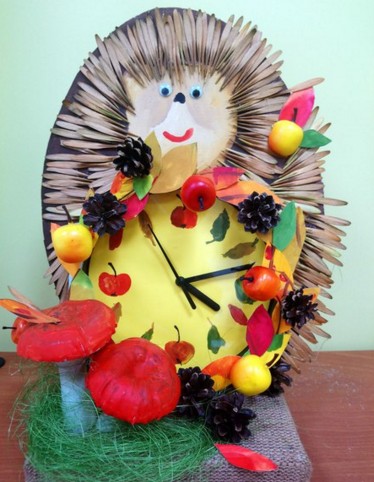
Or, for example, build an alarm clock or a watch from twigs.

A sprig of rowan and pine cones will help you decorate.

Well, last but not least, probably the most popular will be a craft using seeds. I always see such creations at exhibitions in kindergartens and school competitions.


Everyone knows that autumn is rich, so make wonderful masterpieces.


By the way, decorate your classroom amazingly by making garlands of acorns, chestnuts and rowan berries.

Or this idea.

Make a web and bring it to school.

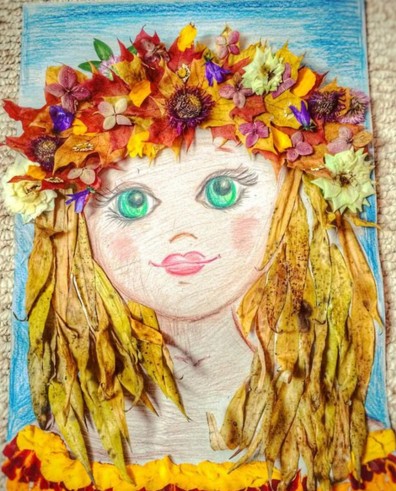
Probably the most enchanting thing will be this beauty, well, a real symbol of this time of year in all its glory, this is the girl’s face. Take any flowers, plants and create.


You can make a portrait like this. I think students primary school and even preschoolers can cope with such work with a bang. Well, middle school even more so.


A gift like this looks super, these are roses, but unusual, and made from maple leaves.

You need to learn how to roll leaves correctly, here is the sequence of actions. Watch this short master class:

On this topic, how to create such a bouquet, I found this video on the Internet on the YouTube channel. Maybe it will be useful to you too. Enjoy watching.
You can decorate a wreath beautifully.


Don't forget that from spruce branches will not amount to a lot of work build a lot of creations.


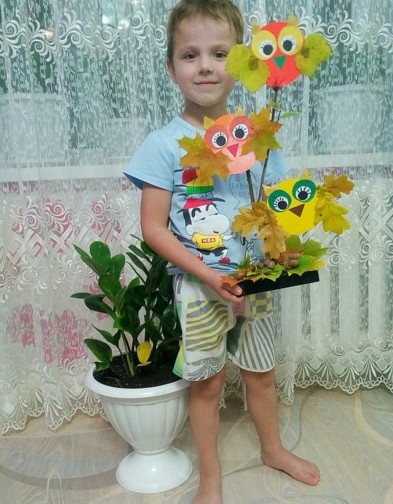
Which cute owl I came out and couldn’t take my eyes off it.

You can build an oak tree, look how wonderful it turned out.

Here's another idea, take note.

Autumn work in kindergarten from natural materials
I think the kids will like the work called applique. Cut the leaves into squares and stick them on a landscape sheet in the form of any character.

An unusual tree like this might also be a good idea. I would say magical, on one side there is winter on it, snow or frost, and on the other there is foliage.

You will need to make a trunk out of plaster, like a stand, and stick the collected branches into it. Let your little one decorate it now as shown in the picture above. Make a snowball from cotton wool, and greens from dry grass, leaves, and flowers.

Or you can make spiders or a hut on chicken legs with Baba Yaga. After all, children love fairy-tale characters very much.


Do you want to go the non-traditional route and use shavings from simple pencils or colored pencils as a basis and create such beauty.

Also create figurines from walnuts in the form of a bear.

And this little mouse.

Here are a couple more mice.

A panel using rowan berries also looks great.

You can take the following option as a basis, make the leaves from paper in the quilling style, and glue the rowan.

This funny kitten will clearly lift everyone’s spirits.

I also want to invite preschoolers to make a smart owl.


It is easy to build the following from tree cuts.

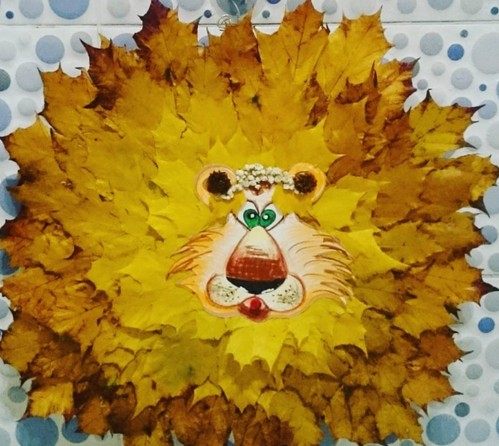
Or make a lion cub or a lion.


Also be happy to stop at simple models, which are cut as follows.

You can also draw, take dry tree leaves as a basis in the form of stencils and simply dip them in paint and make prints.

Or you can design a picture with birch trees like this.


Next job, draw an image of a woman or girl, and ask the child to do the hair.
Use your imagination and build little animals.

It’s interesting to design a boat.

Or make a peacock or firebird.

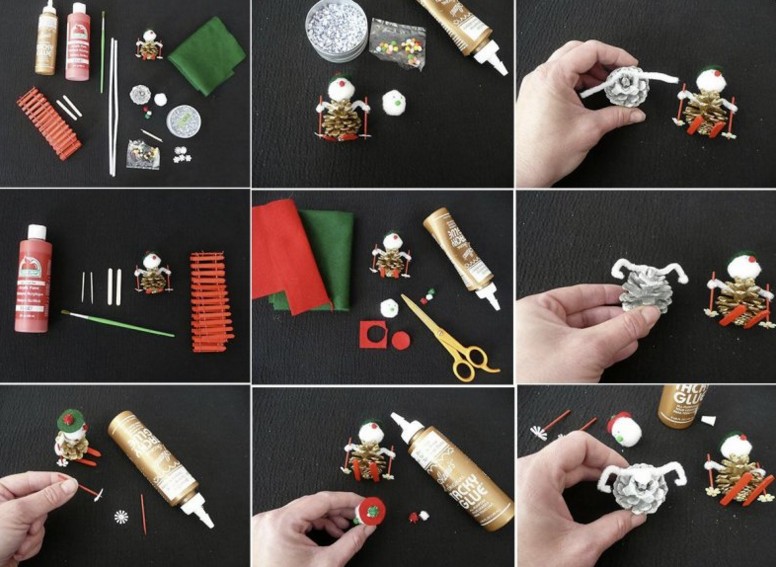
Toys and souvenirs made from pine cones: fast and beautiful
Well, now I present to your attention all the most interesting things from acorns, cones and probably plasticine. Because it is this component that will help recreate new toys and souvenirs.
Here is a picture that was made using paints, a background and multi-colored cones are drawn, which are also painted with acrylic paints.

The next work is such a cute topiary, from all that was in the forest. There are Christmas tree branches, cones, berries, even acorns.

If you love Masha and Misha from the cartoon, then you will like the next idea.

On this topic, I found this year’s new items for you in this video from the YouTube channel. So don't miss it!
Well, a couple more ideas that you can turn into reality.
These could be birds such as an owl or a swan, or a basket of pine cones.

It's easy to make an angel in the form of a doll, or a pendant.

They even make squirrels, but in addition to plasticine, felt fabric is also used.


In addition to all this, you can also take any fruits and vegetables and arrange any composition using natural materials.

Original crafts from leaves on the theme of Golden Autumn
If you have absolutely nothing to create from, then take and collect foliage in the parks and you won’t believe it, you can make such creations from it. Even kids 2-3 years old can handle it. Well, schoolchildren even more so. I have one child who lives in our house and studies in the third grade, so he painted the collected leaves like this.

And my son, who is already 5 years old and will almost soon be 6, will do such a miracle. This is the butterfly, he chose the second one, which one do you like better?

To be honest, I also really liked the hare and the fox. Look, even the bark has been adapted.


What kind of bird is this? Peacock, her ear and tail are beautiful!

Well, the following composition in the form of an aquarium and fish can also be a great idea.


In addition to all this, you can easily and quickly create insects.

But probably the most beautiful and charming craft will be in the form maple leaves, they are folded in an unusual way, in the form of roses. Here are instructions for making such beauty. Repeat all steps as shown in this picture.
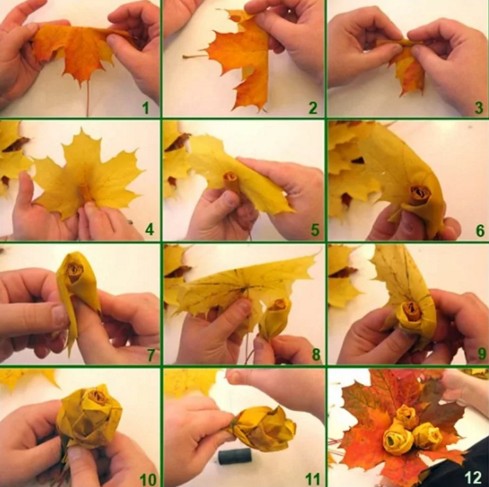
This is what should come out in the end.

You can make flowers from any type of leaves. This video will help you with this, watch the master class.
In addition, take a regular vase and place dry branches in it and decorate with foliage.

And also any photo frame can be presented in an unusual way.

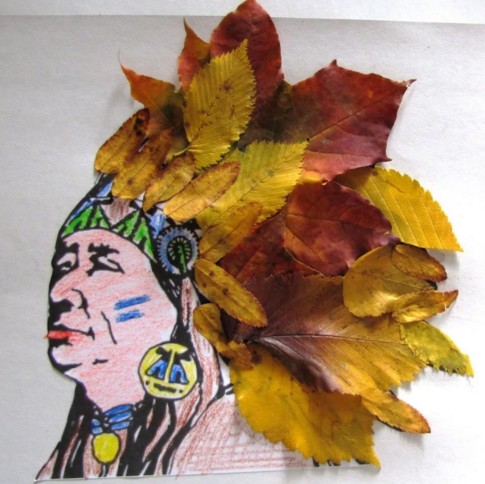
Well, give the boys who love Indians a leader.
And here are a few more cool ideas on the topic of what you can come up with and do from leaves. These are children's creations.


As you can see, there’s just so much that’s missing here. A turtle, a snail, a helicopter and even a mischievous parrot.


Or post the fabulous Petya the Cockerel.

Besides all this, you can go a non-traditional route and make paintings.

And if you don’t have enough sunshine, then here’s an idea for you.
For interior decoration, and even for an exhibition at school or kindergarten You can also bring a vase of maple leaves. How to make it? You will need PVA glue and balloon.
In short, you can look at these steps and build such a creation right today.

Or consider these stages of work.
1. Inflate a balloon, apply PVA to it with a brush and immediately apply the leaves.

2. This is what should happen.

3. Also apply glue on top of the leaves sparingly.

4. Now let the workpiece dry completely, and then pierce the ball with a needle. Now fill it with fruits and vegetables and get ready for the holiday.

I think that after reading and viewing this note, you no longer have questions about what can be made from natural materials; I think I have found enough ideas. Just take it and do it.
All the best and positive wishes to everyone. Bye!
Best regards, Ekaterina
Crafts from natural materials for kindergarten are a favorite topic for many teachers at kindergarten and school exhibitions, so sooner or later every parent has to deal with it.
Watch how to make a rose from leaves in the video:
DIY crafts from pine cones
A very impressive craft can be made from pine cones, a plastic bottle and plasticine:
Funny squirrels are made from pine cones and felt.

Cones and other natural materials are used to create a mysterious little animal with wings.

Very sweet and funny craft made of pine cones and cotton wool - owls. To make owls, coat the scales of the cone with glue. Then we push cotton wool between the scales.

Glue the eyes and nose on top. We got some funny fluffy owls!

From natural materials you can make very impressive birds in a nest. From cones and chestnuts we get a head and a body. We make wings from the leaves. We fix all parts of the craft with good glue.

All that remains is to make the birds their home - a nest. We weave it from thin branches, which we fasten with threads. We make the bottom of the nest from intertwined branches, which are inserted into the side parts of the craft.

Glue the birds' eyes and beaks. We place the birds in their house. A wonderful craft made from natural materials - ready!

By winter and New Year there will be actual craft"Christmas tree made of pine cones." Glue a cone out of thick cardboard. Using a glue gun, glue the cones to the cone, starting from the bottom row.

We cover the entire cone in this way. Christmas tree made of cones - ready!


Their cones can be made very beautiful tree happiness - topiary. This craft will take its rightful place at the exhibition. autumn crafts V kindergarten.

Another undoubted winner of the autumn crafts competition is the leaf topiary.

Watch the video on how to make a tree of happiness using paper and natural materials:
Crafts from needles, nuts, acorns and chestnuts
First, we make the body, head and legs of the hedgehog from plasticine. We begin to stick the needles into the back of the hedgehog, trying to arrange them as much as possible closer friend to friend.

Acorn caps can be used to make a very impressive snake.

Acorns and chestnuts make a lovely squirrel. The squirrel's tail and paws are made from fluffy wire. We connect all the details of the craft using glue.

If you fasten the details of the craft with matches, you can make very impressive animal figurines.

The most skilled craftsmen will be able to make a proud and cheerful deer.

Crafts in a box made from natural materials are popular for kindergarten. Such crafts turn out to be very bright and beautiful - the main thing is to collect more moss, acorns, cones, branches and leaves.

Crafts from pumpkin seeds
Pumpkin seeds can be easily colored with regular food coloring. Dyed and dried pumpkin seeds become good material for crafts using mosaic technique.

You can also lay out a bright and beautiful autumn tree.

You can make a very impressive three-dimensional picture from cereals. First, we make a sketch with a pencil.

Then we apply glue to a sheet of paper and sprinkle with different cereals. We complement the image with sprigs of greenery, flowers and bark.

Crafts from vegetables and fruits
Vegetables and fruits are also wonderful materials for creativity. Look what an amazing zoo you can make from vegetables and fruits.

Eggplant and carrots make a smart penguin with glasses.

Zucchini, eggplant, carrots and cabbage make a real frigate of the sea.

Zucchini ship - option No. 1
This zucchini boat has durable and beautiful sails made of paper leaves.

Ship made from zucchini - option No. 2
From zucchini, cabbage and carrots we can make a very impressive bunny!

You can make chanterelles and cats from onions and carrots.

You can make a very beautiful craft from corn, flowers and berries, dedicated to the holiday autumn and harvest.

You can make a hedgehog from potatoes and berries using toothpicks.

Pink potatoes and carrots make an adorable pig. The ears, snout and legs are attached with toothpicks.

From such pigs you can collect very interesting and educational toy"pig farm"


A very impressive cockerel is made from apples. We fasten the details of the craft with toothpicks.

We cannot ignore a craft that has already become a classic - “Stamps from Potatoes and Carrots”

How to make such stamps, watch the video:
Crafts from stones for the garden
Stones are another wonderful material for creativity in kindergarten. Particularly impressive crafts are made from smooth pebbles. By coloring smooth pebbles you can get our favorite characters, for example, a hedgehog.

If you use glue and connect several stones, you can make funny little frogs.

For autumn exhibition Bright fly agaric mushrooms will certainly come in handy.

Crafts from shells for the kindergarten
Shells are a fairly rare but very favorite creative material for children. See how to make adorable bunnies out of seashells.

Crafts from branches and sticks
You can make a very impressive vase from sticks. At the base of the vase plastic bottle. Let's cut her off top part and color it.

We break off sticks of medium thickness. Using double-sided tape, glue the sticks to the bottle.

We tie the vase at the top and bottom with ribbon for strength and beauty. Looks best in a vase of branches autumn bouquet from leaves, dry branches and cones.

You can put a bouquet of autumn flowers in a wide and low vase made of branches.

Very interesting crafts obtained from cuttings of branches.

You can make beautiful deer from branches. Holes in large branches are made with a drill. Then small branches (legs, neck, horns) are inserted and fixed with glue.

You can decorate a cardboard house with dry cut sticks.

Look what else wonderful crafts can be made from natural material:
By using your imagination, you can create your own from the proposed options, picking up the idea and giving it a unique look.
Greetings to all guests and regular readers of the blog. Recently I touched upon the issue of manufacturing for various competitions and exhibitions in kindergartens and schools. I realized that this issue is very relevant, so I decided not to stop and devote a couple more articles on this topic.
However, today we will no longer create from orange vegetable, but from natural materials, that is, from what can be found in the world around us. Most often for children's creativity they use moss, bark, acorns, leaves, flowers, chestnuts, dry twigs, mushrooms, etc., that is, all plant elements. Mineral materials include shells, sand, shells, and stones.
We will do handicrafts on a specific topic, and I think you can already guess which one. Of course, all products must be close to autumn theme, because I’m celebrating the Autumn Festival in all preschool and school institutions.
Don’t forget that in addition to organizing all kinds of competitions, matinees are always held. Therefore, it’s great if you and your child not only work with your hands together, but also memorize a couple. But let’s not deviate from the topic and get down to choosing and creating crafts.
What crafts from natural materials on the theme of autumn can be made with your own hands quickly and beautifully
First, let's understand and figure out what can be created. After scrolling through a bunch of different sites, I selected different variants creative works. I would like to note that they are all very similar to each other, but at the same time, each work has something unique.
And here is the first product. The so-called autumn in the forest. Take cardboard and cut a circle out of it. Decorate (glue) the imaginary ground with leaves and berries. The house can be built from sticks or paper. Fir or pine branches work well as trees. Also use logs from thick dried branches. Don't forget about the pebbles. Well, plasticine will always help you.

But what kind of house can be made from twigs and colorful autumn leaves. Next to the hut you can settle some fairy tale hero or forest animal.

Another variation of a house made from cereals and various natural materials. It looks very beautiful and bright!

How do you like these cute burdock hedgehogs? Well, it's just a miracle. By the way, you will find out how to make such a craft below, it will be detailed master class with description and step by step pictures. So don’t rush to leave the page, read everything to the end.

Here's another idea with a hedgehog. Only here the painting acts as a product. Kids can easily cope with this type of activity.

As an addition to any craft, you can use a Barbie doll in the role of the Queen of Autumn. And to make her more elegant, make her maple leaves dress.

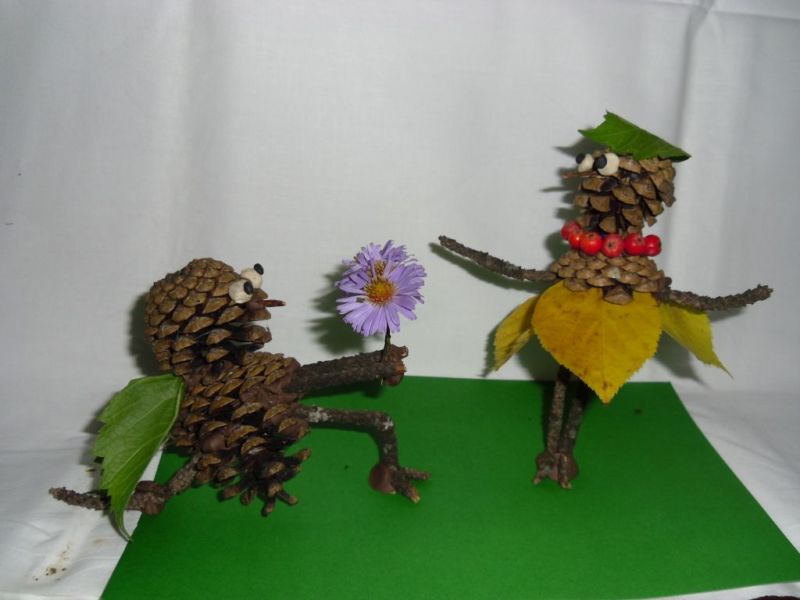
I really liked the next composition. Animals made from cones are so cute and funny. The work is just great!

You can make any cartoon characters from chestnuts. They perfectly complement a forest clearing.

I don’t know about you, but the photo below really grabbed my attention. To convey the whole autumn mood so subtly, it’s simply a masterpiece.

Hedgehogs, hedgehogs! They are the most popular in crafts made from natural materials, so admire them and do it yourself.

Forest deer are simply beautiful. They are made very easily and simply. Connect all the parts using brown plasticine.

Another idea is that you can paint the pine cones and make whatever you want out of them. This is what an autumn composition turned out to be.

Ideas for autumn crafts made from natural materials for elementary school for an exhibition
In fact, such creativity is very useful, and if your child becomes interested in it, then you will then have to prepare natural materials in advance and learn how to store them correctly. But this is, of course, another topic, not about that today. Therefore, the following works will help you.
Option with a sailboat and a forest dweller. Simple, but tasteful.

I see that houses are also often found in products. Apparently because they look impressive and are appropriate in any product.

And this is what I talked about above. That various animals, fairy-tale and cartoon characters are easily made from natural materials.

What a squirrel that brought a nut. Just a cutie. And for work you only need cones, acorns, leaves and a stand. And also plasticine.

Well, the owls are like real ones. And feathers are also part of natural materials, so don’t forget about them.

Now the hedgehogs are not made from burdock, but from your favorite cones. Looks cool too.

The following creation is perfect for schoolchildren. It develops imagination, perseverance and accuracy very well.

Here are more works on the theme “Autumn in the Forest.” I think many people will want to do this with their own hands.


And finally, these funny puppies who went for a walk. Bravo to their creators! Looks original.

And I would like to invite you to watch the following video story. It describes in detail and shows how you can create a craft from natural materials, namely, make a clearing with mushrooms. Great idea for children's creativity.
Crafts made from natural materials for the autumn holiday in kindergarten
Now let's see what our kids can do. Yes, actually everything. So all the works are suitable for both schoolchildren and preschoolers. Help from adults is, of course, welcome and will not be superfluous.
The next work is called “There was a birch tree in the field.” You found a strong birch twig, yellow leaves from the birch tree and your tree is ready. Additionally, they built a hut from branches, covered the ground with moss, lined the path with pebbles or cereals, and everything was ready.

Here is a picture in a frame. All the same familiar materials: leaves, grass, plasticine and sunflower seeds.

And how bright ladybug can be obtained from rowan berries. Indescribable beauty!

Don’t forget that natural materials go well not only with plasticine, but also with vegetables from the garden. Such cute little lambs and pigs!

Well, this craft is quite simple. But how a child will be happy with his creation like this.

What kind of miracles are these? I think this is Leshy and his girlfriend. It turned out to be a cheerful and romantic composition, do you agree with me?

Remember, just above it was shown closely how you can do forest deer? But now they are not individually, but in the whole composition.

That's autumn trees look almost like real ones. And the cute and prickly hedgehogs are already here.

And another variation of making a wise owl.

I never tire of being amazed at how rich human imagination is and what our skillful hands. I say “Bravo!” to the authors of the works.
Interesting DIY projects for grades 1-3 using natural materials
Well, I still have some amazing things for you. autumn work. If you are not tired, then read on and be sure to choose products for creativity with your children.
For example, you can make something like this three-dimensional picture. And you can call it this way - Autumn bouquet in a vase.

What do we see below? Wow, a real tree and a super bouquet of leaves. Class!

Oh, I can’t stop, I found another chestnut hut. We have a lot of them in Tula.

And here is a hedgehog without a head and legs). So big and with a crop on the thorns.

And how beautifully you can decorate a basket with moss and berries! Moreover, the basket itself can also be woven from twigs yourself.

If time allows you and there is a forest not far from you, then wander around it in search of interesting materials for work. You will definitely be lucky and you will find something special, for example, like in the picture below.

By the way, you can create bouquets of roses from autumn leaves. It looks very nice.

Here is another work dedicated to the theme of autumn in the forest. Beauty, what else can you say.

Dancer girls made of leaves, acorns and twigs. Original, original!

And here is just a bouquet of roses made from leaves. Just twist the not yet dried leaves and the buds will be ready.

Original crafts made from natural materials and plasticine on the theme of golden autumn
Now I propose to look at options for products containing plasticine. I won’t describe in detail what and how, since everything is clear and understandable from the photographs. If you have any questions, then write in the comments and I will answer.
- "Caterpillar";

- “Collecting mushrooms”;

- "Forest Animals";

- "Walk in the Woods";

- "Visiting Baba Yaga";

- "Puppy";

- "Happy Snails";

- "Animals";


- "Butterfly";

- Insects";

- "Life in the Forest";

- "Mushrooms"

Step-by-step master classes on making autumn crafts “Hedgehog”, “Cockerel” and “Owl”
Well, as I promised above, I will tell you and show you in detail how you can make the most popular crafts from natural materials. Ready?! Then let's begin!
Burdock hedgehogs in an autumn meadow

You will need: leaves, twigs, cones, tree mushrooms, burdock, plasticine, sticks, any box, scissors, PVA glue, hawthorn berries, rowan berries or any others.
Work process:
1. To make a clearing we will need cardboard. Take any box and cut out the cardboard to the required size.

2. Draw a forest edge on a piece of cardboard. Glue the leaf, cones, berries and tree mushrooms. And in order for the branches to stand, secure them with plasticine.

3. Made from plasticine yellow color make a head for the hedgehog. And make eyes and a nose out of black.

4. Insert a non-fragile stick into the plasticine head.

5. Now form a body with thorns from the burdock.

6. As a result, you should end up with a hedgehog like this. Just don’t forget to stick a piece of plasticine on the end of the stick, otherwise the face will outweigh it.

7. Place a couple of berries on top of the thorns.

8. Make another hedgehog and place them in the autumn meadow. Your craft is ready.

Cockerel made from pine cones

You will need: pine cones (large and small), plasticine, scissors, autumn leaves, rowan berries.

Work process:
1. Take two small dense leaves, preferably with the greatest predominance of red color. Cut them into narrow strips as shown in the photo. Cherry leaves are very suitable for this task.

2. Attach the resulting leaves to big shot(torso) using small pieces of plasticine.

3. Now make a long and colorful ponytail. To do this, you need to use the technology described in point 1. Take yellow, green and red leaves. Rowan, ash and grape leaves work well. Fasten the blanks with a piece of red plasticine.

4. Attach the tail to the top of the pine cone.

5. Make a stand for the cockerel from green plasticine. Decorate the stand with rowan berries.

6. Attach the torso to the stand.

7. Now make the head. Take a small pine cone. And from red plasticine mold a beak, a comb, long earrings. Roll out round eyes from black plasticine. Secure everything onto the pine cone.

8. Make a neck from orange plasticine. And take one leaf and also cut it into strips.

9. Attach the neck to the body, and then attach the head to the neck. Stick a cut leaf to your neck.

10. Finally, place the cockerel on hard surface and decorate his place with any autumn natural materials.
And for a snack, an owl. The craft is made from dry leaves and a transparent bag. Everything is very, very simple. The result exceeds all expectations. So quickly watch the video and do everything according to the model.
And since I can’t stop, catch more cute ideas.
Little fox sister made from carrots. And her clearing is made of different natural materials.

Smeshariki also visited autumn. There is a fantasy - there is a result.

Another family of mushrooms. You can take brown branches, and then simply paint them with white paint.

And here is a hedgehog who found a ripe apple. There is a plot, which means the craft is ready.

Well, the invented forest dweller will decorate any work.

Well, that’s it now, I have to stop, otherwise I won’t finish writing). Finally, I would like to note that all the collected works are not mine, but taken from the Internet. So I’ll once again praise all the authors - “you’re great,” the crafts are all great and for every age and taste. And I wish you, dear readers, to work hard and take prizes at exhibitions. Let your children receive their first certificates and awards. Bye, bye everyone.
Pumpkin flower vase will become unusual decoration hearth
To give your apartment or house comfort, it is advisable to think decorative design space down to the smallest detail, for example, creating crafts from natural materials with your own hands. Such details will make it possible to make a beautiful, but initially “empty” living space more homely, warm and comfortable. Beautiful crafts made from natural materials are especially indispensable for an eco-style interior, but in any other design concept there is a place for hand-made decorations. Also similar interesting things will be very useful for parents whose children need to show off family handicrafts in kindergarten or school. Well, let’s be patient and let’s start making!
- Tree
- Pebbles
- Fruits and seeds
- Leaves and flowers
- Shells
- Feathers
- Manufacturing workshops
- Twigs and twigs - the most accessible remedy for making crafts. You can use them to make animal figures, stars, hearts and any shapes in general, which is very exciting for children. Dry twigs and sticks can be used to decorate a photo frame or mirror, as well as to decorate a panel, filling a certain silhouette with them. An interesting flower pot in eco-style is made from sticks tied together.
- Tree cuts and stumps also provide wide scope for creativity. You can use them to make larger items, such as watches, boxes or pencil holders. This kind of work requires male hands and skills in working with tools, but women can also use saw cuts when creating decorative ornaments. Cuts of small branches can be glued together, creating various crafts. Nice pendants are obtained by tying small cuts on ropes around the perimeter to a large base. You can use the same method to decorate an old floor lamp or chandelier.
- Bark and birch bark - more complex materials in terms of creating masterpieces. Various baskets and birch bark boxes are always works of art, but learning how to make them is very difficult. You can create miniature paintings on the bark of trees, complementing the “drawing” of the bark with suitable details.
- First, frames are made, which can be driftwood of original shapes or several branches connected to each other. The panel can be round, in which case a vine can act as a frame.
- The basis for the panel is burlap or plain paper. In some cases, you can make a mesh of straw, deliberately leaving empty spaces in the picture.
- You can create a composition from leaves, flowers and other available natural materials, and in the case of a straw base interesting solution there will be an interweaving of elements into an already created lattice.
- The last stage is the creation of fasteners (from rope or wire), with which the panel can be hung on the wall.
- First you need to carefully break the raw egg and pour the entire contents into a bowl. The edges can be hollowed out evenly, or they can be left splintered.
- Next, we solve the problem of the stability of the future vase. For these purposes, either an egg stand or egg packaging is suitable. If you do not plan to use other devices, you can use plasticine, which is rolled into a flagellum, which is tied around the bottom of the future vase.
- After registration of the container, you can populate it with residents. It can act as both a vase where small wildflowers will stand in water, and a pot where you can plant greenery, moss or small succulents.
- Any wooden parts should be pre-treated with impregnation to rid them of rot and insect pests.
- Next, in the center of the stump or anywhere in the core (depending on the idea), you need to drill a sufficiently wide and shallow hole into which a standard flat candle will fit. If you don’t have the skill to work with a drill, you can use a regular knife, but the work will take longer.
- After this, you need to sand the edges and cutout of the product with sandpaper.
- For decoration, you can paint the product or leave it in in kind, but varnish the sections. The edges of the product can be tied with burlap or wrapped with jute rope.

Family composition made of sea pebbles

Interesting decorative element from coffee beans
Most often, crafts are made from natural materials in the summer and autumn, since it is at this time that you can find a lot of useful little things. However, some materials are available at any time of the year, so neither Cold winter, nor early spring should become an obstacle to creativity.
15


DIY crafts made from wood (video and photo ideas)
Wooden crafts will always find a worthy place in the interior, and they can be completely different in shape, since wood is used in different variations:

Christmas candle stand made from branches

Natural composition will refresh the interior

Desk clock in eco-style

Hanging bookcase with wooden shelves
16


Crafts made from natural materials: pebbles and pebbles
From stones different color and the shapes make excellent crafts. You can make a comfortable mat, a hot pad, decorative panel or an original figurine.
Advice! Pebbles are the most popular among stones because they have flat areas, making them very easy to attach to the base with glue.

Decorative pots with “flowers”

Mosaic in oriental style on the rocks
Even ordinary painted pebbles look very bright and cheerful, and if you create a composition from them, you will get a unique piece of furniture. Some designers use pebbles to decorate vertical or horizontal surfaces in the apartment, for example, parts of walls, fireplaces and window sills.

Decorative panel made of stones

Homemade towel hooks using natural materials
Topics for crafts made from natural materials for the summer: fruits and seeds
From labor lessons in elementary school, everyone remembers children's crafts made from natural materials, for which they used cones, acorns, nut shells, seeds, coffee beans, etc. Together with children, you can create a worthy decorative accessory for the home from these well-known materials. Most often, miniature figures or three-dimensional paintings. If you attach various fruits to a “bouquet” of dry twigs, you can adequately replace the New Year tree.

Volumetric panel for the kitchen

New Year's toy made of coffee beans and burlap
Advice! Any collected natural material (pebbles, pine cones or wooden sticks) should be dried before creating homemade masterpieces. If the parts are wet, the service life of the craft will be greatly reduced.
13


DIY autumn crafts: leaves and flowers
Fallen leaves of various colors and dried flowers make it possible to create the brightest bouquets, compositions and decorative wreaths. Such autumn crafts made from natural materials go well not with ordinary vases, but with original containers: watermelon rind, coconut shell or pumpkin shell. To decorate festive table, you can just add such autumn compositions candles, ripe vegetables and fruits. Leaves and moss are used to create appliqués, and sometimes the result is such beauty that it would not be a sin to replace a painting by a modern artist with it.

Japanese style leaf pond

Step-by-step master class on creating a vase from maple leaves
15


Marine-themed crafts: use shells
Another unique material for creating DIY crafts is shells. Individual specimens in themselves are of particular interest in terms of decorativeness, and products made from them will not leave anyone indifferent. If you are lucky enough to collect a collection of shells at sea, do not leave them in a bag, but use them to create a painting or pendant in a marine style.

Original candle in a marine style

Decorative wreath made of shells
Master class: shell topiary
13


DIY crafts: feathers
Feathers are usually used as components in other crafts: they are used to decorate tails, hairstyles or tree trunks. But they can also be used separately if tied into small “bouquets” and placed in transparent containers. Such “bird” decor will bring fresh emotions to the interior.
15


DIY crafts made from natural materials: workshops on making
Making crafts from natural materials is quite simple, since they begin to teach this at school. If you try, you can create a real work of art. Let's look at the details of making some beautiful little things.
Colorful panel
An interesting panel can be made from various natural materials. Dry leaves, straw, nut shells, and dried flowers are suitable for it. The plot itself can be absolutely anything. The panel is created as follows:

Beach style in creating a wall panel
Flower pots made from eggshells
Miniature flowerpots are made from eggshells However, this work requires great care due to the fragility of the material:
13


Advice! In addition to flower pots, shells make excellent candlesticks. Any crafts made from shells will be appropriate during the Easter holiday.
Candlestick made from a tree stump
To make a candlestick from a small stump or saw cut, you need to perform a number of simple steps:

Unusual handmade candlestick made from logs

Beautiful Christmas composition
A candlestick for several candles, made in the same way on a long piece of driftwood, also looks interesting. If you think about attaching it to the wall or a stable stand, you can often delight yourself with romantic evenings.

A special drill attachment will help you easily prepare holes for candles
If you want to create something completely unique, something that no one has ever done before, give free rein to your imagination. Sometimes the most familiar object can appear in this way unusual image It’s amazing how anyone could even think of this.

Handmade “House in the Village”

New Year's composition of candles and moss

A beautiful wreath will add freshness to the interior

DIY succulent panel

Hello everyone!
Welcome to the pages of the ShkolaLa blog! It's autumn outside. What kind of “School” would it be in the fall and without autumn crafts? That's right, none) Children bring all sorts of different crafts made from natural materials to school every year, around September - October. That is, right now! Therefore, right now an article dedicated to these crafts is being published on the blog.
Most of the works that you will see below were found by me on the Internet. I want to convey my warm regards to their authors and say thank you for their magnificent creativity and great ideas, which, I hope, will inspire many little schoolchildren and their parents to do their own crafts.
Lesson plan:
From chestnuts
A huge chestnut tree grows right in front of our entrance. And when you leave the house in the morning, no, no, and you’ll get a chestnut on the head. It doesn’t hurt at all, it just happens unexpectedly) So we don’t have to go far for chestnuts, they literally fall from the sky.

Last year we made these “Checkers-Bugs” from chestnuts with our own hands, which we then presented to the kindergarten as a souvenir.

A master class on how to make this game is hidden.
You can also make these amazing snails from chestnuts. Very easy craft, which does not require much time.

A charming and not at all scary spider. True, making a hole in a chestnut can be problematic. Here the child will probably need the help of an adult.

If you add plasticine and a little imagination, you can make the whole of Africa!

Or a poultry yard.

And this caterpillar is just a sight for sore eyes!

I am sure that she could decorate more than one exhibition and win some autumn competition.
From the cones
And for pine cones, my children and I go to Victory Park with a basket. But there you can only pick up pine cones.


The playing field is made of branches, and the chips themselves are made of pebbles, but they can also be made from chestnuts, and even from halves of walnut shells.
From leaves, flowers, berries
Well, there are a lot of beautiful bright leaves in autumn. Collect - I don't want to. However, like berries, rowan, for example.

I remember when Sasha was in first grade, this was in another life (before the blog), she and I made roses from autumn leaves for school. It didn’t work out for us, we tried many times. As a result, we managed. It turned out something like this.

You can make various applications from leaves and flowers.


Use them together with other natural materials.

Or you can try to create a real work of art.

Rowan berries are perfect for making jewelry, beads, for example.

From something strange
And while walking around autumn parks and on the streets you can find something strange and, at first glance, completely unsuitable for crafts. For example, here is a piece of birch. What should I call it? Did you sleep, or what?

We found him and took him with us. They brought it home. Washed and dried. And they decided to turn it... into a watermelon! The shape is very suitable. Look what we got.

We needed:
- birch;
- acrylic paints (white, green, black, red);
- tassels;
- acrylic lacquer;
- PVA glue;
- plasticine.

First, we primed our entire future watermelon with PVA glue.

Then they painted the “crust” dark green.

And they drew a dark stripe down the middle.

The “watermelon pulp” was first covered with white paint.

And then, retreating a little from the crust so that a white rim remained, everything was painted in a rich red color.

To make the transition from white to the smoother red one, a pink stripe was added between them. When our watermelon dried, we coated it with varnish. After that it became even juicier.
The only thing missing is the bones! We molded them from black plasticine and glued them into place.

Now this birch watermelon stands in our room in the most visible place and delights us and our guests, who strive to touch this piece of summer.
That's how much various crafts you can come up with and make it for elementary school with your own golden hands. Nothing complicated, but how exciting!
And right now the singing kids will share with you their wonderful golden autumn mood)
What have you already managed to build from natural materials this fall? Will you tell me? We are waiting for comments)
Happy creativity!
Yours, Evgenia Klimkovich.