Through creativity in early age The child gets to know the world around him by doing crafts “Autumn” for kindergarten he studies new materials, learns to work with them and with auxiliary materials. During creative process The child’s fine motor skills work, which is very useful for overall development. By being creative from an early age, a child receives a comprehensive intellectual development, and even develops the speech apparatus.
That is why it is important to instill a love of creativity from an early age, as soon as the child can independently work with the safest materials. In the first stages, he will definitely need his mother’s help, and then he will make original ones on his own. And let the parents not think that creative activities are just entertainment for kids or a pleasant pastime, because everything that preschoolers do with their own hands shapes their personality, and it depends on the parents whether they can unleash the creative potential of the child.
When a child works with his hands, be it modeling or drawing, or, he develops fine motor skills of his hands, which stimulates all the centers in the preschooler’s brain, including the center responsible for speech.
It is important not to get hung up on one type of handicraft, for example, if you have chosen modeling for a child, then you should not give preference only to working with plasticine, because there is also clay, self-prepared salt dough, as well as seasonal entertainment on fresh air- modeling from snow and sand. Working with each material, the child learns the specifics, because in some places it is necessary to knead the plastic with force, and some materials are very pliable and plastic. Thus, the mobility and strength of the fingers changes, and coordination of movements when working with small elements improves.

The creative process captivates the child so much that he becomes focused, assiduous, more purposeful, because with the help of his parents he will definitely bring the job to the end in order to demonstrate to everyone crafts for kindergarten theme “Autumn”, photo The very first successes of your baby will be stored in the family archive.
Even by doing a simple appliqué, a preschooler will learn to sort objects by shape and size, by similarity if he is working, for example, with autumn leaves, and you can also invite him to make a mosaic using various seeds, grains and legumes.
In the process of cognition various materials, the baby will understand how certain things are made, for example, a snowman will now be not just an incomprehensible figure made of snow, but three balls molded together different shapes.
Crafts for kindergarten on the theme “Autumn” contribute to the development of imagination and fantasy, accelerates thought processes, because if for the first time the baby thinks for a long time about what shape of leaf to take, then over time he will perform all actions instantly.

Crafts “Autumn” for kindergarten
DIY autumn crafts for kindergarten always accompanied by a fun journey, because to collect necessary materials, the whole family needs to go to the forest. In autumn in a deciduous or coniferous forest necessary tools for creativity they literally lie underfoot or hang from tree branches.
At this time, adults can search for mushrooms or pick berries, and children will put even multi-colored leaves of different sizes and shapes, large and small cones, acorns and their caps, small even twigs and Christmas tree needles into their basket. All these simple materials, so familiar to us in Everyday life, can open up a whole new world for your baby.

It will be interesting for the baby to work with colorful leaves throughout the year, in cold weather. winter months When bad weather makes walking outside impossible, you can cheer up the whole family if you offer to do it together.
The leaves collected in the fall should be laid out between the sheets in a thick book. This way they will dry, remain smooth and retain their color. If you need to quickly dry only plucked or collected leaves, you can use an iron. You need to go over the leaves several times with a hot iron, and they are ready for application.
Crafts for kindergarten on the theme “Autumn”
You can combine several types of creativity in one craft. For example, you can take autumn materials and plasticine and make original figures or make a picture using not only paints and markers, but also yellowed foliage.
For the youngest craftsmen, you can suggest working not with whole leaves, but with small pieces that will simply be poured onto a surface coated with glue.

Dried leaves should be cut or broken into small pieces of arbitrary shape. It is better to take multi-colored foliage, then the applique will be bright and colorful.
Using paints or a pencil, you need to draw a trunk and branches on a sheet of paper, then coat with glue the part of the tree where the crown should be. Sprinkle this area with chopped leaves and press down a little with your fingers. The crown should be voluminous and openwork. For example, for the crown you can take a mixture of yellow and red, and under the tree make a lawn of green crumbs. When the material sticks to the surface, it is necessary to turn the base over so that all the excess elements that do not stick fall off.

“Gifts of Autumn” - crafts for kindergarten
Composition “Gifts of Autumn” - crafts for kindergarten that can be prepared for the exhibition children's creativity, and it is always held in October so that children can demonstrate their creative achievements. In addition to beautiful crafts, you can also make functional baskets that will not only please the eye, but also everyone will be able to treat themselves to ripe fruits - apples or pears.
The basket itself can be made from a large pumpkin by removing all the pulp with a spoon and drying the fruit on a warm radiator for several days. You can cut out designs or ornaments on the peel with a sharp knife, and the edge of the cut can also be made not even, but carved.

You can fill the basket with grapes, apples of paradise, small pears, dried apricots and other small fruits, and additionally decorate with rowan branches and beautiful yellowed leaves.
Of course, a child will not make such a basket without the help of his parents, because working with a pumpkin is difficult, and besides, it is necessary to use sharp knife, which is unsafe for preschoolers.
But you can also make an original basket for an autumn composition from an ordinary plastic bowl, using acorns and their caps. Acorns and caps must be glued all over the plastic base, leaving no gaps. The handle for the basket can be made from several vine twigs, intertwining them with each other.
Without a doubt, such crafts for the autumn holiday in kindergarten will take center stage on the holiday table that parents will set for their children.

Craft “Golden Autumn” for kindergarten
The tree of happiness is bright craft " Golden autumn", to a kindergarten it can be done by a preschooler with the help of his mother or older sister. We know that various topiaries are one of the most popular types of needlework today. To create them, they use all kinds of materials that are at hand: coffee beans, pine cones, acorn caps, autumn leaves, and a child can make his first topiary with rowan berries.
These can be done with the whole family while having fun. In addition, the baby will only perform the simplest stages of the craft, so you can’t do it without the help of adults.

The tree can not only be demonstrated at a competition in a school or kindergarten, but also placed at home, adding bright colors to your interior, you can see how beautiful it turns out craft “Autumn” for kindergarten, photo and be sure to present your results in the comments, this will serve as inspiration for other craftswomen.
The basis for the topiary will be foam ball, if you did not find it in the store, then you can cut a spherical, even shape from any thick piece of foam.
The trunk of the tree will be made from a long, even stick or branch (you can fasten several skewers together), and then the trunk should be decorated by wrapping it with a rope, which has a natural texture, so it will easily fit into the concept of your natural craft.

Craft “Autumn” for kindergarten: photo
To make a craft “Autumn” for kindergarten, it is necessary to prepare all the necessary materials in advance and think through all stages of the work. In addition to the trunk and foam crown, which we will decorate with rowan berries, we also need to find a pot where we will plant our tree. A small glass, a cup, a decorative plastic pot, or an iron tin can are suitable for us. The pot can also be decorated with a rope and glued coffee beans to it.
Attach the berries to foam base we will use stationery or sewing pins, and you can also use small nails. Each berry must be pierced with a pin in the middle, and when all the elements are prepared, you can attach them to the base. The pins fit easily into the foam and stay securely in it.

To hide the white base, you can first paste it over or simply wrap it in gold or orange crepe paper. You need to attach the pins as tightly as possible so that the base is practically invisible; for this you need to prepare the berries different sizes and fasten them in a checkerboard pattern.
Near such a bright tree, you can plant a hedgehog made from a pear in a clearing, because the kids really like to make crafts from vegetables for kindergarten, autumn gives us huge selection various fruits and berries.
Lots of ideas for autumn creativity you will also find with children, the main thing to remember is that you can use absolutely any materials, because if you show your Creative skills, then from the usual plastic bottle you can make an original decorative figurine, not to mention various delicate fluffy cones and leaves, which look simply charming even without additional decoration. Be sure to make a wreath for the fall holiday that would decorate your front door, and it will be replaced by a Christmas wreath on New Year's Eve.
Good afternoon, today I'm finally ready to publish large selection autumn crafts. In this article I I won't focus only on chestnuts, acorns and pine cones. About these gifts of autumn I will make individual craft articles-lessons. And today we will take a VERY DIFFERENT MATERIAL for our creativity - and what all these crafts have in common will be their AUTUMN THEME. That is, from a variety of waste and natural and stationery materials we will make children's crafts on the theme AUTUMN. To immediately interest you, let me announce common list our today's crafts from this article.
- Autumn crafts from dough(liquid and tight)
- Children's crafts from paper on the theme of autumn.
- Autumn crafts with paints and crayons.
- Children's crafts from shaving foam.
- Crafts in the technique of water stains.
- Autumn crafts from cereals and seeds.
- Autumn crafts using paraffin and wax.
- Autumn stained glass with your own hands.
- Autumn crafts from eggshell.
- Children's crafts from toilet paper rolls.
- Crafts-appliques from cotton pads
I also have separate articles on children’s crafts made from natural materials - chestnuts and acorns.
As well as thematic selections with children's crafts - a hedgehog, an owl, an apple for classes in kindergarten or school.
That is, on this site you will find a lot of ideas for autumn children's creativity from natural materials. Stay with us - you won't be bored.)))
So let's start the first portion of the miracle with our own hands.
Autumn crafts
Package No. 1
Theme "Autumn Tree"
Trees using the STAMPING technique.
Everything about this children's craft is simple. We give the child a tree trunk that has already been drawn and on a plate we make puddles of gouache in autumn colors (yellow, orange, red). Next we give you what to poke the leaves with. This could be a regular cotton swab, a toothbrush, or a dish brush.

It could be any small items that capture paint well, such as wine bottle corks or cardboard toilet paper rolls.

Autumn tree made of cotton pads.
And here is another gorgeous autumn craft FROM COTTON PADS. Cotton pads moisten in water. We poke the wet disk with a brush smeared in yellow paint, and then in red. And beautiful stains appear on the wet disk - like on autumn leaves. After this, the discs need to be squeezed out of excess moisture and dried thoroughly (let them lie on the cabinet overnight). And in the morning you can make such a bright sunny-autumn craft.

Children will really enjoy coloring the discs first, and then making a golden autumn tree out of them for tomorrow.
Autumn craft made from eggshells.
You can do something more interesting - take shells from chicken eggs and soak them overnight in paint (in a food coloring solution or in a gouache solution). In the morning you will receive excellent craft material. You can make mosaic crafts from it. Or lay out autumn leaves on the crown of an applique tree.

Autumn craft from leaves and berries.
And here is the autumn applique TREE, made entirely from natural materials. Rowan fruits, small foliage from autumn trees. Pieces of plasticine and strokes of gouache paint. A child can do this kind of craft for a very long time, painstakingly arranging all the details, filling in the gaps on the appliqué with foliage and twigs.

Craft volumetric tree.
Here's an autumn craft in the form of a three-dimensional tree. The tree trunk is drawn on cardboard – 2 times. Then we cut out these two trunks - and make vertical cuts in them (on one tree there is a vertical cut in the lower part, on the second there is a vertical cut in the upper half). We put the trunks on top of each other, cut to cut. And we get a cruciform trunk. All that remains is to hang autumn leaves on the branches of the craft - these can be lumps of crafts crepe paper(or table napkins). Can wrap regular white paper napkins (or toilet paper) around the branches and then paint it with a brush and paint in autumn colors.

Autumn crafts
Package No. 2
From rolls.
And here is a three-dimensional TREE craft made from toilet paper rolls. Everything can be seen in the photo below. We cut three toilet paper rolls at the top. We thread them into each other (so that they thread in the lower part, we make a cut and narrow the roll at the place of the cut). We cut out leaves from paper and glue them to the ends of the spreader cuts.

And from long rolls (from paper towels) you can make an autumn tree applique. We cut some rolls lengthwise into trunk and branches. And we cut the rest crosswise for leaves.

Autumn crafts
Package No. 3
From leaves and improvised means.
Here is a craft made from autumn leaves in the form of a peacock. Very simple and accessible for small children. Here's how it's done...

We take an ordinary glass, turn it over and attach a round piece of plasticine to the back. We collect a bunch of leaves, fan it and attach it to a plasticine lump (for strength, we seal another plasticine cake on top). We cut out the beak, eyes and paws from paper - and the new autumn craft is ready. Available for children of primary preschool age.
Using the same principle, peacock crafts are created with autumn leaves, walnuts and chestnuts.
You can make an owl out of leaves. This autumn craft can be voluminous - in the form of a bag filled with dry autumn leaves. We tie the corners of the bag like ears, glue on the eyes and beak, and make paws at the bottom.
You can also make owls from toilet paper rolls - we cut out the eyes from the paper, and select the wings and ears from among the autumn leaves of the appropriate size. Simple and quick for the youngest children.

Autumn crafts
Package No. 4
GREATS.
These are some beautiful fall crafts that can keep your kids entertained. They'll love sprinkling colorful rice on top to create an autumn tree or oak leaf mosaic.

How to color rice at home.
Place portions of rice into plastic bags. Add a spoonful of gouache of a certain color to each bag. Tie the bag and shake the rice thoroughly until it is evenly colored. Pour the rice onto a tray and wait for it to dry. To distribute the paint faster, you can add a little water (literally one tablespoon) to the bag with rice and paint.
The most durable color comes from food coloring. Gouache can leave marks on your fingers and lose color when working with rice. If you want to preserve the richness of the color of the autumn rice craft, you need to spray it with hairspray - this way the paint will be preserved and will stop getting dirty.
Instead of rice, you can use any other grains, including pumpkin seeds. They can also be dyed in the same way as rice.

Here I am attaching a silhouette of a tree - you can attach a piece of paper to the monitor and trace the tree with a pencil. To reduce or enlarge the image on the screen, roll the mouse wheel (here and there) while holding down the Ctrl button on your keyboard.

Here's a craft from the smallest of cereals - MANA. D For such a craft, we need to paint the semolina red, orange, yellow, brown, light yellow. (By the way Instead of semolina, you can use regular fine salt).

Pour the semolina into a wide bowl (to make it easier to mix with your hands) and put a tablespoon of thick gouache paint on the semolina (the paint should not be liquid but as thick as toothpaste). And now, with dry hands, we grind all the semolina with this paint - mix everything and grind evenly so that all the semolina is painted an even color.
Now you can start crafting - on a sheet of paper put autumn leaves, circle them with a pencil and remove them. Next, take a ruler and draw several straight lines so that they intersect the contours of our leaves (divide them into sectors). Now we take PVA glue and a brush - apply glue to those sectors that will be yellow - and sprinkle yellow semolina on them. We wait 2 minutes and shake off excess sprinkles back into plate. Next, we spread glue on those sectors that we intended to be red - sprinkle red semolina on them. We wait 2 minutes and shake off the excess red semolina from the sheet back into the plate. And we continue like this until all sectors of the picture are painted over. in your color. This work can be done by children 4 years of age and older. An adult will only prepare a drawing with leaves and lines. And the child will already choose which sector to cover with glue to match this or that color of the sprinkles.
You can also use it for such autumn crafts. large seeds– fruits of beans, beans, peas, sunflower seeds, corn kernels.

From cardboard we cut out the silhouette of the future autumn craft - in the form of a maple or oak leaf. Apply to cardboard thick layer PVA glue - and lay our grain mosaic on the puddle of glue.


Autumn crafts
Package No. 5
PAINTS and CRAYNS.
In this paragraph of our article, I have collected those autumn crafts that require painting. We will work with different techniques for painting autumn leaves and you will get several ideas for bright autumn creativity with your children.
“Hatching along the relief” technique.
If you have wax crayons (or soft pencils or regular chalks for drawing on asphalt), then you can make such beautiful paintings from autumn leaves.

This is done very simply. We put it on the table newspaper. We put it on the newspaper autumn leaf– the veins on the sheet should stick out with their ribs up (that is, we place the sheet wrong side up). Above put White list paper and let's begin shade this white sheet with chalk or pencil– when shading, we notice that the contours of the autumn leaf lying under the paper are drawn by themselves- along with all the veins.

Painting "Autumn greetings".
Autumn waves her golden hand... Yellow palms flutter in the wind...

Let's guys make autumn palms. Let each of you wave your palm to autumn. We smear the children's hands with yellow, red and orange paint - so that the hand will have different tints of autumn colors. Then we press the child’s palm to a sheet of paper - if the print has gaps, fill them with paint using a brush.
“Marble painting” technique.
This is a very interesting technique - all children adore it. Such autumn crafts are available for the very little ones - even those who are under 1 year old are happy to make such crafts.

We take dad's shaving foam and a flat plate. Squeeze a cloud of foam onto the plate and smooth it over the surface of the plate. Next, we drip paint onto the foam - multi-colored drops of gouache in different places. You can drip from the tip of a brush... or drip with a pipette... or drip with a syringe - or cotton swabs(poke into the gouache, and then poke into the foam on the plate).

Next to the child We allow you to stir the foam in the bowl selflessly... as he wants... children can do this ad infinitum. This is by the way most quick way calm a crying child– a cloud of foam + paint and the child forgot about everything in the world. What if your child puts everything he sees into his mouth?– then you can make edible foam – whipped cream from a can + food coloring. Or just pour a lot of salt into the foam - the child will not want to eat salty food.
When the foam is kneaded with a beautiful marble pattern, we take an autumn leaf cut out of white paper or cardboard and apply it to the foam - place it directly on top of the foam. Then we lift it, dry it and get a beautiful autumn craft. Of course, for painting you need to choose colors of autumn colors (red, yellow, green, orange).

“Finger painting” technique.
This fall craft technique also calms kids down. On a sheet of paper we draw the outlines of the sheets - with a black bold marker - such that it draws through the paper (so that the outlines of the sheets are also visible on the back side - this is convenient, since you can see how to cut them out later).
Next we dilute in different bowls different colors paints - a bowl of yellow + a bowl of red + a bowl of green. In order to have more paint in each bowl of paint, we add PVA glue (regular white stationery) - that is, put half a teaspoon of paint + 2 teaspoons of PVA glue - stirred with a stick and got a lot of paint in the bowl. So the gouache will last for a long time. And this paint dries better and does not stain your hands after drying.

And then we allow the child to smear the entire sheet of paper with paints directly with his hands - he can directly apply paint to the contours of the drawn leaves with a spoon and smear everything with his fingers and palms. Show your child that you can put different pairs of colors on different pieces of paper (green + yellow, red + yellow, red + yellow). It’s okay if the black outlines of our leaves hide under thick lakes of paint (these outlines are also visible on the back of the sheet - we’ll calmly cut them out).
Then we dry all these lakes of paint. Cut out the outlines of the leaves. And the finishing touch is to spray hairspray on our craft - this will fix the paint, make it brighter and it will not stick to your hands.
“Wet painting” technique.
There is also wonderful technology here. We will paint paper autumn leaves using a wet technique, which gives beautiful smooth streaks of paint with a gentle transition from one color to another. We cut out the outlines of the leaves from paper - lower each leaf into water - and place it wet on the table. Now we take watercolor brushes and begin to paint our wet leaves - before they dry. When the paint hits a wet sheet, it spreads like a bright cloud, mixing with neighboring spots. It is good to glue such leaves to the glass on the window - this is easy to do if you smear the back side of the leaf with a wet bar of soap.

On such leaves, painted using a wet technique, you can draw veins with a marker.

“Wet painting + glue” technique.
And here interesting approach to the same technique . Here, too, the outlines of leaves are cut out of paper. And we will need silicate stationery glue (remember how in our Soviet childhood - such transparent glue, similar to snot - it is still sold in the same bottles). Or you can cook a thick jelly yourself from starch and water (we get the same sticky substance).
So... now with this silicate glue on our leaves (still white and dry) we draw veins (central and lateral). We pour thick strings of glue. We are waiting for the glue to dry (it is better to make these veins in advance - in the evening, and let them lie overnight to dry - and in the morning you and your child can start the craft right away).
When the glue veins have dried, we immerse this sheet in water and immediately remove it. While the sheet is wet, dip our brush in watercolor paints and poke it into one or another area of the leaf - the paint immediately spreads across the wet cell of the sheet - but does not climb onto the adjacent cell (the glue edges get in the way). And the result is a beautiful craft - an autumn leaf, which is painted in multi-colored tints.

This autumn craft is accessible to the little ones - the iridescence is beautiful - the colors do not bleed into neighboring cells and the leaf turns out RAINBOW. The children will be delighted. For kindergarten– also an ideal option (I myself work as a teacher in a kindergarten, and I can’t wait for the topic of autumn crafts to begin).
You can also use the same silicate glue to make a craft with live autumn leaves. Spread tracks of glue along the contours of the leaf veins and sprinkle small sparkles on top (you can buy glitter sprinkles for nails if you don’t find sparkles for children’s creativity on sale.

And also the leaf cells between the veins can be painted in different colors.

Autumn crafts
Package No. 6
DIY stained glass windows
We have all tried to make stained glass windows - we bought special children's paints that create rubber films-pictures when they harden. They are easy to remove from the window and stick again in another place. But not many of us know that you can make stained glass windows for FREE, without spending money on expensive bottles.

HOW TO MAKE STAINED GLASS PAINT with your own hands.
We take regular PVA glue (the white one in the bottle) and add food coloring to it (the one we use to color eggs for Easter).
Now we take a file (regular office file) and draw our autumn craft picture(maple leaf, owl, tree). If you don’t know how to draw yourself, you can put a picture copied from the Internet inside the file and paint on top of it with our stained glass paints.
We leave all the beauty to dry overnight. And the next day, having picked up the edge of the adhesive pattern with a fingernail, we remove it like a film and transfer it to window glass— we apply the smooth side to the glass (the one with which it lay on the file) and the picture itself sticks and holds). Autumn stick-on crafts can be peeled off and stuck on again several times.

You can make stained glass windows from colored paper. Cut out any shapes (leaves, trees, animals) and glue them to the glass with soap (we soap the back of the part with a wet piece of soap and press it to the glass).

Autumn crafts
Package No. 7
CANDLES (wax and paraffin) .
Here's another favorite technique of mine. All children adore it - even a 1-year-old child can make such a craft.
We will need a piece of candle (paraffin or wax). The white wax crayon from the kit may work.
On a white sheet of paper we draw the outlines of the leaves with a candle (so that you can see for yourself what you are drawing, it is better to first draw these outlines with weak pencil lines - and then outline them with a candle).
Next, we give the child paint (watercolor or gouache diluted with water) and this sheet with leaves painted with paraffin. The child does not see the leaves (they are colorless), he sees Blank sheet paper. And you tell him that there is a picture hiding here - and in order to find it you need to color the entire sheet. The child begins to paint the paper - and the outlines of candle leaves appear through the paint. The wax repels the paint and it does not stick in this place - so the white outlines of the sheets remain.

You can use a candle to paint over not only the contours, but also to erase the entire silhouette of the leaf (leaving only the central vein of the leaf). Then you can plop multi-colored blots of autumn colors onto the picture - and as a result, the white silhouettes of autumn leaves (for example, oak leaves) will clearly appear on the craft. This autumn craft will delight children of any age - it can be preserved by placing it in a frame.

Leaf preservation technique.
Here's another technique using candle wax or paraffin. Here we will preserve the leaves - so that they rich color and the elasticity is preserved for a long time. It is known that wax was used in ancient times to preserve deceased kings and wooden statues forever. In the same way, with the help of wax, we can immortalize autumn leaves - give them a long historical life - and at the same time decorate them in an interesting autumn craft (I will show examples below).

We collect the most beautiful autumn leaves - elastic in shape and bright in color. We cut an ordinary candle into a saucepan (wax or paraffin does not matter). And over low heat we begin to melt these candles - to a liquid state (we don’t bring them to a boil - why do we need gurgling bubbles). Next, dip each leaf in paraffin and take it out to dry. You can immediately tie a thread to a leaf and, having removed it from the paraffin, tie it to a stretched rope - or to a twig (put a birch branch in a vase and tie the leaves to it).
be careful wax leaves greasy spots on clothes(they don’t wash well - it’s better to scrape them off frozen, that is, keep the clothes in the freezer and then scrape off the wax, and rub and squeeze the spot of the stain, if a trace remains, rub with a cotton swab dipped in cologne.)

Such paraffin leaves can be decorated into an autumn wreath.

- or make a craft-panel, as in the right photo below - we glue leaves in the shape of a huge maple leaf onto a sheet of plywood.

And from such leaves pickled in wax you can make original craft with the birds.

We need a round cut of wood(or a thicker round cutting board). If it was cut, then it didn’t hurt to prepare it (sand it and varnish it), although it’s not necessary.
In this round cut we drill 2 holes. We bend a tight thick metal wire into a ring and insert its ends through the holes in the board. After inserting, we move the ends apart (letter G) so that they do not jump out of the hole. And here we have another task– the ends of the wire protruding from the bottom prevent the board from standing evenly on the table surface. So we take the drill again... and on the bottom surface of the board, next to the holes (in the direction where we have 2 ends of the wire bent) drill and gouge grooves(such a depth that our wire tails will fit into them) - this way the wire tails will go deeper into the board - and will not stick out and interfere with the board lying flat on the table.
And when the frame is ready, you can start decorating it. Tie with paraffin leaves and rowan bunches. Rowan can also be paraffinized in hot wax. Birds can be molded from plasticine or wax and decorated with gouache. In order for the gouache to adhere well to the plasticine, you need to spray it with hairspray later, when the bird is completely painted.
Leaf lamination technique
And here is another way to perpetuate leaves - LAMINATION. If you have a laminating machine, then you will do everything quickly, in a lazy way. And for those who don’t have one (and we are the majority), an iron and ordinary transparent files for the office will help.

We buy thick files (we choose thicker ones) - put a leaf in the file - A newspaper on the table - a file with autumn leaves on the newspaper - and again a newspaper on top. And we make such a sandwich with an iron - the leaves are sealed and can be used in a children's game - or as a teaching aid in kindergarten classes.

Autumn crafts
Package No. 8
DOUGH.
LIQUID DOUGH technique.
We buy pancake flour (pancake mix) at the store and add 1 tbsp. a spoonful of fine salt, add water to make a liquid dough. We color the pancake paint with gouache or food coloring.

RECIPE FOR THICK PAINT No. 2 (also with flour)
Add a tablespoon of salt + one teaspoon to one glass of flour sunflower oil+ half a glass of water. And gouache (or food coloring). Mix all this in a blender until the mixture for autumn crafts becomes thick like sour cream.
RECIPE FOR THICK PAINT No. 3 (on foam)
Shaving cream + gouache + PVA glue (if it is too thin, add a little flour as desired) and we get a wonderful mixture for children's creativity in the autumn theme. Mix foam of different colors in bowls. Make more brown foam. Yellow, green, red, orange equally and in smaller bowls. The foam can be applied with a brush. Or put it in a regular baby syringe (at any pharmacy these syringes cost a pretty penny). You can buy several at once, so as not to rinse them when you change color - and each syringe is a separate color.
TIGHT DOUGH technique for crafts.
There are also two recipes for homemade dough here. The first recipe (salt dough) will be hard, but over time it may begin to crumble and crumble. The second recipe (cold porcelain) creates durable crafts that cannot be broken or crumbled.
Both recipes are easy to make at home.
RECIPE No. 1 – SALT DOUGH.
1 glass of water, 1 glass of salt, 2 glasses of flour. Mix everything until it becomes a tight plasticine. Roll out with a rolling pin or a smooth bottle.


You can immediately make a hole in the crafted leaves and then hang them on a thread on a bare tree branch.


RECIPE No. 1 – PORCELAIN DOUGH
1 tbsp. Mix regular soda with 0.5 tbsp. corn starch. Pour in 3/4 cups of cold water. And mix everything until a homogeneous thick mass. Place the pan with the mixture over medium heat and cook, stirring constantly with a spoon, until the mixture looks like mashed potatoes. The main thing is not to let it cook to a sticky, chewy state. Remove from heat and leave on the counter to cool. Knead the cooled dough until it becomes soft, elastic and stops sticking to your hands.
You can color the porcelain dough in advance - even before cooking with regular food coloring. Or you can sculpt autumn crafts from white porcelain dough and then paint it with gouache or acrylic paints for creativity. To prevent the paint on the craft from staining your hands, you can coat it with varnish (regular hairspray or acrylic, for creativity).

Such porcelain leaves can be placed in a round bowl - gently pressing down with your hand so that they take the round shape of the bowl. And dry it in this form - we will get elegant plates and coasters - cute autumn crafts and gifts.

You can roll dried herbarium elements into porcelain or salt dough. And do such a suspension test.

First, we process the foliage with an iron (but not very hot and through a thick layer of napkins, otherwise the herbarium will turn black from the heat of the iron). Then we'll put flat flower or a branch onto a piece of dough and begin to carefully roll it up

And then we squeeze out round glasses with a plant and make holes for the ropes

Here are some ideas for fall crafts for children of any age. Choose feasible creativity for children 1 year old and advanced work for children 7 years old and older.
Autumn crafts for kindergarten become a real mirror in which the beauty of autumn is reflected. How to make autumn crafts for kindergarten with your own hands?
To create interesting autumn crafts with your own hands, you can use various materials.
Autumn crafts from leaves
For example, it is easy to make beautiful appliques from leaves. All you need is to pick up the leaves the desired shape and colors and pre-dry them under pressure. You can do without drying, especially if children will be working with the leaves - it is easier for them to handle durable and elastic material. It is enough to add eyes to the leaves and they transform into animals.

From leaves and a paper plate you can make a favorite children's character - a hedgehog.

Applique of dried leaves “tree”. To create such an applique, glue a brown trunk with branches onto a white sheet of paper. Here is a wonderful example of a seabed leaf appliqué.

Application of leaves “sea bottom”
The base of the craft can be made from a leaf painted with watercolors.

Painting from leaves “sea bottom” You can make a real autumn fairy out of autumn leaves. We decorate the base with watercolor stains. We cut out the fairy's hands and head from paper. After the base has dried, glue the head. Around the head we draw a sketch of the future craft with a pencil.

From the head we begin to assemble the entire image of the fairy. The hair, crown, body and arms find their place. Gives immense scope for creativity fluffy dress fairies.

A touching autumn craft can be made from leaves and a child’s handprint.

And this is a charming turkey made from paper and maple leaves.

A video master class will help you make a rose from maple leaves:
Autumn crafts from salt dough and plasticine
The unique shape of autumn leaves can also be used to create original pendants. For example, cut out leaves from salt dough. To do this, we paint the salt dough in autumn colors.

We crush the multi-colored pieces into a single mass.

Using molds or a plastic spatula for plasticine, cut out the leaves.

Dry and coat with colorless varnish.

You can make an interesting herbarium from salt dough. We make a round base of the craft from salt dough. We leave an imprint on it with a real leaf.

Coloring bright colors first the print itself. Then we cover the rest of the craft with a thin layer of varnish or paint.

Autumn paintings from plasticine
A real masterpiece on the theme of autumn and study can be created from plasticine. First, we make a suitable sketch in pencil (or print it out from the Internet).

Sketch on the theme “start of school and autumn”
We make a background from a thin layer of purple plasticine. On this one we glue a globe and a book made of plasticine.

Glue letters, pencils, a pointer and a sprig of autumn maple on top. Autumn application made from plasticine - ready!

You can make a real “autumn in the forest” picture from plasticine on cardboard. We start work with the birch trunk.


Autumn crafts for kindergarten from pine cones
You can make a charming forest hedgehog from salt dough and fir cones. To make it you will need fir cone, which is then disassembled into individual flakes. These scales decorate the hedgehog's body. The body itself is molded from salted dough.

If you want to do big hedgehog, then you can use a plastic bottle as a basis. Upper part We color the bottles with a black marker - this is the future face of the hedgehog. Glue the fabric to the bottle, leaving the painted part free. Glue the cones onto the fabric, trying to arrange them as much as possible tighter friend to friend.

When the entire surface with the fabric is covered with cones, all that remains is to glue paper eyes and ears to the hedgehog. We attach apples, nuts, mountain ash and twigs to the back of the hedgehog. Autumn hedgehog made from cones - ready!

Look at the video on how to make a hedgehog from cones using a bottle and plasticine:
You can make a charming squirrel with an acorn from a pine cone and felt. Squirrels with acorns are real symbols of autumn.

You can make a proud autumn deer from a pine cone, twigs and an acorn. The parts of the craft are attached to each other using plasticine.

From natural materials you can make a very beautiful autumn craft “nest with birds”. We weave a nest from thin twigs. We weave leaves into the bottom, covering the gaps between the branches. From cones, chestnuts and leaves we make a bird family - a mother and two little chicks. All parts of the craft are attached with glue. We glue the birds' eyes and beaks and place them in the nest. A nest with birds made from natural materials - ready!


Using the same technique, you can make topiary from leaves.

You can make a very cozy one out of cones.

Autumn crafts from vegetables
You can build a real frigate from vegetables.

We make the sail from lightly boiled cabbage.

You can make paper sails for a boat - they will retain their beautiful appearance for a long time.

Experienced craftsmen, with the help of dad, will be able to construct a real airplane from zucchini and carrots.

You can make a funny penguin family out of zucchini.

You can make a funny cat from onions and carrots.

You can make a very funny hare from vegetables. Using toothpicks, we connect two heads of cabbage together - this is the head and body of the bunny. We cut the zucchini into two parts - these are the future bunny legs. We cut the second zucchini and attach it to another head of cabbage - these are bunny ears. We make bunny arms from peeled zucchini. We make a face for him and attach a carrot. Our bunny is ready. It will decorate any autumn exhibition in kindergarten!

Autumn craft - bunny made from vegetables
Another great fall craft is an apple caterpillar. We fasten the apples together with toothpicks. We also use toothpicks to attach halves of carrots to the apples - these are the future legs of our caterpillar.

Using a toothpick, attach the head to the caterpillar. We decorate the head itself with eyes, mouth and horns. The craft is ready!

You can make adorable pigs out of potatoes and carrots. All parts of the craft are attached to each other using toothpicks.


You can make an elephant out of beets. We connect two beets with tails together using toothpicks - we get the head and body of an elephant. Using toothpicks, we secure the two halves of the beets - these are the ears of the elephant.

We make him a pen out of a cardboard box, put some paper grass and treat him to delicious nuts.

See what an amazing autumn zoo you can make from the gifts of autumn -.

You can use a pumpkin to make a luxurious vase for autumn bouquet.

You can make a small festive bouquet from fruits and berries. Design - any, depending on the products available for sale.

Autumn crafts from needles, chestnuts, acorns and nuts
A wonderful autumn hedgehog is made from plasticine or salt dough. The hedgehog's coat is made from pine needles. Even the smallest children will find it interesting to decorate the hedgehog with needles, sticking them one after another into soft plasticine.

You can make a fast horse from acorns and matches.

A beautiful craft on the theme of autumn for kindergarten can be made from horse chestnuts and acorns - if you connect them with each other with a lump of plasticine, you get very natural mushrooms. Complement this composition with rowan berries and blades of grass - and you will get a real piece of autumn forest.

From chestnut and acorn you can make a charming autumn squirrel. We make the squirrel's paws and tail from fluffy wire, the belly is made of felt, and the face is decorated with factory-made eyes. We attach all the parts using a glue gun.

Chestnuts can be used to make a symbol of wisdom - an owl. We make the wings from chestnut shells.

You can make a very impressive deer from natural materials.

Autumn crafts from twigs
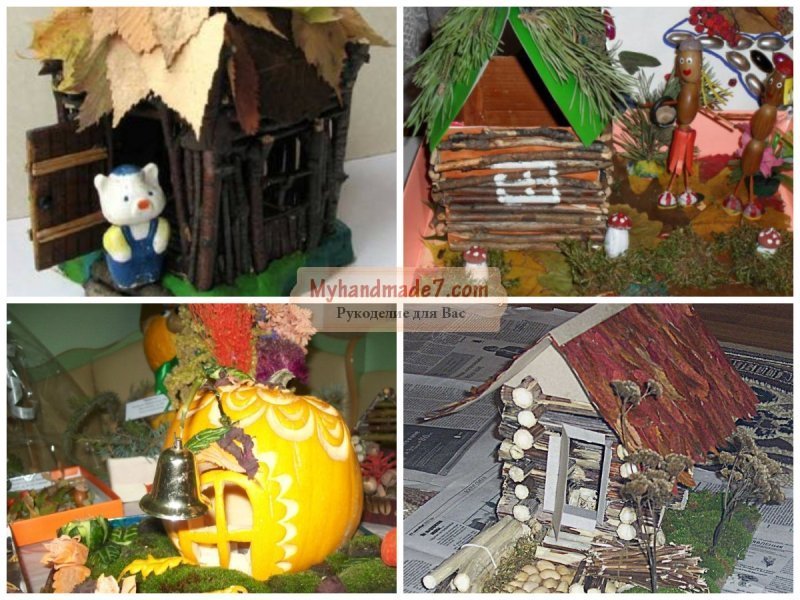
You can make a house from a cardboard box and hollow dry sticks. The roof of the house is decorated with leaves, and the roof is made of dry straw.

You can make an autumn beauty from corn. The autumn dress is made from corn leaves and decorated with berries and flowers.

Craft "autumn" from corn
Foamiran is a type of foam rubber. This material is durable and pliable, and can be very bright and colorful. Many needlewomen and teachers have already fallen in love with it. We decided to make an autumn bouquet from foamiran. We cut out autumn leaves: birch, maple and oak. We paint them with paints, trying to emphasize the pattern of veins and edges.

To make veins, we heat the sheet with an iron and firmly press down the twig - we will be left with a characteristic pattern.

We make an autumn vase from a plastic bottle and branches. We attach the branches using double-sided adhesive tape.

Place the leaves in a vase. We complement the bouquet with natural materials: dry twigs and cones. An autumn bouquet made from foamiran is a small piece of art that will decorate a group or classroom for years to come!

Autumn applications for kindergarten
Easy to perform and beautiful applique made from pieces of colored paper. The child crumples pieces of paper and, one by one, glues them onto the base - the crown of a tree.

This application is a little more complicated than the previous one. The child crumples the paper for the leaves and rolls the brown paper for the trunk and branches of the tree.

A very bright and beautiful applique is made from colored paper and a real branch. The difference in the execution technique is that in this applique, not pieces of colored paper are glued, but tightly twisted balls.

In this applique we glue paper rings.

A very original idea to make autumn foliage from eggshells or pasta. Pasta or shells are colored in colored water and then dried. The material for the autumn applique is ready!

The “autumn tree” applique, made using painted pumpkin seeds.

You can use painted pumpkin seeds to make the pumpkin itself using the appliqué technique.

Pumpkin applique
If used at work different ideas, it’s very easy to turn a kindergarten group into a real autumn kingdom.
Autumn crafts for kindergarten from paper
From paper leaves, glued to a rope, you get a very beautiful autumn decoration.

You can make a spectacular autumn garland from paper leaves.

Beautiful themed products can also be obtained with the help of others. available funds– for example, using cardboard toilet paper tubes: they can easily transform into autumn tree trunks.

We insert autumn leaves, rowan branches and other gifts of autumn into the rolls. We place the trees on a thick sheet of cardboard and complement them with hedgehogs made of chestnut and plasticine. We will get a very simple but effective autumn composition.

You can make very cute hedgehogs out of paper.

DIY origami autumn leaf
Look at the video on how to make an autumn leaf out of paper:
Making some colorful autumn leaves.

These leaves can be used to make a very beautiful autumn decoration.


Autumn cards and gifts for teachers and educators
A very impressive postcard as a gift for a teacher or educator can be made using the scrapbooking technique.

As a gift to your favorite teacher or educator, you can make a stunning bouquet of sweets and corrugated paper.

Another example of an autumn bouquet of candies is a bouquet on a palette with pencils. All parts of the craft are inserted into a foam base wrapped in corrugated paper.

Serves as a palette cardboard base with lids filled with colored plasticine.

But we made such a beautiful stand for the office in the master class ““.

Autumn drawings for kindergarten
An original master class can be given to children, teaching them how to put stamps using... an ordinary apple. To do this, prepare sheets in advance with the outlines of tree trunks printed on them.

Invite the children to paint the trunk and wide branches with paints. While the paints are drying, make stamps: to do this, you need to cut a small apple into two even halves. Then we put red paint on one half and yellow paint on the other, and put prints around the barrel. It turns out to be a real autumn apple tree.

You can use wax crayons to draw spectacular autumn leaves. Place the piece of paper on a regular landscape sheet. We color the junctions of the paper and album sheets.

We remove our paper sheet. We will be left with the outline of the sheet on the paper. We use leaves of different shapes and paint them in bright autumn colors. We will get a very unusual drawing “Autumn leaf fall”

One of the famous painting techniques is painting with autumn leaves.

The leaves are dipped in paint, then pressed against a sheet of paper - a beautiful imprint remains.

Stamps made from vegetables and fruits are well suited for creating autumn designs. Look what an amazing flower you can make from “vegetable” stamps.

Ideas for autumn drawings for schoolchildren

Drawing “Clear autumn day with houses and a stream”

You can paint late autumn with white trunks of birch trees.

Drawing "autumn" with birch trees
Autumn applications:
We paint with paints:
Autumn crafts from plasticine:
Autumn cutting templates


Autumn crafts for kindergarten reviews:
I really liked animals made from vegetables)) (alevita)
I want to make chestnut and acorn mushrooms for my child’s kindergarten. (wera)
I like the sunflower hedgehog, but it’s hard to find a sunflower))
Autumn gives us a lot of materials for creativity. These include leaves of various colors, chestnuts, dried flowers, acorns, and a decorative miniature pumpkin.
But, before you start making souvenirs from them, you need to properly prepare them, namely dry them and, if necessary, coat them with varnish or paint.
If you make a craft from unprepared raw materials, it will be a short-lived product.
As soon as the material dries on its own, the souvenir will lose its shape and will have to be thrown away. And besides this, half-raw leaves can simply rot or become moldy.
So let's start by drying out our autumn finds.
Let's prepare the leaves for the herbarium as follows:
1 way:
Place them between the book sheets and place them back on the shelf, pressing them tightly with other books to the side. In about a week to a week and a half, the leaves will be suitable for crafts.
This method is the best because natural color the leaves do not change and then they do not break for a long time.
Method 2:
This method is good if you don’t have the strength to withstand a week and a half and want to get to work quickly. Place the sheet between two white sheets of paper and iron with an iron set to the lowest setting.

In this case, the yellow and red leaves retain their color, but the green ones may darken and become an ugly, brown shade.
We dry chestnuts, acorns and decorative pumpkins.
1 way:
Dry on outdoors, in the shadow. It will be necessary to wait quite a long time before these materials acquire the dryness we need.
Sometimes this process takes a month. Especially it concerns decorative pumpkins, which make wonderful DIY autumn crafts.
You will see for yourself when the moment of readiness for the gifts of autumn comes. Acorns and chestnuts will become lighter, and the pumpkin will become like a rattle, as the cavity inside will dry out and shrink, and dry seeds will beat against the walls.
Method 2:
We use the oven for this. It needs to be set at a temperature of up to 60C and dried until tender, stirring occasionally.

The main thing is not to rush and do not put on high heat, as the fruits will simply cook and become completely unusable.
Drying dried flowers
There is only one way and it takes a long time. Flowers need to be strung on a thread threaded through the stems and hung in a dry place, with the flower stems facing down.
Drying in a book or with an iron will not work, as the shape will be lost and they will become flat. After the dried flowers are completely dry, they need to be covered with a layer of hairspray. It will give them the desired density and will not allow them to crumble at the slightest touch.
Well, now, let's move on to specific master classes and examples.
1. Panel of autumn leaves
We offer you a great idea for a DIY leaf panel. It’s not at all difficult to make, but the result is quite impressive.
It would be nice if you placed other autumn decorative elements next to the finished leaf painting. For example, pumpkins, spikelets and other things that suit the style. Then you will have a whole autumn ensemble.

What we need for work:
- 1. Dried maple leaves of yellow-red color.
- 2. Tree branch for the trunk
- 3. A square piece of plywood
- 4. Stain or dark varnish
- 5. Simple pencil
- 6. PVA glue
- 7. A bunch of dry spikelets
- 8. Wicker basket for pumpkins
- 9. Several Jack Be Little or Baby Boo pumpkins
If you don’t have such pumpkins, you can fill the basket with chestnuts and acorns. But next year it wouldn’t hurt to grow them, as they look very colorful and festive. Of course, if you have a plot of land.
Look at the variety of varieties and how harmoniously they combine with each other:

Master class step by step:
1 step. Sand the board, focusing Special attention edges. They should be smooth.
Step 2. Cover it with stain or varnish, preferably with a brownish tint. Apply the coating in several layers, trying to make the board not uniform color, but slightly “spotty”.
Step 3. Freehand draw a large maple leaf.
Step 4 Start gluing on the maple leaves. Start from the edges, gradually approaching the middle. The edges of the leaves should match the edges of the sketch as best as possible. The next row of leaves should overlap the previous one. Do not glue the ends, they must be “overhanging” to create a volume effect.
Step 5 Glue the selected twig in place of the stem.
Now hang it up autumn panel, created with your own hands, over a cabinet and place other decorative elements around it.
2. Topiary from herbarium and other autumn materials

Topiary is a decorative tree. In autumn you can collect beautiful leaves and make such a wonderful and cozy decorative element.
Any leaves, dried flowers, acorns, spikelets will be used here. The main thing is to understand the essence and do it the right basis. And what to fill it with - your imagination will tell you.
What we need for work:
- 1. Ceramic pot of a dull color
- 2. A straight tree branch for the trunk
- 3. 1 ball made of foam rubber, polystyrene foam or special floral foam
- 4. Dry moss, sesame or a handful of beautiful pebbles, acorns, dry rowan
- 5. Glue gun
- 6. Dry plaster
- 7. Decorative elements: herbarium, dried flowers, rowan, acorns, etc.
Master class step by step:
1 step. Let's start with the basics. Take a foam ball and place it on a branch that will serve as your trunk. Then remove it and drop some glue from the gun into the hole formed. Reattach the ball and let it dry.

Step 2. Secure the trunk in the pot. To do this, place a drop of glue on free edge branches, attach it to the base of the pot.
Then, dilute the plaster with water to the consistency of liquid sour cream and fill the container. Don't forget that you will still need to decorate everything on top with moss or acorns, so leave a gap of about 3-4 cm from the top.

Step 3. Now we insert leaves and dried flowers into the ball, sticking them with their stems inside. If you want to add acorns to the composition, then first place them on pieces of wire.
Step 4 Now all you have to do is decorate the top of the pot so that the plaster is not visible.
That's all. Using this simple scheme, you can make a wide variety of autumn crafts with your own hands, not only from leaves, but also from dry peas, nuts and so on. They will all look just great!
3. Roses from maple leaves

Looking at this elegant bouquet from roses, it wouldn’t even occur to you that it was made from ordinary maple leaves!
But, nevertheless, it is so. You just need to learn how to fold them correctly and you will get a great basis for many ideas.
Such roses can be included in various autumn topiaries, wreaths, compositions and panels. They look great in combination with any natural materials.

Well, let's get down to business.
What we need for work:
- 1. Maple leaves are not dried
- 2. Thread or soft wire
- 3. Matt lacquer for hair
Master class step by step:
1 step. We form the middle of the bud. To do this, fold the sheet as shown in the pictures below. Try to twist it as tightly and evenly as possible. First in half and then into sausage.

As a result, we should end up with something like this:

Step 2. Now take the second sheet, fold it in half again and wrap it around the base.

The sharp edges of the maple leaves should be carefully hidden inside, like this:

Step 3. We continue to build up the mass around the base, adding more and more leaves. If you want to end up with a bud, then twist it more tightly, but if you ate a more magnificent rose, then loosen the twist a little.

Step 4 When you see that a real rose has “bloomed” in your hands, you need to secure it with threads as tightly as possible.

Step 5 We cut the edges with scissors and place the rose on a lining of leaves, preferably already dry. We cover the composition with varnish and admire it!

These leaf roses last quite a long time, definitely enough for the entire autumn season. You can make as many of these flowers as you like. The more there are, the more chic this autumn composition, reminiscent of a fabric motif, looks.
4. Compositions of decorative pumpkins
Even if you do not grow this vegetable on your own plot, in the autumn you can freely buy them at the market and then dry them yourself. We have already told you how to do this above, so let’s not waste time talking.
Let's get creative!
There will be no master classes in this block, we will simply show you examples of such decor, and how to make them is already quite clear from the photo.
Of course, there are more complex techniques, for example, carving or painting on dry lagenaria, but this is a broad topic and worthy of a separate article. Here we will consider only the simplest compositions that even a schoolchild can do.
Option 1. Basket with a scattering of pumpkins. It couldn’t be simpler, and the view is spectacular!

Option 2. Mini pumpkin candle holders. To do this, you need to cut a hole with a knife of such a size that you can place a foil-based candle in it.

Or this option:

Incredibly simple, right?
Option 3. Pumpkin door wreath. Take any circle as a basis, for example, an embroidery hoop, and attach mini-pumpkins to it.
Pierce the tails with wire and screw it to the base, circle. Use berries, acorns, twigs and autumn leaves as additional decorative elements.
It will look something like this:

5. Chestnut topiary

To create this spectacular autumn craft with your own hands, we will need the same materials for the base as for creating a decorative tree from the herbarium. And for decoration you just need other elements.
For work we will need:
1. Ceramic pot
2. Styrofoam ball
3. Dry plaster
4. Glue gun
5. Tree branch for the trunk
6. Cones, chestnuts, acorns
7. Harsh thread or twine for forming decorative balls
Master class step by step:
- 1. We form the base of the tree in the same way as in the case of topiary from leaves.
- 2. Secure the base in the pot using glue and plaster
- 3. Apply drops of hot glue to chestnuts, acorns and other elements and attach them in a chaotic manner to the foam crown ball.
- 4. Wreath on the door made of chestnuts

Such a wreath of chestnuts on the front door will cheer up not only you, but also passers-by. It's very easy to make. Follow all the steps given to make a pumpkin wreath.
Find some kind of dense base, then pierce the chestnuts and other elements through reverse side, insert the wire, form a hook and use it to screw them to the circle.
Complete the chestnut composition with leaves, acorns, berries and other autumn flowers. decorative elements, which this fertile time of the year gave.
6. Autumn garland “Leaves” made from salt dough

This is a very impressive DIY autumn craft. The big advantage of such a garland is that it is not seasonal and will decorate your home for many years.
After all, it is made not from natural materials, but from salt dough, which does not deteriorate over the years. The only thing is that such products are fragile and you need to handle them carefully so as not to break them. But, even if this happened, they can always be glued together, and the joint will not be noticeable.
What we need for work:
1. 2 cups flour
2. 1 glass of salt
3. 0.5 cups of water
4. Gouache
5. Sewing pins with hook eye
6. Twine
7. Oven
8. White landscape paper, pencil
Master class step by step:
1 step. Draw leaf patterns on a landscape sheet various types, but about the same size. Let's cut them out.
Step 2. Knead a stiff dough from flour, salt and water. If the dough turns out to be unplastic, you can add liquid drop by drop. Knead the resulting material thoroughly and roll it out on a board. The layer should be approximately 5 -7 millimeters.
Step 3. Place the templates on the rolled out dough and cut them along the contours with a knife.

As a result, we should have approximately this many blanks.

Step 4 We make holes with pins and carefully secure the heads. We will hang our leaves on them. Use a knife to squeeze out the veins.
Step 5 Dry the dough in the oven at 50-60C until completely dry.
Step 6 We paint the dough pieces with gouache, trying to make natural tones and transitions.

Step 7 We string the garland onto a twine, making a knot over each leaf so that they do not move.

So our DIY autumn craft is ready. You can hang it anywhere, it will be in place in any corner of the house, especially if you have some other decorative elements in the autumn style.
7. Vases and houses made from ordinary pumpkins
Autumn is the time for pumpkins to ripen. It costs mere pennies and can be found beautiful shape and coloring is not difficult.
And making an element of autumn decor based on it is as easy as shelling pears! There's no need for any step-by-step technologies and accessories.
The only thing you need: pumpkins, a knife for carving, a tablespoon to pick out the pulp and flowers with which you will fill these colorful vases.
Look at our selection of photos of pumpkin vases. It looks very decent and autumn-like.


As you already understood, you just need to cut off the top and clean out the core of the vegetable. Then fill the container with water.
Or you can make pumpkin houses. To do this you just need to cut holes in in the right places. You can see exactly where they are located in the picture below. Kids love these things!

8. Wreath on the door made of natural materials
We have already given above an example of wreaths made of pumpkins and chestnuts. You already know how to make them. Here we simply present a selection of the most effective, in our opinion, ideas.


9. Acorn frame for a photo or mirror
Decorating any base in this way is very simple. We think no explanation is needed here.
The only thing we can advise is that you should not glue acorns with a glue gun or PVA. It's much better if you use plasticine.
Because, most likely, you will soon get tired of this decor and will have to throw it away. And so, you can always dismantle the acorns and get a regular photo frame back for use.
This is what it will look like.

On the photo frame there are whole acorns, and on the mirror there are only caps. This way you can create a variety of autumn crafts with your own hands and decorate any surface: boxes, bread bins, etc.
10. A bunch of grapes made from acorns

This autumn craft will look the best way, if you paint the “berries” in natural colors, and instead of grape leaves add a herbarium of maple leaves of various colors.
Also, a bunch of acorn grapes is a wonderful element of any autumn wreath on the door or large topiary. After all, it can be made not only tabletop, but also human-sized!
But instead of a foam ball, you need to take a large plastic one. Making grapes from acorns is very simple, we will now tell you exactly how.
What we need for work:
1. Acorns without caps
2. Shilo
3. Wire
3. Glue gun
4. Acrylic paint
5. Autumn leaves for decoration
Master class step by step:
1 step. We poke holes in the base of the acorn with an awl.
Step 2. We break or cut the wire into pieces 7-10 cm long.
Step 3. Dip the ends of the wire into a drop of glue from the gun and insert it into the punctured holes.

Step 4 We paint the acorns any color you want. The main thing is that it is combined with leaves that will complement the composition.
Step 5 We collect acorns in a cluster, forming a wire rod on top. Then we attach leaves to it.
Now you can make any decoration based on this autumn craft. Panel, wreath, etc.
11. Autumn crafts from felt
Working with this fabric is a pleasure! The material does not crumble and holds its shape perfectly. This means that any beginner can make an autumn craft from felt with their own hands and it will turn out no worse than the products of experienced craftswomen.
We offer you a selection of the best and simple decors in autumn style, and you can choose any of them! They are so simple that there is no need to describe their step-by-step technology in detail.

As you can see, based on felt leaves, you can make both a wreath and a garland, like the one we already made from salt dough. Here are a couple more options for DIY fall wreaths.

All you need is to draw the templates, cut out the felt and design it according to our photos.
12. Garlic and red pepper braid

How cozy it is when there are bunches of garlic, onions, and red peppers hanging in the kitchen! But if you hang them fresh, they will very soon lose their appearance or simply run out because they will be eaten.
Let's do something like this, but for centuries! Now we will look at how garlic and pepper are made, from which we will form a cute braid for the kitchen.
For work we will need:
1. Nylon tights white or a plastic bag (for the garlic base)
2. Cotton wool or padding polyester (for filling)
3. White coarse thread (for dressing and forming lobules)
4. Glue gun
5. Buckwheat or twine (to imitate garlic roots)
6. Fabric for sewing peppers or salty dough for sculpting it
Master class step by step:
1 step. We form the body of the garlic. To do this, we need to cut into squares either nylon tights or simple plastic bags. Garlic made from nylon looks, of course, more realistic.
But even from the packages it looks good. But the main thing is that this material is always at hand. So, cut out a square, approximately 7 by 7 cm in diameter.
Step 2. We roll a ball out of cotton wool or padding polyester, put it inside a piece of nylon and form a head of garlic. It looks like the one shown in the photo.

Step 3. Then we begin to tie a harsh thread around the head, forming cloves of garlic. First we divide it in half, then into quarters, then into 8 parts.
Look at the photo, the process is clearly shown there.

Step 4 In the place where the roots of real garlic are located, drop a drop of glue and sprinkle this place with crushed buckwheat. If you want, you can replace it with twine, which needs to be unraveled and finely chopped.
Step 5 We make a braid from twine and attach the resulting garlic cloves to it.
Step 6 Now it's time to deal with the pepper. You can sew it, but peppers made from salt dough look much better.
We have already given the recipe for the batch, in the subsection “Garlands of autumn leaves.” These are the peppercorns you should end up with.

Step 7 We make holes in the tails of the peppercorns (we will then thread twine through them and use it to secure them to the braid with garlic). You can do this with an awl or any available item.
The main thing is to make them large enough so that you can thread the thread freely later. Otherwise, after drying, you will not be able to attach the finished product to the composition in any way.
And one more thing: if you make a hole, make sure that the edges of the leg remain more or less large. Otherwise, after you thread the thread, the thin walls may crack and the pepper will fall to the floor.
Step 8 Dry in the oven, color acrylic paint Once dry, coat them with varnish. When the pepper shines, it looks more natural.
Dry at a low temperature, do not rush, otherwise your work may burst and you will have to sculpt everything again. You can't paint a cracked pepper the way you would like.
9. Attach the pepper to the garlic and hang this autumn composition in the kitchen. You can make several such bundles. You can make carrots from salt dough, and a bunch of onions from brown tights.
The principle of making bulbs is the same as garlic, only even simpler. There is no need to form slices.

Also, a bunch of mushrooms on the wall will look great, which you can also sculpt from dough and paint realistically.
Ours has come to an end great review. You have seen many examples and any kind of autumn crafts with your own hands. We really hope that our master classes will be useful to you and that you will definitely take something into account.
Autumn - Golden time year and a great opportunity to create unusually colorful crafts.
It is this time that gives us a rich selection of bright materials for creativity. Seeing all this beauty of the autumn landscape, you can dream up your imagination and you will come up with wonderful works. Moreover, this is the time when children no longer spend so much time outside, but the beauty and bright leaves with puddles beckon and call)))
We offer you ideas for fall crafts that you can make with your children using inexpensive and accessible materials. It will be about wonderful crafts for the autumn holiday in kindergarten.
Autumn crafts for kindergarten
Autumn leaves made of paper
For this easy, but quite interesting craft, you don’t need a lot of material. All you need is:
- colored paper
- scissors
- double sided tape
- wire

You can use paper of any color.
To begin, on a colored sheet, in this case orange, draw the outline of a leaf and cut it out.
Then fold it like an accordion in a circle.
Now we proceed to our ponytail, we take the wire and wrap it with a strip of colored paper on adhesive tape.
When both of our blanks are completed, we proceed to the last stage of our work, and glue the tail to the leaf between its ribs on the back side of our orange leaf.

And now our bright autumn leaf is ready. By making a lot of these leaves you can make a garland and decorate a child's room.
painted leaves
Or you don’t have to, but just collect leaves from the yard and paint them. Here you just need imagination when it comes to colors. And for the kids to like this activity, they just need to be prompted.
Look what original ideas, from the leaves you can make a fish and a dog and Indian feathers... Well, of course, you will come up with something more interesting and fun. The start has been given...Crafts about autumn for kindergarten


Owl made of pine cones

Tree - palm
This is very interesting craft, which is a must do with children, they will really like it.
What you will need:
- paper black, white
- colored paper (corrugated)
- scissors

To begin our work, we need to make some preparations.
The first of them is the trunk of our tree. Ask your child to trace his hand with a simple pencil on black or brown paper. And we cut it out.
We also make leaf blanks. Mode - colored, corrugated paper into small pieces and crumple it with your fingers, your baby can handle this.
It is advisable to make leaf blanks from two colors, it will be more interesting.
Now that all the blanks are made, let's proceed to our applique itself.
We glue our stem-palm onto a sheet of white paper, and on top there are leaves of two colors in a chaotic order. As shown in the photo.

The autumn tree is ready. Such children's masterpiece You can put it in a frame and decorate your room with it.
Application “Autumn Trees”
A bright and cheerful autumn craft for children.
You will need:
- paper black and white
- scissors
- glue and brush
- simple pencil
- colored paper (corrugated)

First, you should make some preparations.
To do this you will need three sheets of white paper, the same size, approximately 10x20 cm.
Let's take it colored paper(corrugated), it can be purchased at any stationery store, and the mode is for small rectangles of different sizes.
Having cut a sufficient number of colored pieces, glue them onto the white blanks in a chaotic manner. As shown in the photo.

Then we draw silhouettes of three trees on black paper and cut them out.
When our three sheets with colored rectangles are dry, we can start gluing our trees.

If desired, pre-cut small light green leaves or any other color can be glued to the top.
This is not for the little ones, crafts for the day of autumn in kindergarten, but for those who are already older.
Apple tree
This unusual drawing colors that will undoubtedly cheer up not only your children, but also yourself.
For this fun drawing you will need:
- paper
- paints
- apple

Draw a tree trunk on a sheet of paper in advance with brown paint, as shown in the photo. Let the paint dry, 5 minutes will be enough.
Then the fun and interesting part of drawing begins.
Cut the apple in half and paint one half with red paint and the other half with yellow.
And we make prints, making the crown of the tree.
It is best to use gouache paints; they are bright and dry quickly.
This drawing does not take much time, but will be interesting for children of any age.

The same beautiful apples can be made on pieces of fabric (burlap). You will end up with either an autumn garland or a home decoration in Vintage style.

Autumn has come
Autumn is a fascinating craft for children about the transition from summer to autumn. It's easy to do, you only need paper and colored pencils. Children with great pleasure turn the picture over, seeing different images. For them it's like a mini-cartoon.
First you need to take a sheet of paper and fold it like an accordion.

Then you need to lay the paper on one side and draw a tree with a crown and leaves. First we draw with a pencil so that we can correct (erase).

When you turn, you get this picture

Then you finish drawing the branches for the autumn tree and the leaves for the summer tree.

You paint it in green and summer colors.
Having painted the autumn tree, we get this picture.

And this is the changing picture we get as a result:


Pumpkin in Art Nouveau style)))
A very simple and very accessible craft about autumn. In the fall, a lot of pumpkins ripen and making another orange beauty is just right.
Oka, by the way, looks like a pumpkin from the fairy tale about Cinderella. It is made very simply from ordinary colored paper in 2 colors. Well, all you need is:
- orange and green colored paper;
- scissors;
- glue;
- marker.

Hedgehog made from autumn leaves
A hedgehog can turn out to be kind and thrifty, or fat and thin. It all depends on how many leaves your kids collect.
For the little ones, of course, you need to prepare a blank drawing of a hedgehog, so that all they have to do is glue on the leaves collected in the garden. Adult children can draw a hedgehog based on the model themselves.
It is also important to show children autumn crafts before they go to the garden and collect leaves. You can conduct a whole lesson on botany, telling children the leaves of which trees they will collect for the hedgehog’s back.

Birds flying south
A very bright and funny craft for children about autumn.
What is needed for such creativity:
- colored paper;
- disposable cups;
- scissors;
- glue;
- artificial eyes for children's creativity.
This is a creative lesson with a story about birds flying south. Birds can be made different by making tails from single-color or multi-colored paper.
If, after finishing such creativity, you pour cocoa into these cups, the children will drink it even with nasty foam.

Dense autumn forest
The blanks need to be drawn and cut out for each child in advance. and distribute before the start of the creativity lesson. And with the idea of gathering the kids and going for a walk with them, collecting leaves.
If you have large group children, then it is interesting to make the trees tall, as tall as the children. Then, by placing them along the wall, you will have a real autumn forest in your classroom or creativity room.

Autumn red apple
Very bright and simple craft. It is made from used plastic bottles. Therefore, in parallel, you can conduct a lesson with children about preserving our nature and using already made things that will simply be thrown away.
To make an apple you need:
- 2 plastic bottles (transparent);
- a piece of green felt;
- red braid;
- a piece of wooden stick or twig;
- red colored paper;
- scissors;
- glue.
Cut off the bottom of a plastic bottle to a height of 5-7 cm.
We crumple the red paper with our hands and place it in the cut-off bottoms of the bottles
We connect the cut bottoms by inserting one into the other. Glue them together and tie them with a red ribbon
Using scissors, we make a hole in the top of our apple and insert a twig there. If the red paper inside the apple lies tightly enough, then the twig will not need to be secured.
Cut out leaves from green felt and glue them onto a branch.

Candlestick with leaves

Children are very creative people. They love to talk on stage, receive gifts, discover something new... The only thing is that they cannot engage in this creativity without adults. And of course we must help them with this!!!

crafts for kindergarten on the theme of autumn
Crafts gifts of autumn for kindergarten - ideas from natural materials (video)