Very soon women's holiday March 8th, and flowers from cotton pads They will look very beautiful on cards or in bouquets for mothers and grandmothers.
This material can be used to make different flowers: daisies, roses, callas, daffodils, snowdrops. It's great that you can do them with kids. different ages depending on the complexity of execution.
DIY flowers made from cotton pads step by step photos
To make any flowers we will need:
1. Cotton pads
2.Glue, scissors
3. Colored paper
4. Colored cardboard (if flowers are for a card)
5. Wooden skewers or cocktail tubes (if flowers are on stems for a bouquet)
Chamomiles made from cotton pads with photos
Chamomiles can be made in different ways:
Simplest:
♦ whole cotton pads glue in a circle in the form of petals.
♦ Cut from yellow paper a small circle and glue it in the middle.
Second way:
♦ Fold the cotton pad in half
♦ At regular intervals we make cuts not all the way through.
♦Unfold and glue a core made of colored paper or a cotton pad painted yellow.

♦ You can also cut out identical petals according to the template and also glue them in a circle.
More complicated way:
♦ We fold the cotton pad like this, gluing the folded edges. One flower requires 7 such petals.
♦ Glue them in a circle, with a yellow core in the middle.

Even one such flower looks very beautiful if you add a few more leaves to it.
Roses made from cotton pads
Roses can be made in different sizes and types.
Small roses are made like this:
♦We cut the cotton pad in a spiral with scissors, and then twist it, starting from the outer tip, forming a rose. Finally, secure it with a drop of glue.

You can make a lot of these roses and then form them into a bouquet on a sheet of colored cardboard, gluing the stems and leaves.
♦If for a small rose one cotton pad is required, then for a large one 5 or 7. First we twist one disc, and then first glue two petals around it, opposite each other. Then two more. The more discs you glue, the larger and more magnificent the rose will be.

You can also make calla lilies from cotton pads. For the middle, cotton swabs work well.

Snowdrops for applique, simply cut out according to the template and glue, adding stems and leaves.

Making flowers from cotton pads with your own hands is not at all difficult, but step by step photos will be of help. So choose the ones you like and create with your children.
Such flowers can be used for cards and bouquets not only for March 8, but also for any other holiday.
DIY crafts made from cotton swabs look original and are quite simple to do; any preschooler can handle them. Crafts made by a child’s hands do not require significant expenses. Children's works, unusual in their execution, are obtained from improvised materials or waste material. At the same time, the significance of crafts is quite important for the development of a child. They develop in young craftsmen fine motor skills hands, imagination, logic, artistic vision and communication skills.
The master class suggests making several works from cotton swabs. They will be able to decorate a postcard or panel and become one of the first significant works child.
What can be done
From cotton swabs, namely from their tips, you can make both flat crafts, for example, for panels, and three-dimensional ones - figurines of plants and animals.
The simplest thing you can do with cotton swabs is flowers. Let's try to make them on paper (in two ways) and in volume.
For the panel you will need:
- cardboard base;
- colored paper;
- white cardboard;
- PVA glue;
- cotton wool;
- plasticine;
- cotton buds;
- sharp scissors or wire cutters;
- felt-tip pens or pencils;
- paint (gouache or acrylic).
How to make a flower from cotton swabs (first option):
- Using a pencil, outline the silhouette of the future flower on the base - arrange the leaves, stem and round corolla;
- Cut out a stem, leaves, a pot and everything else that is necessary for the background of the picture from colored paper and glue it to the base;
- Trim the cotton swabs at one end with scissors or wire cutters;
- Carefully smear the sticks on one side with glue and glue them to the base with a “sun”;
- In order to “close” the cut ends in the center, glue cotton wool or a round piece of plasticine into the middle.

Plasticine can also be used instead of colored paper: mold a stem, leaves and the middle of a flower from it. Sticks are stuck into it; glue is not needed in this case.

Second option:
- Cut circles with a diameter of approximately 5 cm from white cardboard;
- Cut off the cotton ends from the sticks;
- Applying glue in a circle onto the cardboard circle, glue a row of cotton tips along the edge;

- Make the second and subsequent rows, smearing glue on the cardboard and the previous row;


- Assemble the entire composition on a cardboard base by drawing or gluing stems and leaves to it and gluing flower corollas on top;

- If desired, you can paint the sticks with paint.


The voluminous flower resembles a dandelion. To complete the work you need to prepare:
- cotton buds;
- plasticine or floral ball;
- wire, skewer, tube;
- paint;
- water and container for diluting paint;
- tape;
- vessel.
How to do:
- Cut the sticks at one end with scissors;
- Roll a ball out of plasticine the right size or use a ready-made floristry ball;
- Stick the cut ends of the sticks evenly into the ball (you should get a fluffy dandelion);

- Dilute a little paint of any color in a deep container and twirl the ball in it so that it is colored on all sides;
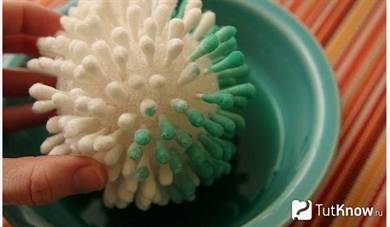
- Let it dry and insert a “stem” made of a skewer, wire, drinking straw, sushi stick (can be pre-wrapped in paper or painted green);

- Arrange the bouquet by tying it with a ribbon, placing it in a suitable vessel or sticking it into a stand.


Also, using a lot of cotton swabs you can make a cute Dolly the sheep. It is necessary to prepare appropriate templates (torso and head), as well as other materials and tools:
- cotton buds;
- thick cardboard;
- scissors;
- clothespins;
- PVA glue;
- marker;
- ribbons.
How to do:
- Cut the ends of the sticks with scissors;


- On the prepared cardboard circles for the body, start gluing cotton swabs in rows in a fan (from the tail to the head);


- Paste over the head, making ears and bangs, draw a muzzle;


- Glue the head to the body, covering the cut ends of the sticks with it;

- WITH wrong side glue two clothespins with the “ears” facing down.


Ready! This sheep can be used as a stand for signs and notes.


The panda, the symbol of China, is made according to the same principle as the sheep. To work you need to prepare:
- cotton buds;
- white and black cardboard;
- thick sheet of paper;
- cardboard base;
- PVA glue;
- scissors;
- dye;
- brush.
Progress:
- For convenience, you can cut out the silhouette of the bear using a template or draw it by hand (so as not to cut out a separate circle and oval for the head and body, respectively);
- Cut the ends of the sticks;
- Lubricating the template with glue, begin to lay sticks on it in a circle in several rows (separately for the head and body);
- Cut out paws (4 pcs.) and ears (2 pcs.) from white and black cardboard;
- Glue the ears and paws to the workpiece from the wrong side;
- Draw spots around the eyes and stripes on the bear’s body;
- bend it slightly front side ears;
Crafts. which can be made with children from cotton pads.
Little children have a very good imagination, so they love to do the most various crafts from improvised means. If you help them, you may end up with many beautiful masterpieces that you can use instead of a present.
Crafts from cotton pads and ear buds for kindergarten and school
Crafts made from cotton pads can be supplemented with other available materials, for example, a cocktail stick and lace napkins. We suggest you do original gift, which can be given for a name day or birthday. So, for this craft you need to stock up on:
- Cotton pads
- Ear sticks
- Cocktail straw
- Decorative hearts
- Lace napkins
- glue gun
- PVA glue
- Colored cardboard
Manufacturing process:
- Take several cotton swabs (a multiple of the number of flowers). Paint the ends of the sticks yellow and dip in cornmeal. Leave them to dry completely.
- Place a cotton swab (colored tip up) in the middle of the disk and secure it.
- Then wrap the edges of the disk and glue them together.
- Apply glue to the tip of the cocktail stick using a special gun. Glue the resulting flower.
- Cut out leaves from green cardboard. Take openwork napkin. Glue three callas in the center of it.
- When the glue dries, wrap the napkin into an envelope and fix the heart in the center.

Crafts from cotton pads and paper for kindergarten and school
This cute and funny sheep is very easy to make. Any child can cope with this task without any problems. To make it, stock up on:
- Glue
- Paper
- With a straw
- With cotton swabs or cotton wool
- Cardboard
- Pencil
- Scissors
- Shilom
- Black varnish

Manufacturing process:
- Roll the paper into a tight ball. To prevent it from falling apart, pour glue into it. Wait for the ball to dry thoroughly.
- Take an awl. Make holes in the workpiece. Insert the tubes there (first pour glue into the holes so that the legs are firmly fixed).
- Make from disks small balls. Glue them to the paper ball.
- Take black polish. Draw sheep's hooves for them.
- Draw a face on a piece of cardboard and cut it out.
- Glue the face.
- Our funny and amusing sheep is ready!
Crafts from cotton pads and cardboard for kindergarten and school
You can make any craft from ordinary cardboard and cotton wool discs, for example, a heart with delicate roses. If you also want to make such a wonderful craft, stock up in advance:
- Cardboard (choose color at your discretion)
- Paper
- Cotton pads
- Pencil
- Scissors
- PVA glue
Manufacturing process:
- Fold paper sheet into 2 parts. Draw half a heart. Cut it out.
- Take cardboard (for example, red). Trace the heart template with a pencil. Do this preferably on the wrong side.
- Take cotton pads. Divide into 2 parts.
- Take scissors. Use them to cut the disks in a spiral.
- Take the blanks and twist them. As a result, you will get a rose.
- Make the number of flowers you need.
- Glue the roses around the edge of the heart using glue.

Crafts from cotton pads for children 3–4 years old in kindergarten
We will tell you how to quickly and easily make snowdrops. To make it, stock up on:
- Cotton wool discs
- Straws for drinks
- Green plasticine
- Plasticine yellow color

Manufacturing process:
- Take paper, make a template. Then cut out using this template required quantity snowdrops.
- Apply green plasticine on top of the plastic juice tubes - these will be the stems.
- Make a flower core in the center of the white blank (use yellow plasticine for this).
- Attach the flower to the stem.
- You can put snowdrops in a glass or small vase.
Crafts from cotton pads for children 5-6 years old in kindergarten
Children aged 5-6 years can already do more complex crafts. Invite them to make daisies. To make them you need to stock up on:
- Cotton wool discs
- Yellow cardboard
- Straws
- Corrugated green paper
- Scissors
- Pencil
- Glue "Titan"

Manufacturing process:
- Take yellow cardboard. Draw 2 circles of equal diameter on it.
- Take scissors. Cut out these circles.
- Take the disks. Fold them as in the picture. You will get petals.
- Glue the petals onto one yellow circle.
- Glue a yellow circle in the central part.
- Take a green tube. Cut it into 4 pieces at one end.
- Glue the stem with the cut parts to the flower (use Titan glue).
- Cut out leaves from paper. Glue them to the stem.
- Make as many flowers as you like. Place them in a vase.
Crafts from cotton pads for children 7-8 years old for school
Roses are made more difficult than previous version. In order to make them you will need to take the same materials as for making daisies.
Manufacturing process:
- Take a disk and cotton wool. Twist the tube, then secure it with glue.
- Take another disc. Wrap this disk around the 1st petal. Secure with glue.
- Take the 3rd disc. Wrap it around the 2nd petal, also fix it with glue.
- Wrap the remaining petals in the same way.
- To make a rose, you will need to stock up on 6 cotton pads.
- Take cocktail straw- this will be the stem.
- Insert the tube into the base of the flower. You can secure it with a strong thread by wrapping it around the base of the flower.
- If your rose is attached to a skewer, then wrap paper around it.
- Cut out the sepals from the same paper. Fix them with Titan glue.
- Cut out more leaves from paper. Glue them to the stem.
- Make the required number of roses to make a beautiful bouquet.

Crafts from cotton pads for children 9-10 years old for school
Nowadays it is very popular to give gifts made by yourself. We would like to invite you to make a topiary that you can give to your mother, grandmother, friend, or teacher.
To make such unusual gift You need to stock up on:
- newspaper
- Cotton pads
- A twig or stick (trunk)
- Ribbon (you will use it to make leaves)
- Potty
- Plaster
- Beads
- Glue sticks
- Special glue gun
- Scissors
- Stapler
- Staples

Manufacturing process:
- For the 1st rose, take a cotton pad. Fold it with the edges inward to form a pointed nose. Secure with a stapler.
- Turn out the wide edge of the rose. Make preparations.
- Make a paper ball. Glue these roses onto it using a gun so that there are no gaps.
- Take a branch and place the trunk in the central part of the ball. Secure with glue.
- Place the tree in a pot: take a small jar, wrap it with strings, and fill the trunk with plaster.
- Cut out leaves from green paper. Glue them in any order.
Crafts from cotton pads for mothers on March 8
We have already described the sheep to you. But there is no sheep with a flower yet. She will become the perfect gift on March 8th to dear mother. To make this miracle happen, stock up on:
- Cotton pads
- Glue "Titan"
- Brush
- Tube – 2 pcs.
- newspaper
- Empty jar
- Stapler

Manufacturing process:
- Connect the 2 disks using a stapler. Fluff the discs to make them voluminous.
- Glue 2 rows of disks to the jar.
- Make legs for the sheep.
- Form a ball from the newspaper. Make a sheep's head, glue a cotton pad and make eyes, nose, eyelashes and mouth. Cover the head with cotton wool discs.
- Make a flower using a disk, make it red.
Crafts from cotton pads for Mother's Day for mothers
Every year we celebrate Mother's Day. On this day you can give beautiful craft in the form of a vase with a flower. To make a gift, stock up on:
- Cotton pads
- Glue
- Red cardboard
- Yellow cardboard
- Green corrugated paper
Manufacturing process:
- Make flower petals from the disks.
- Cut out a circle from yellow cardboard - you will get the middle of a flower.
- Assemble the resulting flower using glue.
- Cut out a basket from red cardboard.
- From corrugated paper cut out the leaves.
- Glue all the elements to the basket.

Crafts from cotton pads for February 23rd for dads
- Cotton pads
- Green napkins
- Skewers 15 cm long – 9 pcs.
- Stapler
- Scissors
- Glue with pencil
- Glue gun
- Red paint
- Brush
- Ruler

Manufacturing process:
- Take 2 disks. Connect them in the center with a stapler, trim the edges with curly scissors, fluff the edges.
- Make some carnations. Color them with different colors.
- You can paint the edges of several flowers with gel.
- Cut strips of 1 cm * 30 cm from napkins - these will be the stems. Cut out more leaves.
- Assemble the carnations: Using a glue gun, glue the flowers to the skewers.
- Glue a flower to the pencil, and glue a couple of leaves onto the pencil itself.
- Wrap the stem of the clove with green paper. Secure the edges.
- Make some carnations. Collect them in a lush bouquet and give them to dad on February 23rd.
Birthday crafts for children from cotton pads
And the next craft could be a great gift for the birthday of a classmate or teacher. To make a present, stock up on:
- Cotton pads
- Paper plate
- PVA glue
- Bead
- Green paper

Manufacturing process:
- Make flower petals.
- Stick them on a plate.
- Cut out leaves from colored paper. Stick them on the plate too.
- Glue another flower core.
Our gift is ready. You can decorate the plate itself at your discretion, or buy an already decorated plate with a congratulatory inscription.
New Year's winter crafts from cotton swabs, paper and cardboard for kindergarten and school
With the arrival of the New Year, you begin to look for good gifts to your family and friends. Make them a present with your own hands - give them Christmas tree. Stock up on the following materials:
- Cotton pads
- Hot glue
- Scissors
- Plastic cup – 2 pcs. (they should be different in size)

Manufacturing process:
- Divide the disks into 2 equal parts. Then fold the halves in half and stick them on big glass all around. So cover the perimeter of the entire glass.
- Carefully cut the bottom of the glass. Insert a smaller glass into it. Then your Christmas tree will take on a cone-shaped shape. Then cover the small glass with discs.
- Form the top of the tree. Decorate it as you wish.
Crafts from cotton pads, paper and cardboard for Easter
In order to manufacture Easter egg with chicken, you will need to stock up on the following tools and materials:
- Colored paper
- Colored cardboard
- Scissors
- With a simple pencil
- paint
- Brush
- Glue
- Cotton pads
- Ear sticks

Manufacturing process:
- Take colored paper (it’s better to use colored cardboard for strength).
- Make an Easter egg template.
- Trace the template onto cardboard or paper.
- Cut the blank along the contour.
- Make a smaller egg out of white paper.
- Glue the white egg onto the colored one.
- Make a body and wings from the disk. Glue it onto the workpiece.
- Paint the body yellow.
- Draw the chicken's eyes.
- Make the beak and comb red
- Make paws from sticks. Glue them.
- Draw grass under the chicken.
Orchid craft from cotton pads
Orchid – beautiful flower. You can make it yourself using cotton pads. For making it, it is advisable for you to stock up on the following things:
- Cotton pads – 3 pcs.
- Wire
- Glue
- core
- Framed
- Double-sided tape
- Scissors
- Threads

Manufacturing process:
- Paint the wheels in advance in any color you wish. Leave only one edge white.
- Divide the disk into a pair of petals, remove the excess cotton wool, since the orchid's petals are very delicate.
- Collect a flower. Wrap the petals with thread at the base so that they do not lose their shape. Secure with wire.
- Glue the core into the middle of the flower.
- Glue the orchid itself to the frame using double-sided tape. All!
Craft a traffic light from cotton pads for boys
To make it you will need to stock up on:
- Cotton pads
- With paints
- Brush
- Cardboard
- Colored paper
- Glue

Manufacturing process:
- Take 3 cotton pads. Paint the 1st one with red paint, the 2nd one with yellow paint, the 3rd one with green paint.
- Cut the cardboard into the shape of a traffic light.
- Glue the discs in the appropriate order.
- Glue a visor above each lantern (make them in advance from cardboard).
- Light and very original craft ready.
Craft panda from cotton pads
You can make a charming panda very easily, just stock up on the following materials:
- Cardboard
- Cotton swabs
- Paper white
- White plasticine
- Glue
- Black paint
- Cotton pads

Manufacturing process:
- Cut out a panda's head and body, plus a pair of ears and paws, from cardboard.
- Attach the cardboard to the disk, outline it, and then cut it out.
- Glue the blank to the cardboard. Paint them with black paint. Make the ears black and white.
- Knead the plasticine. Stick it to the panda's face.
- Cut the ear sticks and stick them into the plasticine.
- Decorate the panda's body around the edges. Glue the sticks, gradually moving to the center of the work. Make the animal's body in the same way.
- Paint the ends of several sticks with black paint.
- Cut out eyes from white paper. Stick them on. Draw the pupils.
Crafts from cotton pads bear
You and your children can make a craft with the image of a polar bear from cotton pads. To do this, do the following:
- Openwork round napkin white.
- PVA glue.
- Scissors.
- With your eyes.
- Red paint.
- Cotton pads.

Manufacturing process:
- Take a napkin. Glue bear eyes on it.
- Draw the nose and mouth of the animal.
- Make ears from cotton pads. Cut the disks themselves into 2 parts or roll them into cotton balls.
- Glue the ears on top of the napkin.
Video: Crafts from cotton pads
DIY children's crafts made from cotton pads are inexpensive and hygienic; they are safe to give to children who are learning to make their first applications and show their imagination. Can be produced flat and three-dimensional figures- flowers, snowflakes, snowmen, dogs and even roll a snowball - but soft and fluffy, not cold!
Flower and flower crafts turn out well New Year theme. This activity is useful joint leisure parents and children.

If the craft turns out to be particularly successful, it may become original decoration interior of a children's room, a unique gift, and even take a prize at a school exhibition of DIY work.

What are the benefits of cotton pads?
Cotton pads are comfortable for children's hands to work with - they are easy to cut with small scissors, fold and bend, glue, and paint. watercolor paint, marker or felt-tip pen, combine with other materials.


It is enough to follow simple instructions on how to properly make crafts from cotton pads, and even small child it will turn out to be a real masterpiece.

Working with a round, colorless object develops children's imagination - it teaches them to look at a familiar shape in a flexible and non-standard way, and this will come in handy when they become adults.

A selection of photos of crafts made from cotton pads clearly demonstrates how many magnificent things can be made from them, and may prompt you to come up with your own idea.

It’s better to start with the simplest master classes on crafts made from cotton pads. Anyone who has learned the technique of work and understands the capabilities of this craft material will begin to produce very beautiful and high-quality things, and their skills will improve with each craft.

Tools and improvised means
No special equipment is required. As a rule, you need a sufficient number of disks themselves, stationery scissors and glue, a needle and thread, watercolors, a brush, decorative pins, sheets of cardboard and colored paper - regular and self-adhesive, multi-colored beads different sizes made of glass and plastic, beads, shiny sequins, beautiful buttons, satin ribbon and other similar decorations.

Depending on what kind of craft is planned, plastic cocktail straws (for example, for a flower stem), toothpicks, spruce and pine cones, tree leaves, pine twigs - anything that your imagination suggests - may come in handy.

Below - beautiful ideas crafts made from cotton pads, easy to make even for a six-year-old child.


New Year's snow-covered tree
Before you start working, you need to prepare:
- a lot of white cotton pads;
- a sheet of white cardboard the size of how tall the tree will be;
- stapler and paper clips for it;
- office glue;
- braid;
- large multi-colored beads - these will be Christmas balls.

Creating a Christmas tree
A sheet of cardboard is rolled into a narrow cone and glued along the edge. The trunk must be stable, so the base of the cone is made even; if it is not possible to roll it properly, you need to trim it with scissors.

All cotton pads are folded into triangles - first in half, then in half again: these will be spruce paws.

Starting from the base - from bottom to top - the disks are attached in horizontal rows tightly to each other to make the Christmas tree fluffy. You can attach it with pins with colored heads - decorations will immediately appear on the tree, or with a stapler.

The Christmas tree is decorated with balls - the beads can be sewn or glued. If you wrap the Christmas tree with braid, it will play the role of garlands.


You can decorate such a Christmas tree to your liking - rain, confetti, even hang real glass ones. Christmas decorations small size.

Postcard with a snowman
When making crafts from cotton pads, it is important to act step by step, without overtaking events - this will teach the child perseverance. For this fun unusual postcard The following materials are needed:
- 2 thick cotton pads (to make the image three-dimensional);
- a sheet of thick colored paper or thin cardboard - the color you want the postcard to be;
- sheets of thin colored paper for a hat and scarf;
- orange colored paper for the carrot nose;
- scissors;
- office glue;
- 2 buttons (for eyes);
- markers.


Making a postcard
One of the cotton pads is cut with scissors for the head so that it becomes smaller than the diameter of the disc-base of the snowman. Button eyes are glued to the head with glue. (Eyes can be made from special stickers or cut out of colored paper.) A hat, a scarf and a carrot for the nose are cut out of colored paper.

The cardboard sheet is carefully folded in half. To ensure that the fold is perfectly even and the cardboard is bent well, you can draw a line along the ruler with the blunt side of the scissors. This is a blank postcard. Cotton pads, a hat, a scarf and a nose are glued to the front of the card.

The postcard is ready! This snowman will also make a decoration for window glass, if you make it not on cardboard, but on a transparent film with glue applied to both sides. This film can be purchased in any department of goods for children's creativity.

Snowball
Snowballs can be hung on live Christmas tree, or you can attach a thread to the snowball and play with the cat. All you need is cotton pads, ribbon and glue. All disks are folded in four to form triangles. A drop of glue is applied to the tip of each triangle.


Four folded disks are glued together with these tips. If this is a toy for a cat, then it is better not to glue them together, but to sew them together.

Four disks make half of the snowball, and the same is made for the second half. The halves are fastened together. To each snowball you need to sew a ribbon in the form of a loop. There are many options for crafts. The main thing is to show your imagination.

Photos of crafts made from cotton pads


Good day to all. Since you are reading my article now, it means that you love making various beautiful things with your own hands and you came here for inspiration and new ideas. Well, what should we start creating? Today we will make roses from cotton pads.
For this we need:
- Cotton pads.
- Aluminum wire.
- Glue.
- Scissors.
- Green gouache.
- Brush.
- Hairspray.
Take a wire of the required length and cotton pads. The length of the wire depends on how tall you need the stem of the future flower. The cotton pads will need to be slightly torn, as shown in the photo. And wrap them around the wire. For reliability, we fix the ends of the cotton wool with glue. The stem is ready. If the stem turns out to be uneven in thickness, then there is nothing to worry about, because real flowers have uneven stems.

Let's put our stems aside for now. We take more cotton pads and cut out leaves from them. In fact, you can cut out the shape of the leaf at your discretion; I decided to cut out the simplest shape.


Now we paint the stems and leaves on both sides with green gouache. It is better to paint on newspaper so as not to stain the table.

Leave to dry. While we have free time. You can make rosebuds. The flower can be collected on the stem, or separately, as you wish. We take cotton pads and glue again. We roll the first disk into a tube and fix it with glue.

We take the second disk and glue it on top of the tube, without gluing the edges of the disk on top, we will then correct (straighten) them as necessary. So we glue other disks until the rose reaches the desired size.


The bud is ready, you can glue it to the stem (if it is dry, of course).

Then we glue the leaves. You can glue the leaves all over the trunk, but I wanted to glue them only at the bottom of the bud.

When the glue has dried well and all the parts of the flower stick well, the flower is ready. From these roses you can create a beautiful flower arrangement, which will decorate a room in your home.


As you can see, you can make flowers not only white. Using gouache you can make flowers of any color. Yes, I almost forgot, I advise you to apply hairspray to the painted areas on the flower, this way they will not be dyed and the varnish will give them a little shine. Goodbye, see you again.