Every parent knows firsthand how often a child needs to do crafts for school or kindergarten. This is a whole creative process, which often turns into a common family affair. At the same time, the procedure for creating such crafts should not fall solely on the shoulders of parents.
After all, such pastime develops many skills and abilities in children, in particular, fine motor skills, imagination, and creativity. It is very easy to make a hedgehog from cones, so a child can complete this task on his own.
One of the popular crafts that children often make in schools and kindergartens is a hedgehog made from a cone. You can figure out how to make it yourself, but a detailed master class will help you cope with the task faster and select the necessary materials.
The fastest way to make a hedgehog is from spruce cones, because its scales give volume to the figure, forming needles on the hedgehog’s back. Pine cones are ideal for this craft. This method is notable for the fact that it also involves modeling from plasticine, which in itself also develops the motor skills of the child’s hands and contributes to the development of imagination, mind and thinking.
You will need the following materials:
- pine cones (one hedgehog - one cone);
- plasticine of different colors: black, red, white, green, brown;
- board for working with plasticine.
- Cut off a small piece of brown plasticine. The size of the piece should be about 1/3 of the cone itself.
- A ball is rolled out of plasticine and attached to the tail of the pine cone.
- Using your fingers, you need to smooth the ball on one side so that it becomes a continuation of the bump.
- On the other side, there remains a free edge from which you need to form the hedgehog’s muzzle.
- If you understand that the muzzle is too big and looks disproportionate in relation to the body, then you just need to pinch off a piece of plasticine and make it again.
- Then take black plasticine and roll it into a small ball. Attach the resulting hedgehog's nose to the muzzle.
- Divide a piece of brown plasticine into four equal parts.
- Roll them into small sausages that will serve as paws for the animal.
- Turn the hedgehog onto its back and attach its paws. The made legs will allow the figure to stand.
- Next comes white plasticine. You need to roll small balls from it for the eyes.
- White balls need to be supplemented with small black dots, which are attached on top of white plasticine to create real eyes.
- To create a mouth, attach another small piece of plasticine directly under the muzzle.
- You can decorate your hedgehog by placing an apple made of red plasticine on it. Alder cones will also look beautiful here.
The “hedgehog made from cones” craft looks presentable and interesting. This fabulous creature can decorate not only any exhibition of an educational institution, but also a home shelf.


It’s easy and quick to sculpt a hedgehog from pine cones and plasticine, and most importantly, you don’t need a lot of materials.
Hedgehog made from natural materials
The next method of creating a hedgehog from cones involves the use of other natural materials. For this figurine you will need acorn caps, seeds, and a thorn plant. Stationery supplies: PVA glue.
Seeds are knocked out from the opened cones; if they are absent, ordinary black peppercorns will also work for the craft. You need to prepare the acorn caps; they will serve as the basis for the hedgehog’s face.
- Generously coat the seeds with glue and press them tightly against the thorn.
- It is convenient to place the thorns in the dishes so as not to prick yourself. You can use a bottle or glass for this.
- We break off two scales from the cone and glue them to the hedgehog’s head.
- Using seeds, we make eyes for the animal.
- For greater stability of the figurine, you can trim off some of the spines from the bottom.
Hedgehog made of clay and cones
Crafts made from pine cones are very popular due to their simplicity and the fact that everyone can find pine cones in the park or just near their home. If you use additional materials, you can create very interesting specimens. For example, using polymer clay, you can create a cute and cheerful hedgehog. You can also use plasticine, but polymer clay is preferable because when baked it hardens and retains its shape for a long time.
You need to glue a large piece of clay onto the cone and create a cone from it. Make the hind legs large, the front legs a little smaller. Make a nose and eyes from black clay. Using a clay tool you need to press the mouth.
In order to add playfulness and positivity to the image of a hedgehog, you can not make plasticine eyes, but buy ready-made ones in the store.
You won't find a better decoration for your home and garden to surprise everyone at a craft show than hedgehog made of cones. The cute prickly animal will captivate everyone with its snub-nosed face and needles made from natural material. By the way, the little ones can make an animal using potatoes and spruce branches, molding a plasticine face.
Hedgehog from a bottle and pine cones
Hedgehog made from cones and plastic Every child can make bottles; such a craft can be presented at a school autumn exhibition or boast of successes in kindergarten. For this craft we will also need an unnecessary plate, it could be a small iron bowl on which the enamel has long been cracked or a plastic bowl, it may even be cracked, and this crack can be glued with glue or taped on top.
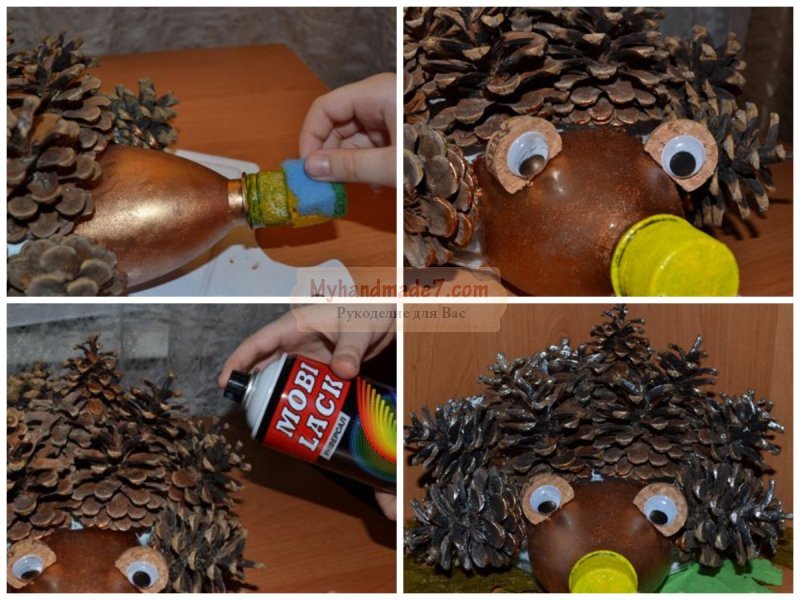
We need to prepare two white bottle caps, which will be needed to make eyes for our hedgehog. Among the additional materials, prepare tape, Moment glue and gray or brown paint. Be sure to collect materials for creativity in the forest or in the park, because you can make not only an animal, but also.

We will not need the entire plastic bottle; we need to cut off the neck, taking a couple of centimeters in the place where the expansion occurs. Cut these couple of centimeters in several places along and bend them. We will use this part to secure the neck to the bowl. We will glue the neck to the bowl using Moment glue, and you can also carefully wrap it with tape several times, now our figure will definitely be durable.
Since the cones cannot be glued in such a way that the base is not visible, it must be painted in one tone: we will use an aerosol primer, which must be used to cover the workpiece on all sides and allow the layer to dry completely.
Along the entire base of the bowl, you need to glue the cones with Moment glue; it will securely fix all the elements. Now you need to design the muzzle: cut out small circles from blue and black paper (the blue one should be smaller in diameter than the lid, and the black ones should be smaller than the blue one). For each eye you will need 1 black and 1 blue, i.e. All you need to do is cut out two pieces of different colors. Glue the round pieces onto the lids, blue first, black on top. They need to be glued to the muzzle. You also need to think about what to make the antennae from; for example, you can use an old thin black wire; if you have old headphones, they need to be cut into small pieces and glued next to the nose.

Hedgehog made from cones and a plastic bottle It’s almost ready, and now all that remains is to decorate it: you need to attach the “harvest” that the hardworking animal collected to the needles. For example, you can attach decorative apples and mushrooms, a few dry leaves. By the way, you can also make an apple yourself, for this you will need a couple more small plastic containers, you need to cut off the bottom and about 2-3 cm of plastic from the top. Then glue both halves together and attach a wooden skewer on top in the center. Attach two leaves cut from green cardboard to a short wooden skewer. Finally, the apple must be painted with red acrylic paint and placed on the needles.
We will make a forest clearing for the animal, for this we will fix the craft itself on an old plate, which we will decorate with moss and flowers. Let this be your child’s first acquaintance with a cute forest dweller who hardworkingly harvests his sharp needles.
If you don’t have an unnecessary iron bowl at hand, then hedgehog from a bottle and pine cones It may also come out on a plastic base. For example, you can use a deep plastic disposable plate, or better yet several for strength.
How to make a hedgehog from pine cones
The best way to spend a cold autumn evening with your family. We are confident that such a process how to make a hedgehog from pine cones Not only kids, but also older children will definitely join, and everyone will have many ideas about what materials can be used to get a prickly animal.

While walking through the autumn forest, pay attention to the fact that there are a lot of dry plants everywhere, including those that bloom with “thorns”; they can also be used in these crafts. We will make the muzzle from an unopened cone, to which we will glue a large dry thorn. We will also need one that has already opened, from which we need to cut off a couple of “scales” and glue them onto the muzzle to make ears. Use black peppercorns to make beady eyes for our cute hedgehog.

It would be useful to collect acorns and their caps in the forest, which can also be attached to the figurine to make legs. Next, you can use plasticine and make the missing elements from it, for example, make a spout at the very tip of a sharp lump.

Craft: hedgehog made from pine cones
The best ones, of course, are made using plasticine; this plastic material easily takes on any shape, so children can create various animal figures using also available materials. And the mother can offer the child to combine two types of creativity and with the help of plasticine it will turn out very interesting, and most importantly simple. craft - hedgehog made from pine cones.
In this case, the open cone will serve as the needle-shaped body of our animal, and we will make the sharp muzzle, paws and ears from plasticine of the required color.
You will need beige or light gray plasticine for the muzzle, a small piece of red and yellow must be prepared for the decorative apple, which will be located on the needles. And for the eyes and nose you need to prepare small lumps of black and white flowers.

A briquette of light plasticine should be divided into two parts, one will be used for the head, the second will be used for the ears and paws.
We will start making crafts from pine cones from the head, i.e. First of all we need plasticine. First, you need to carefully knead a piece of beige in your hands so that it warms up and becomes plastic, then you should roll up a ball and begin to form a cone, which will be our cute face. And the other end must be attached to the blunt end of the cone. The tip of the cone must be bent upward to create a snub nose.
Using a special tool - a stack, you need to push a hole on the sharp tip of the muzzle, here we will attach the little black nose. For the nose you will need a black ball of plasticine, which must be placed in this hole, and then gently pressed down, but not flattened, because it must remain spherical.

You need to form two small balls from black plastic, try to make them the same size. Now press these balls into the corresponding holes. Now you need to make the pupils from white plastic: also roll two small balls, smaller than the black ones, and fasten them on top of them. Our animal's playful eyes will glow.

Which one hedgehog made from fir cones without ears, so you need to separate two small equal pieces from the beige block. First we roll the balls and then flatten them. The flatbread should be pinched on one side so that the ear becomes concave. In this form, both ears must be attached to the head.

Hedgehog made of cones
We still have a piece of light plastic left for the paws, of which there will be four pieces, which means that the plastic must be divided into four equal parts. Then we roll each piece into a ball and attach it to the bump on the belly; at the end, we slightly flatten our paws on one side with our finger to make the craft stable.
Our master class how to make a hedgehog from fir cones, almost finished, all that remains is to pay attention to the decorative design of the craft, for example, using plasticine, make an apple and plant it on needles, you can also make a mushroom. And for the hedgehog, be sure to make a forest clearing with dry leaves and twigs so that he feels at home.
Hedgehog made from cones: master class
Surely you can easily repeat all the steps of the master and will decorate your home hedgehog made from cones, master class necessary only to understand some of the difficulties that may accompany the process. By the way, the natural material itself can be pre-painted in any color with spray paint, and then glued to the base. This way you will get an absolutely fantastic animal, as if straight from the pages of a fairy tale. You don’t have to paint them completely, but only at the final stage slightly tint the edges of the “needles”, as if our animal was wandering through the forest and there was a snowball on its needles.
They always create a warm atmosphere at home, because they can be done with your family, sitting comfortably near the fireplace. We are sure that all family members will pay attention to such creativity, and everyone will turn out to be original. hedgehog from a bottle and pine cones, master class even using the same one, because at the end you can decorate it at your discretion. And then you can hold a family competition to see whose craft turned out to be the most beautiful and neat.
Crafts for kindergarten can decorate the area near the kindergarten. For example, a cute snub nose may peek out from a flower bed, which children who come to kindergarten in the morning will always rejoice at. Or you can make a decoration in the garden in a different way: for example, cut off one side of a plastic bottle and make a muzzle from the neck. Fill the hollow part with soil, and then plant grass there, which will grow and become needles for our hedgehog.

You know that natural materials can be used to create the most original decorative elements, and we have already talked about many of them, so in the fall, be sure to take care of collecting a sufficient number of elements for future creative projects. Such crafts are durable, and even if they are stored outdoors, they will withstand all the hardships of the weather, but if they deteriorate, you can always repeat such figures. Be sure to share your successes in the comments and offer advice to those who have difficulty completing this simple craft.
Today we will tell you how to make a hedgehog from a pine cone - this simple children's craft from natural material can decorate your collection or become a source of pride at an exhibition in kindergarten.
Active development of fine motor skills is the key to a child’s excellent and rapid development. Infants should be allowed to touch and feel objects of different shapes and structures. For babies about a year old, suggest sorting out beans and peas under your supervision. Games with semolina are also very useful for them. Older children (about 3-4 years old) simply need to create something with their own hands. Not only fine motor skills are involved here, but also imagination, thinking and mental development in general.
Modeling from plasticine or salt dough is very useful. It is important that the child himself takes an active part in the process, and not be an outside observer.
Children do great work using natural materials. For example, crafts made from pine cones. They definitely need to be collected in reserve in the fall. It's very easy to make a cute, hard-working hedgehog using a pine cone and plasticine.

To make a hedgehog from a pine cone you will need:
- one pine cone,
- brown plasticine
- a little plasticine in white, black, red and green colors,
- board for working with plasticine,
- stack.
How to make a hedgehog from a pine cone with your baby:
Using a cutting stick, cut a small piece of brown plasticine.

You will need a piece about 1/3 the size of the cone itself.

Roll a ball out of plasticine and attach cones to the tail.

Then use your fingers to smooth the ball on one side so that it becomes an extension of the pine cone.

From the free side, form a muzzle for the hedgehog. If there is too much plasticine, just pinch off a piece so that the hedgehog’s head matches the size.

Roll a small ball out of black plasticine and attach a nose to the hedgehog.

Now take four pieces of brown plasticine.

Roll them into small sausages - these will be the legs for the hedgehog.

Turn the hedgehog over with its tummy up and attach the two front legs first.

Now the two back ones too.

The hedgehog we made from a pine cone can already stand on its paws.

Make balls from two small pieces of white plasticine and attach them to the face on both sides.

Stick smaller black circles on top of the white circles - our cute hedgehog's eyes are ready!

Attach another small piece of plasticine under the muzzle to create a mouth.
This cute hedgehog will become a true friend for your child, and an excellent souvenir for you! How to make a hedgehog from pine cones?
By following our instructions step by step, you can easily make this prickly forest dweller.
Hedgehog made from pine cones and salt dough
Before making a hedgehog, we remove the scales from the cones - just carefully separate them from the core and put them in one pile. You can use tweezers or nail scissors.

This is where the preparation ends, now let’s get started with creativity. First of all, roll the dough into an even ball.

We fashion the body and head of a hedgehog out of it, sharpening its nose a little.

We should get a completely recognizable silhouette.

Carefully, in even rows, insert individual scales into the body. First we make a row around the circumference of the hedgehog’s body.

And from there we go inward, trying to select scales of a similar size so that the hedgehog’s “hair” turns out smooth and neat.

We roll another one out of the dough, this time, a small lump - a spout, and attach it. You can moisten it a little to ensure a stronger attachment.

Our hedgehog is almost ready, all that remains is to bake it in the oven at minimum power. You can dry the craft under normal conditions, but it will take more time.

When the hedgehog dries well, all that remains is to draw its eyes and paint its nose with oil paint or acrylic.

We made some adorable pine cones!

The craft can be based on a foam ball and a cone. More details in the video:
Hedgehog made of pine cones and felt
The second version of the craft, how to make a hedgehog from a pine cone, is made using felt and beads.
For the craft we will need:
- paper templates for cutting
- cone
- regular and curly scissors
- glue gun

We cut out blanks for crafts from felt using paper templates. One piece looks a bit like a horseshoe, and the other is a semicircle with a wavy edge.

Glue the semicircle together using a glue gun.

Sew a beaded spout onto the end of the cone.

Sew on the eyes.

Sew on felt ears.

We glue together a cone, a muzzle and a horseshoe-shaped part, which turns out to be the small paws of a hedgehog.

The hedgehog is ready! Baby hedgehogs made of pine cones and felt.

Hedgehogs made from pine cones can decorate a Christmas tree.

A very cute hedgehog can be made from a plastic bottle and pine cones. For this craft, a plastic bottle with a round cap is best. Color the end of the bottle with a black marker.

Wrap the remaining part with fabric.

Glue the cones to a rag, forming a hedgehog's fur coat.

When the cones are glued all over the bottle, we complement the composition with apples, spruce branches and rowan berries.

Hedgehog made from cones and a plastic bottle (large)
To make a hedgehog, we will need natural materials: cones, rowan branches, leaves, birch sticks. The craft is based on a plastic bottle, which we cut off.

For a detailed master class, watch the video:
Pine and fir cones are some of the most beloved ones that craftsmen use to make a variety of products. Candlesticks, photo frames, toys, souvenirs. And this is not the entire list of what can be made from these gifts of nature. In this article we will tell you how to make a hedgehog from pine cones and a plastic bottle. The product is voluminous, beautiful, and stable. It can be used as a souvenir, toy or decorative element on the site.
Preparing materials for making the “Hedgehog” craft
With our own hands, we make a figurine of a prickly forest dweller from a pine cone and a plastic container. What do we need for this? We learn from the list of materials and tools:
- pine cones;
- empty brown PET bottle;
- disposable plastic plate (deep);
- heat gun;
- construction knife;
- twine;
- buttons (2 large white and 2 small black) or accessories - “eyes”.
Master class "Hedgehog made from pine cones and a plastic bottle"
Cut off the top of the plastic container. From it we will form the animal's face. Do not unscrew the lid. It will serve as a spout.

A hedgehog made from pine cones and a plastic bottle can become an original small flowerpot. You can grow green onions, dill or any other greens in it.
How to make a container for planting plants in the shape of a hedgehog figurine?
For a PET bottle laid horizontally, cut a hole in the middle. Glue the cones in two rows around it. Make eyes from buttons. Fill the product with soil through the hole and plant the plants. Place the figurine in the garden or on the windowsill. When the greenery comes up, the hedgehog will look even more beautiful and original.