The fashion world does not stand still, but is rapidly moving forward in big and small steps. Fashion for clothes, hairstyles, and hair coloring is changing rapidly. Even manicure fashion changes almost every day.
Today an elegant French manicure is in fashion, tomorrow a contrasting gradient on nails is in fashion, the day after tomorrow something else will be in fashion. And these trends need to be taken into account not only by manicurists, but also by their clients. Firstly, in order not to look old-fashioned, and secondly, it’s always nice to be one of the first to try something new.

 Very unusual manicure- fashion trend
 What is a manicure with a hole called?
In fact, moon manicure or a manicure with holes - this is a kind of Alternative option familiar to everyone french manicure(French). French is when top part The nail is highlighted with a polish of a different color from the main color of the nail.
The traditional version uses varnish flesh-colored, white and transparent.


More modern version implies the presence of more contrasting colors, additional patterns, gradients, rhinestones, sparkles.
 French manicure with rhinestones
Manicure with holes - highlighting the hole of the nail from below with a different color, rhinestones, sparkles, whatever.
So, the main difference between a real French manicure and a lunar manicure is that a French manicure involves highlighting the nail from above, and a lunar manicure from below.
 traditional moon manicure

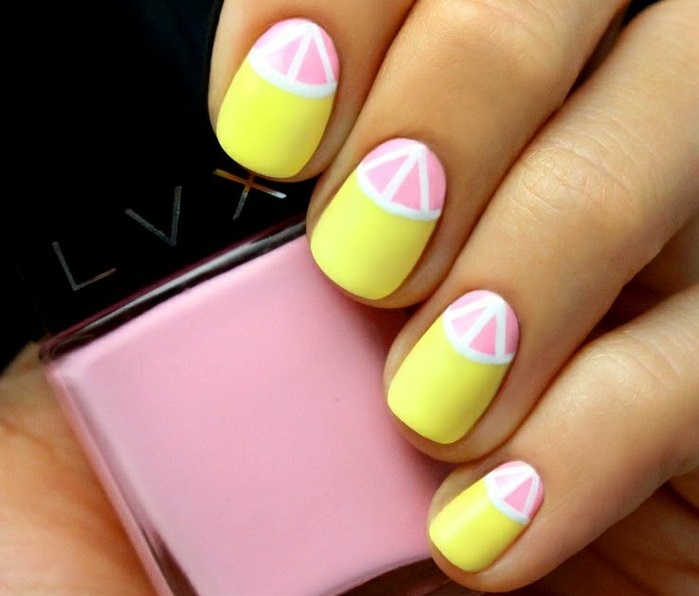
Sometimes masters use not semicircular holes, but triangular ones. The manicure turns out stylish and unusual.


Some masters, at the request of clients, can combine moon manicure and French manicure. Then a very beautiful, fashionable, combined manicure is born. You can add rhinestones, patterns and sparkles to this manicure. But you need to know when to stop, because the abundance small parts greatly distracts attention.


How to do a moon manicure at home: step-by-step instructions
Making a lunar manicure “like on the cover of a magazine” is not at all difficult. But such a manicure will require some accuracy and understanding of the basic principles of creating a spectacular manicure.
Even if you are a complete beginner, creating such a manicure will not be difficult if you follow all the tips below.
So, what is needed to create a manicure with holes?
- nail file
- several cotton sponges
- orange nail stick
- nail polish remover
- a product to treat your finger before a manicure or something greasy so that the polish can be easily wiped off your finger
- two colored varnishes and a clear varnish to fix the work
- special stencil (circle with a hole inside)
- patience
If you do everything correctly, you will end up with a manicure like this.


Now the technology for creating a blue moon manicure:
- Treat the nail. Using a nail file, make the perfect shape of your nail, and using an orange stick, push back the cuticle, degrease the nail plate and apply a base coat. Treat the finger itself near the nail with a special mixture so that any varnish that accidentally gets on the skin can be easily removed
- Apply an even layer of base varnish to the prepared nail. In our case it is white varnish
- Now you need to apply a stencil, slightly extending beyond the base of the nail, to create a crescent
- Apply a varnish of a different color (in our case, blue) to the remaining part of the nail without a stencil.
- Secure the resulting manicure with a layer of colorless varnish.
Advice! Apply a new coat of varnish only after the previous layer of varnish has completely dried. Otherwise, the varnish will become covered with bubbles or simply will not dry, and your efforts will be in vain.
This is the simplest version of the moon manicure. If desired, you can use other colors of varnish.


How to evenly draw holes on nails with gel polish or shellac?
Drawing an even pattern on nails is an entire art that requires maximum concentration from the artist. The exception is if a stencil is used. There's enough precision there.
But the hole on the nails must have perfect shape, otherwise the manicure will look cheap and sloppy. If you don't need this effect, arm yourself with a brush, gel polish and a lamp and go!
To ensure that a manicure with holes using gel polish and shellac comes out “as it should”, prepare:
- two gel polishes, contrasting in color
- base for gel polish
- thin brush
- UV lamp
- stencils for French manicure


Now the most interesting thing is - what are the ways to draw the perfect hole on the nail?
Method 1:
- Apply the outline of the future hole with a very thin brush.
- Paint the hole in 2 layers, drying each layer for 2-3 minutes.
- Then apply color coating above the hole, reaching the border with it, and do the same with it
Method 2:
- Apply colored gel polish to the entire nail and dry well.
- Draw a hole on the dried layer of gel polish with a brush, fill the boundaries of the hole at the base with a varnish of a different color, dry
- Finish the manicure with gel polish and seal the coating.
Method 3:
- Mark the location for the future hole
- Apply colored gel polish to the entire nail and let it dry. It is advisable to do two layers
- Apply varnish of a different color into the hole and dry. Make two layers
- Finish the manicure with gel polish and seal the coating.

These were the main ways to create a perfectly smooth hole using gel polish and shellac. Above was a method for creating a lunar manicure using a stencil. This method is also suitable for any type of varnish, not just regular one.
How to evenly draw a hole on your nails with acrylic paint?
The technique of applying a hole with acrylic paints is no different from the technique of applying a pattern with gel polish or regular varnish.
To bring to life the idea of creating a lunar acrylic manicure prepare:
- brush
- base varnish, varnish base, clear varnish
- dots (or a regular needle), perhaps a toothpick
- cotton pads
- nail polish remover
- acrylic paints


To make a moon manicure with acrylic paints, follow the instructions:
- Prepare your nails: shape them, push back the cuticles, degrease the nail plate.
- Apply a coat of base coat and base color and let it dry.
- Now use a thin brush to apply acrylic paint desired color, mark the boundaries of the future hole, fill the hole with paint.
- Now an optional step: using a dot or a needle, you can make absolutely any design on your nails, in addition to the holes - monograms, flowers, butterflies.
- After the paint has dried, apply a coat of clear varnish to seal the work. This step is required.


That's all. Manicure with holes using acrylic paints ready! This manicure won't last as long as gel polish, but it's still worth a try.
How to evenly paint a moon manicure with regular varnish?
The easiest way to draw holes using regular varnish- stencil. This method was described in detail above, so there is no point in writing about it again.
Advice! If you don't have a special French manicure stencil, you can make your own from cardboard and tape, or use regular duct tape, masking tape, or plastic-coated adhesive tape.
Creating a lunar manicure using a special stencil for a French manicure.
Lunar manicure using homemade stickers with regular varnish.


Lunar manicure with shellac using a stencil
Shellac is a type of gel polish that combines the properties of gel and regular polish. Shellac is as easy to apply and remove as regular polish.

Unfortunately, there are no special secrets or mysteries for creating a lunar manicure with shellac. There is a proven scheme for applying shellac, which you need to take as a basis and stick to it throughout the entire creation of a manicure with holes.
- Give the nail the required shape, prepare it for applying shellac, having previously degreased it
- Apply shellac to the nail plate
- Apply a layer of shellac
- Manicure is ready
In just 5 steps you can create a moon manicure with shellac. This is much faster than using gel polish, because the latter needs to be dried after each applied layer. Shellac does not require such an attitude.


How to do a manicure with triangular holes?
A manicure with triangular holes is done slightly differently than a manicure with crescent-shaped holes. Nevertheless, even in this design, lunar manicure is quite simple and almost anyone can do it.

So, to create a lunar triangular manicure you will need:
- Two polishes different colors and one clear varnish
- Nail polish remover, cotton swab
- Two strips of adhesive tape, adhesive tape, adhesive tape, electrical tape (optional)
- File and orange stick to shape the nail
- Time and patience
Step-by-step description of the process itself:
- Prepare the nail for applying polish: treat the nail plate with a nail file, remove or push back the cuticle using an orange or cotton swab for this procedure, degrease the nail using a primer or regular nail polish remover.
- Apply a base coat of the color you would like to see in the socket area.
- Now cut out thin strips of adhesive tape and glue them in a triangle, as shown in the diagram below
- Paint over the part of the nail that is not covered with stripes with a different color of varnish. Let the varnish dry. After this, remove the adhesive tape.
- Secure the manicure with a small layer of clear varnish.

How to evenly draw a moon manicure with a transparent hole on short nails?
The very first version of the lunar manicure was with a transparent hole. Later women They began to come up with ways to make holes of different colors, because it looks new.
Let's return to the very first option - a lunar manicure with a colorless (transparent) hole. To create such a perfectly even manicure, you will need:
- stencil
- nail polish remover, cotton wool or cotton pads
- clear varnish and colored varnish (one bottle each)
- nail file and orange stick
Process:
- Prepare your nails: shape them, degrease and remove cuticles.
- Apply a coat of clear varnish and let it dry completely.
- Now attach a stencil to the base of the nail; this is the future hole. Paint over everything above the stencil with colored varnish. Let the varnish dry completely.
- Now apply another layer of clear varnish.
- Ready! A classic moon manicure with a transparent hole will delight you for a long time!


How to draw double holes in a moon manicure with a transparent stripe?
Moon manicure with a transparent stripe is the closest option to the classics of all. existing species moon manicure.
This manicure will require significantly more time than a standard one, because the hole will have to be drawn as many as two times.

The set of materials you will need to create a moon manicure with a transparent stripe includes:
- orange stick, cotton pad, nail file
- nail polish remover, sponge
- two colored varnishes and one clear varnish
- stencils for French manicure with thin inner borders than more stencils- all the better
Now about how to create a manicure with transparent holes:
- Give the nail plate the desired shape using a nail file and remove the cuticle.
- Now degrease the nail with special means or nail polish remover.
- Apply clear polish to the entire nail and let it dry.
- Now place the stencil so that it ends where the hole will begin.
- Paint the top area (where the edge of the nail) with the first colored polish.
- Paint the hole area with the second varnish (you can use just one varnish if desired).
- Now let each varnish dry and seal the finish with a thin layer of clear varnish.

Take note! Very often there are manicure options in which a transparent strip is filled with rhinestones or sparkles. In such a case, it is not necessary to use the method just described above. You can do a regular manicure with holes, and apply rhinestones or sparkles to the border of the hole.
Lunar manicure ideas: photos
The article does not describe all options for lunar manicure, but only the simplest ones. More complex options manicure with holes are shown below.
Black and gold are a great holiday or weekend combination. The black color is strict, it is perfectly complemented by the golden tints of sparkles.

A few years ago a trend appeared - a combination matte varnish with metal elements, such as foil or a special varnish with a metallic effect. Delicate moon manicure Bright blue moon manicure 
Video: Moon Manicure 4 ways to draw a moon! Nail Design!
Among the many types of manicure, the option with a very poetic name is especially popular. And although the origin of his name is more than prosaic, this does not make nail art any less loved by women. After all, if you come up with imagination and put a piece of your soul into the process of creating it, then a lunar manicure will become an exquisite decoration for even the most sophisticated female hand.
Lunar manicure
This version of manicure, later called lunar, first appeared relatively recently - at the beginning of the last century. The peak of his popularity was the thirties. Then they forgot about lunar manicure for a long time, as it became unfashionable. But at the end of 2009, the famous connoisseur of retro style Dita von Teese revived interest in it. Around the same time, such manicures began to appear on the catwalks of the country. At most shows of fashion houses, for example, Dior, the models’ nails sported a mesmerizing lunar manicure, evoking memories of good old Hollywood. From this year until now, lunar nail art has not lost its position in fashion, where it confidently competes with everyone’s favorite French manicure. Therefore, to diversify your usual manicure options, you can safely choose lunar nail art. And it remains still relevant in this season, which is why fashionistas all over the world never stop experimenting with this nail art, coming up with more and more variations on the theme of the Luna manicure, as many call it.

The divine Dita Von Teese returned this type of manicure to the catwalks

It is especially appropriate if you want to create a charming retro-style look. In this case, a lunar manicure will make a wonderful finishing touch to your look.
Let's now try to figure it out according to its classical canons. And it is a nail art in which the hole at the base of the nails is not painted over with varnish, which creates a beautiful gap in the form of a crescent - the moon. This is where its name comes from. But that was at the beginning. Today, fashion is introducing more and more new trends into this version of manicure. First, the stylists changed the shape of the part of the nail that remained unpainted: now the oval of the crescent is extended in either direction, and both of these options remain relevant and fashionable. Then, taking into account the popular this season bright colors varnish, the hole near the base of the nails or not painted over, covering the rest of the nail with varnish bright color, or the hole and nail are painted with varnishes of contrasting colors. And here, too, there can be many combinations. The most pompous of them is a black nail with a gold or silver hole; a red nail with a blue or white hole, as well as a green one with a yellow hole, also looks interesting. Everything here depends on your desire and imagination.

This is how classic lunar nail art is done


If you are tired of the classic oval, any shape is possible. The main thing is that the nail hole stands out

This manicure is good because it is suitable not only for long nails, but is in perfect harmony with medium and medium-sized nails. short length. On not very long nails in a lunar manicure, it is better to use lighter colors, because black visually shortens the nail, as do other shades of dark varnishes. And connoisseurs of creativity in manicure can add drawings or rhinestones to it, leaving it as a base classic version moon manicure from one color of varnish or applying several colors of varnish on one nail at once.

This manicure is easiest to do in a beauty salon, but if you wish, you can do it yourself. Lovers of variety can easily complete moon manicure at home.
To do this, you will need simple stencils, which you can purchase in the store. Although you can completely do without them by drawing the hole yourself with a thin brush. But at the same time, you will have to try to achieve uniform nail art. Making it is not as easy as its opposite - French manicure, which has already become familiar to us. Lunar option manicure, in which a “smile” needs to be drawn at the base - the hole of the nail, and not at the end of the nail as in a regular French manicure - is often combined with a standard French manicure. In this case, the smile and the crescent should be drawn, pointing them in the same direction. Moon manicure also differs from French manicure in the use of contrasting colors. This is how French manicure is usually depicted light shades varnishes, and moonlight, on the contrary: the more contrasting and brighter the colors, the better the manicure. In this case, experiments with the most unexpected are allowed. color combinations. You also need to take into account that this manicure, like many others, visually makes the nail shorter. And if, for example, a French manicure is appropriate on nails of any length, then for a lunar manicure they would be more suitable long nails than short ones.
It is easier to apply a moon manicure on your nails with special stickers for a French manicure. You will also need a thin brush. So, the nails are pre-prepared, as for any regular manicure. Crescent polish is applied first. Then it dries so that the stencil does not stick to the varnish. Next, a special strip for a jacket is glued near the hole of the nail and the entire nail is covered with a color contrasting to the hole, without going beyond the boundaries of the stencil. When drawing a crescent without a stencil, first draw a semicircle line and then paint it over without crossing the conventional line. To draw a smile for a French man, you don’t need any special skills, because this is no longer a discovery. Therefore, you can safely use a combination of French manicure and moon manicure. And on top of these artworks a transparent finishing varnish is applied. When choosing colors for the base of your manicure, you can take the latter into account. fashion trend– varnish of matte colors.

Let's do beautiful manicure themselves

Lunar French
IN last years Double lunar manicure, which also includes a French manicure, has burst into fashion. At the same time, the crescent moon stands out in a different color both at the top of the nail and at its base. The moon jacket, which is actually not such a new product, was popular back in the forties of the last century, and then it was called the “Hollywood jacket.” Fashionistas of that time varnished their nails so that both the hole and the end of the nail remained unpainted. Often, a regular French manicure was added to the lunar French manicure, then semicircles were drawn in the same color both at the nail hole and at its end. But there are also originals that risk combining several colors of varnish for the top and bottom nail plate. As they say, it's a matter of taste! Many girls would like to do this manicure themselves. They are hampered, as always, by the fear that they may not be able to conduct it perfectly. straight line, especially when working with your left hand. And thanks to master classes and step by step instructions Any girl can do this manicure. If you don’t have a good idea, then the gallery will suggest ideas and inspire you to create a gallery that you can study and implement on your own nails. Watch, repeat and improve with your own fantasies.
To make this nail art yourself, you first need to degrease the nail plates with nail polish remover. Then you need to organize the cuticle by applying softening agents to it, and after a few minutes, pull it off with a regular orange stick. Before varnishing, you need to coat the nail with a protective strengthening agent. The next step is to apply the base coat. It is important to pay attention to applying it to the hole area. For the hole itself it is better to choose classic color from white and beige to gold and silver. They look best on bright or dark varnishes. Then the moon stands out. To do this, first take an ordinary pencil (you can use the one used for lips), sharpen it well and draw neat semicircles on the nails. An uneven, crooked line can be wiped off with a cotton swab, soaking it in lotion, which will not damage the varnished surface in any way.
Carrying out moon manicure at home, you can make stencils for the moon and “smile” yourself, or you can buy them in the store. But they are not always convenient due to their opacity. Because of it, it is difficult to understand whether the semicircles are similar to each other, the same can be said about “smiles”. Moreover, the varnish tends to flow under the stencil, which can only be corrected by repainting the entire nail. That's why easier with a pencil draw moons and “smiles”. To complete the lunar manicure, you need to arm yourself with a lipstick brush: it is very convenient and much thinner than the brush used for varnish. The brush is carefully dipped in dark varnish and traces the previously drawn semicircle of the moon and “smile”. After this, you need to cover the remaining half of the nail with varnish and remove the remaining pencil near the hole. The nail is again coated with varnish: first dark and then transparent.
In recent years, designers have come up with many options for how to make a moon jacket.
But in any of them, a mandatory moment is nail treatment:
- bath for them
- straightening the shape of the nail,
- cuticle trimming.
It is appropriate to first apply the varnish with which the crescents will be depicted and wait until it dries. After this, you must decide for yourself whether to use a sticker template or use a pencil. By the way, opaque stencils are successfully replaced with completely transparent tape. Important role The fixative varnish also plays a role, which will firmly withstand the threat of mechanical damage to the manicure.
In general, the moon jacket is relatively easy to do, and looks fashionable, bright and elegant. And all we have to do is try, create, experiment and be unique in everything, including manicure!
Photo

Gentle manicure V pastel colors

Coffee with milk

Brightness is everything

Elegant and feminine


The perfect complement to makeup


Dita is not the only celebrity who likes moonlight manicure


Kendall Jenner

Video
Lunar manicure will always and everywhere be appropriate, for example, for work you can choose restrained colors of varnish, and for free time rich shades. This design looks very elegant and is very simple to implement. You just need to stock up on special manicure accessories.
Lunar manicure at home: instructions


- Step 1: Any manicure, including moonlight, begins with preparing the nail. Apply base layer.
- Step 2: Apply two layers of white polish to your nails. You can choose either thick white or transparent options. By the way, the second layer can be made pearlescent clear varnish. Wait until completely dry.
- Step 3: You will need special stickers, which are sold in the same place where varnishes are sold. Often such products can be found in office supply stores.
- Step 4: Apply blue polish.
- Step 5: Remove the stickers and use a thin brush to draw a border between blue and white.
- Step 6: Don't forget about the fixing layer of gel polish. Lunar manicure is ready.

How to do modern version moon manicure. Master Class

Lunar manicure with gel polish: instructions

Lunar manicure with gel polish is practically no different from a regular manicure. But additionally you will need minimum set accessories and knowledge of simple tricks.

What do you need:
- lamp for drying (polymerization) of gel polish (UV, LED);
- gel polish in two shades;
- main coating - base;
- finishing top-coat;
- nail buff with high abrasiveness;
- dehydrator with ph formula;
- acid-free primer;
- sticky layer remover.
1. Usual preparation, filing, removing cuticles, removing dust with a brush, degreasing (we use lint-free material), drying.
2. At the second stage, we treat it with a buff so as to remove only the gloss (keratin layer) from the nail. I advise you not to overdo it at this step, but to act superficially. We use a dehydrator to ensure stronger adhesion of the gel to the nail plate.
3. Apply primer and base layer of gel. The base serves as a base and prevents the coloring elements from the gel polish from penetrating directly into the nail structure. We paint along the end part. Dry under UV lamp - 1 minute, LED lamp - 10 seconds.
- To create a beautiful moon manicure with gel polish, remember that the coating must be done very thin layers. It is always better to make a couple of thin but neat layers than one dense one that will cause waves and bubbles.
- Avoid getting varnish on your skin.
4 . Apply the base layer. There are two of them in the lunar manicure, so it is necessary to apply an extremely thin coating. We dry each one for 2 minutes in UV, 30 seconds under LED is enough). If you are not sure that you can draw the moon, use a thin brush to draw it first. Don't forget to seal the end of the nail at the finish.
For almost ten years now, moon manicure with gel polish, made in various colors, has not lost its popularity among fashionistas. color scheme and decorated with additional elements and accessories. It’s not at all difficult to make a similar design yourself by choosing necessary tools and using your imagination to make your manicure unique.Preparatory stage: tools and basic methods for creating a design on nails
Drawing holes on nails is a design option that first saw the light at the beginning of this century. And if back then it was customary to use the most neutral varnishes, and paint the holes with a colorless coating, leaving them transparent, then modern fashion trends dictate slightly different rules. Now they turn out much better.Moon manicure, which is also called an inverted French manicure, can be created using several different colors and shades of varnish, and decorated with additional elements, for example, rhinestones or designs, stickers. Thanks to something like this unusual design for every day or for a formal look is not difficult. When choosing gel-based products to create such decoration, you don’t have to worry that your nail art will quickly crack.
To successfully design a moon manicure with gel polish, you need to have some patience and a certain amount of time. In addition to this, you will also need separate tools, in particular, to create an inverted jacket with gel-based varnish. This kind of varnish is not able to dry or fix on its own; to fix it, you need to have a special UV lamp at home, which is available in nail design stores.
Necessary tools to draw your own lunar manicure:
- a number of bottles of gel polishes different shades, depending on the desired color combination;
- drying lamp;
- coatings in the form of base and top;
- tools that will create holes on the nail plates;
- additional decorations for nails if desired in the form of rhinestones, pebbles, sparkles and so on.
How to draw the desired pattern on the nail plates:
- using a thin brush for nail art and contrasting varnish for the holes;
- using special stickers for marigolds; if you don’t have any on hand, you can use any adhesive tape or paper tape, having previously cut out the parts required in shape from them;
- to create a lunar manicure design with gel polish, you can also use nail stickers, cutting out the necessary shapes from them; this method eliminates the use of two or three shades of varnish if additional painting on the nails is not planned;
- quite simple and interesting option applying an inverted French coat becomes foil; it can be transferable, in different shades, with patterns, or ordinary silver, gold, matte; in this case, it is also necessary to purchase special glue for nails, onto which the shiny material will be attached;
- as unusual options to create a moon pattern, dry sparkles, glitters, rhinestones and other small decorations used to line the hole are suitable; To fix it on the nail plate, you will also need the glue mentioned above.
Simple instructions for drawing a moon manicure
If you refuse to use conventional colored coatings for nail plates, you must first learn how to properly apply and fix gel polish on your nails. It is worth remembering that this kind of thick coating is applied in an even layer several times, and each layer is dried separately, hardening, in a lamp for about 2-3 minutes. On top you need to cover the nails with top coat, dry again and then carefully remove the sticky top film.When using gel polishes, you need to be very careful. The thick dye mixture should not come into contact with the skin or cuticle. First, the skin on your fingers can be lubricated with oil or cream. You should also have tampons on hand or cotton buds to remove excess gel before it hardens.
Moon manicure with gel polish step by step: general instructions to create a design
- The nails are prepared for a new manicure: the old varnish is removed, the cuticle is trimmed, the nail plates are given the necessary shape, and polished. At the same stage, you need to paint over the nails with a special degreasing coating.
- The next step is to apply nail plates a base coat that will even out the surface of the nail plates and prepare them for the application of gel.
- After drying, the base color is applied. Depending on your desire, it can be basic for the holes or for the entire manicure.
- When the first varnish has dried, a pattern is drawn on the nails using the chosen method (using a stencil, a brush, etc.). When the drawing is finished, the nails are dried again in the lamp.
- The final touch is to cover the nail plates with topcoat and dry. If applicable additional accessories in the form of rhinestones or other elements, they are also painted over with a top coat to secure them.
How to make a moon manicure with gel polish: options for applying the pattern
Using foil. When the nails are dried, a small layer of glue is applied to the selected place where the holes should be located. As soon as it dries a little naturally, a transfer or figuratively cut foil is applied to it. Gently straightens and presses firmly onto the nail. If the foil is transferable, then after 1-1.5 minutes it must be sharply torn off from the nail plate. The photo shows the final version of the moon manicure using foil.
Drawing a pattern with a brush. Dipping a thin brush into a contrasting varnish, draw a concave or convex line along the nail. Then the space under or above it, depending on wishes and imagination, is carefully painted over. Using a brush, you can create unusually shaped designs, or make a hole, for example, triangular. In the photo you can see the stages of creating such a design.

Using stickers or analog tools. Once the base color is applied to the nail and dried, adhesive stickers are attached to the nail plates. Next, the desired area of the nail is painted over with an additional shade. The stickers are removed and the nails are dried in a UV lamp. Photograph from step-by-step creation A similar manicure is presented below.

Creating unfilled holes. This design can be called classic. You can make transparent patterns using the same stickers. Another option is to use adhesive tape, the edges of which can be cut triangular or oval. The sticker is attached to a nail coated with clear varnish. The uncovered area is painted over with the desired tone, the sticker is removed, and the nails are dried. The stages of creating a manicure with a handy product are shown in the picture.

An inverted jacket with stickers, glitter, and other decorations. The creation technique is very simple. After applying and drying the base tone, holes are created on the nail plates using the chosen method. For sparkles and rhinestones, the base is glue, as is the case with foil. Stickers are simply cut out the desired shape and attached to the nails. An example of a nail design with animal print stickers is presented below.

Visual aid for creating a lunar design (video instructions)
Simple and quick way How to create a manicure with holes, complemented by a stripe on the edge of the nail, can be seen in the video. In this version, the pattern is created using gel paint and a nail art brush.Examples of inverted French designs for nails of different lengths
This kind of pattern looks good on nails of completely different lengths and shapes. When short nails The manicure looks neat and visually lengthens the nail plates. When the nails are long, the pattern can be placed anywhere on the nail plate, adding additional decorations. For inspiration and awakening your imagination to create such nail art, you can look at the thematic photographs presented below.Lunar manicure design with gel polish on short nails
Performing lunar nail design on gel polish
The crescent-shaped strip of the young moon at the base of the marigold is called a lunula. Thanks to the special art of its application, this nail art design got its name. Since making a moon manicure with gel polish at home is not difficult, but small tricks Every novice manicurist should know how to do it.
Important! The holes are made in the form of a semicircle or arc, also in the form of a triangle. Each option is correct and unique in its own way.
Preparing everyone necessary tools to create an inverted jacket design is half the battle. Only a thorough study of the technology of how to do a lunar manicure with gel polish step by step with thematic photos will help you achieve salon results.
How to do a moon manicure with gel polish

Correct execution of the moon manicure technique with gel polishes with photos requires having in stock:
- curing UV lamp;
- base and top coat;
- two bottles of colored coating, contrasting to each other;
- manicure sticks;
- ready-made stencils in the shape of a circle or semicircle;
- nail file and buff;
- degreaser (can be replaced with 96% alcohol);
- cuticle care oil;
- cosmetic product for removing the dispersion layer.
Moon manicure with gel polish, step by step photos:
Step 1. Step-by-step moon manicure with gel polish begins with giving the required shape to the nail plates with a manicure file. Removing dead cuticle. Grinding with a buff the unevenness on the surface of the plate and degreasing it.

Step 2. Prepared fingers are painted with a base, which polymerizes under a lamp.
Step 3. The selected color for the lunula is applied two or three times to the entire surface of the plate. Dry each layer separately.
Step 4. Before making a hole with gel polish at the base, stencil strips are glued onto the dried coating.
Step 5. The free part of the nail is painted with the predominant color, after which you carefully remove the stencil strips and dry the coating under the lamp.
Step 6. After performing the moon manicure with gel polish step-by-step photo stages described above, the resulting result is fixed with a layer of topcoat and dried.
Important! Nail decoration decorative elements must occur before the topcoat.
Step 7. After drying the top, as a rule, it is necessary to remove the dispersion layer and treat your fingers with cosmetic oil.
6 techniques for making holes with gel polish, step-by-step guide with photos
Moon manicure with gel polish at home can be performed without the use of stencils. Some techniques may require additional tools to create neat holes.
Important! Before you do a lunar manicure at home with gel polish, you need to choose in advance the most suitable method for creating holes.
How to make gel polish holes on nails with a brush:
- the surface is painted in 2 layers of the dominant shade with alternate drying;
- Before you draw holes on your nails with gel polish, it is better to stock up on an eyeliner brush with a soft and long hair. Then the smile line will be neat and clearly defined;
- Using a thin brush, the lunula lines are applied with a material of the second color, then the holes are painted over completely and dried.
Gel varnish moon manicure at home using foil:
- the main shade is applied in 2 or more layers to obtain a bright pigment, polymerizing each of them separately;
- the required area of the lunula is carefully filled with manicure glue for foil;
- Pieces of transfer foil are pressed tightly onto the dried adhesive layer with the matte side, while leveling the surface well. After half a minute, the strips are removed from the nail plate with a sharp movement;
Important! If the foil layer turns out to be uneven or uneven, you should duplicate the manipulation again to obtain the desired effect.
- The finished manicure is secured with a finishing coat.
How to draw triangle holes with gel polish:
- Before using gel polish to make holes in the form of triangles, you need to cut out stencils of the necessary material from masking tape (plaster or electrical tape). triangular shape. You can also cut individual strips to form triangles directly on the plate;
- the surface is covered with the tone chosen for the lunula and polymerized under the lamp;
- stencils are glued in the cuticle area, then the free part of the nails is painted contrasting color and dried;
- After drying the material, the adhesive strips are carefully removed, and the moon manicure is covered with a top coat.
How to make holes with a transparent stripe on your nails with gel polish:
- the surface of the nail is covered with a colorless gel layer and dried;
- a stencil for French manicure, which has internal boundaries, is applied to the nail so that a lunula is formed in its inner part;
- The upper part of the surface is painted over with the material of the main color. The second color is used to color the hole;
- After the gel material has dried, the manicure is secured with a top coat.
Important! The transparent border of the hole can be decorated by filling it with rhinestones or sparkles.
How to paint a lunar manicure with gel polish, leaving the lunula natural:
- a transparent gel is applied on top of the dried base layer and dried;
- for unpainted holes, use manicure stickers or adhesive tape, which is attached at the base of the nails;
- the open area of the nail plate is painted with the main color;
- then the sticker is carefully removed, and the nails are polymerized under a UV lamp;
- the finished manicure is fixed top layer gel.
Important! If you make the lunula wide enough, the effect of a freshly done manicure will last much longer, despite the growth of the nails.
How to do gel polish moon manicure with stickers or decorative elements:
- The surface of the nail plate is painted with a material of the main color in 2 or 3 layers. By polymerizing each of the layers separately;
- the holes should be made using pre-cut manicure stickers in the form of a semicircle. If you plan to create a lunula with rhinestones or sparkles, then you need to stock up on glue in advance on which decorative elements will be glued;
- The finished manicure is covered with a top coat and dried.
Important! The drawing of the hole made must be carefully sealed using stickers. Since a properly applied top coat should cover the free edges of the nail, to avoid rubbing and peeling of the lunula.
Using the instructions on how to paint a moon manicure with gel polish, you need to be prepared for the fact that novice masters nail service It will be difficult to master this technology step by step. But constant practice will help you get better at it, understand and remember the sequence of applying the lunar design.
Thematic photos will help you get comfortable with how to apply gel polish to holes, as well as awaken your imagination for creating unusual nail art.
Photo of nail coating with moon gel polish


