On the threshold of the long-awaited New Year holidays, which are eagerly awaited not only by children, but also by adults. After all, the New Year is new Hope, new plans, new life. To reign in the house magical atmosphere We always prepare decorations in advance. Someone buys them in stores, but in this article we will tell you how to make interesting crafts for the New Year with your own hands.
The patron of the upcoming 2017 will be Fire Rooster. It is his image that should be present in every home so that the whole year is successful and happy.
You can make a cockerel different ways. In this case, the main thing is to show imagination. We will present several workshops on making do-it-yourself symbol of the New Year 2017:
Rooster toy
The product will look like soft toy. To create it, you will need a pattern, cotton wool, two identical buttons and any dense fabric. It is not necessary to buy it, you can use an old sheet or shirt.

The only thing you can buy is two small pieces of red and orange felt to make a beak and comb out of them. You can also use any decorative elements for the cockerel. In the photo below, the master used straw to make a bow.

The uniqueness of this toy is that it is easy and quick to make. In a short period of time, you will be able to sew dozens of such cockerels to give them as gifts to all your friends for the New Year 2017.
If made small soft cockerels, then they can become decorations for the Christmas tree. It will only be necessary to sew ropes to them, for which they will cling to Christmas tree branches.

You can not make cockerels voluminous. Just cut them out of felt, decorate them with rhinestones, beads, feathers, ribbons and other decorative elements, attach ropes to them to hang them on the Christmas tree.

Rooster made of buttons and old beads
- Outline the rooster on decorative paper.
- Use quick-drying glue to attach buttons and beads to the image, alternating them in colors and sizes.
- The resulting product can be framed and hung on the wall in the hallway or in the kitchen

Painting "Rooster" in quilling technique
The quilling technique is very popular among needlewomen, because it can be used to make exquisite products using only special paper, a toothpick and glue. To make a picture with a cockerel, you will need the same material and whatman paper, which will become the basis for future crafts.
The work will be very painstaking, so you need to be patient:
- First you need to cut the quilling paper into strips 5 mm wide and 25 mm long.
- Then wrap each strip around a toothpick. Glue the ends to the finished paper spirals. All spirals need to be slightly lowered and squeezed into the shape you need.

- Glue all the curls on a pre-prepared outline of a rooster on a drawing paper.
- In addition to the rooster, according to the same scheme, you can make other elements of the picture - snowflakes, Christmas trees, snowmen, and so on.
As a result, you should get such a beautiful product:

The techniques we have listed are the most practical options for crafts new year symbol that persist for a long time. You can use many other ways to make cockerels, for example, from disposable tableware or plastic bags, but they are unlikely to retain their original beauty on long time because of its impracticality.
Craft "Christmas Tree" for the New Year with your own hands
Despite the fact that a live or artificial Christmas tree is decorated in every house for the holiday anyway, we still make small ones. original crafts for the New Year with your own hands in the form of a forest green beauty to festive mood felt everywhere.
Of the many ways to create Christmas trees, we have chosen some of the most interesting:
Christmas tree made of bright pictures

- To make such a beauty, you will need old magazines, newspapers or a children's book.
- Of these, using a shaped hole punch, you need to make as many round elements as possible - these can be flowers, ordinary circles.
- Each of the resulting circles must be twisted a little by wrapping them around a regular pencil.
- They will need to be glued in neat rows to a pre-prepared paper cone, starting from the bottom.
Christmas tree made of felt

From the minimum amount of material, you can make something like this Christmas tree. You will need:
- felt fabric in two colors
- thick cardboard
- quick dry adhesive
- thin Christmas rain
- First, we make a cone from cardboard, which will be the basis of the future Christmas tree.
- Then we cut out circles of different diameters from felt, cut a hole in the center of each through which these circles will be threaded onto a cone.
- When all the felt parts are threaded, you can proceed to decorate the product - glue the Christmas tree rain and other New Year's tinsel in a spiral to the product, which you do not mind.
Christmas tree made of floristic mesh and garlands

- To make such a Christmas tree, you must first make a paper cone and wrap it with a plastic bag.
- Then it is necessary to cut patches of the same size from the floristic mesh, moisten them in PVA and alternately glue them onto the cone in several layers.
- When all the layers are glued, the top of the mesh must be smeared with PVA again and left to dry.
- After the mesh dries, it must be removed from the cone. We won't need it anymore. Instead, inside the Christmas tree with decorative wire you need to attach a garland.
- Optionally, you can outside the resulting Christmas tree, too, attach any decorations.
DIY paper crafts for the New Year
Paper is a universal material for needlework, but short-lived products can be made from it, although they are quite original. In this article, we decided to tell you how to make paper out of paper. easy DIY crafts for the New Year. We will talk about two designs of Christmas decorations.
Crafts from paper tubes

To make such a Christmas tree decoration, you will need scrapbooking paper and a ring from an old chain through which a decorative thread will be threaded.
What will be the algorithm of our actions:
- We cut out a circle of any diameter from any cardboard and mark the center on it (the size depends on your desire, to make the same toy as in the photo above, you need to cut a circle with a diameter of 5 cm);
- From one sheet for scrapbooking we cut out squares with a side of 3 cm, and from the second squares with a side of 2.5 cm;
- Expand all the squares so that they look like diamonds, then begin to bend the left and right ends of the square towards the middle as if you were swaddling a baby;
- Glue the resulting elements with quick-drying glue;
- Clockwise to the center, start gluing the twisted elements to the pre-prepared cardboard so that each tube fits snugly against each other;
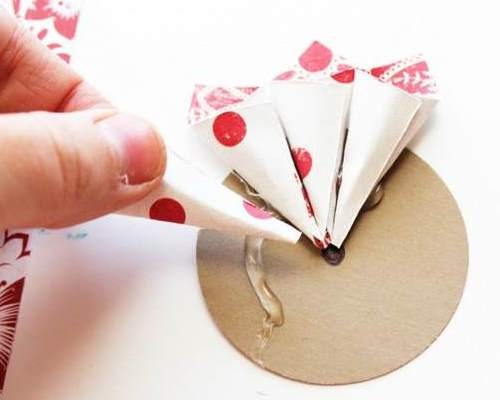
- You will need to make several layers of these tubes so that in appearance the future product begins to remind you of a flower;
- Attach to the middle of the toy if desired. old brooch or a pendant with stones, and glue rhinestones along the edges of the tubes.
Craft from paper squares and foam

The main material for creating such a beautiful paper cone is decorative paper and a foam ball. What to do with them:
- Cut the paper into strips 2.5 cm wide;
- Each strip again needs to be cut into squares with a side of 2.5 cm;
- From each resulting square, you need to make such an arrow, as shown in the photo;

- When all the elements are prepared, they can be glued to the foam ball in layers from the bottom up;
- To the top of the cone, you can attach paper leaves and braid, for which the resulting cone can be attached to the Christmas tree.
On top of each of the proposed toys can be covered with sparkles, sprinkled New Year's tinsel so that they look festive and elegant.
Crafts from cones for the New Year
Crafts from cones with their own hands for the new year look very original and natural on the Christmas tree. From this beautiful natural material, you can come up with a huge amount different toys and table decorations. After all, the cones are amenable to staining and gluing. As examples, we will present you with several options for cone products for the New Year:
- By painting the cone green and sprinkling with white or silver sparkles, you can make a mini-Christmas tree that will look beautiful both as a New Year's toy and as a figurine on the fireplace.

- The cone can be used as a body for a toy bird or deer. You will only need to figure out what to make their heads and limbs from. It can be a sponge, cotton wool, wool - any material and decorative elements.

- Cones can be used to make beautiful Christmas door wreaths. Moreover, they do not even need to be subjected to any processing. Through them, you only need to pass a wire, with which the cone will hold firmly on the wreath.

Crafts from the test for the New Year
To creation salt dough crafts for the New Year children can also be involved. As a rule, children really like to sculpt different figures from it, especially if they are dedicated to the celebration of the long-awaited winter holiday.
The most important thing here is to knead the dough correctly. It is very simple: you will need salt, flour, starch and water. All these components are mixed with each other in equal quantities. If you already know in advance what color your products should be, you can immediately add dyes to the dough. If not, then leave it colorless.

- To give contours to future crafts, you can use special confectionery molds - Christmas trees, snowflakes, gnomes or snowmen.
- Cut out the characters, then lay them out on a baking sheet and dry in the oven.
- When the products are dry, take them out and decorate - paint, glue all kinds of decorative elements to them.
Here are some examples of designs New Year's products made from dough:


Crafts from sweets for the New Year
Candy is the most festive material. In childhood, each of us tied a rope to them to decorate the New Year's beautiful Christmas tree with sweets. Today, sweets are used in a more original way. With their help, you can create not only interesting crafts for the new year but also to make sweet gifts for your loved ones.
For example, if you are going to visit godfathers or neighbors, then you can make beautiful Christmas tree from a bottle of champagne and loose sweets.

How to do it:
- Lubricate the bottle with a festive drink with glue, and attach New Year's tinsel to it.
- Then glue the sweets in a circle in exactly the same way. You can use both the same sweets and different ones.
- Decorate the resulting Christmas tree with bows, beads and that's it - this is the chic New Year's gift ready.
If you go to a house where there will be children, then you can also make New Year's sweet gifts for them. Buy different chocolates and cane-shaped lollipops. From these sweets you can make a sleigh:

- Glue chocolates to candy canes with a glue gun
- Put the rest of the sweets on pyramid-shaped chocolates and wrap them with a beautiful ribbon
- To complement sweet gift, you can tie a toy deer to the sleigh
Candy can also be made christmas clock. To make them you will need:
- cookie metal box
- candies
- New Year's tinsel

- First you need to decorate the cookie box with corrugated paper
- On the one hand, make a dial from old beads
- Glue all the decorations and details of the product on the glue gun
- Then, around the circumference of the box, glue the sweets so that they fit snugly against each other.
- From above they can be wrapped with decorative tape.
When the main part is ready, you just have to complete the decoration of the dial. This is where your imagination comes in handy.
Crafts from disks for the New Year
Everyone in the house, for sure, has old CDs that just take up space on the shelf in the closet. So that they do not simply gather dust, use them to create beautiful crafts for the New Year with your own hands.
We suggest you make from CDs christmas toys and hanging panels. With their help, you can decorate the Christmas tree and the walls in the rooms of your house.
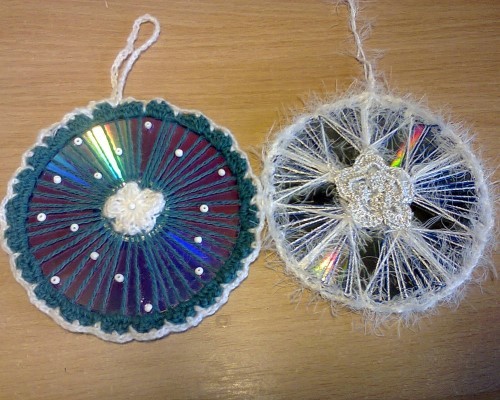
To create Christmas decorations, you do not need to show special talents. Even kids can do this job. You will only need to draw a beautiful winter drawing for them on the disk and give out decorative elements - paints, beads, beads, buttons. Children themselves will show their imagination and complete the decoration of CDs.
Panel pendants according to the manufacturing technique are a little more complicated:
- The discs will first need to be coated with acrylic paint.
- Then thread the braid through the hole and fasten it tightly.
- The next step is gluing a drawing to the disk using the decoupage technique, which we will need to color and give it volume with the help of salt, semolina and other improvised means, for example, toothpaste, from which snowy mountains can be made.

Crafts from beads for the New Year
Beading is a real art, to master at least the basics of which is not given to everyone. But what if you really want to make from this material beautiful crafts for the New Year? There is an exit. We have selected several ideas for creating Christmas beaded decorations that even a child can make.
Christmas ball from beads
- Take a long thin wire and randomly string beads on it.
- Having coped with this task, inflate a small regular balloon.
- Now this ball must be carefully wrapped with prepared wire.
- When the whole ball is decorated, pierce it so that you have such an original Christmas decoration in your hands, as shown in the photo below.

Christmas tree made of beads
- Make a tight cone out of cardboard and set it aside.
- After that, string green beads very tightly on the wire, alternating it with red.
- You just have to wrap the paper cone in a spiral with the resulting garland, and then remove it so that only original Christmas tree which can be used as a toy.

Snowflake from beads
- First, fasten three wires of the same length together to make an asterisk.
- Then, on each ray of the asterisk, simply string the beads so that you get beautiful snowflake which is shown in the photo.

Knitted crafts for the New Year
knitted ideas original crafts for the New Year great amount. Of course, to create at least one of them, you need to undergo special training or train yourself for a long time, relying on video tutorials from the Internet. For those who know how to knit talentedly new Year decoration, we have selected several schemes that can be useful for needlewomen while preparing home decor before the New Year holidays.
Knitted snowflakes

Knitted Christmas balls


Volumetric crafts for the New Year
In this section, we will show you how to make volumetric unusual crafts for the New Year from improvised materials.
The first version of Christmas decorations - Christmas decorations from walnuts. To make them, you need:
- First, peel the nuts from the inside so that only the shell remains.
- cut off satin ribbon 25 cm long, fold it in half, string a bead on it. Insert the ends of the ribbon between the two parts of the shell, and only then glue them together.
- Color the nuts in the color you want, decorate and varnish.

The second option is Christmas decorations from wine corks . To make them you need:
- Paint the corks in different colors
- Think of the shape of the future toy
- Fasten the corks together in the desired shape with wire
- On top of the resulting decoration, attach a ribbon in the form of a bow with a regular decorative pin

The third option for Christmas tree decorations is the simplest - from burnt light bulbs . You just need to color them beautifully - give them the look of penguins, snowmen or Santa Clauses:

Crafts in kindergarten for the New Year
All of the above homemade Christmas decorations can fall into this category. However, we want to highlight here children's crafts for the New Year with their own hands. As an example, let's take original variants for needlework, which you can offer to do to your children in anticipation of New Year's matinees in kindergartens.
Magic snow globe
- On a regular round cardboard, glue cotton wool to imitate snow.
- A plasticine snowman and a Christmas tree are attached to it. On top of this craft, you will need to install a small glass jar, internal surfaces which needs to be smeared with glue and sprinkled with sparkles to give the impression of falling snowflakes.
- We attach the glass jar to the base of the craft using a glue gun. It turns out such an original product:

Modular paper crafts
- In the same way, we first prepare the base. In this case it will be cardboard box from candy.
- We glue it so that both parts touch each other at a right angle.
- Lubricate their inner surfaces with glue and glue cotton wool to them, which will again imitate snow blockages.
- From paper we make different animals - bunnies, cubs, and then we attach them to a horizontally located base.
Here you can also place a plasticine Christmas tree and other home-made products. For clarity, here is an example:

Video: DIY crafts for the New Year 2017
In this video, the needlewoman clearly demonstrates how you can decorate with your own hands in an original way. Christmas balls or make unusual items New Year's decor.
3677
DIY crafts for the new year 2017 master class. For kindergarten, for school. We make the symbol of 2017 with the child - the rooster.
A simple craft for kids in kindergarten
Winter is the time to make snowmen out of white fluffy snow. However, snowmen can be made not only from snow! To make a "non-melting" snowman you will need:
- an empty transparent plastic bottle (preferably with a black cap),
- cotton wool,
- glue,
- black small flat buttons,
- small pieces of fabric different colors(it is convenient to use felt),
- scissors.
The bottle must be filled with cotton wool to the top and screw tightly. Decorate the walls of the bottle with glue, buttons and fabric in such a way that it resembles a snowman, that is, make black button eyes, glue a bright nose. Cut a long strip of fabric or take a ready-made decorative ribbon and tie it around the bottle in the form of a scarf. Fast, original, beautiful! Cope with this task under the force of children from 3 years.
 New! Marathon of New Year's crafts 2018 with children with their own hands!
New Year's crafts for school
Toys can be made from anything, even ordinary socks. For example, a pair of white and colored socks can make funny snowman friends. Do this craft on your own and without special work high school students can.
Necessary for the manufacture of toys:
- pair white socks,
- a pair of colored socks
- decorative narrow ribbons or ropes,
- filler (for example, cotton wool, synthetic winterizer, rice or buckwheat),
- buttons or beads
- scissors,
- thread,
- needle,
- fabric glue.
 First of all, you need to cut the socks as shown in the figure. The white toe is cut at the level of the heel, only the upper part is required for work. At a colored sock, it is necessary to cut out the heel area, and the upper part and the toe area will be needed later to create a toy.
  The second stage of work will be the formation of the snowman's body. The white sock must be carefully sewn along the cut line. Fill the sock with filler almost completely, leaving only small edges that can be tied with a ribbon or rope.
Now you need to add clothes, for this, two parts from a colored sock are used, the lower part will act as a hat, and the upper part of the colored sock will serve as a blouse. With the help of tape, you can fasten clothes on a snowman.

The last stage of creation funny toy the most creative: add button eyes, nose and decorate the snowman. You can carefully sew on the buttons, or you can use glue and beads.
The second snowman is made according to the same scheme. These are such magnificent crafts that are obtained as a result of simple socks!


Ribbon cone
Magnificent decoration Christmas tree or just an element of the decor of the room can be an unusual bump from a satin ribbon. It is not too difficult to make it; children from 6 years old can cope with such a task.
For manufacturing you will need:
- cardboard Green colour,
- pencil or pen
- scissors,
- satin ribbon up to 1 cm wide,
- colored satin ribbons or ready-made small bows for decoration,
- glue.
First, you need to draw a blank for the cone on the cardboard. It should be an egg-shaped figure measuring approximately 5 cm in width and 8-10 cm in length. Such figures will require 2 pieces. For convenience, you can cut out one blank, circle it along the contour and then cut out the second. If the cardboard is not too thick, then you can bend the sheet in half and cut out 2 blanks for the cone at once.

Cut the tape into small strips of about 5 cm, you will need up to 20 such pieces.

Each piece of tape is folded to form a small loop. With the help of glue, the loops are fixed to the base. It is best to start from the bottom of the product, then it will be easier to glue the next pieces of tape.

 Thus, it is necessary to glue the entire base of the cone. It is advisable to stick satin ribbon loops in a checkerboard pattern, then the product will look more realistic and neat.
To decorate the bump and give it holiday look, on upper part stick small bows that you can tie yourself from ribbons of a different color or use ready-made ones. You can add rhinestones or beads as a center for bows.
The second base is glued with tape in the same way. When both parts of the cone are ready, they are connected with glue, holding a small loop of tape between them, for which the cone can be hung. The finished cone must be thoroughly dried so that the glue fixes all the elements of the craft well.
New Year's wreath
 An elegant festive wreath can serve as an excellent decoration for your home. The whole family can be involved in the process of its creation, from children to grandparents, so the atmosphere of comfort and festive mood will be guaranteed.
The most important thing is to make the basis for the wreath. To do this, you need a small piece of wire, from which a circle is formed and a small hook mount.
The rest is inspiration and fantasy! You can decorate the wire circle with various materials.
Kids will love this edible sweet wreath made from their favorite candies. 
 Can do beautiful wreath of bright balloons and a satin ribbon bow. This option looks very stylish. And most importantly, such a wreath will decorate the house for more than one year.
Anything can be used to create a New Year's wreath. A wreath of paper envelopes with artificial leaves as a bright accent looks very interesting. 
The variety of materials for this kind of jewelry knows no bounds, absolutely everything goes into business! 
The rooster is the symbol of 2017
2017 is the year of the fiery rooster. It is advisable to acquire a symbol of the coming year in advance, and you can make a cockerel with your own hands.
This master class is designed for an audience of children 5-7 years old.
Required material:
- yellow, white and paper red flowers,
- scissors,
- glue,
- pencil.
To work, you need to take a square yellow color and roll it into a cone shape, fix the edges with glue. The excess part of the paper must be carefully cut off with scissors so that the cone stands well on a smooth surface. 
Next, the tail for the cockerel is made. It is necessary to cut off several strips of 5 mm wide from a sheet of white paper and twist them with your hands or with scissors. Using glue, fix the tail on the body of the rooster in the lower third of the cone. 
To make paws, you need to cut off two thin (about 1 cm) strips of red color and fold them like an accordion. One end of the accordion is glued to the bottom of the cone, and small circles are glued to the second ends of the strips, cut out in the same way as the red paper stripes. 
It's time to add the wings. Draw wings on a sheet of white paper, cut them out and carefully glue them with glue approximately in the middle of the yellow cone, just above the tail. 
Usually they say “a cockerel is a golden comb”, but you can make it not golden, but red. To do this, you need to cut out two identical scallop parts from paper and glue them at the very top of the cone. 
Most of the work has already been done, it remains to add only small details. The eyes and beak can be cut out in the same way as all other details from colored paper, or you can draw with a pencil or felt-tip pen. You can additionally decorate the cockerel by sticking small circles or hearts. 
Such a cockerel will look great in the interior, it will give good mood and the exciting feeling of the upcoming New Year holidays! 
Origami "Rooster"
Another version of the crafts in the form of a cockerel offers the art of origami. A wonderful cockerel is obtained from a sheet of paper if you consistently follow everything that is shown in the diagram. This activity is great for developing fine motor skills in children this model Good for kids over 5 years old. 
Crafts for the New Year from paper
Herringbone
The main attribute of the New Year is the Christmas tree. Children 3-7 years old can make a green beauty on their own. For this you will need:
- green paper,
- pencil,
- scissors,
- glue.
On a sheet of green paper, you need to draw several semicircles of different diameters. Cut with scissors and glue along the edge to make cones. The Christmas tree must certainly be prickly. To imitate spruce needles, cuts are made about 1 cm along the edge of each cone and slightly folded up. It remains only to connect everything into one structure with glue: at the base is the largest cone, then smaller and smaller. 
Festive garland.
One of the most popular decorations for new year holidays is a garland. Various options there are an infinite number of performances, the simplest of them can be created by children 2-3 years old. This is a well-known paper chain.
To make paper garland with your own hands you need:
- colored paper,
- scissors,
- glue.
It is necessary to cut paper of different colors into strips of the same length and width, a garland of 2cm * 10cm stripes looks good. Using glue, connect the ends of the strips in such a way that rings are obtained. Each subsequent strip must be threaded into the previous ring. 
The result should be a beautiful bright garland. 
The symbol of 2017 is the Rooster and it should be in every home. It will not only decorate the room, but will additionally serve a good gift for relatives and friends. This is a difficult symbol, he loves comfort and does not tolerate gray everyday life. You can make it at home yourself or with the help of your children. Working together with your child will allow you to become even closer to each other and help you develop faster. Let's see how a do-it-yourself rooster is made from a variety of improvised materials - for yourself, for New Year's decor at home, or together with children for a school or kindergarten.

1. Pillow in the form of a rooster
A hand-sewn cockerel will be a good gift and decoration of your own interior. This pillow can be used in the hall, bedroom, kitchen. By choosing material by color, you will be able to add coziness to any room. You can update an already sewn toy and add different applications, beads. If you have even small sewing skills, then you can make such a toy yourself.

First, take sheets of A4 paper or old unnecessary wallpaper. Draw details on it. Choose a special fabric. You can make the pillow monophonic, or vice versa. For example, the wings are of one color, the body is of another, the beak and crest are of the third. For a pillow, a fabric with which pillows or a duvet cover were previously sewn is suitable. Optionally, you can make not only a cockerel, but additionally chickens.


2. Postcard with a cockerel
It is always a pleasure to congratulate relatives and friends, but to give something else and a hand-made craft is much more pleasant. For example, it can be a postcard with a rooster - a symbol of the new year. This will require quite a bit.

You will need:
- Colored paper.
- PVA glue, but a glue stick will do.
- Scotch tape, double-sided is best.
- Scissors.
Add some of your imagination.
Cockerel layouts can be found in a very large number on the Internet. But if you can draw, then the image of this symbol can be drawn by yourself. If it will be a gift for the New Year, then suitable blue background. You can draw snowflakes on it.


You will need two more rooster figurines. You can do more - the card will turn out to be more voluminous. On reverse side Each postcard needs to stick double-sided tape and stick to the center of the postcard. Under the picture, make an inscription with a congratulation, For example, “Congratulations”, “Happy New Year” or “Merry Christmas.
Open the card and inside beautifully write a wish. Or select a wish on the Internet, print it out, cut it out and stick the wish also on double-sided tape. Such a voluminous postcard with a rooster will surely please your family and friends. Such a congratulation can be prepared with your child.
3. Crochet and knit cockerel
For women who know how to knit, this will be ideal option make a rooster. Such a knitted rooster will decorate the kitchen or bedroom, and is also suitable for a gift.

To make this craft you will need:
- 4 black buttons.
- Textile. An old sheet or other heavy fabric may come in handy. You can choose the color you like best.
- The hooks are small.
- Threads 4 colors. You can cook old sweaters that are no longer needed. It can be woolen or cotton threads.
You can create a symbol like this:
- First of all, make a cockerel pattern on paper or old wallpaper. Cut it out carefully with scissors.
- Transfer it to the fabric, observe a slight deviation for the seam of 5 millimeters.
- Now tie the head of the cockerel and his torso. For this, gray threads are suitable.
- Tie the tummy in brown.
- Make the comb and beak red.


You can knit separately the details or completely make the cockerel as a whole. Fill the toy with padding polyester, cotton or pieces of fabric that need to be finely chopped. Sew on buttons for the eye for the symbol of 2017. You can replace the buttons with beads from an old necklace. The craft is ready.
4. Rooster from multi-colored patches
This toy is perfect for decorating the Christmas tree, raising the mood and just decorating. home interior. You can do it yourself at home. In a period of bad mood, it can be rumpled in the hands and it quickly lifts the mood. Or put on the window in order to consider it in the morning after waking up.

You will need pieces of multi-colored bright fabric. Best suited fabric is bright with beautiful pattern. Additionally, you will need threads to match the color of the fabric, small buttons or black beads.
In order to make a bright beautiful cockerel, you will need to do the following:
- Cut out a square from a bright fabric. It can be small, medium or large, depending on the size of the toy you want to make.
- Separately, we take the fabric of red color. Another color won't work as you will be making the beak and comb.
- Details need to be sewn into the corner of the square. Inside the body of the symbol you need to put a synthetic winterizer or cotton wool. Instead, you can take the filling from an old jacket.
- The edges of the figure must be sewn so that a pyramid is obtained.
- You can sew a cockerel with long legs and put it on the refrigerator.
- The tail can be made from thin strips of the same fabric. For a brighter and more cheerful cockerel, a tail of several colors is well suited.


5. Cockerel from plasticine
This craft can be done with your own hands, and together with your child. This will help develop motor skills. For this symbol, you will need modeling dough or plasticine of different colors, a special board for this activity.

Take plasticine of any color except red (this will be the beak and scallop).
- Make three balls of different sizes. The head should be small, just like the head. The trunk is the largest circle.
- Make a scallop and beak out of red plasticine; from white and black - eyes.
- The tail and wings can be made from several colors at once. Wings can be made specially in the form of a droplet. They can be made simply from paper or thick cardboard.
- The place where the wings will be inserted must first be prepared. Make a mark with a knife and fix it with plasticine.


6. Do-it-yourself paper rooster
As simple as plasticine, you can make a rooster out of paper with your own hands. All you need is colored paper or plain paper and paints or felt-tip pens and a little imagination. You can draw a cockerel yourself, you can find ready-made stencils. It can also be both voluminous and flat. With children, a cockerel can be made from a yellow cone - look at the photo, and as a New Year's souvenir, find some more complex and naturalistic solution.


7. Rooster from a ball and threads
Another very easy way to make a symbol of 2017 is to make a cockerel from a ball and threads. All you need is one or two balloons, bright yellow, orange or red thread, PVA glue, and buttons and scraps of fabric or colored paper to decorate the toy and give it a finished look.

How to do:
First, inflate to right size ball. Then we dip the threads into the glue and wrap our ball - tightly or not too tightly, as you like - there we will prepare a frame for our future toy. There is nothing complicated, so this craft can be done for the new year and with the children. By the way, it can be not only a cockerel, but also any other animal.

After the glue dries, simply pierce the ball with a needle and pull the remnants out of the frame. We have the body of the rooster and its head - if you decide to use two balls. Now we take the buttons and make eyes out of them, gluing them to the frame on Right place. We make wings and a tail from a patch or colored paper - we also glue it. Paws can be made from felt, paper or wire and scraps. Here's what you can get:


8. Craft a rooster from felt

You can sew a cockerel not only from fabric or multi-colored shreds, but also from felt. By the way, this is almost the most popular idea, since the felt does not crumble, does not need to be processed, which means that it will be very easy to make figurines and toys. simple crafts roosters are made from multi-colored felt sheets: just cut out the necessary parts and stick them on top of each other - you get an easy flat craft. But more complex volumetric figures you will already have to sew from felt, and here it is better to use ideas already created by someone. Here are four ready-made schemes on how to make a felt rooster yourself, it remains only to download, print, apply to fabric and cut out:
Cockerel made of felt - finished scheme


And if you think that this is too difficult, then look at the photos of other figures made from this material, perhaps you will like some idea more. By the way, good does not mean difficult. There are very simple solutions for a similar craft, which look very cute and are quite suitable for New Year's souvenirs. For example, pay attention to the cockerel-heart.


9. Rooster from plastic bottles
Plastic bottles are a very popular material for country and children's crafts. Here we already wrote what to make from bottles for a summer residence, and today we will tell you how to make a rooster out of them. Most easy option crafts is to take one bottle and decorate it with the symbol of the New Year using colored paper, buttons, disposable tableware and any other materials at hand.

More complex options- this is the creation of voluminous roosters with which you can decorate the cottage. Here one can no longer do without abstract imagination, the ability to create desired forms and combine different colors, since there are simply no ready-made schemes for such figures. You will have to cut out the “feathers” for the tail and plumage yourself, make a comb and collect it all into a single shape. But for some, these birds turn out just like living ones - see for yourself in the photo:


10. Crafts from salt dough - rooster
Another popular material for children's crafts is salty dough. It is not difficult to make it, sculpting is just as simple as from plasticine, but at the same time the figures are stronger and more durable - you can not be afraid that your child will break everything just because he squeezed his fingers a little harder than necessary.

Salt Dough Cockerel Recipe:

Mix in a bowl 200-250 grams of flour and half a glass or a little more fine sea or ordinary table salt. Add about 150 grams of water and mix everything thoroughly. At the end, pour in 20-30 grams of glue - it is better to use PVA, so that the dough keeps its shape better and the figures do not fall apart.

Next, we begin to sculpt a figure - we make a torso, add a head, attach wings and a tail to it, and also do not forget about the scallop and beak. After we paint with gouache or some special paints. We make all the details separately, and then glue them together with glue or water. For the manufacture of small parts and shaping them, use a scalpel or thin and sharp knife, when working with children, it is better to take safe plastic tools - a spatula or something that will help you make cuts and create the necessary elements.


Video: do-it-yourself New Year's cock
Craft - fiery rooster
After all, everyone remembers that 2017 is the year of the fiery rooster, which means that if you are already making a figure, then you should focus on these bright colors. It can be a red rooster, orange, yellow, or you can combine all these shades in one toy. You can make these rooster crafts from different materials- from felt and shreds, from fabric and paper, from plastic bottles, cups and other disposable tableware. Also, a fiery rooster for the new year can be made from ribbons, tinsel and Christmas balls to decorate the New Year tree with such figures or use it as crafts for a kindergarten.


Volumetric craft rooster with children
If you don't like a flat figurine, why not make voluminous crafts in the form of a rooster, which can be given to children in kindergarten and given to friends for the new year? We have already talked about how to crochet a cockerel or sew patches or fabrics - this is the most popular way to make voluminous toys. Crafts in the garden for the year of the rooster are easiest to do from paper, napkins or plasticine, and if everything is clear with plasticine, then with paper - you can use various ways, for example, first make a cone from colored paper, and only then turn it into a cockerel. You can also use techniques such as volumetric quilling or regular or corrugated paper, origami, papier mache and use complex schemes and patterns. Someone even manages to make a rooster out of cotton pads and sticks, and on the Christmas tree - from Christmas balls, cereals, pasta, coffee beans, cones, chestnuts, acorns and other natural materials.


Bonus: Kindergarten rooster
And one more bonus craft is a cockerel from cereals, which can be made for both kindergarten and elementary school. Groats can be used very different, this composition can be made from millet and buckwheat, peas and beans, semolina, rice and other cereals. How more options you will have, the more interesting the craft will turn out - there is a chance to win the competition with your child.

The technology is simple: we draw a cockerel on a piece of paper - parents can do it, and if it’s difficult to draw it yourself, you can always download a ready-made stencil, print it out and use it for decoration. Next, with a brush, apply glue to the entire surface that you will fill natural material. It remains to pour the grits and let the glue dry. After that, just shake off the extra grains and get finished craft. Cunning: if you use several different cereals, then so that they do not mix, it is better to apply layers in turn, “painting” with glue only the areas of the picture that are needed now. But laying out a panel of beans or peas is already more difficult - here you have to put the beans in even rows to each other, after also applying glue to the paper. Here's what you can get:


Photo crafts roosters
What else can a cockerel be made of? Yes, from anything, from buttons or plastic bottles (you can decorate a garden in the country with such a craft). It can be made of wood or thread, old things or some other improvised materials, for example, disposable plates. A quilling painting with a cockerel - a symbol of 2017 - can also be great gift. From satin ribbons, feathers and beads, you can make decorations for a cockerel from paper or fabric.


What could be better than to earn respect and win the trust of the Fire Rooster by making a figurine of the symbol of 2017 with your own hands. This craft can be an excellent gift for family, friends and relatives, or a wonderful item for decorating the interior, or it will perfectly cope with the combination of these two useful qualities.
The cockerel is a domestic bird, loving order, comfort, everything natural, but at the same time it does not tolerate dullness and routine. When making crafts - a rooster for 2017 with our own hands, we will take this into account, and we will try to show off our imagination, impressing everyone with our creative abilities. The examples below will help. original products with photographs and a description of the process of their manufacture.
Almost any master class for making a symbol of 2017 with your own hands is extremely simple and requires a minimum of skills and abilities. You can embody these creative ideas even with children, turning the creation of original crafts into an exciting activity that will develop creative skills in kids and bring you even closer to each other. After reviewing the craft options below, you will understand how few materials are needed to create amazing things that will delight family and friends and, first of all, surprise yourself. With our help, you will understand that repeating is easy, fun and terribly interesting!
After reviewing a lot of ideas, it is quite possible that insight will visit you and you will be able to do something of your own that is fundamentally different from the samples we have given. Watch, be inspired, create!
Idea number 1. Master class miracles in the chicken coop
The pillow, which depicts a bright cockerel or his favorite chickens, will not leave anyone indifferent. Such an accessory will pleasantly enliven the atmosphere of any room in the house - whether it be a living room, a bedroom, a nursery or even a kitchen, not only for the new year 2017, but also at any other time. Moreover, it is not difficult to make this miracle. 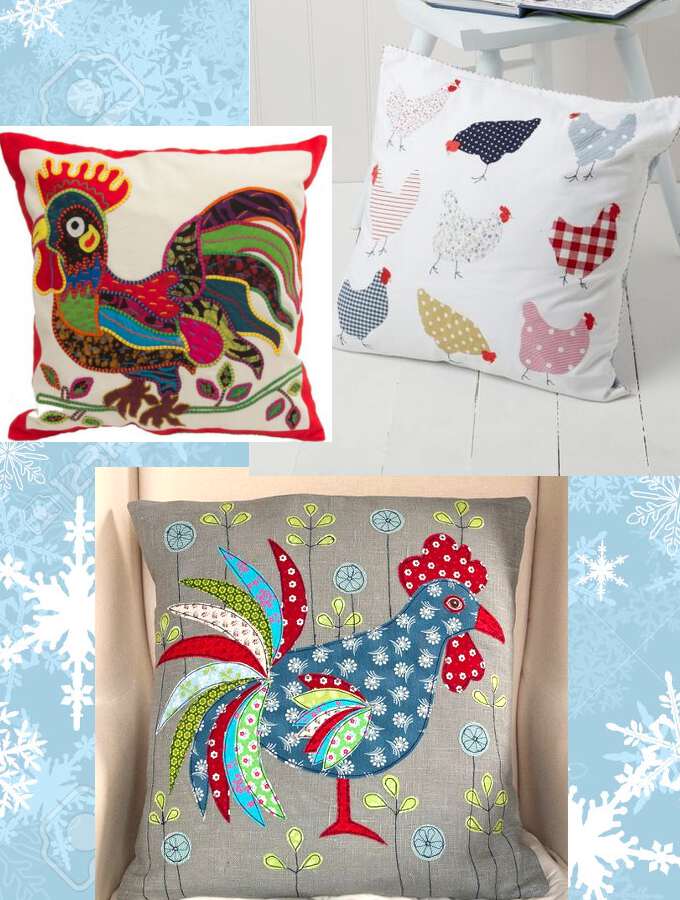
Such a multi-colored cockerel is performed in the form of an application. First you need to draw and cut out the individual parts of the cockerel from paper, and then, picking up bright fabrics of different colors and ornaments, cut out individual elements of the future pillow decoration from them according to ready-made patterns. Then the elements are carefully sewn to the base. Together with a cockerel on a pillow, flowers, grass, butterflies will get along perfectly, ladybugs In a word, everything that your imagination leads you to.
Instead of one owner of the poultry yard, you can depict a lot of chickens, choosing for them interesting combinations from fabrics with different ornaments - from small peas and cages to cheerful flowers. Such an application will look organically on a plain fabric of light colors.
Idea number 2. Let's fly!
Volumetric stylized figures of cockerels and hens suspended on a string will look great, which will be a great alternative to a static panel to create a festive atmosphere for the new 2017. Such crafts - a symbol of the year, made with your own hands, can be easily hung from place to place, coloring with bright colors one or the other corner of the apartment. A brood of hens will please anyone - from an elderly grandmother to fashionable teenager– the birds impress with their style and creativity, carry the warmth of your hands and are endowed with their own special character. 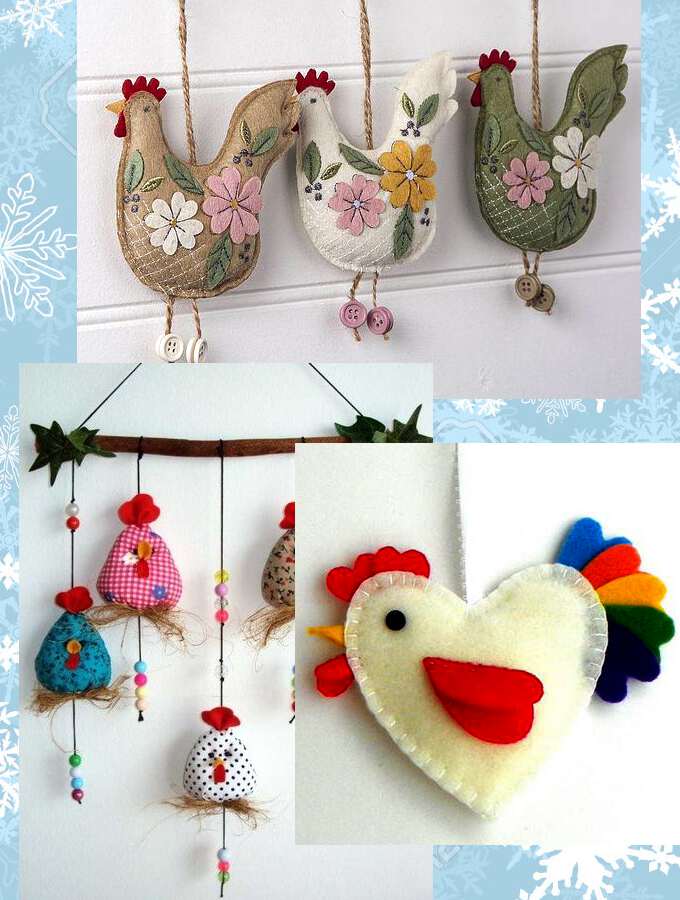
Hens
On one pattern, we cut out the blank of the future chicken, consisting of 2 parts and stitching them together, stuffing with cotton wool. Separately, we make and sew on a comb, beard, beak and eyes. On top of the chickens, you can decorate to your liking with flowers (as in the photo), beads, rhinestones or even feathers, additionally quilting the sides over the entire surface or only along the edge. Do not forget about the legs - we make them from a thick thread, and the buttons sewn together will serve as paws. You can make several of these birds and hang them by the braid.
funny roosters
The master class for making such an installation is extremely simple. Cockerels are made from pieces of multi-colored fabrics shaped like an egg. We give a resemblance to the original by sewing on a scallop, beak and eyes, and attach a little straw from below to make something like a nest. We hang the birds on thick threads different lengths by threading beads on their ends. On final stage we attach the cockerels to a plank, stick or twig, providing a rope on it so that it is convenient to hang our craft for it. The ends of the branch can be decorated with several pieces of paper or fabric, fixing them with glue.
Rooster-heart
If there are cute trinkets, then this craft belongs to them in the first place. It can be made from multi-colored felt, experimenting with color combinations, because the cockerel, as you know, is a motley bird. So, the base of 2 parts is cut out in the shape of a heart, the middle is filled with cotton wool, the edges are neatly overcast by hand. A bright tail, comb-beard, beak, eyes and wings are cut out, carefully sewn to the base. A braid is sewn in the middle, for which it will be convenient to hang the cockerel wherever you want it. Such a master class involves the manufacture of cockerels of various sizes and in any quantity. Birds can become an excellent decoration for the Christmas tree, you can even build a garland from them, or you can hang them somewhere in the house, where this cheerful company will delight the eye and soul.
Idea number 3. Funny anti-stress cockerels
This master class will allow you to make a voluminous cockerel for the new year 2017, which can be placed on shelves, a table, a nightstand. It perfectly holds its shape and pleases the eye with its cheerful and unusual design. 
The voluminous cockerel fits perfectly both into festive weekdays and into everyday interior, making it brighter, more interesting, more fun. He looks funny and invariably cheers up everyone who looks at him.
So, to begin with, we select the fabric from which we will sew the cockerel. It is better to opt for bright materials with a colorful, positive pattern - peas, flowers, a cage, a strip. A plain fabric is also suitable, from which you can make various bold combinations. Procedure:
- we cut out a square bag from the fabric;
- we sew in its edges, pre-cut scallop, nose and beard;
- put cotton wool or a special filler inside the bag;
- we sew the remaining edges so that we get a pyramid cockerel.
With a special desire, the bird can make paws from red threads - it will look very funny. Such a cockerel will sit well where it is determined. If you wish, you can make a whole poultry yard - a cockerel with many chickens and even small fluffy chickens.
Idea number 4. Golden scallop
Rooster - a symbol of 2017, it will not be difficult to make, having the necessary pattern of details. Having picked up a boring, cheerful material, we cut out blanks for the base and wings attached to the photo, sew them together and stuff them with cotton wool. The body and wings are made, if possible, from different contrasting or well-matched fabrics. The scallop-crown should also be voluminous. 
It is sewn to the head like a crown. The beak and beard can be made of felt, the role of the eye will be played by black beads. As a final touch, a straw bow is sewn onto the neck, and our gentleman cockerel is ready! Don't limit yourself to just one bird, make a whole poultry yard, seat all its inhabitants in a basket and place it under the Christmas tree or in the center holiday table. It will be original, and most importantly - the Rooster will appreciate it!
Idea number 5. Button glamor
Looking at the rooster - a symbol of 2017, made of buttons, you are surprised at how beautiful and unusual crafts made from ordinary things that can be found in every home. Surely you will find a whole handful, if not more, of the buttons inherited from your mother. They lie to themselves, lie, idle more and more giving way to zippers, Velcro and buttons on clothes. It's time to correct this unfortunate injustice - we collect all this wealth and boldly begin to create!
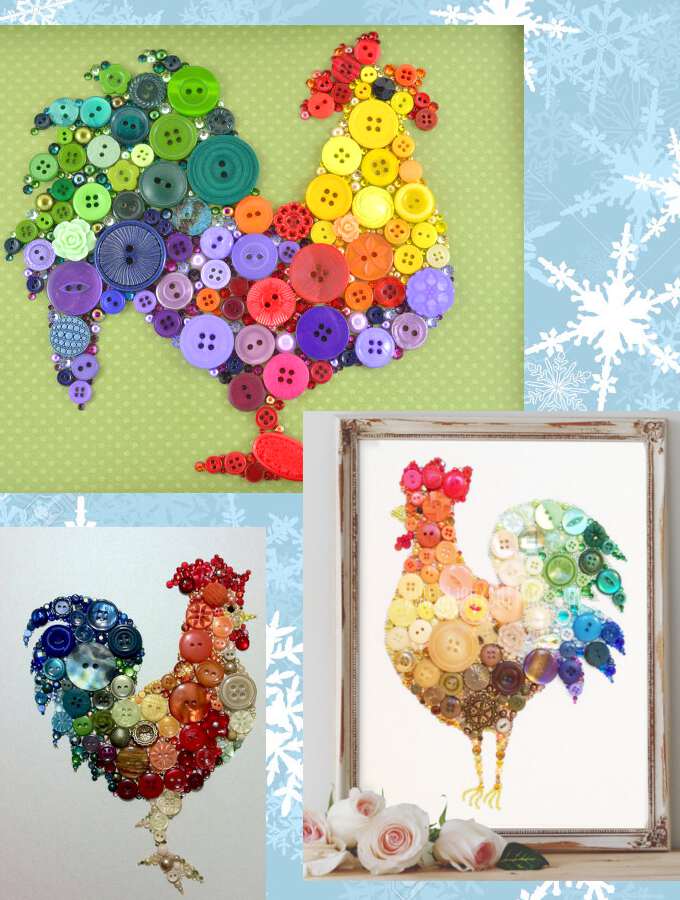
All you need to create such an original cockerel is multi-colored buttons. different sizes and forms. The main thing is to choose a harmonious color scheme so that the “plumage” of the owner of 2017 looks royal. Small rhinestones in the color of the buttons will also be indispensable, which will play the modeling role of filling the gaps formed between the buttons.
This master class is quite simple and requires only a competent selection of constituent elements and patience. You can spread the cockerel on fabric or paper, colored or plain. It would be nice to apply the outline of a bird to the base before starting work so that the cockerel does not move to the side during the creation process. Then we begin to lay out the buttons, having previously applied glue to them and gradually filling this contour. The finished picture is worthy of a frame and an honorable, most prominent place in the house.
Now you know how to appease a proud and arrogant cockerel - just make a symbol of the upcoming 2017, and you will be provided with his patronage. In addition, you can enjoy creative process, improve your skills and make really nice to your family and friends.
By Chinese calendar each year is endowed with its patron - one of the 12 animals. There are beliefs that in each coming year a specific east sign has an impact on people's lives. That is why, on the eve of the New Year, it is advisable to find out all the subtleties and features of the patron of the coming year in order to properly meet and achieve his location.
Having learned the preferences of the patron, you can try to appease him in order to achieve his favor and for all 12 months luck has accompanied him in all endeavors. On January 28, 2017, the Red Monkey will pass the baton to his tenth comrade - the Fire Rooster.
The Fire Rooster is the embodiment of thriftiness, self-sufficiency and extravagance. With the exception of the animal, you still need to familiarize yourself with its preferences.
It is easy to guess that the Fire Rooster carries with it fiery and bright colors: orange, red. Since ancient times, sages have been of the opinion that fire symbolizes a continuous upward desire and has a powerful living energy, which has purposefulness and self-improvement.
Red colors have always symbolized love and passion. So we can conclude that 2017 will be full of romantic adventures and adventures.
A year promises established couples turning points: marriage, rebirth past passion etc..
In accordance with the Eastern calendar, the Rooster appears as a sophisticated, witty and insightful animal. In all his undertakings, he strives for perfection and tries to bring everything he starts to an ideal end. In addition, he simply cannot ignore and loves compliments in his direction.
When meeting the New Year 2017, each house should have its symbol, so in this article we will look at how you can make a rooster with your own hands. Such cute souvenirs can also be used as a gift, because they are always priceless.
There are always a few balloons at home. If a thread about 1.5 m long remains from a yellow ball of yarn, and somewhere in the bins there are scraps of cotton fabric lying around, we will get the listed wealth, PVA glue, a piece of cardboard and scissors. Let's make a colorful Christmas toy - a rooster.

In order to make a rooster with your own hands, you need to prepare:
- ball of yellow yarn
- balloon
- scissors
- red fabric
- ready-made eyes for toys
- PVA glue, but superglue is better.

First, inflate the balloon to the size we need. So it’s easier to decide what size you need to make the paws, beak and comb of the cockerel.
From the red fabric we cut out a triangle - a beak, two paws and a trapezoid. Last geometric figure will soon turn into a real comb. We will not decorate the earrings, too many red details spoil appearance toys.

We fold the trapezoid in half and round the fold line in two places. After that, we shorten the base of the comb a little.


Lubricate the balloon abundantly and quickly with PVA glue. We take a ball in our hands and wind the thread around the ball in random order. The number of turns is not limited, only the second row will have to be additionally lubricated with glue.
On the last turn, we decided to leave a loop with which we will hang the cockerel on the Christmas tree.


It remains to glue the parts cut out of red cotton onto a yellow base. Needless to say, it's not an easy job. PVA dries for a long time. It is better, if possible, to use Moment glue or any other superglue.


Bye part Christmas toys dries up, let's take care of the cockerel's wings. From the cardboard we cut out a blank that looks similar to the crown shown in the picture.

We wind the thread of yarn between the teeth of the cardboard in several layers, after which we fix the bottom of the wing by stretching the thread between the rows. We remove the finished wing from the machine. Let's repeat the procedure one more time.


We glue the wings to the toy using PVA. We are waiting for the result - the complete drying of the glue for at least an hour. Well, it remains to attach ready-made eyes bought in a needlework store.

We can’t wait to put the cockerel on the Christmas tree and admire the handmade toy.

Everything is fine, except for the ball orange color with yellow yarn looks more harmonious. We recommend using fleece instead of cotton.


How to mold a rooster from plasticine - a master class with a photo
And now let's look at how to make such a colorful plasticine rooster.

To do this, we need a variety of plasticine bright colors and stack.

Take half of the yellow bar.

And give the shape of an egg.


We sculpt a red beak.

We attach the scallop as shown in the photo.


Then the eyes and beak.

From green plasticine we make blanks for the wings.

And three blanks for the tail of different colors.

