How to make a messy bun, which is now a big trend? It’s very easy to do this – just take a closer look at the MK on our website!
Option No. 1 – Fan
- Comb your washed and dried hair. Apply a little foam to make styling easier.
- Tie a high ponytail. On the first turn of the elastic, thread the entire hair through, and on the last turn, make a loop (do not pull the hair completely out). There is no need to hide the tip.
- Make the loop careless - comb it a little or ruffle it with your hands.
- Be sure to backcomb the ends of this loop that stick out from under the elastic.
- If necessary, fix everything with varnish.
Option No. 2 – Spiral snail
- Gather clean and dried strands into a ponytail at the top of your head.
- Twist it around its axis to get a spiral.
- Wrap this spiral around the base of the tail.
- Pin the snail with pins.
- Lightly fluff it up and spray your hair with hairspray.
- If the styling is not voluminous, lift the hair near the roots with the sharp tip of a comb or a simple pencil. To give this effect, you can initially comb your hair a little.

Option No. 3 – For business meetings and work
- Part your hair on the side, dividing your hair into two equal zones.
- Take both strands in your hands.
- Tie them in a knot.
- Repeat until you run out of hair length. Then tie with an elastic band.
- Twist this “chain” into a bun.
- Hide the tip inside the bun.
- Secure your hair with hairpins.

Option No. 4 – With a French spikelet
- Tilt your head down.
- Divide your head of hair into three equal parts.
- Make the first braid as for a classic braid.
- For the next braids, add loose thin strands on the sides.
- Continue weaving the spikelet to the crown area.
- Tie the end with an elastic band.
- Gather all your hair and twist it into a braid.
- Place the tourniquet in a bun and secure with a pair of hairpins.


Option number 5 – Elegant hairstyle
- Comb your hair with your fingers and gather at the back of your head.
- When you re-twist the elastic, do not pull the hair completely out, but form a small loop.
- Give it a rounded shape by extending the central strands a little more.
- Hide the ends of the strands inside.
- To make the bun large and disheveled, pull it in different directions.

Option No. 6 – Bun for long hair
- Comb your hair, lightly moistening the strands with water.
- Collect them with your hand - hold them by the very ends.
- Twist this tail around its axis. If there is a lot of hair, divide it in half and intertwine both parts together.
- Wrap the rope around the elastic, hiding it under your hair.
- Hide the tip inside the bun. Pin it with pins.
- Was it too neat? Pull out a few curls.

How do you like this option?
Option No. 7 – Bun with fleece
1. Comb thoroughly.
2. Apply mousse to them.
3. Tie the ponytail with an elastic band.

4. Comb with a fine comb to create volume.

5. Make a loose bun out of combed hair, twisting it with a rope and styling it in a snail shape.

6. Secure the result either with pins or a thin elastic band - just put it on top.


Option No. 8 – Romantic side bun
- Using a thin comb, take a thick section of hair from the top of your head and comb it thoroughly.
- Tie the ponytail to the side - approximately near the earlobe.
- Comb your tail a little.
- Twist it into a light rope.
- Roll it up like a snail.
- Tuck the ends inside.
- Secure everything with pins.

Also, see another simple option:
Option 9 – Fashionable snail for long hair
1. Comb your hair thoroughly. Separate a wide section at the top of your head. Spray it with hairspray and comb it.
2. Gather all your hair into a ponytail at the crown area.

3. Make a depression slightly above the elastic band and pull the tip of the tail through it - you should get a loop.

4. To prevent the hairstyle from falling apart in the future, pin this tip with a pair of good bobby pins and hide it under your hair
5. Straighten the finished hairstyle and pin it with pins and spray with varnish.

How to make a messy bun on your head? Expert advice will definitely help you with this.
- Tip 1. A loose and light bun should not collect all the strands - a few curls may fall on the face.
- Tip 2. Bangs are perfect for the disheveled version - both smooth and straight, and asymmetrical.
- Tip 3. For decoration, use hairpins, ribbons, hoops, colored scarves, and decorative hairpins.
- Tip 4. It’s easiest to do the snail on hair that has been washed the night before - it won’t fall apart, but a greasy sheen won’t appear.
- Tip 5. If necessary, use fixatives without strong odors (they interrupt the aroma of perfume). If fixation is carried out on dry strands, give preference to varnish, if on wet strands - foam and mousse.
- Tip 6. Do not wet your hair with a lot of water - it will begin to stick to your hands and will lie unevenly.
- Tip 7. Your new hairstyle must match your shoes and wardrobe.
- Tip 8. The figure is also important. So, girls with a long neck are recommended to wear a high bun on the top of their head - it will emphasize its elegance. A bun at the back of the head will help make your neck visually thinner.
- Tip 9. Another important point is growth. For tall women, a stylish snail on the back or side of the head is suitable.
- Tip 10. Short women can safely create this style on the crown. The main thing is that it is not too big. A very voluminous hairstyle will weigh down the top part and make the look rough.
- Tip 11. For sharp facial features and wide cheekbones, curl the strands slightly below the crown and leave a couple of curls for framing.
- Tip 12. A modern bun can be placed at the back of the head, on the crown or on the side.
Now you know how to quickly create a messy bun, and you can create new hairstyles every day.
The average hair length can set some limits in choosing a hairstyle, since some of them can only be realized on long hair. However, with shoulder-length hair, you can afford many beautiful and interesting options that will not give away their real length.
The relevance of updo hairstyles increases especially in the summer season, when you want to collect your hair and remove it from your face.
Additionally, the dress code for formal events favors elegantly tied hair. If you are looking for new ideas for everyday or evening hairstyles for medium length hair, here you will find both. Give us a couple of minutes, and we, in turn, will prove that we have collected the best images for you.
Best Hairstyles for Medium Length Hair
Which hairstyle is best for medium length? Of course, it depends on the case. However, it is possible, having collected basic information, to create a kind of summary on this issue. In a nutshell, there are: bun, simple and French knots, braided hairstyles and hairstyles with tucked ends. Let's look at each image in detail:
- A bun is probably the easiest hairstyle you can do yourself. If your hair is thin, the bun size may be small due to the lack of required volume. Don’t be discouraged, by combing your hair you can add noticeable volume to your hair, which will noticeably increase the size of the bun.
- Knots. Modern knots are quite loose and sloppy. Lift your hair at the roots to create some volume around the face and tie a low or high messy knot. After this, you can create loops in your hair by pulling out random strands. Don’t be afraid to ruin your look: deliberate sloppiness is a trend in modern fashion.
- Braids. Today, it is a rare everyday hairstyle without such an element. Whether it's a wide braid around the head or a tight thin braid on one side of the bun, braids are very welcome to complement a modern look.
- Multi-component hairstyles. Sometimes you want to complicate your look, and the most unusual ones are created by combining elements: bends and curls, braids and buns, braids and knots, and many others.
You can also create your own and unique style by drawing inspiration from the ideas we have prepared for you in this collection.
No. 1. Hairstyle with tousled bangs
Despite the fact that tousled bangs are often an element of shaggy-style hairstyles, they can successfully dilute an elegant pin-up. It's important to blend it with the rest of the low bun by incorporating face-framing strands.
No. 2. "Lush" blonde

Thin hair, due to its smaller width, can make your hair look incredibly flat. In some cases, especially typical for those with blond hair. To fix this, you can create additional volume through high backcombing.
No. 3. Unusual bun for medium length

If you have chosen a sloppy style, some bright accents will help add originality to the image. This hairstyle looks especially interesting when strands of caramel and coffee shades are combined together.
No. 4. Ballerina hairstyle

A tightly pulled ballerina bun is the image of little girls. Modernize it: lower it to the back of your head, add a few thin waves. To add more volume to fine hair, you can use a bagel.
No. 5. Low-key loose hairstyle

Medium-length hair does not always have to be pulled back into a sleek and elegant hairstyle like for formal events; It is also ideal for everyday styling. Try looks that don’t require a lot of time and professional skills so you can enjoy your new day longer and spend less time getting ready.
No. 6. Cinnamon Bun (Cinnabon)

Choosing a hairstyle for a wedding guest is not an easy task: you want to look impressive, but at the same time, not divert the attention of the guests from the image of the bride. Curled curls look quite discreet for such an occasion and will suit any dress code - just avoid additional hair accessories.
No. 7. Loose curls

Fans of Jane Austen novels, because... “Pride and Prejudice”, “Sense and Sensibility” will not remain indifferent to these hairstyles. You can dilute a rather formal image with a touch of romance by adding flowers or hairpins.
No. 8. Low bun with braids

One of the winning accents for creating volume is wicker details. You can use braids to create a face-framing shape, a loose bun, or other intricate ideas. If you are looking for a prom look, this stylish hairstyle will make all the attention turn to you.
No. 9. "Rose on the side"

Sometimes details play a major role. At first glance it may seem that this is just a side bun, but take a closer look and you will see a blossoming bud. This image can suit both the feast and the world, and will allow you to go to a romantic evening immediately after the end of the working day.
No. 10. Wavy Pin-Up for Medium Hair

Medium-length hair can appear short in low buns because there is little hair from the neck to the ends. Gathering twisted strands into a loose, low hairstyle allows you to avoid adding the missing volume.
No. 11. Elegant buns and chignons

Minimalism is an important fashion trend, and it can be safely applied to the beauty industry. These simple yet elegant hairstyles can go perfectly with a sophisticated evening dress or a cashmere sweater with a midi skirt.
No. 12. Chic medium bun

Not enough time? Just spin and run.
This lightweight bun is ideal for medium-length hair because it allows you to achieve volume that just isn't possible with a pulled bun. For a more formal event, you can use softly twisted strands in your hair.
No. 13. Daring weave

A quick and easy way to create an original hairstyle for medium hair is braiding. They not only add visual accents, but also add some texture to the hairstyle. Try playing with different sized braids to create a Mohawk hairstyle.
No. 14. The perfect French twist bun

The French bun is one of the most popular hairstyles: in addition to looking sleek and stylish, it is also easy to do. All you need is five minutes of free time and a few pins! The advantage of this styling is its versatility: the bun is suitable for any event.
No. 15. Halo wreath made from fishtail braids

Let me present to your attention a stunning version of braided hairstyles based on fishtail braids. Thanks to its unusual texture and cute weave, this hairstyle looks both incredibly perfect and completely casual.
No. 16. Messy Textured Hairstyles

Despite the fact that the French bun is perfect and chic and is already classified as a classic hairstyle, it can add a few extra years to the image of a young girl. You can add modern and fashionable accents by framing your face with random, untidy strands.
No. 17. Curled Honey Blonde

An easy style for medium lengths created with just strands of hair twisted and held in place. Try and experiment until you get an option that suits your taste. To keep this complex structure in place, be sure to fix it with the required amount of varnish.
No. 18. Low hairstyle with thin wavy curls

While sloppiness and disorder are the trendsetters of today's fashion, in some circumstances they still remain unacceptable.
If hair texture is what you want to achieve in a sleek hairstyle, thin wavy curls are your way to achieve it without adding extra volume. To complete the look, you can weave several small braids.
No. 19. Inverted braid bun

It may not be very easy to weave a braid from the bottom up, but remember that the effort spent on every centimeter of braiding will be rewarded in an original and unique way. For a finishing touch, attach a small flower to the bun.
No. 20. Cute messy bun

Why not try tousled knots and rolls instead of the standard and boring bun? By creating small details in the Mohawk style, you can move on to a single whole hairstyle of intertwined knots.
Depending on the occasion: formal evening or casual look, you can style your hair in a suitable shape.
No. 21. Loose, messy styling

The bright accents of the Dolce & Gabbana show were the hair and makeup of the models. In addition to creating incredible suits and dresses for the catwalk, they select sophisticated looks. Messy updos, dark, romantic lipstick and gold-plated accessories are perfect for your next formal event.
No. 22. Modern French roller

Despite the previous look, traditional hairstyles have their advantages, especially if you are a successful modern woman with a hundred tasks to complete in your working day. The best choice in this case is a light roller that can be done in less than 10 minutes.
No. 23. Low air styling with added accessories

To create the illusion of long hair, a low hairstyle with wide curls is a great move. This cute, simple hairstyle can become extraordinary when added with embellishments.
No. 24. High volume hairstyle

If a low bun isn't your style, try a high volume bun. By moving the hair back, the hairstyle gains texture and volume from the back. Cute accessories in your hair will complement your look.
No. 25. Medium length random weave

Girls with straight hair, this idea is just for you!
Hide the curlers away and try this option instead. The hairstyle can be easily done by yourself: leave a few strands around the face, braid one large braid on either side, and then gather the remaining hair with pins, release a few loops and, voila, the hairstyle is ready!
No. 26. French twist with accessories

Medium length hair is ideal for this hairstyle. Gather your hair at the back and turn it to the side, twisting it into a roll. Secure the twist to the curl side and add embellishment. If you have short front strands, leave them around your face for a more casual look.
No. 27. collected hair

Tied up hair is a sophisticated hairstyle that is suitable for any occasion and suitable for all hair types.
It’s also easy to do for medium hair! Gather your hair and wrap it loosely. The beauty of this hairstyle is that it does not require perfect styling to achieve the desired effect.
No. 28. Bunch with spikelets

Another version of the bun, but more airy and sophisticated. It is created from curled hair by combining the ends of the strands on both sides at the base of the bun. You can complement the look with a hairpin or brooch.
No. 29. Wavy back bun

A great example of how to work with cascading length hair. After styling your hair in wavy strands, pull it all back and arrange the remaining strands in a messy style. The hairstyle is ready!
No. 30. Neat low hairstyle

If you like neatly styled hair with the addition of a personal twist, don't pass this option up!
This idea is great for medium length hair because all you need to do is curl your hair at the back at neck level. An interesting addition to the finished styling can be shiny hairpins or hairpins.
No. 31. French braid and bun

French braid from the center of your head and, overlapping it at the back of your head with side strands, gather the remaining hair into a bun. This look is great for longer hair without the ends sticking out of the braid. It is also suitable for medium hair: just tighten a tighter bun.
No. 32. Classic low hairstyle

This option will suit everyone without exception: regardless of fashion and face shape.
Gather your hair at the crown of your head for extra lift, and leave a few long strands in front to add extra emphasis. If creating a romantic look is not your goal at the moment, it is better to refrain from additional accessories.
No. 33. "Twisted" hairstyle

Why resort to boring images when you can easily create a real masterpiece on your own head? A hairstyle with lots of twists and twists is a great idea for medium length hair. You don't even need extra decorations for such a spectacular creation.
No. 34. Messy low bun

This option is suitable for both semi-formal events and everyday styling! Such a bun will favorably highlight several shades of your hair, be it just highlights or. Experiment and develop this idea in any form you want.
No. 35. High Curly Hairstyle with Headband

This hairstyle for medium length hair is done in three steps, but looks immaculately neat and formal! Step 1: Gather your hair at the back and roll it into a curled roll (the appearance may look different depending on the length of your hair). Step 2: Separate a few strands and leave around your face. Step 3: Put on the headband!
No. 36. Simple and elegant hairpiece

How much chic is there in this hairstyle?! The bun is very elegant and looks beautiful on medium length hair.
A classic hairstyle with the addition of a modern concept of messiness and carelessness, it is perfect for a formal event and will be the perfect complement to any evening dress.
No. 37. Double Twist Hairstyle

If you feel more natural with your hair down, this option is the best. The hairstyle is perfect for medium lengths: wide curls and strands curled on each side are a simple and cute solution.
No. 38. Retro chignon with sparkly embellishments

This idea would be a great choice for any 1920s themed retro party, which is only growing in popularity these days.
Add a sparkling headband or other accessory and you will definitely become the queen of this evening.
No. 39. Curly hairstyle

Let this cute idea that looks simple, but at the same time special, inspire you to try to create it. Give up the classic bun and transform the loose ends of the strands into a more complex design. A small decorative hairpin or hair clip will add even more charm to your look.
No. 40. Large twisted chignon

Pull your hair into a low ponytail and twist it into a large bun. Draw one strand over the top and add a small accessory. This option is perfect for straight, shoulder-length hair.
No. 41. Floral hairstyle with a twist

How great is this hairstyle? Write in the comments.
With loosely braided strands on each side, this look is imbued with femininity and tenderness, and the flowers go well with the double twist. At the end, be sure to fix your hair with hairspray to maintain volume for a long time.
No. 42. Low bun a la “Natural”

A low, neat bun is the official hairstyle option for medium-length natural hair. After giving your hair some volume, gather it at the back, then create thin braids or curls along the hairline and gather them together into a bun. The lace insert will perfectly harmonize with your bride's dress.
No. 43. Braids with woven ribbons

When your big and significant day comes, old and unoriginal styling ideas are in no way suitable. Try this fantastic idea: a hairstyle that evokes a delicate bouquet with ribbons.
No. 44. Caramel-coffee Pin-Up

Let the coloring of your hair be the main highlight of your hairstyle. Without the bright and visible contrast between the dark brown base and the dark brown base, this look wouldn't be so unusual. This once again proves that professional coloring is a solution that allows you to experiment more extensively with new hairstyles and looks.
No. 45. Low hairstyle with jewelry

One of the easiest hairstyles to master is the low bun. Despite its apparent simplicity, it can look very impressive. To add charm to your hairstyle, style it with a stylish accessory.
No. 46. Easy wavy hairstyle

Braids and dyed strands are not the only ways to add uniqueness and originality to medium-length hair styles.
Curly locks can also be part of intricate hairstyles.
Any creation with wavy hair: from curled and low to careless and airy buns will not leave anyone indifferent.
No. 47. Hairstyle with braided elements

These down hairstyles bring out the best in everyone. On the one hand, the hair frames the face, emphasizing its expressiveness and at the same time maintaining its length. On the other hand, braids and twisted strands enhance the uniqueness of the basic look.
The hairstyle is no problem suitable for both a date and a first appearance.
No. 48. Hairstyle with a sleek, formal bun

The image of “romantic carelessness” is beautiful, but not always appropriate.
A sleek hairstyle, instead of complex styling, can be combined with an elegant or lace dress in order to avoid excessive pretentiousness of the image. Plus, the bun is tight enough to withstand a night of dancing and fun.
No. 49. Hairstyle with waves in vintage Pin-Up style

Waves are an incredibly versatile element and are perfect for creating hairstyles for medium hair.
Smoothly falling waves fit perfectly into the retro style of Old Hollywood, while more complex curls look modern and futuristic.
No. 50. Majestic voluminous hairstyle

Medium-length hair is ideal for creating hairstyles for a formal event, as it provides the opportunity to both emphasize and soften facial features and, at the same time, allow you to well secure the shape of the hairstyle. To create additional height and volume, you can initially comb your hair.
No. 51. Tucked back weave

No, it's not a bun... but this style is perfect for those with medium-length hair who want to combine a bun shape with extra volume in their hairstyle. A similar look can be created by tightly attaching curled strands to the back of the head.
To add a touch of whimsy, complete your hairstyle with a cute accessory.
No. 52. Voluminous platinum blonde

Add an accent to your wedding look with gorgeous side swept platinum blonde hair. Add extra volume with backcombing.
This option is perfect for those with thin hair.
No. 53. Side bun of curled strands with braided elements

Transform a formal bun into something more subtle with braided pieces.
Arrange the twisted strands in curls and collect them in a bun - the familiar look of a classic hairstyle will immediately be updated. This option will look good on long and medium length hair.
No. 54. Messy waves with a pearl-floral crown

Light and carefree curls look doubly impressive when paired with a pearl headband.
This idea can replace a veil in a bridal look or add a touch of sophistication to a casual look to match the level of a formal event.
No. 55. Low curled bun with silver accessories

Unusual curls are a great way to highlight the main accents. Instead of a tight bun, opt for a big low knot. In it, the hair is firmly fixed, and, at the same time, such a styling is not devoid of originality. To finish off, add silver jewelry to your hairstyle.
No. 56. Ponytail with shiny comb

Gather the curled curls at the back of the head, not too low, but not too high, creating additional volume and a kind of ponytail. Leave a couple of loose short strands on the sides to frame your face to add freedom and ease of perception to the look. A small comb will decorate your hairstyle for prom or school prom.
No. 57. Gibson wavy bun with pearls

The perfect wedding look: in it, a bun of twisted curls is successfully combined with a delicate decoration. The pearls are large enough to draw attention to themselves, but small enough to be the focal point of the entire look. Perfect for those with long and medium hair.
No. 58. Hairstyle with a low curl

A moment of philosophy. As Feris Büller said: “Life, as we know, is too short.” There seems to be so much to do around here, there is always something new to try. Think about all these things: barbecues, fireworks, ski trips, late evenings on the couch with friends over a bottle of beer.
For any of these moments, collect your hair in this way - it’s very easy to repeat and looks incredible.
No. 59. Backward and tightly twisted

Just two steps: curl and secure - that's all you need to do this amazing classic hairstyle at home. Curl your hair as if you were going to make a bun, but at the end simply wrap it towards yourself and secure it.
No. 60. Hairstyle with a careless roller and coloring

And again we return to disorder and negligence.
To create such a hairstyle, you should forget about caution and accuracy, otherwise the whole image will be lost. All you need to do is twist and gather the strands on each side of your face, then randomly secure the remaining strands. The less neatness in the image, the better!
Brief summary
That's all! You have been presented with all kinds of hairstyles for medium length hair. As you can see, medium length hair offers many possibilities and ideas that suit current fashion trends. You can bring some of them to life yourself, while others will be helped by your master: just choose the picture you like and get ready to try out a new stunning image for yourself...
Thank you and good luck!
How to make an artistic mess on your head? This hairstyle is particularly chic and playful. It is ideal for young girls with slightly curly hair. Forming such a hairstyle does not require much effort. There are two simple ways to do this.
How to make a creative mess on your head
How to make a creative mess on your head using hot rollers
This method is more suitable for owners of medium-length hair. Hairstyle formation will consist of the following stages:
1. Apply a small amount of foam or styling mousse to washed, dry or slightly damp hair. For a more long-lasting effect, it is better to use strong fixation products.
2. Warm up the hot rollers. For these purposes, it is better to choose the largest diameter.
3. Separate the strands with a comb and wrap them in curlers, pulling them perpendicular to the head to prevent creases from forming.
4. Sit with them until the curlers are completely cool and the strands are dry, after which they can be carefully removed. Try not to pull the curls, as they may unravel.
5. Comb your hair using a large, wide-toothed comb or part it with your fingers.
6. To add fluffiness, you can make a small backcomb on the top of the head. Pin your hair back with a large bobby pin. In this case, some strands should come out.
This hairstyle can be done in just half an hour. It will complement your image and make it unique.
How to make a mess on a girl's head with your hands
For this hairstyle it is not necessary to use any devices. You can easily give the curls the desired shape with your hands. To do this, follow the following sequence of actions:
1. Wash your hair and dry your curls with a towel.
2. Apply a small amount of styling product. Do not use too much as this may cause the curls to stick together.
If your job requires you to look flawless every day, then quick hairstyles for every day that you can apply to your hair in a matter of minutes are a lifesaver.
A very short haircut leaves virtually no styling options; the maximum is to change the direction of the bangs or slightly lift the hair, thereby increasing the volume.
When the curls cover your shoulders or are even longer, you can choose several options for simple styling that you can do yourself.
Many young ladies now have average hair length. With such hair you don’t have to struggle for a long time when drying, it’s easy to recolor, the ends rarely split because they are often cut, and the hairstyles are light and natural.
For hair of this length, it’s very easy to learn how to do a quick hairstyle with your own hands, then you won’t have to spend either money or time on trips to a beauty salon.
Long hair, although it requires much more care and maintenance, often causes trouble with its problems, but it is very easy to style into beautiful hairstyles.
The owner of long hair already has 3-4 options for daily hairstyles in her arsenal, but you must admit, this is very little.
We will offer a wide selection of styling that you can easily do yourself by looking at the photos and videos recommended in our article.
Here's what you need to have to create your hairstyle:
- A professional hair dryer with several attachments (as a rule, inexpensive household hair dryers can only “fluff” hair and dry it dry). It is extremely difficult to do anything with hair without attachments;
- Brushing helps a lot where hair drying was not possible;
different combs; - Mousses, styling gels (one or two are quite enough, but those that “make friends” with your hair).
The final detail of quick hairstyles will always be jewelry - hoops and hairpins can be taken with you in your purse when you go to work in the morning.
Skillfully picked up strands will create a romantic look at the end of work, with this hairstyle you will look absolutely irresistible on a date or any evening event.


How to choose all these accessories correctly?
Let's start with brushing (we are talking about a round comb, with the help of which you can create a brushing style that gives additional volume to the hair at the roots).
Voluminous hair will also decorate the owner of long hair, and is perfect for a girl with medium-length curls. Of course, the width of the brushing will differ.
Strictly speaking, for short strands you will need a narrow brush, and for curling the ends - a wide one.
If you have a cascade-type haircut, where short length is combined with long strands, then you will need both types of brushing. Choose a quality tool.
Dense natural bristles, ceramic coating and a comfortable handle are the guarantee that your brushing will last a long time.
A hair dryer comb will be a kind of hybrid between brushing and a hair dryer. This device will allow you to do simple everyday hairstyles with your own hands.
You can hardly think about a quick hairstyle for every day if you have such a hairdryer at hand - each time the curled strands will lie differently, creating a new, fresh look.
However, a hair dryer comb will not replace a regular hair dryer with a set of different attachments.


Be sure to purchase styling products. These can be mousses, gels, straightening balms, wax for individual strands.
Despite the fact that girls rarely wear “wet hair,” a gel to create such an effect will not be superfluous. Hairspray for fixing a quick hairstyle is a must-have in the modern girl's arsenal.
Types of quick hairstyles for short and medium hair
For quick hairstyles for short hair, the current approach is “as long as it lies beautifully.”
Most often, short hair for styling just needs to be greased with gel and dried, and while you have breakfast and apply makeup, the hairstyle will be ready.
If you have medium hair length, then there are more options for quick hairstyles; let’s consider simple and complex ones.
Bob hairstyle
A hairdryer, brushing will help us, and we may need varnish. We lift the hair from the root, curl it and dry it at this moment.
To fix individual strands, you can use a gel.
If you have heavy and voluminous hair, then additional fixation is not required. Light and thin strands should be secured with varnish.
Adding volume to a quick hairstyle
This type of styling is suitable for those whose hair is at least shoulder length. You will need styling mousse, which we apply evenly.
Now use brushing to pick up a small strand, lift it from the root, twist it down near the ends, and then fix it with varnish.
If you get to work without a hat, you don't have to comb your hair all day. During the cold season, comb your hair only when you take off your hat.


Curls
We will need a curling iron of suitable thickness. Grab a small strand and twist it. This type of quick hairstyle gives ample opportunity for flights of fancy.
You can make just a few curly strands, curl only the bangs, or, conversely, work out each curl in detail. It is advisable to style only clean hair with curling irons.
If you have normal scalp oiliness, then it is acceptable to wash your hair every 3-5 days and style it with tongs every day. When the first signs of dirt are noticeable, you can no longer use the curling iron.


Quick hairstyle in the style of “light mess”
The distinctive feature of this style is that it is very easy to do, and the strands sticking out in different directions will provide the most incredible styling, moreover, it is different every day.
Rub a small amount of styling gel into your palms, apply to strands, laying them out in disarray, let dry (or blow-dry on low power) and fix with hairspray.

Apply hairspray from a long distance, otherwise the strands will look stuck together and unkempt.
This styling is easy to do, even if you are on a trip or staying overnight with a friend, and do not have the entire arsenal of usual care products at hand.
Such simple options for quick hairstyles will allow you to look impressive every day without visiting a beauty salon.
It’s a little more difficult to make quick hairstyles for long hair, but learning how to do them with your own hands is absolutely possible.
Options for quick hairstyles for long hair
Girls with long hair carefully try to create beautiful styles for special occasions, but for quick hairstyles there are often only one or two ponytail options left, which, of course, adds neither beauty nor uniqueness.
The quick hairstyle options we offer are easy to do with your own hands at home; they do not require special styling products or special skills.
Bulka with a roller
The hairstyle is ideal when you have a working day ahead of you, and after it you plan to go out to a special event or on a date.
By the way, such a quick hairstyle would be appropriate with a tracksuit. All you need is a foam roller (it can be replaced with any bright scarf that matches your clothes).
Place the ponytail on top of the foam rubber or scarf, securing it with an invisible elastic band. Braid the remaining hair with a braid or roll it into a “flagellum” and wrap it around a bun.
On the sides you can use invisible ones. Your chic hairstyle is ready in 5 minutes.
If you need to diversify your look after a hard day, take a few stilettos decorated with stones into your purse.

Rapunzel
All you need is the skill of braiding, which almost any owner of long hair has.
Two small strands can be left on the left and right, and the remaining curls can be braided.
It is important to braid only on the right or only on the left, without pulling too much, because the braid will have to give a slightly disheveled appearance. We collect the end of the braid from the opposite side and the quick hairstyle is ready.
For a romantic look, let’s twist the remaining strands. In the photo you can see how airy and unusual the images turned out.
Greek
This type of styling requires the absence of bangs. Take 2 strands from the front and secure them with a hairpin; we will need these curls at the end of the process.
We lift the hair from the root and backcomb it. Whether to fix it with varnish or not is at your discretion. We will fix the strands into a “malvinka”, and we will collect and secure the hair at the back.


Daily simple and easy styling, based on some negligence, is suitable for the office dress code, while at the same time maintaining a certain romance.
In the summer, circumstances oblige us not only to lie on the beach, but also to go to work, walks and dates. If you can put a light, cool dress on your body, then with your hair the situation is more complicated. High air temperatures force girls to look for not only stylish, but also quick ways to remove their hair. We offer 55 hairstyle options in different styles that you can
Scythe
If you think that a classic braid is too banal for a summer walk, we offer several fairly simple but stylish options that will be an excellent alternative to a traditional hairstyle.Option 1
To begin, make a parting on one side and start braiding from the opposite temple. Move diagonally, weaving strands from the crown and forehead area. As a result, you will get a stylish asymmetrical and not at all hot summer hairstyle.Option 2
This is a very simple and quick technique that will help you slightly improve the classic braid. First of all, tie a not too tight ponytail with a thin, invisible elastic band. Make a gap in your hair above the elastic and thread your ponytail through it. Then, braid your hair using any technique you like. Thus, a simple everyday hairstyle is ready.
Option 3
This hairstyle looks great on long hair. To begin, tie a ponytail that is not too tight at the side. Make a gap above the elastic and let all the hair through it. To add volume, loosen a few strands. A little lower, tie another elastic band and repeat all the steps again. The number of sections depends on
Option 4
To get such a careless but stylish braid, you need to curl your hair in light waves and backcomb it on the top of your head. Then braid your hair using any technique you know. When the braid is ready, pull it in different directions to add volume. At the end, divide the hair into two parts, tie it in a knot and secure it with a bobby pin on the inside.
Option 5
Separate one side strand at each temple (above eyebrow level). Braid them into a braid. Grab a curl next to each braid and secure it to the back of your head with an elastic band or hairpin.Repeat the steps, separating the strands near the ears. Braid them into braids, grab adjacent curls and secure them at the back of your head. The rest of your hair can be left loose or braided.

Option 6
Comb your hair with a side parting. Separate the strand near the ear and braid the hair using any technique. Don't braid too tightly. Secure the end of the braid with a clear elastic band. Release the strands from the braid to give them volume. The final touch: spray your hair with hairspray. This option will look best on curly hair. If you have straight hair, spend a couple of minutes curling it with a curling iron.
Option 7
Make a side parting. Separate a section of hair from the parting and begin braiding, taking in the hair that frames your face. Use any technique. Having reached the neck, change the braiding technique and weave the remaining hair into the main braid. Once you've finished braiding, place an elastic band on the end of the braid. Release the strands, which will make your hair look fuller. Finally, spray your hair with hairspray.In the photo below you can see the combination of a simple braid and a fishtail. It looks very impressive.

Option 8
A quick and simple hairstyle option that even a first-grader can handle. Despite all the ease of weaving, the final result is a styling that others will consider unusually complex.So, divide your hair into three equal parts. We braid one braid from each part, the ends of which are secured with small elastic bands. Now take one braid and roll it into a ball. We secure it with hairpins at the base of the back of the head. We make balls from the remaining braids.
This hairstyle has only one drawback: true Rapunzels will have to tinker with braiding their curls. But those with medium-length hair can handle braiding in a matter of minutes.

Option 9
An inverted braid seems unusually complicated, but in reality everything is very simple. The braiding technique is surprisingly simple and with its help you will create a unique hairstyle in a couple of minutes.First level: separate one strand above your forehead and make a ponytail. To prevent the ends of your hair from interfering with your work, curl your ponytail onto the top of your head and secure it with a clip.
Second level: grabbing the side curls, we make a second tail. At the same time, we retreat a little from the first tail. Now remove the clip. We divide the first tail into two halves, between which we draw the second tail. We bring the tip of the second tail up and secure it with a clip. Leave the ends of the first tail below.
Third level: grab a strand a little lower, connect it to the free ends (from the first tail). Making the third tail. We remove the clip, divide the ends of the second tail into two halves and pass the third tail between them. We attach the third tail with a clip at the back of the head. Leave the ends of the second tail below.
We repeat the steps as necessary. Once you've finished braiding, secure the end with an elastic band. The final touch: carefully release the strands, starting with the very first ones. The higher the strand, the more volume we give it. It is not necessary to braid your hair all the way – the hairstyle will look chic even with three levels.

If you are looking for a simple but original summer hairstyle, an unusual ponytail will be an excellent option both for everyday life and for an evening walk.
Option 1
To create this hairstyle, first curl your hair a little at the ends. Tie the ponytail with a thin elastic band. Make a gap in your hair and thread your ponytail through it. If necessary, curl your hair a little more or separate the curls with your fingers to add volume.
Option 2
For this hairstyle, the hair must be straight, so if necessary, use a straightening iron. Then, divide your hair into two layers: top and bottom. Gather the top layer of hair with a thin elastic band at the back of the head on either side of the head. From the bottom layer, weave a braid in the opposite part. The thickness of the braid depends on your personal wishes. Wrap the braid around the elastic band of the ponytail and secure the end with a small hairpin.
Option 3
To create a more elegant ponytail, you will need hair foam or wax. Make an even parting (in the center or side, whichever suits you best) and gather your hair on one side. Apply foam to them and divide into two equal strands. And then just tie a knot twice in a row. Secure with a thin invisible elastic band directly under the knot, and twist the ends of the hair a little or lightly backcomb it.
Option 4
To create such a stylish ponytail that is perfect for any kind of summer event, you will need a curling iron or straightener, hairspray, bobby pins and a little time. To begin, curl your hair at the ends. Then divide them into 4 parts: at the back of the head, at the crown and on both sides at the temple, and tie them with elastic bands so that they do not mix with each other. Take the hair from the top of your head and comb it a little from the inside, and then twist it with a flagellum and secure it with bobby pins. Repeat the same with the hair at the temples. When the hairstyle is ready, spray it with hairspray to be secure.
Option 5
A very romantic summer hairstyle. To do it, divide your hair into two parts along the parting line. Braid braids on both sides, which converge from the temples at the back of the head. Tie them together with a thin elastic band. Then separate a thin strand from the ponytail and braid it. Wrap it around the elastic band and secure it with a bobby pin on the inside. Comb the tail a little with a comb or curl it with a curling iron.
Option 6
The ponytail is one of the most popular and versatile hair trends in the world. This option is very fast and original. To begin, curl your hair at the ends and then divide it into two parts. From the hair at the top of your head, begin to weave a loose braid, weaving all the strands into it along the line of your forehead to open up your face. The braid should end at the back of your head, and then lift the rest of your hair and tie it together using a thin elastic band. To hide the elastic, you can wrap it with a strand of hair and secure it with a bobby pin on the inside.
Option 7
Another easy and quick way to make an elegant ponytail. Curl your hair at the ends to create light waves. Then divide them into two parts. Comb the hair on the top of your head a little and tie it high with a thin elastic band. Gather the rest of your hair a little lower and also tie it with an elastic band. To create more volume at the top of your hair, loosen a few strands at the top of your head.
Option 8
This is a great way to turn an ordinary ponytail into an original hairstyle in a few minutes. Tie all your hair into a ponytail at the back of your head. Separate a small strand and wrap it around an elastic band to hide it, and secure with a bobby pin on the inside. Then tie another elastic band just below. Make a gap in the resulting sections and pass the hair through it. Tie another elastic band a little lower and repeat the procedure. The number of sections directly depends on the length of your hair. To make the ends look natural, curl them a little with a curling iron or flat iron.
Option 9
Divide your hair into 3 strands (central and two side). Secure each strand with an elastic band if you are doing your hair yourself. This way your hair won't get tangled. Roll the central strand into a rope and wrap it around the side ponytail on the right. Separate one curl from the left strand. Roll it into a rope and wrap it around the right tail. We also roll the remains of the left strand into a bundle and wrap it around the tail. We secure the hair with an elastic band.This hairstyle has several advantages. Firstly, we don’t need to maintain clear symmetry (uneven strands give a chaotic shine). Secondly, the absence of a parting allows you to disguise some defects: unpainted roots, dandruff or too thin hair.

Hairband made of… hair
This is the simplest and most original way to replace a regular headband and remove hair from your face on a hot day.Option 1
First, divide your hair into two sections. Gather the hair at the back of your head with an elastic band to keep it out of the way, and proceed to the strands at the front of your face. Make a parting on either side and begin to braid, weaving strands into it along the line of the forehead. When the “headband” is ready, loosen the hair at the back of your head and enjoy the original hairstyle.Option 2
Separate a small section of hair from the neck area and weave it into a thin braid. Wrap it around your head and secure it with a bobby pin on the opposite side. This hairstyle looks great on curly hair.
Option 3
Make an even parting and separate two strands from both sides of your head. Weave them into braids, not too tight, and tie them at the ends with invisible elastic bands. Connect them together at the back of your head and secure them with bobby pins.
Option 4
Separating the strand in the bang area, we backcomb it. Near the ear on the right, we separate one curl and form a flagellum, twisting the hair away from itself. Secure the tip with a clear elastic band. Take the bobby pin and secure the tourniquet at the back of your head, closer to the left side.We repeat the steps on the opposite side: separate the strand near the ear; we form a flagellum; secure the tip with an elastic band. We place the second flagellum under the first and secure it with an invisible one.

Hairstyle in 30 seconds
If you’re running out of time and you’re in a hurry to attend an event where you need to be dressed up, these options are for you!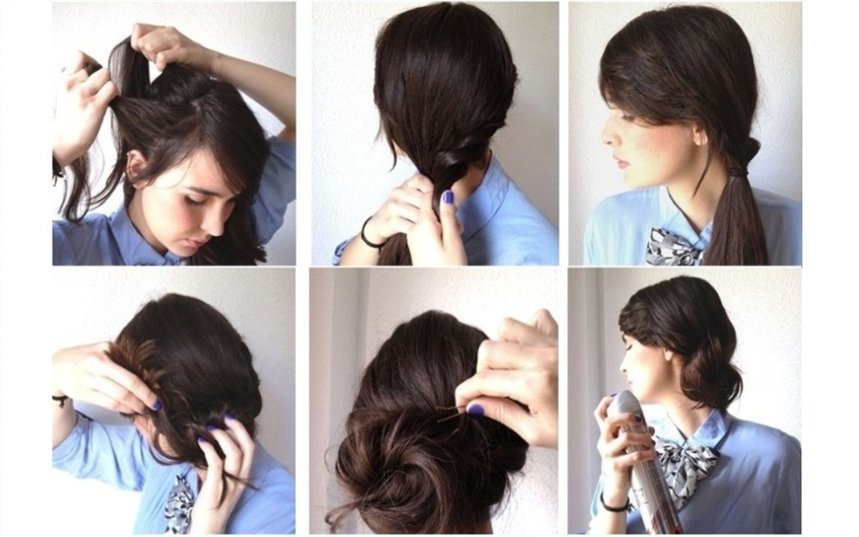
Option 4
Divide your hair into three sections. The middle one should be larger than the others. Weave a voluminous braid out of it and twist it into a knot using bobby pins or bobby pins. Roll the strand on the left into a bundle and pass it around the knot counterclockwise (from below). Wrap the strand that remains on the right around the hairstyle clockwise (through the top). Secure with bobby pins or spray with varnish.
Option 5
To achieve this hairstyle, you need hairspray, bobby pins and a little time to practice. To begin, fluff your hair with your hands to create good volume and apply generous amounts of hairspray. Then gather your hair together and curl it inward to form a shell. Secure your hair with bobby pins. You can leave a few loose strands to give your hair a sophisticated casual look.
Option 6
This is a very simple way to make a knot at the back of your head. First, tie the ponytail and divide it into two equal strands. Twist each strand clockwise. Then start weaving the strands together (counterclockwise). Tie the tourniquet at the end with an elastic band and twist it into a knot at the back of your head, securing it with hairpins.
Option 7
Tie a ponytail at the back of your head, not too high. Make a gap above the elastic and pull the hair through it. Then, carefully curl the tail into a shell and secure with a hairpin or other accessory.
Option 8
To make a hair bow, you will need a thin elastic band, bobby pins and 1 minute of time. To begin, tie a knot high on the top of your head and divide it into two parts. Pass the tip of the tail in the middle and secure it at the back with a bobby pin. This hairstyle is also called “Lady Gaga style bow”.
Option 9
This hairstyle will take longer to create than the previous ones. You will need a foam donut and pins. Tie a high ponytail, put a donut on it and hide your hair under it one strand at a time, securing it with hairpins for security. At the end, the hairstyle can be decorated with a bow or other accessories.
Option 10
Curly “donuts” look much more interesting than regular round ones, if you like ballerina buns. Such “donuts” can be bought in specialized stores or ordered online. The technique is no different from the classic versions. The hair must be tucked behind the donut.
Option 11
Pull your hair into a ponytail high on the crown of your head. Divide the tail into two halves, wrapping each with a flagellum. Now roll the ropes around the elastic band. We twist them tightly and in opposite directions (left - to the right, right - to the left). Secure your hair with bobby pins and fix it with hairspray.
Option 12
Divide your hair into two halves. Take the first strand and separate a curl from your forehead. We twist the curl away from ourselves, starting at the forehead and ending behind the ear. We tie the first ponytail low at the back of the head. We do the same with the second half of the hair. Now all that’s left is to roll the bagels. Ready!
Perhaps the easiest way to escape the heat in the summer and at the same time create an exquisite hairstyle is a Greek headband.
Option 1
Place a Greek headband on the top of your head and thread small sections of hair under the elastic. You will have a wonderful hairstyle in just a few minutes.
Option 2
This is a more complex example of how to use a Greek headband. For this hairstyle you will need two headbands. Place one under your hair and then backcomb the back of your head. The second one - put it on the top of your head and wrap the strands under it. Voila!
"Malvinka"
One of the fastest and cutest hairstyles is familiar to us from an early age, thanks to Malvina, a girl with blue hair. The main difference between this hairstyle: the hair is loose, the upper strands are pinned high on the back of the head.Option 1
A great way to add variety to your look if your hair barely touches your shoulders.Separate the strand above the bangs and backcomb it. Place a roller under the strand and secure it. You can use Velcro curlers as a roller. They stay on the hair better. We grab the side curls and (together with the combed strand) secure them to the back of the head with an elastic band. Using any thin object, we pull the hair out a little from above, giving it volume. A Chinese stick or an ordinary hairpin will do. It is better to pull out strands with your fingers on long hair, but not on short hair.

Option 2
Separate one strand at each temple (above the ear) and secure them at the back of the head with an elastic band. We grab the curl with the first strand, pass it over the ponytail and wrap it behind the first strand. We repeat on the opposite side: grab a curl, pass it over the ponytail and place it under the strand. We connect the ends of all four curls with an elastic band. It turns out to be a cute heart.
Option 3
Using a hair straightener, curl the ends on a few side strands. Separate one strand at the top of your head and backcomb it with a comb. To keep the strand in place, spray it with hairspray. Having laid the combed strand, pin your hair with a hairpin, making a “malvinka”. Ready!An excellent option is suitable for a romantic date, going to the theater and even for a wedding.

Option 4
Grab a wide strand (from forehead to ear) at each temple. Secure the strands at the back of your head with an elastic band, masking it with a thin curl. Chaotically, in any order, braid a couple of thin braids. To make it even more fun, you can curl the ends of your hair a little.
Option 5
Separate a strand at each temple and make two flagella (turning the strands away from you). Connect the flagella at the back of the head, tying them with an elastic band. Braid the loose ends of the braid using your favorite technique. For example, ala “fish tail”.
Focus on accessories
With the help of ribbons and scarves, you can turn even the most ordinary ponytail into a work of art. Someone will think that hair with a scarf resembles a collective farm style. And he will be wrong! It's fashionable and beautiful - even Hollywood stars flaunt branded scarves skillfully tied to their hair. In summer, a scarf will protect you from the scorching rays of the sun. It also has other advantages: with the help of a well-placed scarf you can hide hair imperfections, overgrown roots, gray hair or a sparse parting.Option 1
Unwind and comb your hair. Tie a knot about halfway through the scarf. It can be a regular or decorative knot - to your taste. Place the scarf over your forehead (with the knot slightly to the side). Tie a double knot at the back of your head and hide the ends of the scarf behind the base of the fabric.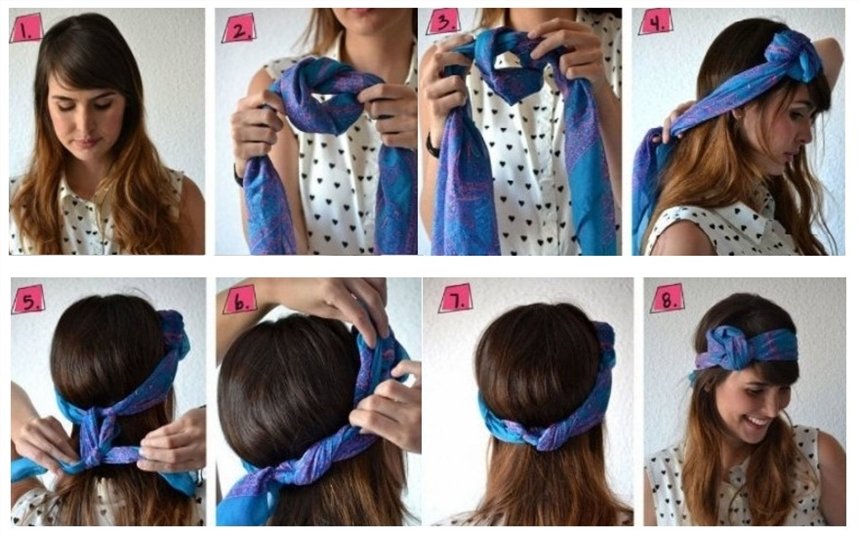
Option 2
Do you love fashionable pin-up looks? Then you will like this option.Divide your hair into two parts: the back (crown and back of the head) and the front (forehead). Gather your hair in a bun at the back. You can pre-braid it into a braid, which will give your hairstyle a fixation. Twist the hair in the front into a braid, style it into a donut and secure with bobby pins. The finishing touch: tie a cute scarf or scarf around your head.

Option 3
Another great version of the “pin-up girls” image. Create long bangs by parting a section above the center of your forehead. Gather the rest of your hair into one or more ponytails (the ends of which are curled with a curling iron). The most important stage is the formation of bangs. It is the large bangs that are one of the distinctive features of this style. We wind the front strand onto a curling iron. Give it the desired shape and spray it with varnish. We tie a small polka dot scarf behind the bangs with a bow.
Option 4
The popularity of the film The Great Gatsby renewed interest in American culture of the 1920s. And, of course, this interest has not bypassed the fashion world. Ladies of that era, going to a party, preferred short hair, and long curls were tucked under a catchy headband. However, the headband was also worn on short hair. In addition, hair was often curled. If you like to visit Mafia clubs or jazz bars, then retro styling will come in handy. Let's look at one way to create this hairstyle.Comb your hair to the side and wear a glamorous headband. We pass the hair through the headband - strand by strand. Voila! We advise those with short hair to smooth their curls with gel and (where would we be without it?) wear a headband!

Among these hairstyles, you are guaranteed to choose several for yourself.