For several years now, before the New Year holidays, my child and I have been making Christmas tree decorations from cotton wool. This material for children's crafts is convenient, affordable and safe. This time we made a wizard Santa Claus so that we don't get bored.
We needed:
- cotton wool- 250 grams
- Potato starch- 0.5 tbsp
- Yogurt bottle- 1 piece
- Packaging from chocolate Santa Claus- 1 piece
- Plastic straw- 1 piece
- Satin ribbon- 30 cm.
- Decorations(sequins, sparkles)
How to make Santa Claus from cotton wool and a plastic bottle
1 . Pour one tablespoon of cold water into a plate. Add 0.5 tablespoon of potato starch.
 2
. Stir until dissolved.
2
. Stir until dissolved.
 3
. Gradually pour 1 cup of boiling water into the resulting mixture, constantly stirring the potato paste. Leave for 15 minutes for the glue to cool to room temperature.
3
. Gradually pour 1 cup of boiling water into the resulting mixture, constantly stirring the potato paste. Leave for 15 minutes for the glue to cool to room temperature.
 4
. Plastic bottle pierce the yogurt bottle (this is easily done with ordinary scissors), making holes at the same level on both sides for a plastic tube, which you can then pull through. Leave pieces of the same length on both sides - this is a blank for Santa Claus's hands.
4
. Plastic bottle pierce the yogurt bottle (this is easily done with ordinary scissors), making holes at the same level on both sides for a plastic tube, which you can then pull through. Leave pieces of the same length on both sides - this is a blank for Santa Claus's hands.
 5
. You need to make two holes in the lid and thread a piece through them beautiful ribbon. Tie a knot on the inside of the lid.
5
. You need to make two holes in the lid and thread a piece through them beautiful ribbon. Tie a knot on the inside of the lid.
 6
. Remove the wrapper from the chocolate Santa Claus. Cut out a piece with a face. Attach the image to the bottle. Secure the top edge by screwing the foil lid on.
6
. Remove the wrapper from the chocolate Santa Claus. Cut out a piece with a face. Attach the image to the bottle. Secure the top edge by screwing the foil lid on.
 7
. Now we begin to cover our Santa Claus with cotton wool. We tear off thin, long cotton flaps, moisten them generously in starch jelly and place them on the bottle, without touching the area with the image of the face. The ends of the flaps should lie crosswise. When you wrap cotton wool around Santa Claus's hands, try to ensure that the ends of the flaps end not on the palms, but on the torso.
7
. Now we begin to cover our Santa Claus with cotton wool. We tear off thin, long cotton flaps, moisten them generously in starch jelly and place them on the bottle, without touching the area with the image of the face. The ends of the flaps should lie crosswise. When you wrap cotton wool around Santa Claus's hands, try to ensure that the ends of the flaps end not on the palms, but on the torso.
 8
. In this way we gradually make a fur coat, a beard, a hat, and hands. To make your beard voluminous, simply place several flaps (not one thick one, but several thin ones on top of each other, from different trajectories). Wet the cotton generously!
8
. In this way we gradually make a fur coat, a beard, a hat, and hands. To make your beard voluminous, simply place several flaps (not one thick one, but several thin ones on top of each other, from different trajectories). Wet the cotton generously!
 9
. While the starch jelly is wet, you can attach various accessories to it, for example, sequins, light braid, sparkles. If, after drying, some of the jewelry falls off, it can be secured with a glue gun or thread.
9
. While the starch jelly is wet, you can attach various accessories to it, for example, sequins, light braid, sparkles. If, after drying, some of the jewelry falls off, it can be secured with a glue gun or thread.
 10
. The finished craft should be left to dry at room temperature. Do not place Santa Claus on a window or radiator, the cotton wool will turn yellow and the outer festive look spoil. It will take at least a day for it to dry completely. Santa Claus will lose significant weight and the Christmas tree toy will become light, suitable for decorating the holiday tree.
10
. The finished craft should be left to dry at room temperature. Do not place Santa Claus on a window or radiator, the cotton wool will turn yellow and the outer festive look spoil. It will take at least a day for it to dry completely. Santa Claus will lose significant weight and the Christmas tree toy will become light, suitable for decorating the holiday tree.
Magic grandfather is ready to decorate the New Year tree

Santa Clauses made from cotton pads
Are you preparing a craft for kindergarten for the New Year? An excellent solution would be to make a magical grandfather from cotton pads. By the way, during the work, you can discreetly and unobtrusively find out what kind of gift awaits you. New Year child.
For the craft you will need:
disposable plate;
cotton pads;
red colored paper;
half of a Kinder egg case;
shifty eyes;
PVA glue, scissors, simple pencil.
Start with the Santa Claus hat. Cut out a semicircle from red paper. You can use a disposable plate as a stencil. Let the child try to cut out the part along the contour on his own. Glue the hat to the plate. Decorate the edge of the hat with halves of cotton pads. Make a pompom from the whole disc.
For the nose, take half a Kinder egg case and carefully wrap it in red paper. Try to make as few folds as possible. Use glue to secure the paper and attach the red nose to in the right place. Glue on the eyes.
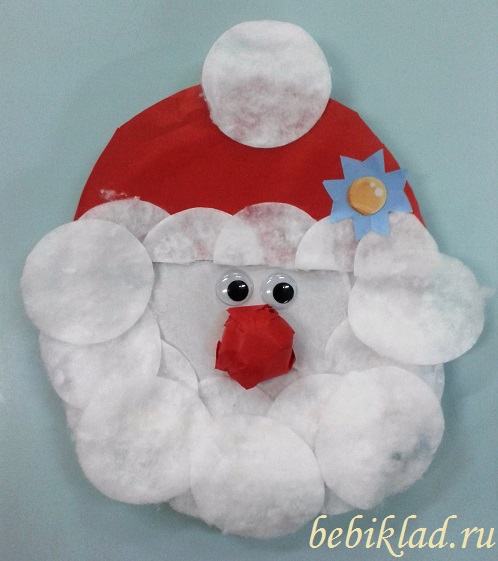
Divide the cotton pads into two parts. By the way, this is an excellent exercise for developing a child’s fine motor skills. Glue the discs so that the fleecy (inner) side is on top. After all, Santa Claus has a fluffy beard. Make sure that the circles are positioned evenly along the circumference of the plate. For volume, you can make several layers.
Glue on the hat paper snowflake, Christmas star, brooch or other decoration. Let your imagination run wild. This will add personality to the craft.
If with reverse side glue a loop, you get a Christmas tree toy or just Christmas decoration. The craft will become an interesting gift, if you write on the free side New Year's greetings. From disposable plates and cotton pads you can make the Snow Maiden and others fairy tale characters. Perhaps you will have actors for the real thing New Year's performance. It’s so great to create with children!
Santa Claus: all about your favorite New Year's character
It may seem that the New Year holiday has existed at all times. Moreover, exactly in the form it is now - cheerful the winter vacation with decorated Christmas trees, children's round dances, the beautiful Snow Maiden and, of course, Father Frost. However, this was not always the case.
A little history
In Rus', the arrival of the New Year was celebrated either in spring or autumn, and no one ever decorated the Christmas tree. Peter the Great tried to force people to celebrate the coming of another year on the first day of January just a little over three hundred years ago. True, the glorious tradition did not take hold immediately. And if in Germany Christmas trees appeared a long time ago, then in Russian cities - only by the middle of the nineteenth century. In village houses, the new custom took root for decades.
The character, without whom the modern New Year is unthinkable, did not exist at all. The image of Santa Claus emerged somewhere at the beginning of the twentieth century. By this time, Zimnik with its cold and snowfalls, and the harsh Moroz the Voivode, and the perky Morozko, and the foreign Santa Claus were known, but our beloved hero was not.
Some researchers are inclined to believe that the Russian Father Frost was borrowed from European culture, and his prototype is St. Nicholas. Others are sure that this New Year's hero was invented by the Russian people. In any case, by the beginning of the last century, the purpose and image of this character were completely formed. His character was also determined: a handsome and kind grandfather, at the same time strict and fair, inspiring trust and able to fulfill his innermost desires.
In pre-revolutionary Russia, both Father Frost and the decorated Christmas tree symbolized well-known biblical events. The tree was decorated for Christmas, the main decoration was the golden star of Bethlehem, and good Grandfather Frost gave gifts to children for the holiday. In those days, our character was not particularly popular.
The revolution and wars pushed all kinds of celebrations “for later,” and the anti-religious campaign launched in 1927 completely canceled everything related to Christmas. In 1935, the government, with the personal permission of Comrade Stalin, returned everything to Soviet citizens at once: the holiday, the Christmas tree, and Santa Claus. True, new winter holiday symbolized only the arrival calendar year, and its original meaning was lost.
Santa Claus has become one of the main symbols of New Year's celebrations. Now he has faithful assistants: cheerful and beautiful granddaughter Snow Maiden, as well as a snowman, always ready to help out in difficult situations. Over time, our character acquired personal transport: a traditional Russian troika, harnessed to a painted cart or wide sleigh.
Ordering Father Frost and the Snow Maiden to your home was already possible in those years. Thousands of Soviet children carefully prepared for the exciting meeting, learning songs and poems.
Our days
The national recognition and respect won by our hero in the Soviet country remained even after the collapse of the state. In Russia, the New Year (including the old one) and Christmas are loved and awaited; the large country begins to prepare for the celebrations almost from mid-November. Nothing is complete without a kind, fair and generous wizard. New Year's event, be it Kremlin Christmas trees or office corporate parties.
The New Year's character is also used for pedagogical purposes: every child knows that a gift from an attentive and fair Santa Claus can only be received if he studies well and behaves well throughout the year. However, in wonderful holidays gifts from good grandfather All children receive it - both obedient and not so obedient.
The most important residence of our hero is located in Veliky Ustyug, in the Vologda region. There, Santa Claus rests, receives guests, answers letters, and on November 18 celebrates his birthday.
For many Russians, an annual meeting with loved ones New Year's heroes– this is another opportunity to return to a serene childhood and believe in all the good things.
Video “How to make Santa Claus from cotton wool master class”
Before New Year's holidays There is very little time left. In all kindergartens and schools they begin to make all kinds of crafts related to New Year theme. Moms and dads are creative with their children at home. Very often children are given a task to take home and make an original New Year's toy or decoration. Often parents do not have special skills, but there is no need to be upset. This article will become a great assistant. Check out the master classes on creating Santa Claus presented below, and you will be able to make a rather original and unusual New Year's craft with your own hands, while the money will remain intact and your child will be happy.
Santa Claus made of paper. Applications for the little ones
Waiting for the New Year holidays is a wonderful reason to get creative and involve our children in this activity. The first master class is dedicated to making crafts that our kids can do with the help of their parents. This exciting process will help your child develop his perseverance, fine motor skills hands, imagination and spend time in a fun and interesting way.
On the eve of the New Year holidays, you can do a lot of bright and interesting applications. Invite your child to make an applique in the form of Santa Claus with you.
The Santa Claus model presented below is designed to decorate walls, windows, doors, you can stick it on thick paper or cardboard, and it will become a wonderful postcard.
Decorating a snow lawn
On snowy lawn First of all, you need to glue all the ice puddles, then cut out the Christmas tree figures and glue them onto paper, then start decorating Santa Claus. After that, glue the bear with the Christmas tree, the sleigh with gifts, and last of all, glue the rope from the sleigh.
Glueing Santa Claus
Separately cut out all the parts of Santa Claus in advance and paste them onto a diagram printed on paper. First of all, glue on the red fur coat, then glue on all the white parts (collar, beard, edge of the fur coat). The face, mouth, nose, white parts of the eyes, and eyebrows are glued on top of the beard. Use a felt-tip pen to draw the iris and pupil.
Using a blue marker, draw shadows on the eyebrows, beard and hat. Next, glue on the mittens. The mitten that holds the sled needs to be glued under the edge of the sleeve, and the other one - on top of the white edge, as in the image.
Felt boots are also glued under the lower edge of a fur coat. Additionally, using dark red paper, you can create a shadow between the left sleeve and the right side of the fur coat.
Bags with gifts on a sled
To begin, glue an orange bag, a red one on top of it, cut out a patch and two ties from green paper, and glue them. Using a felt-tip pen, draw the threads on the patch. At the end, you need to glue the cut out sleigh to the bottom of the bags.
Glue the teddy bear
Now you need to glue the body of the bear cub on top of the bags with gifts. Glue a hat, scarf, mittens, felt boots, nose and ear on top of it. Additionally, use a felt-tip pen to add eyes, a mouth, and the lower part of the paw. Using a pink pencil, draw in the cheeks. As for the Christmas tree, it must initially be glued to the back of the bear’s body in the shoulder area. Use a blue marker to draw shadows on the scarf and hat.

Now take care of the overall design of the picture. To do this, use colored pencils to outline the shadow and light areas, giving the picture additional volume. Leave the applique to dry, and then you can glue it to the window or door using a small piece adhesive tape.
Santa Claus made of fabric
This Santa Claus can be made in the form of a toy, and it can also be used as a thermal cover. To make a similar Santa Claus from fabric, you will need red rags, prepare calico for the base and lining, a small piece of linen to decorate the face, padding polyester for stuffing, and additionally for decoration you will need scraps of white faux fur.

Start by cutting out two body pieces and four arm pieces on the fabric you prepared for the base. An additional 2 cm will be left for allowances. Next, use a pen to indicate the location of the face.

Now assemble a red fur coat from scraps, it is made using the “crazy” technique. You need to pin one triangle to the bottom of the base with an obtuse upward angle. After this, select a strip of another fabric, but also in a red shade, and sew it to one of the sides of the triangle. Place the flaps facing each other, sew, bend and smooth them. The third strip should cover the second side of the triangle and the cut of the strip sewn to it. You also need to position the strip front side down, stitch, turn and smooth it. In this way, cover the entire surface, giving it the appearance of a red fur coat. This will be the back.
As for the front of the product, there will be a flap of linen that will serve as the face. It can be immediately included in the overall product during assembly, or it can be sewn on at the end, when Santa Claus is completely ready.
Start assembling the arms. You should learn a kind of “sandwich” of lining, padding polyester and patchwork top, which are assembled on the main fabric. First, pin all the parts together, and then quilt them.
Next, you need to trim all the parts, leaving seam allowances of about 1 cm. After this, fold the two parts of the body face to face, sew them, zigzag the edges and turn them right side out. If this is a toy, then you need to make additional detail, which will serve as the bottom. The body should be stuffed with padding polyester and the bottom should be sewn to it using blind seam. If you plan to make a case, then you do not need to perform these steps.
Do the same with the parts of the arms, leaving the holes unstitched, through them you need to turn the parts out and fill them with padding polyester. After this, you can sew them up with a hidden seam.
Next, you need to sew an applique in the form of a nose and cheeks to your face. When performing this procedure, place a little synthetic padding under the bottom to give the part more volume. A beard, mustache, and eyebrows can be made in two ways: felt parts from wool using the dry felting method, or you can make them from leftover fur. All you have to do is carve out fur collar(the fur must be different from that from which the beard is made), fur strip for a hat and the bottom of a fur coat. Fasten the hands, embroider the eyes.
DIY Sweet Santa Claus
We must always remember that we create our own mood. Therefore, to make the atmosphere more festive, make sweet Santa Clauses that can decorate any table and holiday dishes.
This recipe is quite easy to prepare and does not require any dyes. All you need are strawberries, whipped cream, and chocolate or baking chocolate sprinkles.

First, cut off that part of the berry where the leaves were located; this must be done so that the figurine can stand in vertical position. Then cut off the top, which will be used as a cap in the future.
Next, using a spoon or piping bag, place a little whipped cream on the main part of the strawberry, cover with a cap (the cut off tip of the strawberry). You also need to put a small drop of cream on top of it - it will serve as a pompom.
Make eyes from chocolate powder, and also make two buttons, using a toothpick for convenience.
You can complicate your task by adding an additional ingredient in the form of pineapple.

To perform this Santa Claus, repeat the same steps with strawberries, but in this version you need to insert a piece of pineapple between them and secure everything with skewers or toothpicks. Decorate your pineapple-shaped head with lush hair made from cream.

To place the chocolate eyes, cut small holes in the pineapple and insert the eyes using tweezers.
New Year's candlestick with Santa Claus
Fairy winter candle holder You can easily make it yourself. At the same time, in addition to Santa Claus, you can place any image with a New Year theme on it.

Take a half-liter jar and stick on it all kinds of applications of Santa Claus, Snow Maiden, bunnies, Christmas trees, etc., use PVA glue for this work. In this case, be sure to glue an applique of the fire around which all the characters are warming themselves.


Leave the jar to dry, then apply spray paint to it silver color. Let it dry. Next, you need to peel off all the applications; the best way to do this is to wet the jar with water. After this, give it time to dry again, then paint all the figures using acrylic paints.


Let the jar dry, coat the product with varnish, dry again and make additional decor candlestick. You can make snowdrifts from plaster and place them on top, and also make a stand for a candle from plaster. Allow your candle holder to dry completely.


Now all you have to do is place a tablet candle inside and Christmas story It's like he's coming to life. The flame will blaze, and Santa Claus will sparkle with new colors.
Sweet New Year's gift. Santa Claus with candy
This master class provides a description of the manufacture unusual crafts in the form of Santa Claus with candy. It can be made for souvenirs for kindergarten, or used in cases where you welcome guests with children at home. Such skewers can become bright and original decoration festive table. Therefore, read the instructions and get down to business. Don't forget to invite your children, they will also be very interested in participating in the process.

For work, prepare cardboard, wrapping paper(can be replaced with ordinary one), cotton pad, decorative elements in the form of ribbons, felt, etc., wooden skewers, glue and candy. First of all, you need to cut out a triangle from thick cardboard. Also cut out the piece shown in the photo from wrapping paper. You will need it to wrap the cardboard triangle.

Now start making the face. To do this, cut out a circle, carefully bend it and make the nose in the shape of a semicircle by cutting it out with scissors. Shade the edges of the face and draw on the cheeks using a cotton swab and blush.

Glue the wrapping paper to one side of the triangle. In this work, double-sided tape was used for these purposes. Glue a face on top.


Cut out mittens from felt, glue them and decorate the place where the candy will be located.


Glue a wooden skewer to the back of the triangle and cover it with paper on top. In this procedure, glue moment crystal was used.

Additionally, on a stick at the base of the triangle, you can tie a bow from satin ribbon. Fix it with glue, making a small drop - this way the bow will not move out.

And at the end of the work, give Santa Claus a piece of candy, attaching it with double-sided tape. Now your souvenir is ready.

Santa Claus from a plastic bottle
Such a Santa Claus can be made in just a few hours, without spending significant Money. You will need one plastic bottle, a piece of padding polyester (70 X 50 cm will be enough), the same piece of red fabric, a small piece of fabric white, as well as all kinds of materials and tools that are always needed when sewing by hand.

To begin, take a bottle, place it on padding polyester and wrap it around it plastic container. In order not to spend extra money, you can look for padding polyester at home; in any case, you will find old, unnecessary baby coat. If you still don’t have it, don’t despair, you don’t have to buy it. Wrap the bottle in several layers of fabric - this will not spoil the product. The bottle will serve as the body of the toy, and the padding polyester needs to be cut off a little above the neck - the head will be made from it.

Wrap the bottle and sew the edges together. You don’t have to pay too much attention to the quality of the seams; no one will see them anyway. The top of the padding polyester will become the head of Santa Claus, so sew up the top, and carefully tie the neck area with a rope.

To prevent the head of the toy from being made of synthetic padding, cover it with white cloth. Don't worry if you get creases, the main thing is that they don't fall on your face. Distribute them at the back. In the future they will disguise themselves.

Now start making clothes. Cut out two triangles from red fabric, sew them, sew a pom-pom from white padding at the top, and use it to make the edge of the hat.

Next you need to make a fur coat. Choose a red or of blue color and wrap it around the workpiece. Sew the edges together, it is best to sew the seam in the center, because. then it will still not be visible - we will cover it with padding polyester. Make fur for a fur coat by cutting padding polyester into strips. Sew a collar, the bottom of a fur coat from it, and also sew a stripe on the front.

Make hands from fabric strips and fill them with any material to add volume. Don't forget to wear gloves; the sleeves should also have white trim. Sew the arms under the collar, this way you will avoid unnecessary visible seams.

Now, using the same padding polyester, make a beard and mustache out of it. Eyes can be made from buttons, beads, or you can simply draw them. Give your cheeks a rosy glow; blush is best for this. Additionally draw the mouth and nose. Santa Claus from a plastic bottle is ready.
Toys and crafts in the form of Santa Claus are great decoration any interior. As you can see, it can be made from anything. So get everything ready necessary materials, call your child to help and start making real New Year’s masterpieces. You'll see, your handmade Santa Claus will look unique, bright and beautiful, and besides, the flight of your imagination is not at all limited. Good luck in your creativity and happy New Year holidays!
About how to do Christmas trees with our own hands, we talked about in our last article >>>> As you know, it is customary to put gifts under the Christmas tree, and, of course, Grandfather Frost brings them. Therefore, in this section we will tell and show how to make another popular New Year's craft - Santa Claus from paper. Here you will find a large number of ready-made patterns of paper crafts for the New Year. All you need to do is print out the pattern you like, cut it out and glue the craft according to the instructions. Santa Claus-matryoshka, Japanese Santa Claus, dancing Santa Claus, Santa Claus in a reindeer harness, Santa Claus cap and beard, Santa Claus mask, Santa Claus finger puppet, Santa Claus bag, as well as Santa Claus's vehicles (sleigh, bus, train , airplane) - you will find all this in our article.
1. DIY Santa Claus made from paper (option 1)
Homemade Santa Claus - matryoshka. It consists of boxes of different sizes with the image of Santa Claus, which can be nested into each other according to the matryoshka principle. Very easy to make. This paper craft for the New Year can be used as an educational toy.
2. DIY Santa Claus made from paper (option 2)
Santa Claus in company with the Snow Maiden, Snowman, Sasquatch, deer and Elves.

3. Paper Santa Claus (option 3)

4. Origami Santa Claus (option 4)
For this New Year's craft you will need a square paper, on one side - red, on the other - white. For detailed video instructions, see the link.

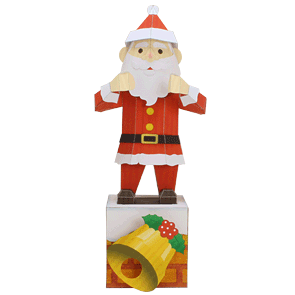
5. Homemade Santa Claus (option 5)
Miniature Santa Claus from our favorite website CREATIVE PARK from CANON. You can put it on the table, or you can hang it on the Christmas tree as a homemade Christmas tree decoration.

Dancing Santa Claus from the same site. See link >>>>
Santa Claus in a reindeer sleigh >>>>


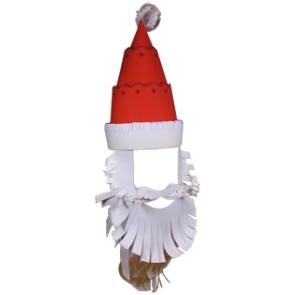
Santa Claus hat with beard >>>>
6. Homemade Santa Claus (option 6)
Paper Santa Claus on a sleigh >>>>

7. How to make Santa Claus with your own hands (option 8)
DIY finger puppet Santa Claus made of paper. On the same site you will find a Deer finger puppet. Now you can show a New Year's puppet show.

8. How to make Santa Claus out of paper (option 9)
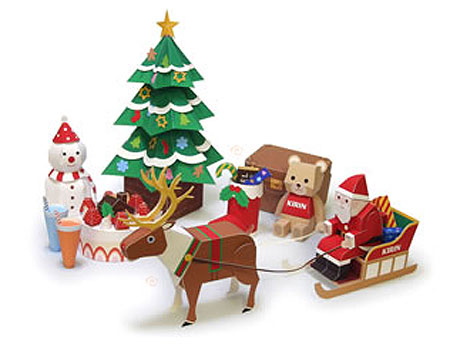
Whole New Year's scene from the Kirin website: Santa Claus in a reindeer sleigh, Christmas tree, snowman, chest with gifts, etc.
9. How to make Santa Claus out of paper (option 10)
Another homemade Santa Claus made from paper. This paper craft for the New Year is very easy to make.

10. DIY Santa Claus made from paper (option 11)
New Year's paper craft - cheerful Santa Claus on a sleigh. You can download the craft diagram from the link >>>>

11. DIY Santa Claus made from paper (option 12)
The highlight of this New Year's paper craft is that paper grandfather Frost is in sitting position. It can be placed on the edge of a bookshelf or table, for example. Original craft for the New Year with your own hands from the Disney site FamilyFun.

Who knew that these days they would be fashionable? Christmas decorations from the childhood of our parents and grandmothers, and that people will buy them for unrealistic money. One of these toys is Grandfather Frost made of cotton wool, which stands under the Christmas tree and in New Year's Eve brings us gifts.
It turns out that it is not at all necessary to run around flea markets and overpay. You can make this Santa Claus yourself. To do this you need to stock up on patience, time and mood.
For work you will need
Materials:
- cotton wool (it should be in layers, not lumps);
- glue (starch + water);
- wire for frame;
- toilet paper (for papier-mâché);
- foil for blanks;
- paints (acrylic and watercolor);
- wooden stand;
- padding polyester;
- threads
Tools:
- wire cutters;
- brushes (hard – for glue, synthetic brushes No. 6 flat, No. 1 round – for painting);
- scissors;
- sewing needle.
Before starting work on making Santa Claus, we prepare a lot of papier-mâché. Add a tablespoon (without top) of starch to half a glass of cold water and bring to a boil. Separately tear into small pieces toilet paper. Add paper to the resulting warm glue and rub the resulting mass well with your fingers. It should be like dough.
Beginning of work
Head. The best option is if we find a head from old doll Santa Claus. But it’s not always possible to find such wealth in our apartment, so we’ll use what we have on hand. We will need food foil 50-60 cm long. We make a large ball out of it and begin to crush it to the size and shape of a chicken egg.
Where Santa Claus's eyes should be, we press the beads. We put a layer of papier-mâché on our blank. Very important to know! – each layer of papier-mâché must dry well. Then we make a “carrot” from the mixture and smear it where the nose is. We make small balls - we get cheeks, chin, forehead. Don't forget to dry.
Now we apply a little of our mass in the eye area and form the eyelids. After the face is ready, we sculpt the back of the head. Dry everything well and polish it sandpaper face of Santa Claus.
The head is ready, now we need to paint the face. Take white or ivory acrylic paint and add it pink color. You can add watercolors. Stir and get the color we need for Santa Claus's face. Apply the paint with a flat synthetic brush No. 6. We make 4-5 layers. Dry each layer well. Paint the eyes with round brush No. 1. Apply pink paint to a sponge or piece of foam rubber and swab the cheeks.
Torso. We calculate the proportions as follows: the height of Santa Claus should fit six of our heads. For the frame we need, preferably, a three-core copper wire in a braid.
We cut the braid between the wires from the top to shoulder level. At the top, we will put the head on the middle pin, and bend the two side wires horizontally - we get shoulders, then we bend it down, and we get a frame for the arms. We make a loop in the palm area. From below we cut the braid to the line of the hips, bend it horizontally - we get hips, and bend the wire down - these will be our Grandfather’s legs. We lift the middle part of the wire up, strengthening the spine. We immediately bend our arms slightly at the elbows.
We cut the padding polyester into ribbons 3 cm wide. And we begin to tightly wrap our frame. We wrap the neck, shoulders, arms (separately), torso. Santa Claus's hands will be in mittens, so at the same time we use padding polyester to give the ends of the wire the desired shape.
In the lower part of our Santa Claus doll, the legs will not be visible from under the suit, so you should wrap two legs together with padding polyester until you get a blank for the suit. For this procedure we will need 50-60 cm of padding polyester. We take a needle and thread and secure our design with stitches. Having received such a torso, we see that our Grandfather Frost begins to take on a human appearance.
Cloth. Now let's start working with cotton wool. This technique is called cotton papier-mâché. To begin with, prepare the glue in the same way as for papier-mâché, only add a little blue or blue to the glue watercolor paint. As a result, when the cotton dries, it will have a cool, bluish tint, like snow.
- We lay out the first layer of clothing on the doll itself. Lay out the cotton wool thin layer(5-7mm) on the table, and with a brush, coat it well with glue. The pieces of cotton wool should be small. First we form a hat on the head of Santa Claus. We smooth it with our fingers so that the joints are not visible. Important: dry thoroughly. Using the same principle, we make mittens, sleeves (from mittens to shoulders) and a suit on the body of Santa Claus. We iron our dress thoroughly and dry it.
- Second layer. Before doing this, you need to prepare a layer of cotton wool measuring 50*50 cm. Lay the cotton wool on the table in a thin layer (5-7mm), coat it well with glue and leave to dry. While the cotton wool dries, on a separate sheet of paper we draw up costume patterns for our Santa Claus. We transfer these patterns to an already dried layer of cotton wool.
We will get the following details:
- hat, cap lapel;
- eyebrows, mustache, beard;
- sleeves, sleeve cuff;
- mittens;
- front half of the suit;
- back half of the suit;
- cuffs at the bottom of the suit;
- lapel along the side of the suit;
- collar;
- belt.
The above parts must be cut out with scissors and again soaked well with glue. This will already be clean for us, upper layer clothes. We begin to “dress” the doll, immediately laying out the folds and draperies of the clothes. We smooth it well with our fingers and let it dry.
Stand. We take a wooden board measuring 15*15 cm, make two holes in it (to glue the wire from the legs). We prepare a layer of cotton wool, 20*20 cm in size, soak it with glue and place it on our stand. If necessary, there can be two or three such layers. Dry well. There is no need to paint the stand; cotton wool perfectly imitates snow.
We dye the clothes of Santa Claus, while taking into account that this technique is very valuable natural color cotton wool. Where necessary, apply shadows with paint.
Completion of the production of Santa Claus
Remained finishing touch. We glue our cotton Santa Claus into the stand, give him a staff in his hands - it can be a sushi stick wrapped in thread, a bag with gifts - we make it according to the principle of cotton papier-mâché.
Also, for Santa Claus you need a Christmas tree, which can be made from beads. (You can find out how to do it by).
We are pleased to admire the work done and welcome the New Year.
A toy Santa Claus with his own hands will bring a holiday to any home. Whether you believe or not in a magical old man with a bunch of gifts in a bag, every interior is full of his images. But children believe in him unconditionally, therefore, when making a craft in the form of Santa Claus, they are probably expecting a real one, bringing them a whole mountain of long-awaited gifts. Give your children a real fairy tale and make with them a doll, paper, plasticine - any Santa Claus that your imagination can draw. And if our photographs from interesting ideas, then even better.
DIY Santa Claus
We will devote our entire article to how to make Santa Claus with your own hands. After all, in fact, crafts can be very diverse: sewing, felting, knitting, appliqué, painting and modeling. Well, we'll start with decoupage.
This plate with the image of Santa Claus is made using the decoupage technique. A beautiful napkin with the pattern you need to divide it into layers, you will only need the top one, the one on which the pattern is applied.
If you are decorating a plate or any object whose surface you will not use, you can use PVA glue for the work. But in this work the technique was used reverse decoupage, that is, take a transparent glass plate and stick the napkin on the back side, and on the front side it will be visible.
So, put a napkin on the back surface, degreased with alcohol, and moisten it with water. Make sure that the napkin is well soaked, but does not come apart. Be sure to remove excess water with a cotton swab. While the paper is still damp, cover the surface of the napkin acrylic varnish, thin layer. It should be applied with a narrow brush, moving from the center. The varnish should dry for quite a long time, about twelve hours. If desired, you can apply another layer, also allowing enough time for drying. Patterns and ornaments are applied to the clean surface of the plate using acrylic paint, you can paint over the entire surface of the plate. Another layer of acrylic varnish will complete the craft.
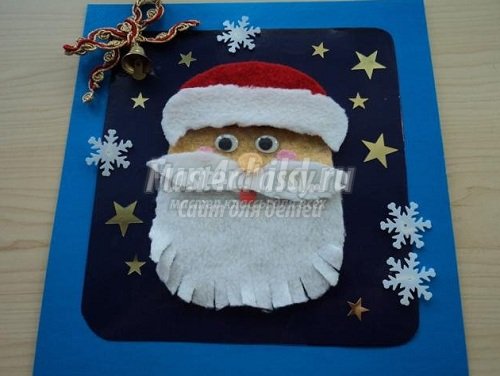
DIY felt Santa Claus

And such a Santa Claus with his own hands can decorate your christmas tree. It is made from felt, and you and I already know that it is completely simple to make.
To sew a toy you will need small pieces of white, beige and red felt. Of course, it’s a pity to buy large pieces to make such crumbs out of them, but you can make a lot of these Santa Clauses and give them to all your friends and acquaintances.
- On paper, draw a pattern for your craft; you will need five elements - head and beard, face, edge, hat, mustache.
- From beige felt we cut out one element - the face, from red felt - two elements of the hat.
- From white we cut out two elements of the head with a beard, the edges and a mustache.
- Now we create a mustache and a hat, sew the elements together not completely, and fill them with filler.
- We glue a beige face onto one part of the head using Moment glue, sew the two parts of the head together, and fill them with silicone filler.
- We put the hat on the top of the head, secure the bottom with a pin, put the edge along the bottom and sew it on hand stitches. At the same time fixing the hat.
- You need to sew the edge on both the front side and the back side; we cut out two elements for you.
- A voluminous mustache, beaded eyes and a nose made from rolled felt with silicone are sewn onto beige felt.
- The end of the hat is crowned with an elegant bell with braid for hanging the toy.
There's more you can do the simplest postcard made of felt with Santa Claus. You don't even need a pattern - just use your imagination and creativity. For beginners, we recommend that you first make a paper sketch of the craft, and only then transfer it to felt fabric. Use glue to connect pieces of fabric together.
DIY Santa Claus made from plywood


DIY Santa Claus made from paper

New Year is a wonderful occasion to make an applique on greeting card. And who can decorate our applique better than Santa Claus with his own hands made of paper? You can glue either simple pieces of colored paper or strips folded using the quilling technique. In the second case it will be more effective. If everything is more or less clear with the figure of Santa Claus, then we will tell you in more detail how to make a Christmas tree. You will need sheets of double-sided colored paper. Cut out strips from it, but not even, but with small sides of two centimeters and a centimeter. Use scissors to cut the fringe strips on one side and use a wooden skewer to roll them into a roll, starting from the narrow edge. When you have rolled up the entire strip, secure the straight edge with glue and carefully straighten the fringe so that the element becomes as flat as possible. You will need a lot of such patterns; you will need to lay them out and glue them onto paper in the shape of a Christmas tree. Decorate the centers of the elements with folded multi-colored stripes.

Using thick paper or cardboard, you can make other important attributes, for example, make Santa Claus's sleigh with your own hands. These can be, or you can use a rolled one for the base newspaper tubes, and we suggest you make a sleigh based on old typewriter, from which the body has already been removed. You need to cut out four elements from cardboard - the sides of the sleigh, the back and the front. You can color the sleigh with pencils and paints, and rhinestones or shiny stickers will add a snowy winter texture. You can put not only Father Frost and the Snow Maiden on your sleigh, but also put a bag or box with a gift in them.
Sew Santa Claus with your own hands
Using fabric you can make toys that you would never buy in a store. You can sew Santa Claus with your own hands and your child will simply be delighted with this toy. Santa Claus tilde has gained enormous popularity.

A distinctive feature of these wonderful dolls is a sweet facial expression, but at the same time very small facial features, as if simply outlined, rosy cheeks, plump tummy shapes, long legs and arms, Natural, soft fabrics, which are always used for sewing tildes, are welcomed by all mothers, since the child will both enjoy playing with such toys and be safe.

You can not only sew a figure or Santa Claus costume with your own hands, but also knit it. A knitted figurine will be a favorite toy, and if it is not stuffed with stuffing, then such dolls can be used for a homemade puppet theater.
How to sew Santa Claus with your own hands

But Santa Claus can be not only a toy, but also a decoration for a bag of gifts. We'll tell you how to sew Santa Claus with your own hands and place him on the packaging for New Year's souvenirs, which we can then give to our relatives or friends. You can embroider the face of Santa Claus using satin stitch or cross stitch, you can make a fabric one using glue, or you can make a crocheted element, which you will then sew on a bag. It is done quite simply - the first row of loops is closed into a ring and tied with single crochets. When the circle is already of sufficient size, tie it with several circles of snow-white threads, then change the thread to red and knit a hat. Thread long white threads into loops into the bottom row, and then trim the resulting beard with scissors. Also make a red nose, like the real Santa Claus, from threads knitted in a circle. The resulting element is sewn to the finished bag quite tightly. It is better to tie the top of the bag with an elegant ribbon.

For the most simple Grandfather Do-it-yourself frost patterns will also be the simplest. These are two large balls - one for the body, one for the head. Having cut out the circles, fold each of them in half, baste the bottom with thread not all the way, and when we have already filled the fabric with padding polyester, tighten the thread so that we get a ball. Santa Claus will also need an elegant hat with a pompom, made from fabric swatches. We connect all the elements together, sew the eyes onto the face, outline the mouth with red threads, small ball we make the nose. We create a beard and mustache from padding polyester, and we also use it to make the edges of a hat and a fur coat. Santa Claus for New Year's composition you're ready.
Do a real doll Making Santa Claus with your own hands will be more difficult, because this is an entire art. ? For such crafts, a combination of modeling and sewing is most often used. With the help of skillful stitches, you can “sculpt” a face for a toy, and a fur coat, hat, and boots are simply sewn from fabric. This combination is called sculptural textiles.

For Santa Morse, you need to create a frame using the technique of sculptural textiles. For these purposes, we will use a small plastic bottle into which a wire is inserted in a loop into the place where the head will be attached. The same loops will serve as hands; they will not be visible at all under the mittens. We paint a face made of fabric, glue on eyes, and attach a beard made of artificial fiber. A fur coat, felt boots, an elegant sash - we make everything, even Santa Claus’ staff, with our own hands.

If you are familiar with the technique of felting wool, otherwise called felting, then you can make this variation of the fairy tale wizard. This technique is very difficult, but at the same time, dolls created using the felting technique always look original and complex. Base material is wool, which is repeatedly pierced with a special needle until the material becomes dense and the fibers tangle together, forming a dense structure. Since such a craft is hollow inside, it will not require much material from you, but if you put such a Santa Claus under your Christmas tree, then the delight of everyone you know is simply guaranteed.
We hope that we have provided you with enough options on how to make Santa Claus with your own hands. Don't forget to please the New Year's old man by making his granddaughter - the Snow Maiden!
Key news tags: ,
Other news