The mental and physical health of the child is the main task of parents, educators and other professionals. From birth, the development of the baby goes on continuously and every second. To increase the efficiency of this process, it is necessary to make the world around us diverse, bright and informative. For this, certain conditions must be created. One option is to make educational books with your own hands.
Types of educational toys
The leading activity of a child from birth to three years is the game. This fact must be taken into account and actively used in the development and education of the baby. Any game is impossible to imagine without toys. But they should be useful for the child and correspond to his age characteristics.
It is not at all necessary to buy a toy or a developing book that is useful for development in a store for a lot of money. It can be easily made independently from improvised materials. There are many ways and step-by-step instructions on how to make a toy or how to sew an educational book with your own hands.
Such items can be divided into several categories:
- books;
- cubes;
- panels and rugs;
- pillows;
- stands;
- houses;
- animal figures, etc.
In this article, we will talk about how to make educational books with your own hands. We will also consider the purpose of such toys.
What are educational books?
As a rule, such cognitive toys are intended for children from one year old.
By purpose, they can be divided as follows:

Why do they make soft developing books with their own hands? They stimulate the development of fine motor skills of the hands. This has a positive effect on the mental development of the child, as well as on the formation of speech.
Materials for the manufacture of educational books
It is often thought that the manufacture of an educational toy or book requires expensive materials and special skills. Not at all!
In order to make educational books with your own hands, it is enough to have a desire. Here you can use various improvised materials, such as:
- paper and cardboard;
- fabric, including felt, fleece and even knitwear;
- artificial fur;
- leather or leatherette;
- threads of different thickness;
- tapes;
- Velcro;
- buttons;
- beads;
- cords;
- buttons;
- bells, bells;
- rustling cellophane wrappers;
- cereals (rice, peas, buckwheat);
- ready applications.
Developing books made of fabric are very interesting. With your own hands, you can combine its various types: cotton and felt, silk and knitwear, and the like.
Cardboard and paper book
This type of product is intended for children from a year. The book may contain information about any one animal, color or shape. It can be done using a photo album, files, cardboard and plastic rings. Consider how a do-it-yourself paper developing book is made. A master class on making this type of book is described below.
Necessary materials:

Manufacturing steps:
- For a book using a photo album or files, fill each page (file) with cardboard the same size as the file. To do this, cut out cards from thick paper to fit the page. If the book will consist only of cardboard, without files and an album, then you need to cut out pages from dense double-sided material of the same size.
- So, we are making a developing book with our own hands. Photos can be cut from magazines, coloring books or just draw yourself. You can also find pictures on the Internet, and then simply print them out or take a picture of the necessary items, and then insert the photos into an album.
- Options for placing images on the page:
- one large picture on one page;
- one large photo and several small ones;
- image + poem or short story.
4. Insert pictures into an album or file. If the book is without files and an album, you need to connect the cards together with plastic rings, after making holes with a hole punch.
To make a cardboard book last for a long time, you can laminate the pages before binding.
Do-it-yourself cardboard-fabric educational book: master class
This type of product is similar to the previous one. It is suitable for children from one year old.
Necessary materials:

Manufacturing steps:
- With the preparation of the foundation, a cardboard-fabric educational book begins. We make patterns with our own hands from separate sheets of thick cardboard of the same size.
- Next, we cut a blank from the fabric in the form of two horizontally located pockets. The size of one part is equal to the size of a cardboard blank. We sew along the edges and in the middle. We get two identical pockets.
- Then we insert a cardboard blank into each of them and sew it on a typewriter. The base is ready!
- We add developing elements consisting of threads, buttons, lacing and other types of sewing accessories.
- We put the blanks with pictures and developing elements together and sew them in the middle on a typewriter, thereby connecting them together and forming a book.
Felt books
Do-it-yourself educational books made of felt are very popular with children due to their bright colors and soft texture of the material. The manufacture of such toys is in many ways similar to the manufacture of products from cardboard and fabric. Their topics can be very diverse and depend on the tasks. Such a book is suitable for children from 6 months (without using cardboard) and from 1 year (with cardboard).
Necessary materials:

Manufacturing steps:
- Page formation. To do this, you need felt, which must be cut into rectangles of the same size. Next, we sew two rectangles together with an overcast seam on a typewriter or manually. If the basis is cardboard, then it must be inserted between the layers of fabric, and only then sewn.
- We decorate the finished pages of the book with the help of applique, threads, sewing accessories, lacing, based on the subject of the book and the developmental tasks set.
- Connecting pages. When they make educational books for children with their own hands, there are many ways to fix the pages:
- stitching by hand.
- fixing the pages with a kind of felt binding. To make it, you need a strip of fabric: the length is equal to the length of the page of the book, and the width is the total thickness of all pages plus the distance between them. For convenient opening and closing of the book, the distance between the pages should be 0.2-0.5 cm.
- If there is cardboard at the base, then it is better to make double pages (turns), and they should be stitched in the middle, according to the principle of fastening sheets in a regular notebook.
Do-it-yourself soft developing books are easy to make. They are very amusing to kids, arouse interest and thus stimulate their development. Let's look at several options for making pictures for educational books.
Sun
To make a figure of the sun you will need:
- yellow fabric;
- threads, cords;
- scissors;
- needle with thread.
From the fabric, cut out two circles of the same size. Between them at the edges we add threads and cords of different thicknesses, sizes and textures. These will be rays. We sew the resulting blank and fix it on the page of the book. You can weave pigtails from the rays or tie them into ponytails, and make eyes out of buttons.
This option is perfect for studying color, shape, the concepts of "day" and "night".
Octopus
In order to make an octopus, you need:
- stencil cardboard;
- textile;
- scissors;
- buttons for making eyes;
- cereals or small bells;
- thread with a needle.
We start creating an octopus by making a stencil. To do this, you need cardboard and a pencil. On the cardboard we draw the body and tentacles of the octopus, and then cut out the stencil along the contour. We apply it to the fabric, after bending it in half, circle it, and then cut it out. It turns out two identical blanks. We sew them together.

We add grits to the tentacles or sew bells on the bottom. We set the buttons in place of the eyes and attach the octopus to the page of the developing book.
This option contributes to the development of fine motor skills, which favorably affects the mental development of the child, as well as the development of speech. In addition, with the help of an octopus, you can form concepts such as color, marine life.
Butterfly
To make a butterfly you will need:
- stencil cut out of cardboard;
- felt;
- textile;
- scissors;
- thread with a needle.
We put the stencil on the felt and trace along the contour with chalk or a pencil. Cut out the resulting workpiece. From the fabric of the same color as the felt, cut out a square a little larger than a butterfly. We sew the fabric to the page of the book in the form of a pocket in which we hide the butterfly.
By the same principle, you can make several multi-colored pockets and butterflies, and then place them on the page of a developing book. You can also hide in one pocket not one, but two butterflies of the same color, but of different sizes.
This option is perfect for the formation of the child's concepts of color, size, insects.
Velcro applications
To make applications, you need to prepare:
- felt;
- scissors;
- Velcro;
- needle with thread.
First, we cut out the figures necessary for the book from felt: animals, wagons, a train, cars, etc. Using a needle and thread, we attach Velcro to the figures. On the page of the book where the figures will be attached, a thematic background should be selected, that is, a railway for a train or animal houses and the like.
This option can be used to develop thinking, get acquainted with the outside world, theatricalization of your favorite fairy tale.
Lace appliqué
Children are very fond of lacing something, so this addiction can be used to advantage. As an idea, you can apply an application consisting of shoes with laces. How is such a developing book made with your own hands? Its patterns are very simple, and the result will greatly amuse the baby.
To make such an application you will need:

We make shoes from fabric or felt using a stencil. We make holes for the laces, decorate them with accessories. We sew the shoes to the page of the developing book and tie the laces.
Thanks to such an application, a child can easily learn what shoes are like, develop fine motor skills of hands, learn to pull, pull, lace.
Whatever version of the product would not be chosen, it will always be of interest to the baby. And do-it-yourself educational books made by yourself will bring the child not only double benefit, but also joy, since they will also contain a piece of maternal warmth. And this is one of the most important components of the development of a small person.
A good educational tool for children will be a voluminous book. Its use allows the child to develop not only logic, but also fine motor skills: after all, he can feel every component of the pages. You can prepare such a manual yourself.
Materials and tools
To create a soft book, you will need the following materials and tools:
- Multicolored felt.
- Yarn, hook.
- Multi-colored threads and a needle.
- Beads of various shapes and sizes.
- Velcro tape (hook + loop).
- Buttons on the leg.
- Scissors.
To attach the parts, you will need a thread with a needle and a glue gun. Many elements and the pages themselves can be sewn on a sewing machine (faster and more reliable).
Armed with everything you need.
We make a felt developing book with our own hands
On a sheet of felt we embroider the name of the child for whom the allowance is intended, decorate with additional elements from pieces of felt.
On the right side in the middle we sew a button, on which a loop will be thrown - a fastener.
Building a Fence Page
- Background: dark (night), moon, stars.
- Fence: two crossbeams (about 1 cm wide) and "shtaketiny". On the strips-beams at the same distance, we sew adhesive tape (loops), glue the second part of the Velcro (hooks) on the inside of the "rails". We sew the crossbars to the felt sheet. We fasten the shtaketins with Velcro, number them with a felt-tip pen.
- Jug: From felt we cut out 2 details of the jug. We sew the sides and bottom so that it can be “put on” the fence.

How to work? Build a fence with the child, placing the pickets by numbers or in reverse order, put the jug on a certain rail (number 4, for example).
Page "In the Snowdrift"
- Background: blue (day), sun.
- Snowdrift: sew to the sides and bottom of the page.
- Tree: fastened from below to the "snowdrift", the upper part is sewn to the background sheet. We glue snowballs to the branches.
- Hare and mouse: cut out two identical parts from felt of the desired color, embroider eyes, nose. From yarn we knit a rope from air loops. We sew with a looped seam along the edge, during the process we fix one end of the rope in the back area or between the ears. We attach the second end to the snowdrift on the reverse side.

How to work? Ears protrude from the snowdrift. The child guesses who is hiding in it. If the sun has removable rays (on buttons), then it will be possible to add or subtract them.

Abacus page
To make an abacus, we wind 10 beads on the threads. You can take the same or different in shape, size, color. We fasten them to felt strips, which we sew onto the background sheet on both sides.
How to work? First you need to make out how the beads differ. Count their number. Separate a certain amount.

After that, examples of addition and subtraction within 10 are worked out. When the child learns to quickly perform actions, you can use the abacus to count with a transition through a dozen.
Lacing Page
We sew loops to the strips of felt, fasten them on the background sheet. From the yarn we collect a chain of air loops (you can take an ordinary lace), fix it at the ends with paper clips, wrap it with thin tape. Then we thread into the loops.

How to work? The child learns to lace up the "boot" in different ways, to make a knot, to tie a lace with a bow.
Page "Pigtails"
We make cuts on a strip about 1 cm wide. We thread and collect chains of air loops - 3 in each. We fix the strip at the top of the sheet.

How to work? The child learns to weave pigtails, fix them with an elastic band (you can take a small one from the weaving kit).
Geometric Shapes Page
We cut out different shapes from felt (you can make them double to make them stronger). On the background sheet, we circle them with a pencil along the contour, highlight with embroidery. We use sticky tape to fix it.

How to work? The kid correlates the figures, finds the same ones (on the page and among the figures), fixes them. Among them, polygons and curvilinear figures can be distinguished, divided into groups according to color shades.
Page "Polyanka"
On the page we sew buttons on the legs. We cut out flowers from felt, make cuts, decorate with small ladybugs.
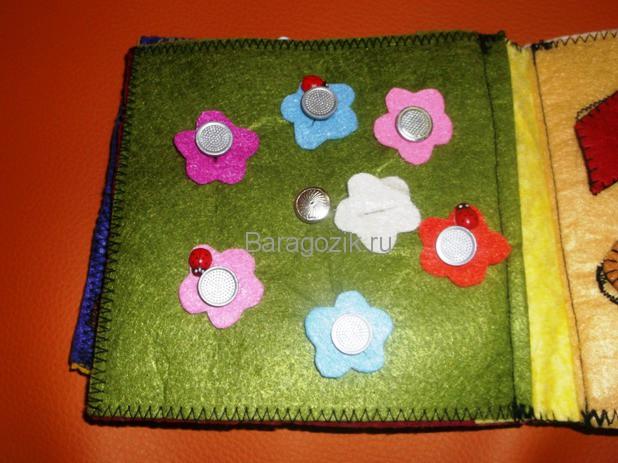
How to work? Flowers are worn on a button. You can compose a task according to the picture: there were 7 flowers in the clearing, 3 were plucked, how many are left? Or: ladybugs sit on 3 flowers, how many flowers without insects?
Clock Page
All details are cut out of felt, glued or sewn to the base. With the help of a looped seam, we imitate the strokes on the dial. We fix the arrows so that they can be moved: for this purpose, you can use a button on a leg or a wire.

How to work? With the help of this page, the concepts of time are worked out, children are trained to determine the time by the clock, set the right time.
Surprise Page
Last page. We sew a pocket to it, covering the valve.

In the pocket you can hide any figurine made of felt (in this case, a cat). To fix the book, we sew on a button, wind a loop around it - a fastener that will be worn in front.

How to connect the parts?
To connect the pages, we use any fabric (in this case, viscose napkins for cleaning).
We cut rectangles with a length equal to the height of the book and a width of 3-4 cm. And one rectangle - 10-12 cm wide (outer spine). We sew them between the pages according to the scheme shown below.

The next stage is the stitching of the pages along the open edges, fixing the inner and outer parts of the spine.

The book is ready! Now you're ready to start learning with this colorful hand-made manual!
Felt is a unique material that is widely used in needlework. Its rather dense structure allows to produce a wide variety of products. Having tried at least once to make crafts from felt with your own hands, it is impossible to stop. This activity is very exciting, I want to create again and again.
So where do you start? What felt products are the easiest to make and what can be done with children? For beginners, we advise you to choose the simplest schemes for creating hairpins, brooches, bags. Felt patterns can be easily made by yourself. Pay attention to the master class containing step-by-step pictures and templates, so it will be easier to understand the sequence of actions.
You can buy felt for making felt crafts in special craft stores. Choose beautiful and bright materials with your children; using felt, crafts will turn out to be original, very unusual.
What is required for work
Before you start needlework, we recommend that you purchase the necessary materials:- Felt of different density. For bulky crafts made of felt and toys, choose a thinner material. It can be sewn without any difficulty and subsequently filled with holofiber or padding polyester.
- Threads. Choose colors that best match the tone of the felt or contrasting shades.
- Needles. Take several different needles, they will be needed to work with felt of different density.
- Pencil. It will be necessary for cutting the material.
- Awl. This auxiliary tool will help you make small and neat holes in the felt.
- Scissors. Use sharp and large.
- Glue gun. It is useful for beginner needlewomen.
- Elements for decoration. All kinds of pebbles, buttons, fasteners and beads will help to give felt crafts a special look.
Crafts for kids
A variety of toys that develop books, which are created with their own hands, turn out to be special and arouse great interest among kids.Make unique easy felt crafts for kids, every day you will improve your acquired skills!

letters
Soft letters made of felt can be used first for playing with the baby, and later for learning. Use simple patterns, carefully cutting out the outlines of each letter of the alphabet. After the work with the scissors is completed, you can proceed as the longest stage - sewing together the parts of the letters.
Well, then the most pleasant thing is filling the products with synthetic winterizer, this can be done together with the child. By the way, according to the same principle, you can make a mobile from felt.


Patterns of letters:


Fascinating activities with children can be carried out using fabric books. Making books from felt is not as laborious as it might seem at first glance.
Brooches
A bright brooch draws attention to your outfit, so many women carefully select this accessory for a particular look. Make a felt brooch with the step-by-step instructions below, and you will see that it is quite possible to create them yourself using materials at hand.
Snail patterns (click on the picture, it will enlarge and then download it):

If you have an old zipper and felting wool on hand, they will come in handy for making a felt brooch. The stylish finish of the accessory is a unique detail of your image.
Ideas for inspiration:


Handbags
An original felt bag will complement the elegant look of every girl. A small and bright accessory is easy to make yourself. We have prepared for you a master class that demonstrates step by step how to create a felt bag. For work, you will need to take not only felt, but also cotton fabric, which will be used to create an applique and a pen.It is worth noting that a bag made of felt can be detailed with buttons, embroidery (ornament). Focus on the accessory with the use of metal elements.


Food
Even food made of felt looks realistic, almost any vegetable or fruit can be imitated thanks to a special material finishing technique. Undoubtedly, such work will be interesting for children, involve them in this process.Our step-by-step instructions with photos will help you create a "delicious dish". Surprise your loved ones with an unusual craft, the felt food “cooked” by you will be perceived as a real masterpiece.

Hairpins
Romantic felt hair clips will decorate any little girl's hairstyle. Graceful roses of a rich pink and red hue will look great in your hair.You will spend a minimum of time on making hairpins with floral motifs and will delight your child with an excellent hand-made gift.

A few more ideas:


Mobile phone cases
Today, a felt phone case is a unique accessory. But there is no need to purchase it if you have some felt and step by step instructions on hand.

We present you the original design of a children's cover with the well-known Om Nom. Below are instructions for creating a case for glasses or pens with a cute dog and a bunny, a small owl can also be attached. The craft turns out lively, bright.
This cover is designed for phone size: 12.5 cm by 6.5 cm. To download the manual in large size - click on the picture and only then click save.


Let's create an unusual glasses case and a fashionable felt phone case together, you will definitely succeed!
More ideas:

Additionally, felt key chains can be made.
Owl pattern:

Pattern for keychains (first click on the picture, and then save):

More keychain options:


Needle beds
For a needlewoman, even a needle bed should be special! We suggest you make it from soft felt. As a result of a simple but exciting work, you will get an unusual felt pincushion that will store all of your needles.
Fantasize, detail crafts, you may want to give some to a friend, sister or mother.


Decorations
Delicate, romantic and elegant earrings and necklaces can be made not only from metal. We invite you to learn how wonderful felt decorations are created. This craft will be a great gift for mom on a child's birthday.


By following the detailed instructions, you will master the process of making amazing jewelry that girls will love to wear. Rest assured, your efforts will be appreciated.


Below we attach diagrams that will help you in needlework. Engage in the manufacture of products with the children, it will be a lot of fun. For convenience, you can enlarge the diagram to the desired size, which will make your work easier.


Pattern, click on the picture and download.
Good afternoon, dear needlewomen! Do you agree with the opinion that children deserve the best? And most importantly. every mother is ready to give it to her baby. In our previous article we talked about a business board, and in this one we will discuss one more thing for the development of your baby - this is a developing felt book.
A book made of felt is a very useful and original toy for a child. It has many useful functions for a baby: it develops tactile sensations, teaches role-playing games, counting, the alphabet, helps develop fine motor skills, attentiveness, a specific set of functions depends on the content of the books.

The child loves to explore the world around him, fingers touch and learn about various objects and surfaces and transmit signals to the brain. Especially your baby will like a soft book made of felt, because it is so pleasant and curious to look at it!
Also, such felt books are called quiet (quiet book), due to the fact that while the baby is busy with a book, silence and tranquility will reign in the house.
A felt book can be purchased at the store, sewn to order or made by hand.
Don't worry, even a novice needlewoman can sew a felt book, and the "Craftswoman" will tell you how to do it. Therefore, you need inspiration and materials for sewing a felt book with your own hands.
DIY felt book video
Which felt is better?
Felt is produced mainly in several countries, including the most affordable ones in China and Korea.
Chinese felt more suitable for beginner needlewomen, as it is quite cheap and suitable for improving skills, after a short operation, spools and scuffs appear.
Korean felt- does not roll, will not be erased, better quality, but at the same time noticeably more expensive.
The thickness of the felt also varies - 1 mm, 2 mm, 3 mm, 4 and 5 mm. Korean felt is also hard and soft.
It is better to buy felt in a set, there are already included different shades that will be useful to you. Some sewing accessories will also come in handy.
DIY felt book
Before you start sewing a developing felt book, first work out the idea:
- The age of the child (the content of the book depends on this)
- Book size (20x20 cm, 20x30 cm)
- The book will be only made of felt or combined with cotton, fleece.
- It is required to sketch a sketch of the book, based on fittings and filling - think over each button and ribbon.
- When the sketch is ready, prepare patterns for each part. You will find some patterns for felt products in this article.
- Consider how the book will be bound and bound.
- Work through the plot and tutorial elements.

By the way, about patterns: if you have the slightest drawing skills, you can draw a unique freehand pattern and cut the pattern according to the drawing, or you can print a drawing or a coloring book for children and cut out the pattern from there.
It is not difficult to cut the basis for the pages for a felt book, count how many pages there will be and cut twice as many. Plus felt for the main page.

Materials for the book from felt.
- of course, the felt itself. Approximate quantity: for pages 11 sheets 20x20 centimeters, for elements 20 sheets 15x15 cm.
- pins
- threads to match the felt used.
- decorative buttons
- beads
- Velcro tape
- Buttons
- Laces
- Holofiber or synthetic winterizer
- Rep tape
- zippers and so on
*The APPROXIMATE quantity and types of materials are given. You can change the materials and accessories at will.
How to sew a book out of felt.
All developing felt books are sewn according to the same principle:
- Glue a sealant to the facial tissue - adhesive fabric with an iron.
- Cut out the details and elements of the book from felt
- The elements used are attached to a sheet of felt with pins, and sewn on a sewing machine or by hand. Two completed pages sew together, hiding the wrong side. then we finish the removable elements and put them into the finished pages.
- If you are using removable Velcro elements, so that the child does not damage the felt by accidentally closing the page without attaching the element, sew the soft part of the Velcro onto the page, into the part with hooks on the part.
- seams, which are used when sewing from felt:
- "Forward with a needle" (for removable parts);
- “Behind the needle” (for sewn parts);
- "Loopy" (in order to arrange pages).
- Page fixing books made of felt can be different, choose which one you like best: grommet, tape, looped, you can fasten with strips of felt.
- you can use curly scissors for processing pages - the book will look much neater.
- Can be sewn between pages synthetic winterizer or tarpaulin. In the first case, the book will be softer, and in the second, harder.
How to sew Velcro to a felt book.
You can sew Velcro to the back of the felt, or to the padding fabric.
- First, attach the sealing fabric to the wrong side of the appliqué.
- Sew Velcro to the wrong side of the felt
- Trim excess fabric
- Sew on details

You can also see how to sew Velcro on a felt book by watching the video.
How to sew Velcro to fabric video
Felt book collection
As soon as you finish sewing on applications, buttons, laces, beads, in other words, as soon as the pages are ready, start sewing the felt book itself.

You need to take the felt with sewn applications, put it facing the table and put the synthetic winterizer. Cover with the second page, right side facing you.
Now we sew the page manually along the edge, cut off the protruding synthetic winterizer, then sheathe the edges of the pages with inlay.
How to sew a page and finish its edges with fabric video
As we have already said, the binding of a soft book can be done in many ways. You can study this issue in more detail by watching the video.
Video: how to make a felt book binding.
Felt books ideas
The ideas for the pages of a developing felt book will never end, there are a lot of them. You can even design the cover in an original way. For example, playing peek-a-boo.

In a felt book, you can arrange a real apartment - with a bedroom, kitchen, bathroom and even a laundry room.


In a toy made of felt, you can arrange the seabed, look for and hide fish in the waves.

The ladybug on the lock develops motor skills, teaches you how to open zippers.

Velcro sorter will captivate your baby for a long time.

Also on the pages you can arrange a real garden! Planting and harvesting in baskets.

Lacing develops naughty fingers, kids are very fond of lacing.


We learn time.

Another original cover art.

You can play in autumn.

Wash and hang socks.

Hide the sun behind the clouds.

Play teremok.

In the fairy tale "Three Little Pigs".

Invent clever games.

Play puzzles.


Play Tetris or the fairy tale "Kolobok"

Under the leaves of a flower, you can also arrange a "seeker"


Fantasize and create felt books for your kids, because a child will remember his mother's books all his life!
Text prepared by: Veronica
All kids love to play, and parents want children's trinkets to be not only beautiful, but also developing. This DIY felt book is a safe and useful toy for kids aged 1 to 4.
Felt is a dense wool material. The fabric is soft, does not cause allergies, is well washed, has bright colors.
Felt book - preparatory period
First decide what you want from this toy? Will it be just for fun or will it teach the child to count, the alphabet, develop motor skills, and give some knowledge of the world around.
You will need:
- felt pieces of different sizes and colors;
- multi-colored threads "magpies", needles for hand sewing;
- scissors, glue, cardboard. Patterns of figures, find them on the Internet or draw them yourself;
- small accessories: buttons, beads, ribbons, zippers, braid, fringe;
- rings for fixing finished sheets.
Felt book - manufacturing steps
- Cut the felt into rectangles according to the size of the pages.
- Sew two pieces together on three sides. Put cardboard or thin foam in the middle of the pocket to keep the book in shape. Sew up the fourth side and overcast all edges of the sheets.
- Distribute applications corresponding to the chosen topic.
- Connect the pages in pairs. Secure the spines of the sheets with plastic rings or eyelets through which you pass the string.
Having created the frame of the product, proceed to filling the book with characters. Make figures from thin felt, attach with Velcro in the right place on the sheet. Use laces, buttonholes, straps, buttons - anything that will help develop little fingers.
Make an amusing craft so that when you open a book, your child wants to watch it to the end. And take the topic informative, educational.

Page one - counting with a child
Make a bunny, vegetables, clouds, sun and decorate the picture. Do not forget about pockets for planting root crops and a string for drying carrots. While playing, the child will learn to count, remember the names of vegetables and animals living in the forest. The storyline can be anything: count fish, flowers, mushrooms, cars, whatever.


Page two - informative
Sew a flower, place a bee inside it with a caterpillar tied with a thread. If the child tries to pull out the insect, he will pull out the caterpillar from the tulip. It will look like a plump worm crawling on a flower. Explain to the baby what insects are, where they live, what they eat.

Page three - developing fine motor skills
Create a wardrobe picture. Insert a zipper in the middle of the sheet and the cabinet doors will open. Think of fashionable clothes for the doll. Attach Velcro to the wrong side of doll clothes, and the child will be able to model outfits on his own.

Page Four - Studying Pets
Does your little one love cats, dogs, birds, hamsters and guinea pigs? Bring him joy - design a page on a rustic theme.
- Cut out animal figures from multi-colored felt. They can be flat or voluminous, sewn from a double piece of fabric and stuffed with padding polyester.
- Attach them to the sheet with clothes pins or sticky tape. Let your child determine which animals are shown in the picture and how they help a person.
- Tell the child why they plow the land, how they grow grain and make flour, from which his favorite buns are made.
- Make all cows, horses, geese, chickens and other animals from colorful material so that a small person wants to touch them. Show your imagination, design an opening gate on a mini-farm, let everything be real, like in adulthood.

Make as many leaves in the book as you need. The best option is 6-10 pages.
As you can see, making a soft book is easy, it would be a desire, fiction and free time. And, of course, do not forget that the presentation of information is appropriate for the age of the child.