In the professional life of a master nail service often encounter one or another problem. They can be either purely technical or related to human relations.
This article will talk about technical side question. Every time you meet with a new client, you must decide whether the extension will be done on tips or on forms.
It’s good if by this time you have already accumulated knowledge, skills and abilities, and you can call yourself a universal master. Then your decision will be objective. It often happens that insufficient knowledge of a particular process leads to a subjective choice (personal preferences of the master).
The motto for every professional should be individual approach to the client, namely: taking into account the shape, size, problems of natural nails, as well as the client’s wishes.
Those same craftsmen who, performing only one type of work, try to convince the client of the imperfection of all others, can be advised to study new methods, approaches and techniques of work.
Tips: we will choose for everyone
Modern variety various types tips are such that they are suitable for almost any type of nails.
Universal tips with an extended hole (contact zone). The shape of the tips allows you to create almost any shape of the free edge of the nail. Suitable for most nail types.
Tips with a shortened hole and a natural dome - for clients with short hair nail bed, as well as for those who prefer medium-length nails.
Curved tips with a high dome and a long hole that look perfect on nail plates of any length.
Tips without a hole, having a dome bend of 50%. Suitable for curved natural dome nails and for creating stunning arches for competitions.
Snow-white tips with an ideal, natural dome shape, and with a dome bend of 50%. Intended for quick creation.
An exception may be clients with natural nails that bend downward. But, despite such difficulties, from the given range of products you can select tips suitable for the nails of a particular client. It is possible that the master works with only one type of tips. Then, when selecting, adjusting and gluing them, you need to be especially careful to avoid problems.
Tips are glued like this:
Prepare natural nail to work (disinfect hands, file free edge nail, move it away using an exfoliator, carefully remove the natural shine of the nail, remove dust from filing);
Disinfect natural nails (so that bacteria do not get on the tips when trying them on);
Try on the tip and, if necessary, shorten its contact area;
Natural nail plates are repeatedly disinfected and treated with a preparation that normalizes acid-base balance natural nails;
Glue the tip by applying it to the free edge of the nail at an angle of 45 degrees. The tips are smoothly lowered onto the nail and fixed for 10 seconds;
Shorten the tips with wire cutters (cutter) to the desired length and shape the free edge.
Let's solve problems
If a master decides to work with tips, he may encounter a number of problems. Let's list the main ones.
1. After the tips have been glued, their edges and borders are natural nail plate do not match (photo 1).

a) Reason: the size of the tip was chosen incorrectly.
Solution: select tips so that the edges of the tip exactly coincide with the boundaries of the natural nail or slightly overlap it.
It is prohibited to forcefully spread the tips on the nail!
b) Reason: when gluing, the tip moved relative to the central axis of the nail.
Solution: when gluing the tips, be careful and do not rush.
2. Education longitudinal cracks on the surface of the tip when gluing it (2).

a) Reason: in 70% of cases, various drugs (for example, disinfectant liquids) that got on the tips are “to blame” for this.
Solution: after you have finished processing the glued tip with files, you cannot disinfect the free part of the natural nail with a spray! It is necessary to use a special lint-free cloth soaked in antiseptic.
b) Reason: applying a tip with a curved dome to a flat nail plate.
Solution: use tips strictly according to the size and curvature of the natural nail.
3. After the extension is completed, the contact zone of the tip is visible from under the modeling material (3).

a) Reason: the contact area of the tip is not cut enough.
Solution: when processing tips, eliminate the “natural nail-tip” boundary.
b) Reason: the tips were pressed twice during the gluing process. For example, for some reason the tip that was just glued was moved. This can happen if the client's hands are cold. Then the glue hardening time is extended several times ( usual time hardening - 3-5 seconds). From the moment you pressed the tip for the first time, part of the glue had already hardened, which affected the transparency and strength of the connection.
Solution: while gently pressing the tip, do not change the pressure. If for any reason it was not possible to glue the tip with one click, you must replace it with a new one, re-process the natural nail and perform the gluing procedure again.
4. After gluing, the tips are asymmetrical to each other.

a) Reason: incorrect tip rotation.
Solution: before gluing each tip, you must first try it on. In this case, the client’s palm should lie in the master’s palm freely and without tension. (4)
.
b) Reason: the order of gluing the tips is incorrect.
Solution: follow the order of gluing the tips. Start with the little finger of your left hand, then the ring finger, then the index finger. Lastly, we glue the tip onto the nail of the middle finger and align it along the central axes of the already glued tips.
5. Lifting the tip in the area of the lateral sinuses of the natural nail (5).

a) Reason: the shape of the tip does not match the shape of the nail.
Solution: if the nail plate is barrel-shaped and the tip is flatter, you need to additionally press the side parts of the tip. It is advisable to choose tips exactly according to the size of your natural nail (see point 1).
b) Reason: incorrect choice of tip size, as a result of which the contact area of the tip ends up on the nail folds.
Solution: use tips strictly according to size.
6. Creases on tips


a) Reason: faulty cutters, incorrect angle when cutting tips (6a, b - incorrect).
Solution: Check and sharpen the wire cutters. Tips are cut correctly like this (6c is correct).
b) Reason: the master presses strongly with his nails on the contact zone, trying to press harder on the sides of the contact zone of the tip.
Solution: the tips should be pressed with your fingertips.
7. Air bubbles under the contact area (7).

a) Cause: the glue was chosen incorrectly.
Solution: choose glue according to the surface of the natural nail plate. For example, if the nail is uneven (deformed), you need to use gel glue. Its consistency allows you to fill the unevenness and cavities on the natural nail with the subtype.
b) Reason: when gluing, the pressure on the tips changed.
Solution: glue the tips with a smooth movement, displacing air from under the hole of the tip. Don't be distracted so as not to change the pressure on the tip.
Also, remember the following rules:
Do not try to stick the tip onto a large surface of the natural nail. The maximum “coverage” area is 1/3 of the natural nail. When exposed external factors The glue on the nail is the first to break down, so it is more convenient to use tips without a contact zone. They are glued, capturing 2-3 mm of the natural nail. If you still encounter one of the problems, remove the tip by soaking it in special liquid for removing tips. Then re-glue the tips. This will take a few minutes and the result will be quality work- beautiful, durable artificial nails.
Tamara KATKALOVA, nail modeling instructor
Look at your nails. Sometimes you really want them to be long and beautiful. But growing them takes so much time and effort. And if one accidentally breaks, then all the work is useless and you have to start all over again, never reaching the desired length. After all, on long nails you can create extraordinary masterpieces of design. However, growing nails is now very good alternative, which many women have been using for a long time. This is, you guessed it, . Now we will look at this important material, with which you can easily lengthen your nails like tips.
What are nail tips and a brief history of their appearance?
Tips (translated from English as tip) are plastic tips that imitate a natural nail. They serve to create nails of a certain length. But they can come up with many uses. You can practice making different designs on tips first. You can even create your own collection of drawings that will always be at hand. And if you are a professional manicurist, then they can serve as a kind of advertising.
A little history. Nail tips were first made from various materials, until in 1970 they tried to make it out of plastic, which created a real sensation in the nail industry. However, the problems so far were that they were done by hand, there was only one size, and the tips were thick and stiff. The problem was solved in 1974, when they began to be mass produced using a special technology. However, they were quite expensive (about 40 thousand dollars), and their service life was about 7 months. Tips are made from ABS plastic(acrylonitrile butadiene styrene). The variety of shapes and thicknesses of tips, and accordingly their quality, has also changed. And now we can choose tips individually for our nails.
 The structure of the tips. Tips have a certain structure. First of all, all tips are divided into two halves: this is the contact zone, which has a shorter length (3-6 mm) and thickness, and. The first is designed to lie on the nail, and the second forms the length of the tip of the nail. Separates these parts stop line. The contact zone may have an end various shapes: round, V-shaped, jagged, etc. This depends on the size of the natural nail, the speed of filing, as well as convenient and high-quality gluing. You can make the shape of the free edge yourself or leave it. They can be square, sharp, with tapered ends, etc. Lots of options available to choose from tips colors. There are white, transparent, colored and ready-made tips. Here the choice depends on what you want to do with them. Tips also differ in their curvature, because everyone has a different nail shape.
1. Among the variety of tips, choose exactly those that repeat the shape of your nail. Then they will fit well enough on the nail and will not allow it to deform under the tip. If you pick required size if it doesn’t work, then take tips a little larger than the nail plate and then use them to adjust them to fit your nail.
2. Pay attention to the elasticity of the tips. They should bend gently, but not break. You can try bending the tip so that the fold goes from one side to the other. If white stripe did not appear, then the tips are of sufficient quality. Softness is required so that they can be cut down more easily.
3. To give the tips the required length, you can file them, but cutting them off is much faster. However, you cannot use simple ones for this, otherwise the tips will crack or you simply will not get what you want. There are special tools for this - type cutters. Using them you can get any tip shape from oval to square.
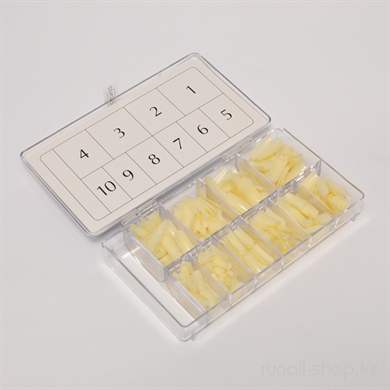
5. Tips are sold in sets and are divided into 10 sizes for each nail. Most manufacturers number them: 10 is the largest, and 1 is the smallest. Before using tips, it is better to remove these numbers to ensure a smooth surface. This can be done using a file, acetone or a correction pencil.
The main thing when choosing tips is that they should be:
- quite thin and similar to natural nails
- good bending and elasticity
- not sharp, and therefore safe
- comfortable for nails, without nicks or scratches.
How to stick tips?
 Now let's look at the most important question, how do you still attach the tips to the nail so that they hold securely and for a long time? We have already talked about the choice of tips. Once you have selected the tips according to size, they are ready for use.
1. First, you need to treat your natural nails (file, remove cuticles, etc.) and remove shine and moisture from them. When installing a tip on a nail, make sure that it covers less than half of the natural nail.
Unfortunately, not all women are blessed by nature with strong and durable nails. This issue can be easily resolved, you just need to visit a beauty salon and use the nail extension service. This process can be done with your own hands. We will consider two types of gel extensions: on tips and forms. We’ll also briefly talk about the types of extensions in French style with visual photos. And, if you have no desire to visit salons, then our article will tell you about gel nail extensions step by step.
What to choose: forms or tips?
Nail extensions can be done using forms or tips. When there is a nail base on the finger, it is necessary to use tips. In order not to be mistaken in making the right choice, you need to take into account the width of the nail surface, what kind of bend you want to get at the end of the work and do not forget about the height of the nail hole. When we talk about using forms for gel extensions, we mean recreating from scratch the length and shape that you or your client prefer, not forgetting to take into account the structure of the nails and the size of the fingertips. When the type of work that suits your client has been chosen, you need to know that there are five types of nail structure:
- slightly convex;
- snub;
- flat;
- cat's nail;
- wavy.
The most common are cat's toenail and snub-nosed nail growth.
"Cat's nail"
Extension of cat nails should not be done using tips, since as the nail grows, its free edge will bend down. This will create a space between the tip and your nail, therefore allowing dust and water to enter. In this case, you need to use a nail extension form.

"Snub" nails
If you are working with snub nails and decide to do extensions on forms, do not be surprised that in the future the nails will lose their correct structure. And in this case it is better to use tips.
The final result of gel extensions also depends on the type chosen, one of which is used most often - this three-phase build-up gel:
- Base gel
- Construction gel
- Finishing - gel polish coating

Nail extensions at home
In order for your work at home to be coordinated and complete, you will need to stock up on these tools; they can be purchased at ruNail:
- UV lamp;
- antiseptic;
- modeling agent - adhesive;
- the basis;
- degreaser - dehydrator;
- tips;
- forms;
- sculptor;
- clinser;
- flat brush;
- file 220/280 grit;
- file 240 grit;
- finishing gel;
- glue for tips;
- lint-free wipes;
- orange sticks;
- dust brush
- cuticle oil

Step-by-step instructions for beginners
Gel nail extension on tips:
- We prepare the nail surface using an orange stick: we peel back the cuticle, create the required form the free edge, and polish the nail area with a file rectangular shape 220/280 grit, it prepares nails for polishing, smoothes and eliminates scratches.
- Apply degreaser
- Apply a thin layer of glue for tips to the free edge of the nail and the places where the tips come into contact. You need to place the tip to the nail at an angle of 45 degrees, and lower it so that the line of the tip’s foot and the edge of the nail are aligned.
- Next, without disconnecting, carefully lower the tip onto the nail and spread the glue in the same amount over the entire area with rubbing movements.
- We place the tip again at an angle of 45 degrees, bring it to the stop line and, after hearing a crack, gently lower the tip onto the nail. You need to hold it for about 10 seconds.
- We shape the tips according to the client’s wishes, taking into account the structure of the nail.
- We get rid of dust particles and degrease.
- Apply modeling agent to the nail area.
- Using a slightly damp brush, apply the base gel along the entire length of the future nail and place your finger under the lamp for 1 minute.
- Using a flat brush, apply the sculptor, taking into account the structure of the nail. Leave under the lamp for three minutes.
- Using a lint-free cloth, remove the sticky layer with cleanser.
- Using a buff, we polish the area of the nail.
- Degrease and coat with finishing gel. Place your fingers under the lamp again for three minutes.

Below we offer you video tutorials on extensions:
How to extend nails with gel on forms
- We treat our hands with antiseptic.
- We clean the surface of the nail using a 220 grit file.
- Cover with degreaser.
- Next, cover with the base and place your hands under the lamp for two minutes.
- Clean the top layer.
- We attach the form.
- Using a brush, apply the gel, while turning your finger nail down so that the gel is evenly distributed.
- Place your hands under the lamp again for three minutes.
- Cover with gel again and form an “S” bend.
- After the lamp we clean the sticky layer.
- Getting rid of the form.
- Level the surface with a buff.
- We clean off the dust with a brush and cover it with finishing gel.
- Place your hands in the lamp again to dry for two minutes. Degrease the surface of the nails and apply oil to the cuticles.
Below we suggest considering step by step build-up in photos and videos:


Ageless French
Under each type of French, you can see finished work in pictures, as well as videos on design.
Beautiful, well-groomed hands have always been and remain a woman’s calling card. Nail extension with tips is one of the most popular methods modern manicure, helping all women keep their hands in perfect shape.
What are tips?
The word “tips” comes from the English “tip”, meaning: tip, top. This translation explains in general terms the principle this method extensions: a plastic “tip” is glued to the natural nail, which is filed, sanded, and “merges with the relief”; Then the entire nail is covered with a special compound and dried. Plastic templates, which are glued to the nails, and are called tips.
 Currently, tips for nail extensions are produced in a wide variety of shapes and sizes - to suit every taste: flat, convex, square, oval, pointed, white, transparent, colored, with a pattern. They need to be selected in accordance with the shape and size of natural nails and the artistic design. If it was not possible to select the tips exactly according to the width of the nail, it is recommended to take a template a little wider - in this case it can be filed down. If you use a narrower tip, problems may arise such as deformation of the nail plate, detachment or even breaking of the tips, and an untidy appearance when your nails grow back.
Materials and tools for extensions onto tips
You can grow your nails using tips using two various methods- acrylic and gel. Acrylic nails are more durable, but their disadvantages are specific bad smell during the procedure, a negative effect on the “native” nails. In this regard, the gel is more “environmentally friendly” - it has no odor and does not interfere with the normal functioning of the nail plate. The main disadvantage of the gel is that if the nail becomes cracked, it will have to be completely replaced.
To extend nails using tips you will need the following tools:

- several files with different abrasiveness, buffs;
- pusher - manicure tool to push back the cuticle (instead of a pusher, you can use orange sticks for this purpose);
- cutter - special tool for cutting tips;
- brushes;
- brush for cleaning nails;
- tweezers, tweezers, manicure scissors.
If you do nail extensions yourself at a professional level, you will have to purchase a sterilizer - be sure to sterilize all tools after each client. When using the gel, you will need an ultraviolet lamp. With any method, a supply of lint-free manicure wipes and disposable towels will be useful.
The following materials will be needed, regardless of the extension method:
- glue for tips - it must be non-toxic, hypoallergenic and strong enough;
- degreaser;
- cuticle softener, cuticle oil;
- antiseptic;
- brush cleaner.
The choice of other materials depends on the method of extension. To experiment with your own nails, you can buy a starter kit for gel or acrylic extensions. Typically, such kits contain the required minimum of drugs, which is enough for several procedures. Well, those who plan to do this seriously need to study both the materials and the methodology more carefully.
For gel extensions the following medications are needed:

- dehydrator - a product for dehydrating the surface of a natural nail, improving adhesion;
- primer is a kind of primer for nails, it can be acidic or acid-free;
- transparent modeling gel;
- sticky layer remover;
- finishing coating.
To this list you can add white, camouflage (i.e. flesh-colored) gels, several colored ones, acrylic paints and brushes for painting, various decorations for nails (pebbles, rhinestones, sparkles, etc.).
At acrylic extensions you will need the following tools:
- primer;
- acrylic Powder;
- the so-called liquid is a liquid into which the brush is dipped before picking up powder;
- coating agent acrylic nails, or finishing gel, or just clear varnish.
You can also get camouflage and white powder, as well as the above-mentioned nail design products.
Procedure for nail extension using tips
 Regardless of the extension method, first of all, the nails need to be properly prepared. First you should wash your hands and treat your nails disinfectant and a cuticle softener. Next, the nail is shortened, the cuticle is moved back, and the nail plate is thoroughly cleaned. The next stage is to make the surface of the nail plate evenly rough. This is done using a file with an abrasiveness of 180 by 240 grit. The result of the extension depends on the quality of this procedure, so you need to be careful not to leave “glossy” areas. On the other hand, it is advisable to try not to saw through your nails - special care must be taken with thin and fragile nails.
It is better to select tips for each finger in advance, but if they have not been chosen before this moment, now is the time. Tips for extensions are tried on, adjusted, and cut to length. To glue the tips, you need to carefully lubricate the contact area with glue, that is, the area of contact between the nail and the applied element. Next, apply the edge of the tip to the middle of the nail at an angle of 45 degrees, and then gently press it to nail plate for about 15 seconds. Be sure to ensure that there are no air bubbles under the tip.
After the tips are glued, you can give them the desired shape - square, oval, almond - and cut to the final length. Then their surface must be processed with a coarse file to create a rough surface and to smooth out the transition from the natural nail to the glued tip. Start processing correctly from the edge of the tips, moving towards the base of the nail. Otherwise there is a risk of peeling or peeling. The result should be completely matte nail, completely merging with the natural one, that is, there should be no visible step transition at the place of gluing.
The next stage: cleaning from dust, treating with a dehydrator, applying a primer. The primer does not need to be applied to tips, only to your own nails. Dry in accordance with the instructions for the preparation (it must indicate the time and method of drying). The further procedure depends on the method of extension.
 When applying gel extensions, a thin layer is first applied. base layer— you need to completely cover the nail plates and tips without touching the cuticle. This layer is dried under a UV lamp for at least three minutes. Next, a constructive or base layer of gel is applied. This layer should be thickest in the middle part of the nail, in the so-called “stress zone”. Thus, the shape of the nail, when viewed in profile, should not be straight, but slightly rounded, with thinner edges. After this layer has dried, the gel is filed off, cleaned with a brush, and a thin finishing layer is applied. After final drying, the sticky layer is removed and a special oil is rubbed into the cuticle.
When applying acrylic extensions, the brush is first dipped into the liquid, then into the powder, and this mixture is applied to the nail with gentle movements. In this technique, you should remember about the “stress zone” - there the acrylic layer should be thickest.
Nails dry without special equipment or effort. The final filing, polishing and application of the finishing coat are no different from those with gel extensions.
Care for extended nails
Usually, extended nails are not particularly fancy. If a girl has extended her nails, corrections need to be performed approximately once every 2-3 weeks to maintain their shape.
The rest of the time, be gentle with your hands: wear rubber gloves when in contact with detergents, avoid sharp changes temperatures, use nail polish remover without acetone, and, of course, you can’t use your own chic manicure gnaw, hit with something or otherwise injure.
Growing out your own manicure is often an impossible task, which is why you can use nail tips and create a manicure of the desired shape and length.
After all, one of the most important touches in a woman’s appearance is manicure. Every girl dreams of having well-groomed hands and healthy nails.
What are tips?
Many people wonder what tips are and how they should be used correctly. These are certain plastic forms of varying lengths that are attached to the nail.
These materials, in their shape and appearance very much resemble a natural nail. They are designed to create a manicure of the required length.

To choose the right material for extensions, you should definitely take into account the structural features of the nail itself and pay attention to its shape. If the tips follow the shape of the nail plate, then they will fit well on the nail and will not allow it to deform.
When choosing this material, you should pay attention to their quality. Good quality ones should be quite elastic, bend gently, but not break. When selecting, you can try to bend them from one side to the other. If a white stripe does not appear on the fold, it means they will not break. They should also be fairly soft to make filing easier.
When choosing of this material to build up you need to pay attention to it inner side. There should be no roughness or various nicks on it. From smoothness outside depends on how well they fit on the real nail.
Return to contents
What types of tips are there?
There are tips different types And various sizes. To choose the right one, you need to try them on a real nail and make sure they are the right size and shape.
If the tip is not suitable, you can purchase a little more and then file it down to the required shape.
The surface is divided into two halves, namely:

- contact form, which is thinner;
- free edge (length itself).
The length and shape can be completely different, namely:
- oval;
- square;
- round;
- pointed, shaped like a cat's claw.
Additionally, you can give it any shape using a soft manicure file. In addition, these elements may be various colors or transparent. They can be with different patterns and stylish designs.
Read also: Features of application laser file for cuticle
Nail tips also differ in the degree of curvature, which is why they must be selected according to the shape of the real nail.
When choosing this material for extensions, you should consider the following rules:
- they must be quite thin and as similar as possible to natural nails;
- they should be quite elastic and bend well;
- they should not be sharp;
- they must be safe.
Tips are divided into ten types by size. The first number is the largest, followed by numbers in decreasing order of size. That is why it is not at all difficult to choose the optimal tip size for yourself, which will ideally suit the shape and size of your nails.
In addition, these extension elements differ in purpose. You can select universal ones, as well as tips for working with problematic nails, which have various convexities, or, on the contrary, are concave.
By choosing the right tips in shape and structure, you can get just the perfect manicure.
Return to contents
Benefits of using tips
Nail extension using tips has a lot of advantages, in particular such as:
- ease of extension;
- extension can be done quickly;
- Suitable for those with brittle and peeling nails.

It is worth noting that those with fairly wide nails should not apply nail extensions with tips. In addition, those whose nails grow down should not do such a manicure, because they will be very curved.
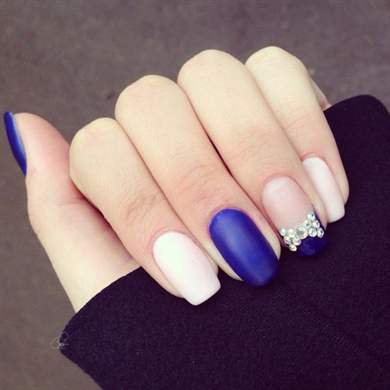
Using types you can do original manicure by executing fashion drawing. Using crystal options, you can make on them beautiful engraving, which after processing will shine and shimmer like real crystal. You can choose absolutely any design for engraving, it all depends on the preferences and capabilities of the artist.
With the help of such a device, you can bring to life the most daring design solutions and make your fingers a real work of art.
Tips are very convenient to use because they are affordable, you can glue them yourself, and they help hide imperfections.
Materials with a pre-applied pattern on them are very popular, because you can create your own unique original manicure and do not need to apply a pattern, which requires precision and accuracy.