The whole family is considered long tradition. Unfortunately, due to our busy lives, we increasingly give preference to purchased jewelry rather than making it ourselves. But, if you want to return to childhood, please yourself and your family, cheer up your children and involve them in very interesting activity, the site invites you to make original New Year's paper crafts with your own hands!
Here you will find everything you need: garlands and balls for the Christmas tree, appliques and three-dimensional figures. It's all very easy to do if you follow step by step instructions on the picture.
New Year's paper crafts for the Christmas tree
To do handmade jewelry For Christmas tree, you can use ordinary white A4 paper, colored paper, papyrus paper, velvet paper, tissue paper, crinkled paper, or silk paper as the main material. For volumetric decor - cardboard and felt.
Crafts can be various shapes and type - artificial flowers, chains and lanterns in the form of a garland, outlines of animals, a star (spade) on the Christmas tree and balls.
To make any decoration you will need: paper of a suitable color, scissors, a ruler, a simple pencil, decor in the form of large beads, sequins, rhinestones and Christmas tree tinsel, thread and a needle.
The step-by-step instructions for each craft are different, so it’s better to see it visually than to read it.
Paper crafts for New Year 2019:


Volumetric paper figures
For children school age It will be interesting to make an original New Year's craft with your own hands. They will be especially pleased with the ideas three-dimensional figures(see photo below) in the form of angels, Santa Claus, snowman, Snow Maiden, animals.
It is recommended to use as a basis for making jewelry plastic bottle or cups.
Photos of three-dimensional paper figures, step by step:


DIY paper Christmas garlands
To do original decoration for a Christmas tree or apartment decor (walls, windows), use any paper and thread ( satin ribbon). Can also be used in combination with paper - cotton wool, large beads, felt


Applications on cardboard
Applications made of colored paper glued to cardboard can be used in the form of New Year's cards and paintings on the wall. You can make animals with your own hands, fairy-tale heroes and inscriptions.


Multi-colored paper garland for children

Very unusual and original garland for the New Year 2019 you can make the most colorful paper with your own hands bright colors. If you use templates geometric shapes, you can create wonderful layouts, from which you can then easily and simply assemble a garland.
This interesting New Year's craft will bring liveliness and color to both the nursery and the family room, because the funny garland will lift the spirits of both children and adults. The garland can also be hung on a Christmas tree as Christmas tree beads.
To make a paper garland you will need:
- colored paper or colored cardboard;
- pencil;
- ruler;
- scissors; glue.

Step 1. Download templates of geometric shapes and print them on colored paper or, armed with a ruler and with a simple pencil(preferably with an eraser), make a drawing of three-dimensional geometric shapes, again, on colored paper or colored cardboard.
Step 2. Using scissors, you need to cut out each future geometric shape along the contour.

Step 3. Now glue the figures together, not forgetting to pull the thread through in time so that when assembled, the garland thread remains inside the figure. The garland is ready!
Approaching is a joyful event, loved by everyone since childhood. Guardians hearth and home and the female half of the office employees strive to create a festive atmosphere. The easiest way to decorate your favorite place is to create paper crafts. In this article, readers will learn what they can do with their own New Year decorations made from paper; a photo for printing is attached.
In families with children, children need to be involved in decorating the house. Kids will enjoy drawing, gluing, and coloring crafts. And how nice it will be for a child to see his work in the house.
Ideas for New Year's decor
Conventionally, holiday decorations can be divided into two categories: for windows and rooms. To the main ideas paper decorations those listed below are considered.
1. Stencils. This decoration will suit both for home and work. Simply print it out. Then color and cut out. You can attach the decoration to the table, window and enjoy. An example is the stencil in the pictures, click on the picture to enlarge and print!


2. Snowflakes. A standard window decoration will brighten up any room. Schemes templates for printing:


To make a corrugated product you will need : office paper, scissors, stapler, glue. The first step is to cut an A4 sheet of paper in half. Then fold both sheets of paper like an accordion. Then you need to find the center point on the sheets folded like an accordion. To do this, you need to fold the accordion sheets in half and unfold them back. Secure the central point with a stapler. The next step is to cut out the pattern. When choosing a pattern, you should be aware that it will have to be repeated on the second sheet of paper for symmetry. Then unfold the sheet and glue the ends together with glue to form a semicircle. The final step is to combine the two halves of the snowflakes into a single whole. The finished result is shown in the figure:

3.Quilling snowflakes. The quilling technique involves the use of spirals of narrow strips of paper. An example of such a snowflake is shown in the figure - enlarge and print:


4. Christmas tree toys. A standard children's craft in the form of a flashlight, it will perfectly decorate not only workplace, but also an apartment. The picture reflects one of the variants of such a toy.

5. Fairy lights. The simplest option for decorating a room is a simple chain garland. To make it you will need plain or colored paper, scissors, and glue. Cut the paper into strips, glue the ends of the strips to each other. Can be connected with a stapler. The end result is shown in the figure.


6. Origami.
A Christmas tree made of paper in the diagram below will look unusual and stylish. 
7. Door decorations. This decor can be made even with a small child. To prepare this decor you will need: plain or colored paper, glue, scissors, paints, a flat round plate, a small round saucer.

8. Children's crafts. The most popular children's craft is making Santa Claus. To do this, you will need the following items: cotton swabs, black and red felt-tip pens or small charcoal tablets, scissors, colored and plain paper, glue, rope or thread. You need to cut out a circle from plain or colored paper. Then from colored paper red or of blue color you need to cut out a semicircle because it will be Santa Claus's hat. You need to glue a thread or rope onto the cut out circle. Then glue the semicircle onto the thread. Next, you need to glue a beard using cotton sponges. Then use felt-tip pens to draw eyes and nose. Beautiful craft— the decoration is suitable for the Christmas tree, room, window and office.

9. 3-D decorations. The main feature of this decor is volume. Decorating funny little things using 3-D technology will harmoniously fit into any interior. To prepare this decor you will need: glue stick, scissors, paper, needle and thread, pencil. At the first stage of making the decoration, you need to cut out 10 identical circles from white paper. Then you need to draw a radius on each circle with a pencil and cut the radius line. The next step is to make 2 cones using glue. The figure shows a diagram of the appearance of the decoration.
Similar actions need to be done with the remaining circles. Then you need to sew the double cones to each other using thread and needle. It must be taken into account that all cones must be connected into a ball shape. The extra thread will be useful as a loop for the ball. Appearance products are shown in the figure.

10. Paper panorama.
This decor will perfectly decorate the windows. It is enough to cut out the stencils shown in the pictures from paper. Then glue the component images onto the windows. 
Stencils for printing:


Someone is preparing for the New Year by decorating the Christmas tree with designer expensive jewelry, and some – cheerful colorful ones electric garlands and glass balls from the store.
Such Christmas decorations will undoubtedly do New Year's beauty stylish and beautiful, but, unfortunately, they cannot compare with toys made by themselves. After all, the process of creating them not only increases the anticipation of the holiday, but also gives priceless minutes of communication to all family members.


There are a lot of options on how to make Christmas tree decorations with your own hands for the new coming year, but the most affordable and do not require special skill in making are New Year's toys from paper. All you need is available materials that can be found in any home, a little patience and creative imagination.
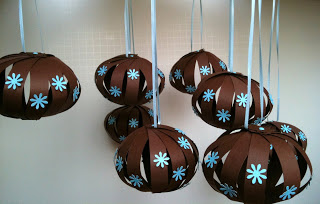
The most common and versatile toys on New Year- This Christmas balls. You can make them yourself from any thick paper: colored cardboard, colorful postcards or old magazine covers. Plain colored balls will give a uniform style to the room, while multi-colored ones will give an atmosphere of fun and fairy-tale magic.

So, before you start making these paper toys, you need to prepare the following:
- thick paper with a design you like;
- scissors;
- PVA glue;
- a compass or any object that, when outlined, can be used to reproduce a circle (jars, lids, glasses, etc.).
How to do:
- Draw 21 identical circles on paper and cut them out with scissors.

Prepare the mugs as follows:
- bend the circle in half twice (this is necessary to determine the center);
- straighten the circle and bend one side so that the edge of the circle is exactly in the center;
- bend two more sides of the circle to form a triangle with equal sides;
- cut out the resulting triangle, which will act as a pattern for the remaining parts;
- Place the triangle on the remaining circles, trace with a pencil and bend the edges outward along the lines.
- Glue 10 circles together on both sides so that you get a strip: 5 circles on top, and 5 on the bottom. The strip must be glued into a ring. This will be the base for the ball.

- Divide the 10 remaining parts into 5 pieces, which are glued into a circle. The result was two “lids”.

- Glue the upper and lower “lid” to the base in sequence.
- The loop by which the ball is suspended can be made from a thread threaded through the top of the toy using a needle, or from beautiful ribbon. The ribbon loop is secured with a knot and threaded through the top of the ball “cap” before gluing it to the base. The knot remains inside the toy, and the loop remains outside.
An original do-it-yourself paper toy for the new coming year is ready!
More paper balls for the Christmas tree


Volumetric snowflake
Another indispensable attribute of the New Year is snowflakes. They can be the simplest, cut out of a sheet of paper in a random pattern, or they can be voluminous using the origami technique. We suggest making the latest version of the New Year's snowflake with your own hands.

To do this, you need to cut out six squares of the same size, fold each of them diagonally, and then in half. Parallel cuts are made along the fold. The square unfolds, the inner tabs are wrapped and fastened together.
The outer petals are connected to the same petals of the remaining squares. You can attach them using either glue or a regular stapler.
Even if your home interior decorated superbly and spending time in any room is a pleasure; there comes a time when you want a holiday in the house in the middle of everyday life. And even the holiday itself comes unnoticed according to the calendar. And there is a desire to somehow celebrate this day, to make the rooms elegant, to create that very joyful festive atmosphere. And this is wonderful, especially since a few cute details are enough for bright changes in the interior. And for them it is not at all necessary to buy expensive materials and spend a lot of time on manufacturing. Today you will learn how easy it is to make beautiful paper decorations with your own hands.
Basic materials and tools for work
What basic materials and tools will you need for the job? This, of course, is the paper itself. Believe me, everything can come in handy: napkins, newspapers, magazines, music notebooks, writing paper, colored from sets, colored double-sided, Whatman paper, corrugated paper, paper with various textures and embossing, design, for scrapbooking and others. Your imagination will tell you what paper to use when to create an original decoration that will suit the style of your room.
Cardboard, either white or gray, or colored, may come in handy. If you have tight White paper or cardboard, you can use paints (watercolor, gouache, acrylic, etc.) to give the paper your own desired color or apply patterns and designs.
Of course, you will need glue (PVA, glue stick, universal transparent Moment), a stapler with paper clips, scissors, a stationery knife, thread and a needle. A shaped hole punch can be useful for cutting out flowers and other small figures. This type of hole punch is used in scrapbooking and will be very useful if you like to do paper art. But if it’s not there, it’s okay, identical parts can be made by cutting out the outlined template.
For fine and accurate work, you may need tweezers, for example, medical ones.
Well, the most important tool is, of course, your imagination. For many paper decorations, diagrams will be shown, and some you can easily figure out yourself. The activity is going to be exciting! Let's get started.
Probably all of us in childhood decorated window glass with homemade paper snowflakes. I really want to arrange my home winter's tale. Why not unfold a fairy-tale world right on the windowsill? We bring the idea to life.
You will need thick white cardboard. Cut out figured pictures from it according to the template. Glue them together (you can try to overlap them) to create a single strip of pattern the length of the window sill.
Then glue a second strip of the same type. In it, it is advisable to swap the pictures in places or even use other template pictures; you can come up with them yourself.
Now you need to glue a box of the same length as the window sill, about 10-15 centimeters wide and about 4-6 centimeters high.

We place rectangular pieces of foam rubber inside the box. In the foam rubber we fix cardboard holders with slots for strips with our figured landscapes. We insert the strips into the holders: one to the front wall of the box, the second to back wall. We stretch a garland between the landscapes along the box. Bulbs with white or blue light will look best.
So, turn on the garland, turn off the lights and admire the fairy tale!

Let's continue decorating the house for the New Year. This time we do paper toys to the Christmas tree. Prepare your paper different colors, ruler and pencil, scissors, 2 beads and a needle and thread. 
Cut the paper into 18 strips different color about 10 centimeters long and approximately 1-1.2 centimeters wide. Draw and cut out two circles with a diameter of about 2 centimeters.
We string the bead onto a thread and thread it through double thread into the eye of the needle, as shown in the figure. 
Fold our strips in half. First we string a circle on a thread, and then all the stripes in the order you need (alternating colors, for example). 
We also string stripes on the same thread from their opposite end. At the end we string a circle, and lastly we string a second bead. Then we straighten the strips like a fan. 
The first one is ready Christmas tree decoration from paper! 
Let's move on to the next one. It is assembled according to the same principle. You just don’t need to bend the stripes (this way the toy will be in the shape of a ball).  And the strips are distributed in a circle so that there is a distance between them. Therefore, you should not thread the thread through the toy, as was the case in the first case. It is better to fasten the strips at both ends with rivets (used in scrapbooking) or fasten them so that the strips can be fanned out.
If you use paper of the same color for stripes, decorate the toy, for example, with small flowers.  They can just be made using a figured hole punch, which we talked about above. You can cut out flowers with scissors or even decorate the toy with something else (sequins, rhinestones, sparkles, beads, etc.).
When the toy is ready, we stretch a ribbon at the top under one of the stripes, with which the toy will hang on the tree. If you make the toy ribbons long and different lengths, then the balls can be hung on a chandelier or attached to the ceiling and used as an independent decoration, for example, in a nursery.
And these amazing decorations made of colored paper will be appropriate for any occasion or will become original decor rooms. Making them is quite simple. 
For greater effect it is worth making such balls different sizes and hang them together.
You will need paper of different colors, although you can use just white paper. 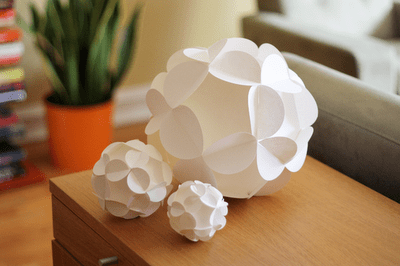
To make one ball, you need to cut out 12 blank modules along the contour, make cuts in them in the indicated places and connect the parts of the toy together. 
But these balls are somewhat similar to the previous ones, but they are made differently. 
You need to draw and cut out identical circles from colored paper. Then draw and cut out an isosceles triangle that fits exactly within your circles, touching the circle itself.
We attach a triangle to each circle and draw lines along its sides. Then, using the lines obtained inside the circle, we bend the edges of the circles. You will end up with many triangles with rounded edges bent outward.
We glue the triangles (former circles) together, applying them to each other with these same bent edges. Take a close look at the photo of the finished toy to understand how the circles are glued together.
The size of your colored balls will depend on the diameter of the circles you draw and the number of these circles.
And again paper ball decorations

In order to glue such a toy, we will again need to draw and cut out circles of the same diameter and different colors. 
We stack the circles, draw a line along the diameter on the top circle and connect the circles in several places with a stapler. 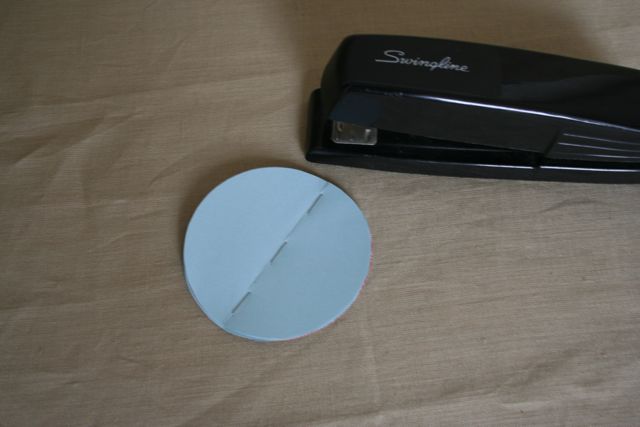
Then we open our circles slightly, like a book. Now we glue the circles together with a drop of glue, alternating: first from below, sometimes from above. After gluing, straighten our ball. All that remains is to attach a thread or ribbon to hang the decoration. 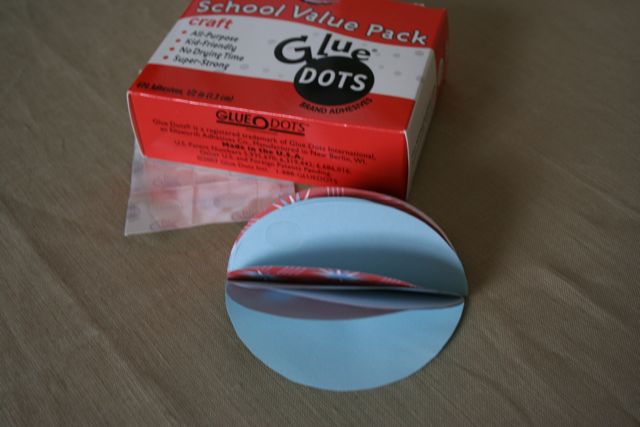
By the same principle you can do colorful balls much easier to assemble from them paper garland, strung on a thread or cord. 
To make such a ball, fold the cut out circles in half and then glue them together, placing the halves next to each other. Connecting the balls into a garland, we stretch a thread through the center of each of them.
It is not necessary to make exactly balls for a garland. You can make toys different shapes and connect them in one garland.
Such a garland will great decoration for a children's room. Yes, and you can do it together with your child, because everything is so simple.
More interesting options creation paper balls look for .
Weaving volumetric paper jewelry
And finally, one of the most complex paper toys among all presented here. But it is much more wonderful than it is complex. So, let's turn on and develop spatial imagination - we will make woven paper balloon.
Be prepared for hard work. In addition to colored paper of two colors, you will need 10 paper clips, glue stick and tweezers. It is better that the colored paper is double-sided.
Here is a template that resembles a sun. You shouldn’t draw this yourself; the bend and thickness of the rays are very important here. Take advantage of just that; it may need to be enlarged a bit before printing. After printing the template with the sun, cut it out and transfer it to colored paper. You should end up with one sun of each color. 
The additional details that are in the template are parts of the future basket for our balloon.
Place the sun blanks one on top of the other so that their rays are directed in opposite directions. In the center, 2 suns can be fastened together with glue.
Now we begin the actual weaving. We stretch rays of one color between rays of another. Then we turn our blanks over and do the same thing again.
Having reached a certain place, you will need to begin to shape the ball. This is where we will use paper clips to secure the weave. We now use paper clips until the very end of working with the ball, until we secure the rays in the weaving with glue. 
When the ball is ready, you will need to make a basket for it. We take a pre-cut blank, which consists of a circle and a strip. These are the base and walls of the basket. We connect the ends of the strip and get these same walls, then glue the bottom to the walls.
A piece that looks like part of a wheel with spokes will serve to connect the ball and the basket. Connect the ends of the circle of this part with glue. Then glue the so-called knitting needles with their tips to inside walls of the basket, and glue the rim to the base of the ball.
To make the principle of working with weaving more clear to you, you can carefully watch the video of the entire process.
That's all - the magnificent balloon is ready! This DIY paper decoration can decorate a child’s room, children's party or simply become a decorative element to set the mood in your home. You can make several of these balls of different colors and sizes and hang them from the ceiling individually or on a special frame with crossbars, like a pendant. 
If you find an error, please highlight a piece of text and click Ctrl+Enter.
15 New Year's crafts things you can do with your kids!There is very little time left until the New Year, and it’s time to think about holiday decorations for home. You can buy ready-made options in the store, but it’s much better to make original things with your own hands.
Snowman made from a sock

You can make these funny snowmen from unnecessary socks. You will need socks, rice for filling, some scraps and buttons. Cut off the toe of the sock and tie it with thread on the other side. Pour in the rice, giving round shape, tighten the thread again and add more rice, forming a smaller ball. Sew on the eyes and nose, make a scarf from a scrap, sew on buttons. And the cut off part will make an excellent hat.
Christmas tree pendants

A cinnamon stick is used as a base; several artificial spruce branches and multi-colored buttons are attached to it using glue. Such Christmas trees will not only decorate your home, but also fill it with the warming aroma of cinnamon.
Deer from traffic jams

Bottle stoppers - excellent material for crafts. For example, you can make such a cute deer. You will need some corks, glue and various beads for decoration. It’s not a shame to hang something like this on a Christmas tree.
Crafts from sticks

From ordinary ice cream sticks you can make cute Christmas trees, snowmen and snowflakes. All you need is paint, glitter, buttons and a little imagination. Even the smallest children can handle these.
Christmas trees made of colored paper

Like these ones wonderful Christmas trees You can make it by making a cone out of green paper or cardboard and decorating it with different things. Buttons, pebbles, beads and various paper figures are suitable.
Potato drawings

This cute print is made by dipping half a potato in regular gouache. And the adults will need to paint on the rest when the paint dries. This option is ideal for very young children.
Snowflakes made from pasta

Attach pasta of different shapes with glue and cover with silver paint, secure with tape - unusual New Year's snowflake ready.
Snowmen made from lids

Cover metal bottle caps with white paint (it’s better to use acrylic) and glue them together, as shown in the picture. Draw a face on the snowman and decorate it with a scarf made of bright ribbon. If you glue a loop on top of it, such a snowman can be hung on the Christmas tree.
Crafts from pine cones

You can make different animals and any other characters from the cones. You need paints, scraps, buttons and, of course, imagination and inspiration.
Christmas tree made of buttons

Select green buttons of different diameters and a few brown ones for the top and secure them with thick thread. Decorate the crown with a star.
Painted balls

Place the wax crayons pieces in a transparent Christmas ball, heat it with a hair dryer, constantly twisting it. When the pencils melt, they will leave beautiful colored streaks inside the ball.
Garland of fingerprints

Draw the cord of the garland and the base of the light bulbs, then give it to your child colorful paints- Let him draw bright light bulbs with his fingers. You can decorate with this pattern New Year's card or gift bag.