Sea and river shells are one of the most convenient and beautiful natural materials. They make all sorts of crafts - chic paintings, original jewelry, various decorative elements, photo frames and even charming Christmas tree decorations. Shells can be an interesting decoration for boxes, flower pots, and candles. Making any craft from a shell with your own hands will bring you great pleasure, and will also delight your children who love creative, interesting pastimes together. In this article we will share with you the technology for making cute souvenirs and Christmas tree decorations - Christmas angels.
These crafts are easy to make and can be a wonderful gift for loved ones on New Year's Eve and Christmas.
Cute Christmas angels - seashell crafts
To create beautiful Christmas tree decorations, you will need the following materials: several large and small shells (pearls), gold-colored beads, large (or just beads), fishing line, ribbon or decorative cord, and hot glue. If the shells are dark in color, you will need to first apply white, soft pink or blue acrylic paint to them.
The first stage of making a shell craft with your own hands is to make the head of a Christmas angel. We take a fishing line and string gold beads (5 pieces) onto it, and then close it into a ring - this is a halo. Next, we thread the ribbon through the bead and form a loop (you can use it to hang the toy on the spruce). Glue a halo around the cord - on top of the beads. Now let's start making the body: glue a large shell to the bead with the narrowed side. All that remains is to make the wings: take small shells and glue them to the sides of the body. Tip: if you don’t have small shells, you can replace them with tulle, organza or other material. That's it, your charming Christmas tree toy is ready! If you wish, you can decorate it - for example, attach a bright satin bow to the angel’s neck or cover the figurine with glitter varnish.
Shell crafts. Let's make an original photo frame with our own hands

An unusual photo frame made of shells can become an exclusive gift. To make it you will need a set of materials and tools, including:
- an ordinary simple frame for photographs, without decorations or any decorative elements;
- glue;
- acrylic paints, varnish, gouache;
- various shells;
- beads, beads.
The technology for making crafts from shells is elementary. You need to take a photo frame and stick beautiful seashells on it in any order. You can also decorate the product with beads and seed beads. Show your imagination and decorate the frame as you like. If desired, you can add sea inhabitants from salt dough to the shells - fish, octopus. At the end of the work, you can cover the decor with acrylic paints and varnish, which gives a special shine and significantly extends the life of the product. In addition to photo frames, you can also give panels and paintings as gifts to your loved ones. As you can see, you can make interesting crafts from shells easily and quickly, using a minimum of materials.

The pictures show a wide variety of decorative elements made using this invaluable natural material. You just have to show a little patience and perseverance, and you will definitely be able to create a beautiful, stylish decoration.
DIY shell crafts: butterflies for interior decoration
If you want to transform and decorate your home, make butterflies from sea and river shells. For this work you need donax shells (2 pieces of medium size), mussel shells (1 piece) and zebrina shells (1 piece), red and black gouache, glue, brush and varnish. The body of the butterfly is made from a large mussel shell and a zebrina shell, gluing them together. Identical donax shells are glued to the sides of the insect’s body (preferably they are white). On the muzzle, draw eyes with black gouache and glue two antennae (they can be made from wire or bristles). After drying, the craft is varnished.
Svetlana Kotlyarova
The New Year is coming - the most beloved and long-awaited holiday. Pending New Year's Eve, we make various New Year's crafts for the Christmas tree with the children. Today I bring to your attention master-Christmas tree making class seashell toys"Father Frost". I found the idea on the Internet, thanks to the author.
Required material:
Sea shell
Gouache, brush
Details for decoration toys: eyes, lumps of cotton wool, small beads, braid.
Markers
Execution steps:

1. Draw with gouache on shell Santa Claus cap in red.

2. Draw the face in orange or pink.

3. When the paint is dry, glue the eyes, then cotton balls onto the cap of Santa Claus.
Glue a small bead to make a nose.
The tape for the loop can be glued, or you can drill it into it before doing the work. shell small diameter hole.
Let's draw felt-tip pen mouth.
Our the toy is ready!

Dear Colleagues! Happy New Year! I wish you health, happiness, fulfillment of all your desires! Peace and all the best to you and your loved ones!


Publications on the topic:
Animals bought New Year's toys. There were boxes on the counter near Cuckoo. And on the shelf there were colored balls, and in the sun they shone like gold.
Probably the most favorite holiday of children and adults is coming. New Year! Many have already decorated their Christmas tree at home. And my guys and I decided.
Our "New Year's toy" consists of disks. For work we will need: 6 pieces of disks, a pine cone, New Year's tinsel, a glue gun. 1.
I'm looking at New Year's toys. I’m looking forward to the long-awaited, naughty holiday. It’s too early for us to decorate the Christmas tree, but the adults let me play. Shiny.
Let me introduce you to a small tutorial on how to make a simple Christmas tree toy. For work we will need: -a ring from the cornice. -sheet.
Children really like to make such a toy craft for the Christmas tree. If you make preparations in advance, then a child in the preparatory group can do it.
To make a toy we will need: - a sheet of colored paper - white paper - scissors - a glue stick - a simple pencil - satin.
I propose that together with me we create exclusive decorations for the New Year tree in a marine theme, and we will also make funny Santa Clauses from flat shells and scallops. There can be a huge variety of variations on the theme of shells in New Year's decor. The main thing is not to be afraid and to fantasize, especially since the material is waste, these shells, once brought from the sea, have been lying around for years, thrown around, and they will bring benefits and aesthetic pleasure!
The work can be done with children, they will definitely enjoy tinkering with New Year's decor, sorting and gluing shells and beads, for example, you can make such Christmas tree decorations for the classroom and decorate fir branches with them, creating a holiday atmosphere.
Unfortunately, I can’t convey with my camera all the beauty of the products in reality, due to the rhinestones and transparent faceted beads, they look like real jewelry, they shine and shimmer, I want to admire them for a long time.
For work we will need the following materials:
-Various shells;
-Scissors;
- Cords or narrow satin ribbons;
-Glue “Titan” or thermal gun;
-Brush;
-Pieces of lace or small flowers for gluing;
-Pearl beads of different sizes and shades;
-A piece of beaded wire;
-Acrylic paints for Santa: white, red, beige, black (you can use an outline);
-Acrylic glossy varnish, optional with glitter;
The materials are ready, let's get to work:
We will be the first to make Santa Clauses out of shells:
Step 1: Paint the base white:
For painting I use acrylic paints, but you can use others, for example, to make the gouache stick more tightly, you can add a little PVA glue to it on the palette. It is not necessary to paint the reverse side. If the paint does not cover the shell at one time, we paint it again as many times until we paint it completely, with each previous layer completely drying.
Step 2: Draw the cap:
Use red acrylic paint to paint the top of the shell and draw a strip on either side, up to half the length of the shell, and leave to dry:
Step 3: Glue the string:
For hanging, you can use a thin cord or a narrow satin ribbon about 14 centimeters long, I used Titan glue, unsightly ends can be hidden under a half-bead or a piece of lace, I used a small lace flower:
Step 4: Draw a face and glue beads:
Using beige or flesh paint in the center, a little below the cap, draw a stripe, as in the photo:
Glue the red nose and pompom to the tip of the hat:
Draw the eyes and red mouth in black:
Step 5: We cover the shell with acrylic glossy varnish, you can cover it several times with each previous layer completely drying, I covered it with varnish to which I added glitter (sparkles), although the photo does not convey this, but in reality it looks very beautiful, the glitter is called “Rainbow” , you need to read the label on the varnish, it should say that adding glitter is allowed.
Let's start making the second shell:
Step 1: Glue a narrow satin ribbon for hanging, glue it directly on top of the sink, since if you glue the hanger from behind, then under the weight of the decor the sink will tilt and the work will be crooked.
Step 2: Glue various small shells on top; before gluing, attach them and see if the composition looks beautiful. You can glue either with a thermal gun or with Titan glue, as in my version.
Step 3: Glue the bow, make and glue a twig with beads:
We put 5-6 beads of matching color on the bead wire, begin to twist the beads one by one, as shown in the photo, and form a twig.
From a ribbon, the same as the pendant, we make and glue a bow, with a twig we made on top:
Step 4: Glue the decor:
On a bow with a twig we glue a large pearl half-bead, next to it are turquoise and blue beads, small shells. On top, in the spaces between the shells, we glue various pearl and transparent stones; large rhinestones look beautiful. The main thing here is to follow the color scheme, then the work will look harmonious. If it’s still difficult for you to choose colors yourself, don’t worry, look on the Internet, there are many color combination tables. The top of the decoration can be varnished, but I didn’t do this, since the stones already shine and add a lot of glamor, and it is not advisable to paint the shells in this particular work, especially since it can stain the light ribbon.
The shells for the base can be taken in other shapes, you can also paint them with ordinary nail polish, in colors that suit us, as you like, but do this before gluing small shells. I made this work on a shell, which my eldest daughter painted with nail polishes when she was at sea. I didn’t raise my hand to throw it away, although the shell-base seemed crooked and scary, now it will show off on the Christmas tree, a button with a pebble also went to work:
The work is ready, let's admire the result!
Get inspired, create, fantasize! I wish you success in your creativity!
In this article from Krestika you will learn how to make beautiful crafts from shells with your own hands, how to process them and how to decorate the interior of your home in an original way with items made from shells.
Processing shells before starting creativity
We bring back from our vacation a reminder of the sea in the form of a whole scattering of various shells. Shells can have different shapes, colors and even patterns - this depends on the glands that the mollusks have. The surface of the shells can also be different - rough, smooth, twisted, with stripes, fan-shaped, etc.
How to clean shells from foreign odors and shellfish residues
Processed shells can be bought at the market or in a store.

If you brought them from the seashore or ocean, or found them in a lake or river, then the shells must be processed.
If there are no shellfish remains in the shell, just soak it in a chlorine-containing solution (water and “Whiteness” in a 1:1 ratio) for half an hour. If the shell is not clean, you can keep it in the solution longer. Next, scrub the sink with a small brush to remove the dark layer.
If the shell contains mollusk tissue and there is a foreign smell, then it is necessary to carry out thermal treatment: boil the sink for 5 minutes or heat it in the microwave for 30-60 seconds. After these procedures, you should remove everything unnecessary from the sink with scissors or tweezers. Next, you can proceed to the above-described procedure for processing the sink.
Eat Another way to clean a shell from shellfish remains. Place the shells in a bag in the freezer for several days. After the freezing procedure, it is necessary to remove the mollusk tissue from the shell.
Subsequent processing of shells
After cleaning and drying, the shells have a dull matte surface. You can give them an artificial shine (this will be discussed below), or leave them as is.
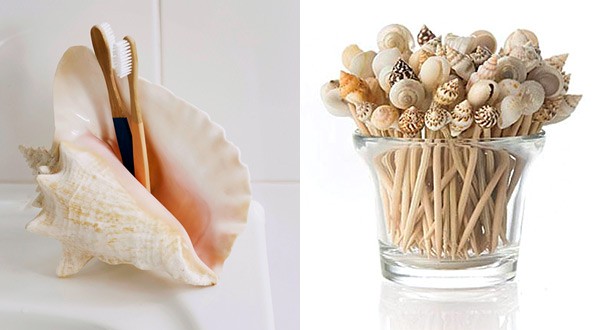
Use them as decoration for baskets, boxes, etc.
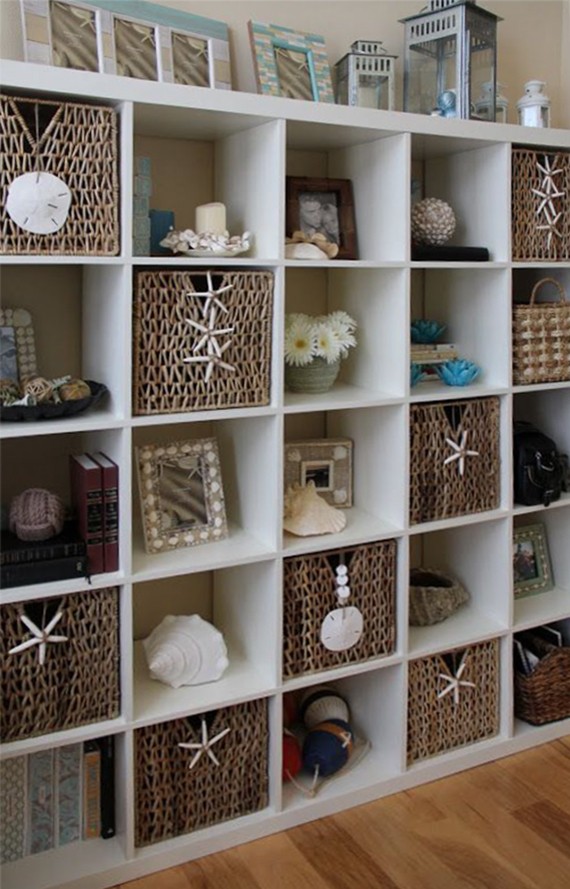

Photo from homedecordesigns.info
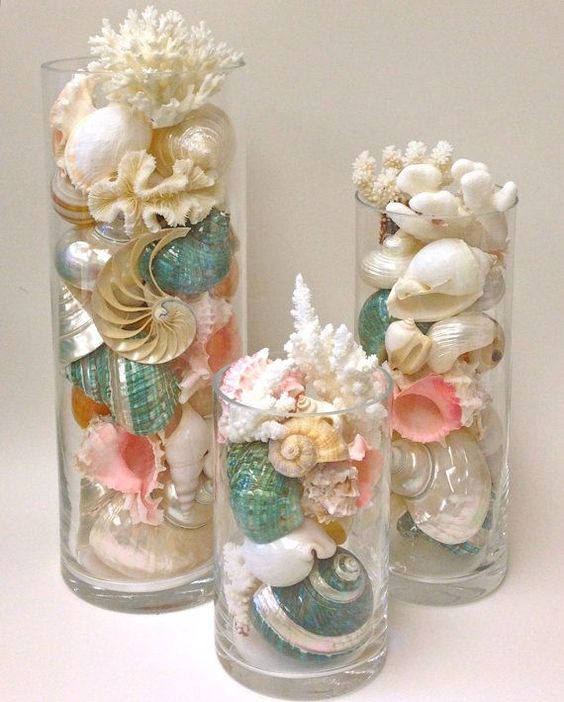
And also as independent interior items, such as stands, vases and flower pots:

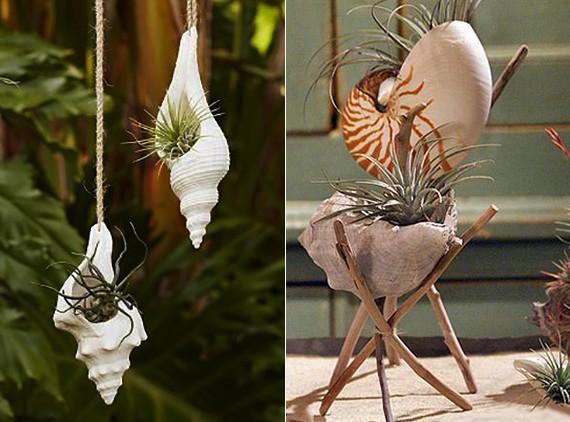

Stands for small items
Using the universal Moment glue, it’s quite easy to create various interior compositions with shells and starfish...

...decorate mirrors:

Shells look especially organic in tandem with natural materials, such as wood and twine:

And children can take part in creating simple crafts from shells. In this work you will need glue and thick cardboard for applications:


Varnishing shells
Seashells that have dried out from water look a little dull and lose their attractiveness. Glossy varnish gives them shine and a certain gloss, so they look brighter and more impressive.
With the help of mother-of-pearl coating, shells are transformed and shine as if they had just come out of the water.


You can use it as a cover for sinks. acrylic lacquer(transparent or with mother-of-pearl), which is applied to the shell with a regular art brush. Acrylic adheres well and dries quickly, making it great for decorating shells.

When covering the shells with acrylic varnish, you can simultaneously cover them with loose sparkles (glitter), they will stick to the varnish and will stick well, giving the shell additional texture and volume:

Aerosol varnish also suitable for covering shells. Aerosol varnishes are colorless, as well as with golden and silver glitter.
It is better to work with aerosol varnishes in specially designated, well-ventilated areas or outdoors.

Photo from seathingsventura.com

Photo from dekorella.hu
An alternative to the above varnishes can be nail polish. Even the one that doesn’t fit well will do.
In order not to stain your hands and the surface of the table, and also to avoid sticking the shells to the kaolin surface, it is best to paint and dry by placing the shells on pencils or knitting needles standing in a pencil holder.
Galina Pchelka demonstrates in his video tutorial how you can transform the most ordinary seashells using nail polish:
In your crafts, you can combine both matte and varnished shells.


How to make a through hole in shells
When making crafts, it becomes necessary to make small holes in the shells. This work is almost like jewelry, since the shell is a fragile material and can crack or delaminate during the drilling process.
One rule must be observed: the thinner the wall of the shell, the smaller the hole and the accessories used (thread, fishing line, wire, etc.) should be.
A hole in a shell can be made using automated and manual methods.
Using drill or screwdriver you need to select a drill with a diameter of 0.8 - 2 mm. The shell should be placed on a wooden or plastic board and secured with masking tape. The hole must be drilled directly along the tape. This will help the shell not break.

The hole can also be made using clove and hammer. To do this, secure the shell with masking tape and apply a mark on its inside. Next, place the nail against the mark and gently tap it with a hammer to create a starting hole. Next, move the nail back and forth until you get a hole of the desired diameter.
If you don’t have a nail and a hammer at hand, you can replace them needle, knitting needle or other available means.
It is necessary to follow safety rules and protect your eyes, as shell fragments can fly in your direction and cause injury!

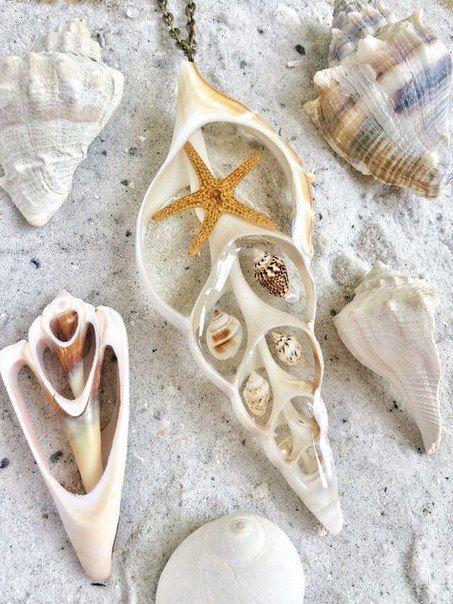
Having learned how to make holes, you can create very beautiful jewelry from shells, for example, pendants, earrings, bracelets:


Accessories for jewelry can be bought at a handicraft store.


Chips on the shell can be cleaned with sandpaper or a sanding block and an original decoration can be made from such elements.


And also in the manufacture of costume jewelry: pendants, and even.
Crafts from shells using different handicraft techniques
Shells can be bleached, or acrylic paints or enamel.
Before painting, the treated shell can be coated with a primer, but this is not necessary. You can apply paint directly to the surface of the shell - this way its natural pattern will be more clearly visible under the paint.

It is better to pour paint onto the palette in small quantities, adding small portions if necessary, since acrylic paints dry quickly.
It is also necessary to have different types of brushes: wide - to paint over the shell completely and thin - to draw fine lines and inclusions. While working, periodically wet the brushes in a glass of water.
As long as the acrylic paint has not dried on the shell, it can be easily erased. If the paint has already dried and you decide to make adjustments, then it is easy to paint it with a different color.

All kinds of patterns (dots, squares or stripes) can be applied to shells in accordance with the relief pattern on its surface:

You can also use to paint shells paint for painting porcelain or ceramics. Most often, after using such paint, products are heat treated in the oven. In the case of shells, this is not required.

Coating spray paint- a quick and convenient way to give shells the desired color scheme!

Photo from decoracion.facilisimo.com
From shells and gold leaf They make unique jewelry, for example, the following pendants:

Photo from how-do-it.info


Shell decoupage is great for beginners to practice their skills.

Inlay of shells with rhinestones
An example of “expensive” decor is the inlay of shells with rhinestones.

There is a special glue for rhinestones on sale; in addition to it, you will need tweezers or a magnetic pencil for rhinestones.
Gluing with rhinestones is a painstaking process, so practice on small shells and simple patterns

Gluing chains of rhinestones is faster and easier, since you don’t need to glue each rhinestone separately:


You can decorate a New Year tree with shells inlaid with rhinestones, wear them as jewelry and create truly chic interior items!

Christmas tree decoration from SeashellCollection

Photo frame for luxury interiors
Flowers, floating bowls and shell topiaries
One of the most popular ways to use shells is to create.


In addition, shells can be...

…. and create incredibly tender flowers:


Channel Tvorilka Club shows from shells:
You can create shells of various shapes, sizes and colors!

By adding pearls, stones and beads to the base of the bouquet, we get a beautiful, unfading color:
Decor of photo frames and paintings from shells
Decorated with shells brought from vacation, they are the most relevant item for decoration.

The principle is the simplest: glue “Moment” or “Titanium” glue over the entire perimeter of the finished frame, matching the shells to each other as beautifully as possible.

In this case, the frame can only be partially filled with shells...

...or can be decorated entirely:

Another way is to place the shells themselves in frames, thus creating stylish ones:

The idea could be more complicated:


Victor Bochkarev clearly demonstrates the technique of creating a collage with wax and shells:
If you don’t yet dare to make such masterpieces, then you can easily make them from shells.

Channel Vekoria Handmade teaches how:
Candles and candlesticks with shells
Wax candles can be decorated with shells on the outside, and gel candles can be decorated on the inside.

Wax candles

You can create real sea stories inside a gel candle! To do this, you first need to place decorative ornaments and shells on the bottom of a glass or bowl, and then fill everything with a gel solution. Such candles simply fascinate with their beauty!

To decorate a wax candle with shells, you need glue and a variety of shells and other decorations. But it's more practical to do candlestick, for example, from an ordinary glass glass into which the candle itself will be inserted.

Photo from runningwithsisters.com
From shells of the same shape - for example, mussels - you can glue a candlestick in the shape of a flower. To do this, take a round base, preferably made of natural material, such as wood. Glue the outer petals onto it in a circle, then gradually move towards the middle.
You can use both a glue gun (when gluing elements with rough surfaces) and universal Moment glue (if one of the surfaces is smooth - glass or plastic).
Don't forget to leave the center of the flower of the required diameter to place the candle in.

Candlesticks can be made from glasses turned upside down. Fill the glass with sand, shells, etc. with decorative elements, then cover the bottom with thick cardboard and decorate with twine. To keep the twine on the glass surface, it is better to use universal Moment glue. Candles can be wrapped with the same twine.

How to make the sea in a glass, watch the video channel Recipes from MarMari:
The shell itself is a ready-made decorative candlestick.

You should remove the wick from the tea candles using the metal base located at the bottom of the candle, and return the candles back to the mold.

The wick must be glued to the bottom of the shell in the center. Next you need to melt the paraffin. To do this, you need to boil water in a saucepan, then turn the heat down and lower the molds with paraffin into the water. Once the paraffin has melted, you can pour it into the sinks.
If the shells are unstable, then place them in an egg carton or fix them with plasticine while pouring paraffin.

The paraffin should harden within 20 minutes.

Christmas decorations in a marine style
Christmas decorations in a nautical style? Why not! This is a very popular option abroad
It is best to preserve shells as a reminder of carefree days at the beach in the form of interior items, decorations and souvenirs. After all, they are such a beautiful, completely free, natural and durable material. In this material you will find 50 inspiring photos, 8 ideas and the same number of step-by-step master classes on making crafts from shells with your own hands for beginners.
Basic instructions for preparing shells
Cleansing
Before you start making crafts from shells, you need to prepare them well.
- If the shells are “dead” and there are no remains of mollusks left in them, then they just need to be soaked in a solution of water and any chlorine-containing product (for example, bleach, “Duckling”, etc.) in a 1:1 ratio for 30 minutes. If the shells are very dirty or you want to remove the dark outer layer ( periostracum), then soak them longer. After soaking, brush the shells and rinse in clean water.
- If the shells are “live”, that is, they have the remains of mollusks (even if they died long ago) and have an unpleasant odor, then they need to be thoroughly cleaned. To do this, put the shells in boiling water for 5 minutes, and then remove the remains of the shellfish using tongs, nail scissors, etc. There is a second way: heat the shells in the microwave for 30 seconds, then try to remove the remains with tongs. If unsuccessful, continue heating the shells in the microwave, checking the result every 10 seconds. When all remains have been removed, treat the sinks with a bleach solution according to the first instructions.
After processing, inspect the sinks for chips and, if any, sand them with a sanding block, disc or sandpaper. If desired, you can add shine to them using clear nail polish or furniture polish, as well as using oil or rich cream. True, in this case, before treating the shells with glue, the gluing areas will have to be additionally degreased with alcohol.
Drilling holes
To make some types of crafts from shells (for example, wind chimes, beads, bracelets and other jewelry), you need to drill a hole in them. This task is quite simple, the only difficulty is that the shells can crack or delaminate at the drilling site.
- Therefore, remember the main rule: the thinner the shell, the smaller the hole should be in it and, accordingly, the thread/accessories of the decoration.
There are two ways to make holes in shells - manual and automated.
Method 1. Select a drill bit for a drill, screwdriver or straight grinder with a diameter of 0.8 - 2 mm. Place the shell on a wooden or plastic board and secure it with masking tape. Drill a hole directly through the tape - it will prevent the shell from splitting or delaminating.
Method 2. If you do not have a screwdriver or drill, then you can make a hole in the sink using a nail and a hammer. To do this, first cover the shell with masking tape, put a mark on the inside of the shell, then place a nail and gently tap it with a hammer several times to make the initial hole. Next, widen the hole by moving the same nail back and forth inside it until you reach the desired diameter.

If you don’t have a nail or a hammer at hand, then use an ordinary needle, nail scissors or a knife and “drill” the hole by hand. The result will appear in about 10 minutes.
Idea 1. Inlay frames, frames and frames
You can decorate the frame of a mirror, painting or photo frame with shells. We present examples of such crafts in the following collection (scroll the photo to the right).


Today we suggest you decorate a mirror frame with shells, but using the same principle you can decorate any photo frame or painting frame.

Materials:
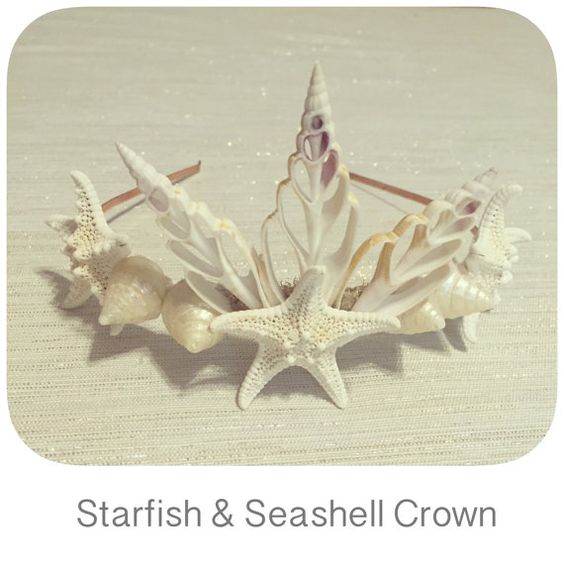
- Shells of small, medium and large sizes and, if desired, additional decorations (eg starfish, pearls, figurines of skates, etc.).
- Glue gun and a few sticks of glue or clear epoxy glue.
- Newspaper or any unnecessary paper to protect the mirror from glue.
- Masking or regular tape.
Instructions:
Step 1: Protect the mirror with paper and secure it with masking tape. At this stage, the frame can be painted if you are not satisfied with its original appearance.
Step 2. Sort the shells by size to make it easier to create your future composition.
Step 3: First glue the first row of small to medium shells (about the same size) around the mirror.

Step 4: Now start gluing on the largest shells. Beforehand, you can play with the layout options and choose the best one. If you are using epoxy glue, once all the parts are glued, leave the frame to dry overnight.


Idea 2. Making a Valentine panel
From a collection of shells of different shapes and sizes, you can make a panel in the form of a valentine. However, you can cut out any other shape from cardboard/plywood, say, the same seahorse or a letter.

Materials:
- Glue gun or any strong adhesion glue;
- Collection of river and sea shells;
- Cardboard;
- Scissors;
- Leg-split.
Instructions:
Step 1. Cut out the base for the heart-shaped panel from cardboard.
Step 2. Using a knife or awl, make two holes for the twine.
Step 3. Start gluing the shells, trying to leave minimal gaps between them. Leave the loop holes open.

Step 4. Cut the twine to the desired length, thread the two ends of the rope into the holes on the back of the panel and tie with double knots.
In the next video you can see a visual master class on making crafts from shells with your own hands in the form of a Valentine panel.
Below are more ideas for creating a shell panel.


Idea 3. “Painting” a picture on canvas
Here is another idea for creating a wall craft from seashells.


Materials:
- Canvas on stretcher;
- Shells;
- Glue gun or other strong adhesion glue, for example, “Moment”;
- A template or stencil of the desired design, printed on paper;
- Acrylic paint to create a background (optional);
- Brush (optional).

Instructions:
- If you want to repeat the idea of the painting in this master class, then first create a background for the composition from shells. To do this, use a brush and acrylic paint of the desired color. Wait for the background to dry and proceed to the next step.
- Secure the template or stencil to the canvas with masking tape, and then trace its outline with a pencil.
- Start gluing the shells onto the drawing without going beyond its boundaries.


Idea 4. Cooking candles for mini-candlesticks
Shells are almost ready-made miniature candlesticks that are just waiting to be supplemented with paraffin and wick. You can use the resulting candles for a romantic picnic or simply for interior decoration.

Materials:
- Sea or large river shells;
- Small round candles in tin molds;
- Water and a saucepan for a water bath;
- PVA glue or double-sided tape.
Instructions:
Step 1. Remove the candle itself from the tin container, and then remove the wick from it by pulling the metal base at the bottom of the candle (see photo). Set the wicks aside and return the candles to the molds.

Step 2. Glue each wick with double-sided tape or PVA glue in the center of the shell.
Step 3. Now we need to melt the paraffin until it is completely liquid. You can do this in three ways:
- Bring the water in the pan to a boil, then reduce the heat until the water stops boiling and lower the ramekins into it.
- Place the candles on the stove, preheated over low heat, and make sure that the paraffin does not burn.
- Warm up the paraffin using a hairdryer.
Step 4. Once the paraffin has melted, remove the molds from the heat and begin filling the shells. It is best to use some kind of tongs or a pair of Chinese chopsticks for this. Don't forget to protect the table surface with newspaper first.

- If the shells are too unstable and you are afraid that the paraffin will harden unevenly, then it is better to arrange the candles in the cells of the egg packaging or fix, for example, with soft plasticine that does not leave marks.
After about 20 minutes, the paraffin will completely harden and you will be able to enjoy the light of the shell candles.

Idea 5. Making topiary in a marine style
Topiary is a small decoration in the form of a tree in a pot. You can learn the principles of making topiary from shells with your own hands or from the following video lesson.
And in this selection of photos you can get ideas for decorating a topiary made from shells with your own hands in a traditional round shape or in the form of a Christmas tree.


Idea 6. Making a flower candlestick
If you have enough bivalve shells, you can make them into flowers.

Today we propose to make such a craft from mussel shells.

Materials:
- Bivalve shells;
- Any round base of small diameter;
- Glue gun;
- PVA glue (optional);
- Glitter (optional).

Instructions:
Step 1. Prepare the shells - wash them with soap, remove any remaining organic matter and, if desired, bleach them using chlorine-containing products (see instructions at the beginning of the article).
Step 2: Paint the round base of the candle holder a neutral color, such as white.
Step 3: While the base is drying, sort your sink set by size.
Step 4: Start gluing 1 row of shells to the sides of the base using hot glue.

Step 5. Once the first row is slightly dry, begin creating the second row, placing each new shell overlapping the previous one so that it is located between the two shells of the first row. As a result, you will have a checkerboard layout of shells in two rows as shown in the photo.

Step 6. Glue the third and all subsequent rows using the same principle, but not on the base, but on the joints of the shells of the previous row (the place is highlighted by the arrow in the photo below).

Step 7. Once you have glued the last row, look around the candle holder and add another row or two where you think it is needed.
Step 8. Hooray, the shell candle holder is ready! If you wish, you can additionally decorate it with sparkles. To do this you need to do the following:
- Treat the shells with PVA glue on the inside or just around the edges.
- Sprinkle glitter generously onto your craft, let the glue dry, and then shake off any excess.

Idea 7. Create wind chimes
Shells are an ideal material for making wind chimes, because the “chime” of such sea bells is very pleasant to the ear.

Materials:
- Twine, fishing line or any thread.
- A twig or wooden stick.
- Scissors.
- Hot glue gun or a tool for drilling small holes (drill with a 2 mm drill bit or just a needle and nail scissors).
- Seashells.
Instructions:
Step 1. If you want the shells to be tied to the threads, then first drill holes in them (see basic instructions at the beginning of the article). If you don’t have a tool, and you are satisfied with the adhesive method of fastening, then immediately proceed to the next stage.
Step 2. Tie twine to the branch as shown in the photo, measure approximately 7 cm in length from it and cut off the excess.

- If you use shells with holes, then the twine must be cut immediately to the desired length with a reserve for knots.
Step 3: Glue the shell to the twine using a drop of hot glue. Then glue another 7cm strand of twine to the other end of the shell. Continue working until you are satisfied with the length of the first row.

- Shells with holes can be tied to a thread in at least two ways: by tying knots around the holes or under them (the knot must be larger than the hole).
Step 4: Continue hanging strands of shells until you reach the desired number. In this case, you can play with the length of the rows to form, say, an arch or a ladder. In this case, the wind chime has alternating short and long threads.

Step 5. When the piece is ready, tie another piece of twine at both ends of the branch.

Following the principles of this master class, but by replacing the branch with a hoop or adding shells with starfish, beads, feathers and other decor, you can create more fancy wind chime designs.

Idea 8. Making a bracelet from a cowrie shell
If you have at least one cowrie shell, you can make a boho-style bracelet for your arm or leg with your own hands. You can buy all the accessories for such decoration in handicraft stores or large sewing stores.

Materials:
- One cowrie shell;
- 1 m of silk cord;
- Half a skein of floss in a contrasting color;
- Beads (in this master class we use copper beads from an old bracelet);
- A pair of crimp terminals with loops (designed for cords and making bracelets);
- Clasp for jewelry (in the form of a ring or carabiner);
- Ring for fastening (detachable);
- Scissors;
- Pliers.

Instructions:
Step 1. Drill a small hole at the two ends of the cowrie (see basic instructions at the beginning of the article).
Step 2. Cut approximately 15 cm from the skein of silk cord and set this piece aside for a while.
Step 3. Pass the silk cord about halfway through one hole of the shell and tie a knot.

Step 4: Pass the other end of the cord through the middle of the sink and tie a knot in the second hole.

Step 5. Cut several strands of floss, gather them and fold the resulting bundle around the silk cord next to the shell as shown in the photo.

Step 6: Take a short piece of lace, wrap it tightly around the top of the folded floss, tie a knot, and cut off the excess. You will get a brush. Fluff it up and trim it with scissors if necessary.

Step 7: Start stringing beads onto both ends of the bracelet. Once the desired length is reached, bend the ends of the cords in half and insert the resulting ends into the crimp ends.

Step 8: Use pliers to pinch the ends of the bracelet and then cut off the excess cord.

Step 9. Using pliers, attach a ring to one end and a clasp to the other. Your shell bracelet is ready!

21 average rating: 4,48
out of 5)