I puzzled over how to knit a visor ... Of course, there are many ways to sew a two-piece visor, knitting a tight visor directly from the cap, but I didn’t like these options. Firstly, I wanted the seam between the two parts to not look rough. The best option, in my opinion, is to not have it at all. Secondly, I wanted the visor to keep its shape, like a real baseball cap. It became clear - the visor must be knitted with a cover. So, I took Igor's cap, which he wore in the summer, circled the shape of the visor. Then she tied the sample with single crochets, transferred the visor pattern to it in full size and calculated this handicap in single crochets. By the way, the density of my knitting with single crochets, Semenovskaya "Carolina", crochet No. 3 30SbnX42 rows = 10X10cm. I started knitting a visor from his “crown”, i.e. center top edge. To do this, I tied a chain of air loops and began to tie it in a circle. The point is that two parts of the visor are knitted at the same time. Having knitted a row in one part, I knitted Sbn (this is instead of a seam) and, continuing knitting in a circle, immediately knitted a row in another part, at the end of this row again Sbn (instead of a seam on the other side). I knitted in a spiral so that the seam from the connecting posts was not visible. Although ... if it is difficult to count all the time, you can also close the circular long row with a connecting column, and then place it in the lower part of the visor. I knitted in a spiral - it was not in vain that I thought for so long how to achieve a lack of a seam. This is what the beginning of knitting looks like. This detail can already be folded in half and you can see how the cover for the future visor will appear. In order for the shape to be exactly like that of the visor of a baseball cap, the resulting cover needs to be tied in such corners. Upon closer examination, it turned out that the visor did not have a flat base at all, but a curved one. So I continued to give it the right shape. On the other hand, I knitted another corner symmetrically ... I almost forgot - due to the fact that I still knitted in a circle, I started each new row when knitting a corner, not turning the work, but from the same edge. This is necessary in order not to disturb the texture of the fabric knitted in a circle. This is how the finished cover for the visor looks like Now what remains is a curved shape. Of course, it would be great to insert a ready-made plastic visor from the previous, obsolete cap into this case. I didn't find that. Therefore, I cut out a shape from a plastic 2 liter bottle. The visor from the bottle needs to be cut a little smaller than the cover, but not much. The cover should fit the visor. We insert the visor into the case. We sew the visor along the edge, while hiding all the threads inside once and for all. And sew the visor to the cap itself. The plastic in the bottle is soft, when sewn to the cap itself, it will easily take the specified shape around the cap itself. As for the cap itself. In order for her to also hold the cap like a baseball cap, it was decided to knit it with single crochets. The circumference of the head of my Igor, who is now 2.5 years old, is 47-48 cm. Therefore, the bottom was connected with a diameter of 14cm. The additions were made according to the same principle as in the lower example. Then I knitted without increments until the length of the cap reached 13 cm. In width, with a bottom of 14 cm, it turned out 24 cm. However, due to the fact that the cap is quite dense, it was possible to measure this only by folding the cap in four, and not in half. I decided to decorate the bottom edge of the cap with such a strip, alternating colors. At the same time, when changing the thread, the last method of knitting a double crochet was performed with a thread of a new color. From the wrong side, a non-working thread was pulled along the canvas. This option of pulling the thread, in turn, gave a little extra density to the bottom edge. I didn’t make a description of the cap - the main thing here is to maintain the necessary proportions in centimeters. I post the description of the visor. At the same time, I draw your attention to the fact that I calculated it according to my knitting density, once again I remind you that 30SbnX42 rows \u003d 10X10 cm with hook No. 3 Semenovskaya "Carolina", so check your knitting density before you start knitting. In any case, I think this description will help you knit your visor or make your calculations. Maybe I am not the discoverer of this method of knitting a visor, but I have not yet seen anything similar. I would be glad if my description and my story about the story with a visor are useful to you.
The summer months bring joy to both adults and children. You can spend whole days outside, blissful under the warm sun. But the influence of the daytime heavenly body is not always useful, so mothers begin to think about how to cover the baby's head. A long stay under the rays threatens with undesirable consequences - from deterioration of health to sunstroke. A cap for a boy with a hook for the summer, knitted by a caring mother, will save the baby from the troubles of summer days.
The headdress is knitted easily and simply, even a novice craftswoman will cope with it. You can knit several caps - for each outfit.

We knit a simple cap for a boy with a crochet for the summer with our own hands
Not everyone is ready to watch knitting videos, preferring a verbal description of the model to them. The scheme to the description will make it clear.
Consider how to knit the simplest cap for a boy.

First of all, you should dwell on the yarn. The best yarn is cotton. Products made of natural material pass air well, the child will not be hot in them.
1) To begin with, a chain of air loops is dialed. Then it closes in a ring, and the product continues to be knitted from top to bottom.
2) In the first row, three loops are additionally recruited for lifting. Then the row is knitted with double crochets. The hook is inserted into the center of the ring of air loops. The row ends with a connecting column.
3) Subsequently, the product is knitted according to the pattern. Rows 12-19 are done in the same way.

4) The next 20th row consists of double crochets, each of which is performed on a double crochet and air loop of the previous row.
5) In the 21st and 22nd rows, the product is processed around the perimeter with single crochets.
6) To make a tie, 32 air loops are recruited in the 23rd row. Loops 31 and 32 are lifting loops. On the remaining 30 loops, a row of single crochets is knitted. Then, continuing to knit in a circle, not reaching the end of the row of 15 loops, the second tie is knitted. Having made the last single crochet for the tie, a connecting column is made in the loop of the 22nd row. The base for the cap is ready!
7) The visor is made separately from the cap, then it is attached to it with the help of posts.

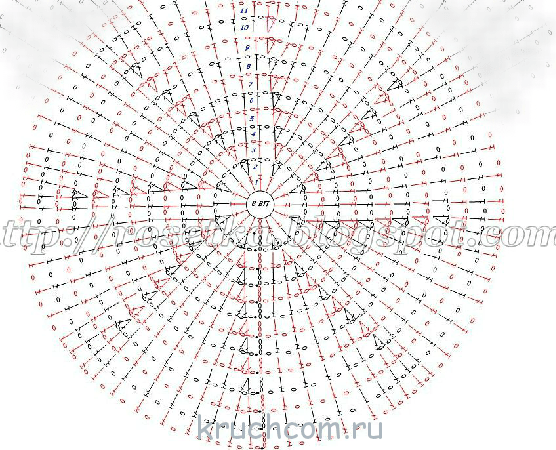
Knitting begins with a set of 27 air loops. On the presented diagram, the notation is adopted: single crochet columns are shown with crosses, ticks with a cross are increments. An increase means knitting two columns into one loop of the base. To achieve rigidity of the visor, you can add a thin fishing line to the thread.
"Marine" theme becomes the most relevant in the summer. So why not knit a cap for a boy in a marine style.
Unlike the previous model, this product will require yarn in two colors, these can be standard blue and white. But no one forbids the use of others.
1) The headpiece is knitted from above. The beginning is standard - a chain of air loops (5 pcs.), Closed into a ring with a connecting loop.
2) The next rows are worked in single crochets in a circle. To add, you should make an increase in each loop, that is, knit two single crochets from one loop of the previous row. In order for the top of the cap to be flat and not bent, the addition of loops is carried out according to the rule:
- in the 1st and 2nd rows, an increase is made in each loop;
- in the 3rd row, an increase every three loops;
- in the 4th row, an increase every four loops;
- starting from the 5th row, the increase is done in random order.
Loops are added until a circle with a diameter of 17 cm is knitted (for a boy 4–5 years old).
In order for the cap to match the marine theme, you need to alternate rows: 2 rows of blue yarn, 2 - white. The last loop of a row of each color is a connecting column, the beginning of a row of a new color is an air loop.

3) To knit the side walls of the base of the cap, the loops are reduced. To reduce the number of loops in a row, you need to skip one of the loops of the previous row, that is, just do not knit it. It is enough to reduce one loop in each row. Rows also continue to be done with single crochet "sea stripes". You need to finish the cap with yarn of the same color, knitting it 5-6 rows.
4) The visor will immediately be attached to the base. Having determined the loop corresponding to the middle of the cap, 10 loops recede from it to the right. From this point continue to knit as follows: 4 single crochet, 4 half crochet, 4 single crochet, 4 half crochet, 4 single crochet, connecting loop.
5) The second row of the visor is performed with single crochets, at the end - a connecting column.
6) The next 3rd row is knitted similarly to the 1st (see paragraph 4), and the subsequent ones are similar to the 2nd (see paragraph 5).
7) The final stage is the decoration of the cap. For this, a strip of white yarn and a “steering wheel” are knitted. Decorative elements are sewn to the finished cap
Let's analyze the main options for decorating a cap with applications
To make a cap for a boy more elegant, it is decorated with appliqués or decorative buttons.

Video on the topic of the article
Hello!!! My name is Dabizha Olga, I'm from Kazakhstan, Kostanay. Now I want to take part in your summer hats competition again. I am sending you two works.
A cap for a boy is crocheted from Trinity yarn cotton hook No. 1.75. Visor according to the scheme. A fishing line is inserted in the last row. Yarn consumption is also a small footage, good 610 m. The anchor is glued ready. For decoration, two buttons and twisted lace.

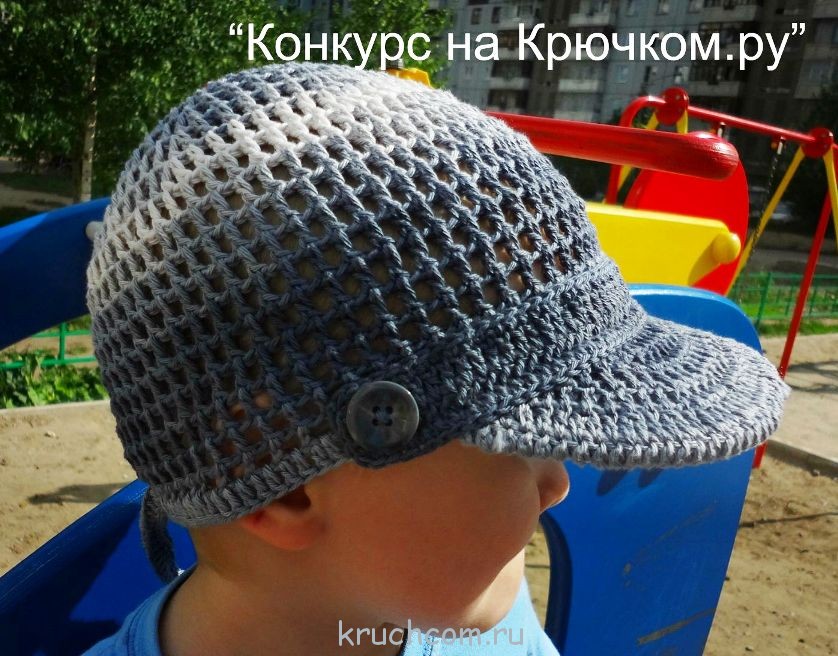
An openwork cap for a boy is knitted from 100% cotton.
You will need: Charm yarn (100% cotton, 106 m / 50 g) - 50 g each in white and light gray, hook No. 2, button for tying.
Cap knitting description:

Competition “Knitted panama hats and hats for the summer”
The time has come for the bright sun and, of course, panama hats and hats that will protect the heads of our kids. And it's time for a new competition!
The prize fund of the competition is 1500 rubles.
Prize for 1st place - 1,000 rubles.
Prize for 2nd place - 500 rubles.
Also, all participants of the competition will receive a diploma from the site Kryuchkom.ru for participation in the competition.


Yellow or green, take your pick. Caps are knitted from 100% cotton, a plastic visor is required.

Competition work No. 2 - Knitted cap for a boy
Hello. My name is Natalya Kuteeva, I live in the city of Krasnoyarsk. Crocheting is my main hobby. I have already taken part in competitions on the Kryuchkom.ru website, so I want to participate again)).
I present 3 of my works for the competition: a hat-kerchief, a hat-cap and a bandana.
The cap is knitted from ALIZE bahap yarn, 100% mercerized cotton, crochet No. 3.
In this form, the model was also invented independently. The base of the hat is knitted in a circle according to the scheme, the edge was not knitted in a circle - st / sn and made ties. I cut out a visor from plastic and tied it with a st / sn in the shape of a visor. I sewed a tied visor to the base of the hat, and also sewed a strap (st / sn) and buttons.
We invite you to participate in the competition "Knitted panama hats and hats for the summer." Conditions of the competition - . Submit your work by email. the address [email protected] marked “Competition on Kryuchkom.ru”

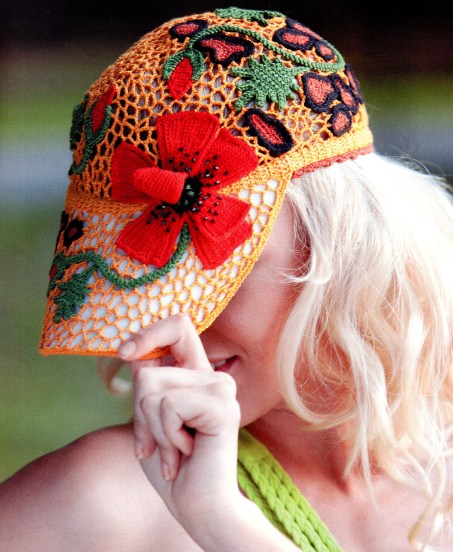
Knitted poppies on a cap are very beautiful and relevant on a hot summer day. The description and step-by-step master class from Svetlany Tomina will help you knit the same floral cap, which will be a bright addition to your outfit.
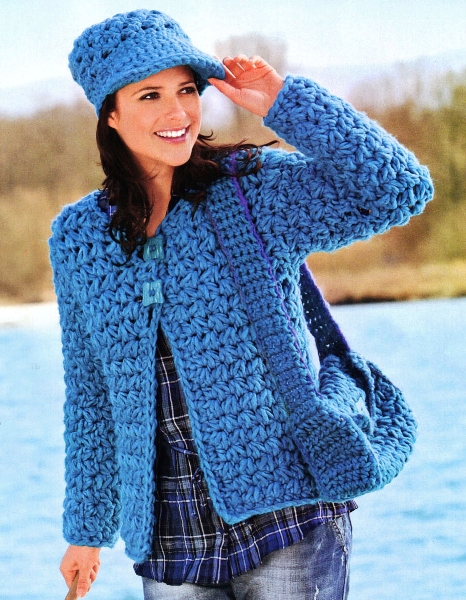
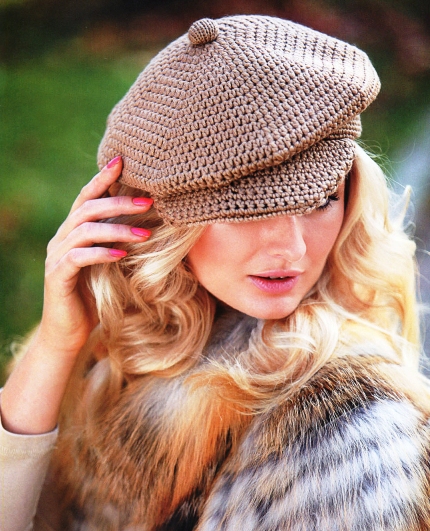
A practical set in a sporty style, consisting of a jacket, a bag and a cap with a visor, knitted from thick yarn. Thanks to the volumetric pattern and yarn, the model looks amazing.
 So our first competition has ended, I want to thank all the participants, the work is just wonderful!!! With such mothers, children will always be beautifully dressed, and I am glad that knitting is gaining momentum more and more!!!
The arrival of summer is a joy, especially for children who are ready to spend hours outside at this time. But every mother at this time of the year thinks about what kind of headdress to wear to her child so that the sun does not bake his head. A baseball cap that you can make at home is perfect. And it is best to knit several products for different costumes, and then your child's head will be hidden from the sun's rays.
Useful information for beginners
Before you start knitting a children's baseball cap, you need to choose the material.
It is worth choosing a summer thread, namely 100% cotton, while the thickness of the thread should be minimal. Tulip, begonia, microfiber are perfect.
As for the color scheme, light colors are best for summer, as dark ones will attract the sun's rays. For a girl, saturated tones of raspberry, pink, red or white are suitable. For boys, it is better to knit a baseball cap in green, brown or gray colors. Of course, white hats are best for summer, but they are impractical and have to be washed often.
Summer baseball cap is perfect for both boys and girls. For example, how do you like these options?

The difference between hats for boys and girls lies in the choice of color, decoration of finished products and patterns. The same baseball cap can suit a boy and a girl, only their difference will be manifested in patterns. Embroider anchors for boys, berries for girls.
Baseball caps are knitted in the round. The whole process can be divided into 3 stages: knitting the bottom, poly or piping and knitting the side.
This is how an approximate diagram of the ages and sizes of the child's head, the depth of the headdress looks like.

There are various forms of caps, you can see all their diversity on the MK.
Crochet baseball cap: a step-by-step master class
As mentioned above, the manufacture of a baseball cap is divided into three stages: the bottom, the middle part (Velcro at the back), and the visor.
The most difficult thing is to tie the visor. In order to make it strong, it is best to use a special frame. Now such a frame can be found in a specialized store. And, of course, you can use improvised means and make it from a plastic bottle by cutting out a folder of the required shape. When cutting, use an old cap or a pattern for an adult. After cutting out the base, it is necessary to tie it with single crochets or according to the chosen pattern. It is necessary to tie on both sides at once.
Thus, it turns out that the frame remains, as it were, inside, and you move from the edge to the inside. In this case, in the future you will have to tie the visor to the cap. Sometimes a one-piece knitting option is used, but in this case it is necessary to strictly follow the pattern and make the necessary additions.
Beginning knitters should definitely follow the pattern to avoid mistakes. Approximate options for baseball caps are shown in the photo:


I present to your attention a master class on crocheting a children's cap with a visor for a boy, decorated in a marine style.
Cap for a boy 1-2 years old (OD - 47 cm). For work, we need a 50 g skein of blue 100% cotton yarn (50 g - 180 m), as well as hook number 3.
MAIN PART OF THE CAP
1 row- we knit 18 double crochets into a sliding loop.
2 row- in each loop of the first row we knit a double crochet, in each 3rd loop we knit 2 double crochets - in total there are 24 columns in this row
3 row- (we knit with a sirloin net up to the 15th row): three lifting loops, a double crochet, one air loop, etc. - only 24 columns.
4 row- three lifting loops, in the first arch - 1 double crochet, one air loop; in the second arch - 1 double crochet, one air loop and 1 double crochet, one air loop, i.e. in the 2nd arch we knit 2 columns, etc. - 36 columns in total.
5 row- three lifting loops, in the first arch - 1 double crochet, one air loop, in the second arch - 1 double crochet, one air loop, in the third arch - 2 double crochets, alternating with an air loop, etc. - a total of 48 columns (photo 1).

6 row- we knit similarly to the previous row, only in every 4th arch - 2 columns with a crochet - only 60 columns.
7 row - 13 row- we knit without increments of 60 columns in each row.
14 row- we knit similarly to the sixth row, only in every 5th arch - 2 columns with a crochet - a total of 72 columns.
15 row- the last row of the sirloin net - we knit 72 columns without increments.
16 row- two lifting loops, in the first arch - 2 double crochets, in the second arch - 1 double crochet, etc.
17 row- two lifting loops, in each loop we knit 1 double crochet.
18 row - 19 row- one lifting loop, in each loop we knit 1 single crochet.
The main part of the cap is ready. We do not cut the thread, because then we will tie the entire cap together with the visor with a crustacean step.
HOW TO CROT A VISOR
The visor will take up a little less than half the diameter of our cap. To do this, fold the cap in half and in half again (photo 2).

We outline the borders of the future visor with a thread of a contrasting color (photo 3).

In order for the visor of our cap to expand in the center, we will knit it in short rows. We outline the borders of the shortened rows with a red thread. The visor will be knitted with a blue thread. The hook needs to be taken in a smaller size, we knit it tightly with a thread in 2 additions, so that the visor keeps its shape and is tough.
1 row we knit from the first to the last 8th thread with convex columns without a crochet. Thus, we slightly raise the visor of the future cap. After each 6th column, we make one increase. We complete the row with a connecting loop. The next 8 rows are shortened.
3 row- knit up to the 7th red thread.
4 row- knit up to the 3rd red thread (photo 4).

5 row- knit up to the 6th red thread (photo 5).

6 row- knit up to the 4th red thread (photo 6).

7 row- knit up to the 5th red thread.
8 row- we do not knit 4 loops to the 4th red thread, a connecting loop, we turn the knitting.
9 row- do not knit up to the 5th red thread of the 4th loop, connecting loop, turn the knitting (photo 7).

10 row- we knit to the end of the visor with single crochets. We knit the last two loops together.
11 row- 2 connecting loops, then to the end of the visor with single crochets, we knit the last two loops together (photo 8).

We decorate the cap (photo 9) and a blue button.

We knit a button in the same way as we crocheted in the previous master class.
Everything, our cap with a visor for the boy is ready!

Videos crochet cap
For more details on the whole process of crocheting a baby cap for a boy, see the video master class.
In the first part, we knit the cap itself and start knitting the visor:
Part 1
In the second part, we knit a visor for our cap and decorate it with additional elements:
Part 2