Nature generously endows us with everything necessary to create a variety of interesting and unusual crafts. This article contains recommendations for making products from natural materials with your own hands. The crafts, the photos of which you will find in the article, range from easy ones that you can make with your child and take him to school with you, or, to more complex ones, with hard-to-find, but completely natural components.
In contact with
Classmates
Crafts for elementary school and kindergarten
Often children are given the task to make some simple crafts with their parents and bring them to school. Everyone remembers the labor lessons in primary school. This section of the article will tell you how to create nice do-it-yourself trifles so that your child can proudly take these crafts from natural materials to school or kindergarten.
Angel from a cone and an acorn
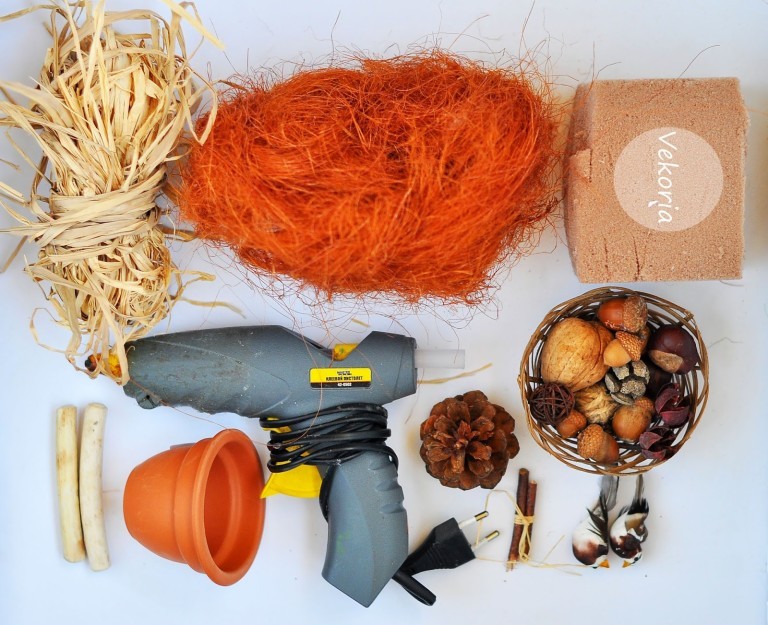
Making this autumn angel is a pleasure. Materials for crafts can be collected in the park or in the forest. You will need:

How to do:

Walnut shell boats
The child will have fun in the bath with such boats. And they can also be let into streams in the spring. You will need:
- colored markers or pencils;
- walnut shells;
- toothpicks;
- glue;
- candle;
- lighter or matches.
How to do:
- Cut out small sails of any shape from paper, decorate to taste and glue to toothpicks.
- Light a candle and put some wax into each half of the shells.
- When the wax hardens a little, insert a toothpick with a sail into the middle of each half.
- Leave the wax to harden. You can speed up the process by placing the boats in the refrigerator.
Rattles on sticks
Children love everything that rattles. Make these funny rattles with them, so you will keep the children busy and save the house from a pogrom. You will need:
- wooden sticks 10–15 cm;
- small plastic containers with lids;
- beans or rice;
- dye;
- brush for paint;
- hot glue gun;
- clay.
How to do:
- Fill containers halfway with beans or rice and close tightly with lids.
- Using a hot glue gun, glue each container to the ends of the sticks.
- Cover containers and sticks at their base with clay, let dry.
- Now you can color the rattles and draw on them.
maple dragonfly
This craft is fragile and beautiful, like the dragonflies themselves.
You will need:

How to do:
- Color the seeds and branches to your liking and let dry.
- Attach two short branches to the end of the longer branch where you outlined the head. These are the antennae of a dragonfly.
- Turn the dragonfly branch upside down and glue a couple of large maple seeds slightly back from the end of the branch.
- Under a large pair of wings, just going over them, glue a small pair of seeds.
Grow grass and feed the birds
grass head
This funny face with green hair will delight children, and even growing grass-hair can be trimmed. You will need:

How to do:

Bread bird feeder
In autumn and winter it is more difficult for birds to get their own food, so this feeder is a godsend for those who want to take care of the birds. Thus, the child is instilled a kind attitude towards animals. You will need:
- dried bread;
- peanut butter;
- corn;
- thick needle;
- strong thread, thin rope or wire.
How to do:
- Pass a thick needle and thread through the top of the slice of bread and tie a loop.
- Brush the slice thickly on both sides with peanut butter.
- Cover the peanut butter with seeds.
The feeder is ready, you can hang it on a tree, your feathered friends will be delighted.
Other crafts made from natural material
Cosmetics
Having entertained children with funny homemade products, you can think about yourself.
Lip scrub
 In this scrub, honey is an antiseptic, coconut oil moisturizes and nourishes the lips, and brown sugar is the main ingredient that exfoliates the dry top layer of the skin of the lips. It is important to remember that homemade cosmetics do not last as long as store-bought ones due to the lack of preservatives in them, so making large portions at a time does not make sense.
You will need:
- coconut oil - 1 tablespoon;
- bee honey - 1 tablespoon;
- brown sugar - 2 tablespoons;
- a small glass container with a lid;
- small capacity;
- tea spoon.
How to do:
- Mix honey and coconut oil in a bowl. Stir until smooth, thick and dense.
- Add brown sugar and stir until smooth.
- Place the mixture in a glass container.
This scrub will be usable for two weeks.
Mascara
The recipe is quite complicated and you will most likely have to work hard to find all the ingredients. However, nothing will stop lovers of everything natural. You will need:

How to do:
- Mix all ingredients in a bowl until smooth.
- Carefully draw up the mixture with a pipette and squeeze it into an empty tube.
That's all, mascara can be used. To remove such a carcass, you need warm water or heated olive oil.
Miscellaneous home decor items
Sea shell candles
More beautiful and more romantic than tea candles on a rainy autumn day and shells brought from a trip to the sea, there can only be an unusual combination of them.
You will need:
- tea candles;
- small pot;
- medium saucepan;
- seashells;
- essential oil;
- water;
- glass container;
- pipette;
- spoon.
How to do:

When the wax hardens, the shell candles are ready to use.
Pine cone roses
Prepare your most beautiful vase - these roses will never wither. You will need:
- Pine cones;
- branches;
- paper;
- paint of different colors;
- brush for paint;
- scissors;
- hot glue gun.
How to do:

Now you can put the roses in a beautiful vase.
Autumn wreath on the door
Autumn crafts made from natural material usually include autumn gifts. Most often these are fallen leaves and ripened fruits. In the West, at this time of the year, it is customary to hang wreaths on the front door, symbolizing fertility.
You will need:
- base for a wreath 45 cm in diameter;
- leaves from corn (18-19 pieces);
- corn cobs (9-10 pieces);
- hot glue gun.
How to do:
- Glue, alternating, leaves and cobs to the base of the wreath.
- Bend the ends of the leaves to give the wreath volume.
The autumn wreath is ready, you can hang it on the door.
Pictures from natural material
Paintings from natural materials are easy to create. As brushes you can use:
- fallen leaves;
- wool;
- feathers;
- flowers, etc.
The same materials can be made elements of the picture.
You can make natural safe paint. You will need:
- 1 tablespoon of white kaolin clay;
- 1 tablespoon powdered pigment (e.g. mustard for yellow, cornflower for blue, rose petals for red, spinach for green, etc.)
- water.
By mixing all this, you will get a safe paint and a lot of positive emotions for your children.
That's all. We hope that this article will be useful for you, and the process of creating things with your own hands will be as pleasant as the result.


Good afternoon. Today I can finally sum up a large collection of ideas for crafts made from natural materials. We already have a wide-form article with autumn leaf crafts for children and adults. There is a detailed article in the autumn theme. In this article I will publish the most interesting and non-standard tricks and techniques. I decided to do wide overview page, which will prove and show that natural material for creativity is not only acorns and chestnuts. You will see with your own eyes and fall in love with all your heart in new fresh ideas of working with natural material. Crafts made with your own hands, from branches, from leaves, from dried flowers, from everything under your feet. Nature is rich in material, and man is rich in beautiful ideas. So, let's see what crafts can be made from natural material this season.
Idea Pack #1
SCALES from cones.
The cones are made up of scales. If you collect open pine cones, then it is convenient to pull out of them with pincers, pliers, or bite SCALES with wire cutters. And then use this bumpy natural material as a mosaic coating on a variety of autumn crafts.
Note. In order for the cones to open well, spread out with scales, they can be warmed up in the oven.
Here we see mushrooms. Their legs are carved from a thick wooden chock. The hats are molded of plasticine and the top of the hats is covered with scales. It turns out cute mushrooms-crafts with their own hands. Suitable job for school.

But the spruce cones have scales flatter and smoother. They look like the smoothed feathers of birds. Therefore, the idea of \u200b\u200bcrafts comes to mind on a bird theme. We sculpt the bird's body from plasticine, we coat with PVA glue, put a layer of torn paper napkins on the glue, again with glue, again with napkins - it turns out papier mache shell. We dry this shell until it is completely lignified. And on this hard dry surface with hot glue (layer by layer, row by row) we lay the spruce “tile” of feather-scales.

And also the scales of a spruce cone are similar to the scaly armor of ancient lizards. So here's another idea for you. After all, this is a great challenge to your artistic potential. It's not just a bird here - there's a whole beast that looks like it's alive. Great crafts for boys made of natural material.
Here we act exactly the same as with the bird- we sculpt the base from plasticine, pack it in several layers of papier mache (alternating pva glue and paper napkins). And then, after this mass has dried into a hard crust, you can glue the dinosaur figure with spruce scales.


After plucking the cone, a cone BOTTOM remains. It looks like a flower with petals. From such cone flowers, you can make a new autumn craft with your own hands - for example, a WREATH. We glue the base for the foam wreath with a chopped cone - just with hot glue from a gun.

You can cover such cones-flowers with bright gouache. In order for the gouache color to become juicier and shine, it is necessary to sprinkle this product on top after drying with gouache, I recommend spraying it with simple hairspray. The color will stick and won't stain your hands.

You can make beautiful flowers yourself, choosing the most accurate and even scales of different sizes, and laying them radially from the center. The middle of the flower can be decorated with beads or rhinestones. From such natural material, you can even make brooches in the autumn style with your own hands - and wear them with a coat, or pin them to a shawl.

Flowers from cones can not only be collected into wreath crafts, but simply laid out on a panel. Put on glue on a piece of plywood. You will get an excellent craft made from natural material for a competition in a school or kindergarten.

From whole buds You can also make great crafts. We add not only natural material to the cones, but also other materials (colored felt, cardboard, ropes, plastic, etc.).


Idea Pack #2
Crafts from natural material
WALNUTS.
From nutshells, we all made boats in childhood, or hats on plasticine mushrooms. But you can go further in your creativity from walnuts. Children will be happy to create mice or birds, and adult skillful hands and a warm spiritual heart can create a whole world out of a nutshell ... Now you will see it.


In this article I want to introduce you to a very good person. Her name is Marina. Master with an attentive soul.
This is how the account page of this master on the Fair of Masters website looks like.

I really like the work of master Marina from the site Fair of Masters. With her own hands she created amazing, in its sincerity and warmth, the world of good old women. The walnuts in the place where the wings are connected are surprisingly similar to a wrinkled smiling old woman. It remains to add eyes, a nose-bone and mentally wrap everything with a cotton handkerchief. And now the cunning old woman looks at you cheerfully.

We make a body from a bump, weave hands from rough paper packaging twine. From felt we dump warm felt boots. Each old woman can be made with her own character. Cheered up with a big smile. Or silent thoughtful, on my mind.

Old women can be both summer and winter.

You can create whole worlds from natural material in which kind old women live and work. They themselves will keep their world clean.

And after work, they will gather for a cup of herbal tea to tell stories, make fun of each other and sing songs of their youth.

Master Marina sells her crafts. You can order her work on the master's personal page - https://www.livemaster.ru/woods. Marina can make you a custom-made craft for your family and friends.
After all, how nice it is to receive as a gift the World of good old women, which will always smell like a village CHILDHOOD for you - grandmother's pancakes, a pile of firewood by the barn, chickens running around the yard, a heated tree of an old bench near the fence.
Master Marina, I want to give an idea. In one I talked about another Czech Master who created the world of ACORN PEOPLE - Dubanchikov and wrote a book with stories about them, which he illustrated with emotional scenes made from natural material. The book is published in the Czech Republic, and only in Czech. I think that many children will like our Russian book with kind stories about Russian village grandmothers, illustrated by Marina's works.
After all, this is a real miracle, to make a new world out of natural material with your own hands - kind, fabulous, REAL. More and more new houses, cozy benches, swings, carts, wagons will appear in it.


Idea Pack #3
Crafts from natural material
FAIRY HOUSES.
If you like fairy tales with fairies and magicians, then you will like the world of fairies made of natural material. You can create cozy houses for fairies with your own hands, set up entire housing complexes for them, with ponds, parks, gardens, swings.

You can bring a man-made miracle to the school competition of crafts made from natural materials. The house where the gnome lives. Parts can be attached to plasticine, staples (from a stapler), to glue from a hot gun.


Pieces of moss, acorn caps, scales torn from a cone with pliers, lichens and dry hard hanging mushrooms taken from trees in the forest. And even pieces of plants torn from indoor flower pots - any natural material will be used to build such a complex but interesting craft. The house will grow and be ennobled by natural design before your eyes.


You can base thick wooden stick found in the forest. Saw off a comfortable piece from it. Buy at a hardware store tinted stain for wood- and cover the tree in a noble dark color. Cut out of thick cardboard windows, cover them with the same stain. From ice cream sticks put together a real door, arrange a porch. Sculpt a conical roof from plasticine. Break a large pine cone with tongs or pliers on scales and lay out tiles from them on the roof of a natural house.
Some elements can be molded salt dough(a glass of fine salt, a glass of flour + water (add water a spoon at a time, and grind with salted flour with your hands until a single lump is formed, similar to plasticine). Roll out the dough - cut into bricks with a knife. Dry - and get a lot of building material for the porch , paths, fences, etc. The dough can also be painted with gouache or stain.


But the house is VERY SIMPLE. Now I’ll tell you how to make it with your own hands from the things that surround us.
- Take strong cardboard package from milk or juice. Cut windows in it - this will be the future facade of the house.
- Buy a small bag of gypsum plaster (or putty) diluted with water and coat the facade of the house with this mixture.
- Dry and cover with whitewash or white gouache (toothpaste on the edge).
Make a roof out of cardboard, also apply glue to it and lay tiles from pieces of bark or cones. or chips.

Idea Pack #4
Applications
And of course, the most common crafts made from natural material are applications using dry herbarium - herbs, leaves, flowers. We made everything from leaves of chicks or fish in an aquarium. In a special article, I give many options.
And in this article I want to show a beautiful mosaic technique of laying out dry natural material in the form of a SILHOUETTE PICTURE.

You can find a lot of ready-made silhouette templates on the Internet. If in the search bar you type the phrase "silhouette of a hare picture" or another animal.

The most important thing in such a craft is to achieve recognition - the clarity of the silhouette. Therefore, you need to choose a silhouette without small details - protrusions. And if you chose with detailed protrusions, try to make the small relief detail be made with ONE SOLID petal (like the ears of a bunny or its protrusions of the paws in the photo above).
If, when laying out the mosaic, the edge of the plant protrudes beyond the border of the silhouette, it must be carefully cut with scissors (as is done in the photo above with a cat - it has triangles of ears cut out).
Nature Idea Pack #5
Crafts from branches.
From branches of different shapes and bends, you can lay out beautiful crafts with your own hands. Branches can just decompose on a white paper background, repeating the outlines of a bird or animal. It is possible in advance on paper draw a silhouette of a bird weak pencil lines. And then pick up branches that would lie on this drawn silhouette of a bird, repeating the curves of the picture.
Crafts from natural material can be fix with glue with a hot glue gun. Or make a photo-craft. That is, lay out the branches and take a picture of the craft, thereby perpetuating your product from natural material in the form of a photograph.

You can fix the craft at the key nodes of the plexus of branches and then in these knots attach it to the base (vertical wall or horizontal shelf-stand), as is done in the photo below.

In addition to branches, you can use wood chips, pieces of bark, chips and saw cuts from logs, chocks, thick branches in your crafts. This is how crafts-owls from the photo below are implemented. Simply and interestingly made with your own hands - you can safely take it to the exhibition of autumn crafts to school or kindergarten.

One and the same idea can be embodied in different angles and different materials. Here, for example, in the photo of horse crafts made from natural material, both branches and bark, and snags are used.

You can lay out entire mosaics completely filling the silhouette image with natural material. The direction of the branches should repeat the direction of the pattern details. Spread the branches in the same directions as the fur pile of the animal, or repeat the muscular relief of the animal with branches.

Perhaps this type of crafts made from natural material will captivate you so much that turn into a solid hobby with the prospects of monetization in a profitable business. Why not make beautiful wooden sculptures for a summer residence or estate for sale.

And if you want to use branches to create crafts from natural material in class at school, then here are simple ideas for you on how this can be implemented in the lessons of labor for boys. Everyone is taught cut with jigsaws plywood figurines. In addition to animal figurines, you can put together frames from slats and make beautiful landscape paintings of an autumn forest with mossy branches overgrown with lichen.

Similar ideas can be implemented at labor lessons for girls - without plywood and a jigsaw - by making a frame from cardboard twisted into a square tube (fold 4 pieces into a frame-frame, insert branches into holes), and cut animal silhouettes from dense packaging corrugated cardboard from old boxes and paint in gouache, if desired.

Package of nature crafts No. 6
Maple and ash seeds.
Dry lobed tree seeds can be very interesting to beat in a variety of do-it-yourself crafts.
You can make a mosaic craft out of this natural material in the form of a bird (because maple seeds look like feathers). You can lay out a pattern in the form of a butterfly on the glass, and thanks to the transparency of the background, it will seem that it is hovering in the air, as is done in the photo below. Maple seeds paint well with watercolor, so your butterfly craft can be in all colors of the rainbow.

At school or kindergarten, from the same natural material, you can make very simple children's crafts with a base on thick cardboard. Maple seeds can be a hairstyle on a painted human head, they can become a fluffy squirrel tail, feathers on the wings of an owl, or needles on a cardboard hedgehog (as in the photo below).

And maple seeds look like dragonfly wings. Therefore, you can make simple children's crafts in the form of beetles. For example, string beads on a wire (this will be the body) and glue seeds to the body on glue or plasticine. Wings can be painted with nail polish and sprinkled with glitter glitter. The bulging eyes of a dragonfly can be cast from frozen drops of the same nail polish. You will get a beautiful quick and simple craft made from natural material for children.

And the same maple natural material can become the basis for fun GRAPHIC CRAFTS-DRAWING with an ordinary black marker. We paint on the missing details for the snub noses and turn the seeds laid out on a sheet of paper into interesting graphics. These are already crafts for training your imagination - a great idea for a circle on the topic "Learning to think creatively."

I told more about this GRAPHIC method of using natural material in the article.
Idea Pack #7
Crafts from natural material
STONES.
A simple rubble stone left over from summer cottage construction, or smooth river, sea stones can become the material for your natural DIY crafts. The stone itself can tell by its shape who it looks like. And you just have to take felt-tip pens or gouache to bring this image to life.
If you feel like an artist in yourself - you can make complex multi-line drawings - as is the case with the stone owl craft. Or smooth thick pebbles can look like clumsy chubby panda bears - and such crafts made from natural material will be feasible for children. First, we cover all the stones with white, dry them, and then with a black marker we draw on it the black details of the teddy bear.


Ordinary felt-tip pens draw very well on stones. After completing the general painting work, the details of the picture need to give contours(clear boundaries) black marker.

You can draw the silhouette of a snail or a sheep on the stone yourself. And to give the children the task to simply color the finished silhouettes, supplement them with a pattern of stripes and dots or curls.

From dry grass and wire or other natural material, you can make a nest. And in this craft, put the chicks made of stones with your own hands. Older children can decorate a complex picture with a chick and an open beak. For younger children, the task is easier in the form of chickens in shells.

On a piece of plywood or a round saw cut from a log, you can lay out a whole picture of stones and other natural materials decorated with paints. This craft is suitable for work on the autumn competition in school or kindergarten.

Older girls will like exquisite pictures from the life of a fashionable girl - a felt-tip pen, paints, stones and rhinestones.

You can use the mosaic technique to lay out a variety of characters from stones. Attach the stones to the glue with a hot glue gun. The stones in the mosaic can be painted with gouache, or have their own natural color.

These can be landscape paintings made of natural material (sea pebbles, glass turned by water, shells, etc.).

Idea Pack #8
Crafts from natural material
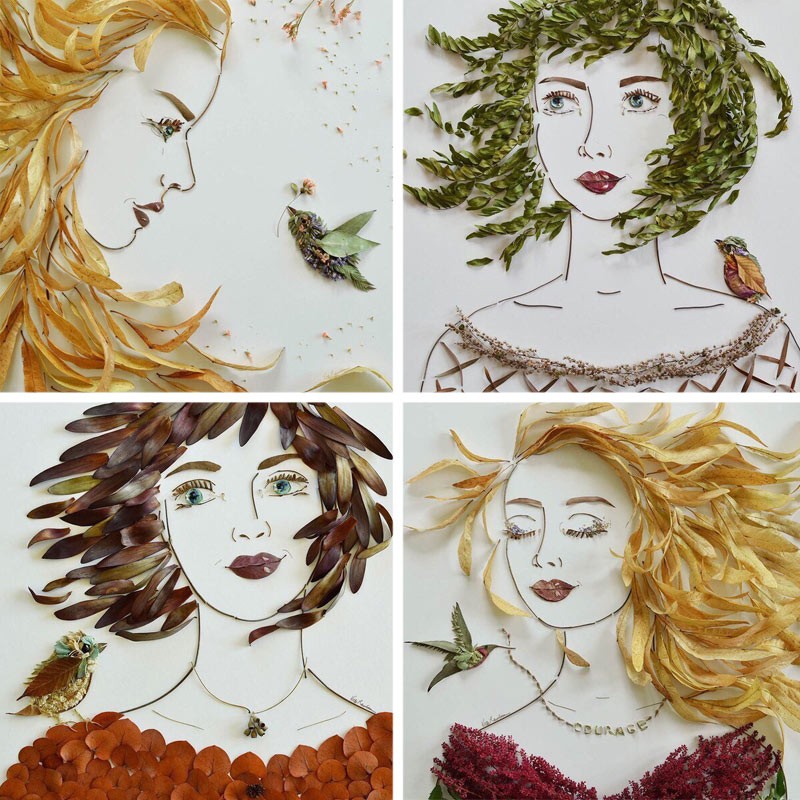
PORTRAITS.
A very interesting topic for crafts made from natural material these are portraits. The face in the picture always attracts the eye. You want to look at such a craft for a long time, it has a soul, human eyes, into which you want to look, read their thoughts. A portrait is a craft that looks at you.

You can plant all the details of a portrait from natural material on glue. Or just fold the portrait like a mosaic on a sheet of cardboard, take a picture and brush off all the details of the masterpiece with your hand from the table. And on the wall in your room there will be a photograph of a disappeared, but ever-living portrait.
As an ornamental natural material, you can use stones, dry leaves, cones, seeds, bark. For drawing thin lines, branches of different trees, straws, blades of grass.


If you are working with children, then you can give them an easier task. Print the finished face on the printer. And from natural material in this craft make additions
Good luck with your work.
Olga Klishevskaya, specially for the site
Every year, nature gives us a lot of natural materials suitable for creativity for free. The process of creating with your own hands develops the artistic taste, thinking, memory of the child, cultivates perseverance. But most importantly, you can have fun and usefully spend time with friends, delighting yourself and others with crafts.
Preparation of natural materials for their further use
Nature is the best artist, it creates such natural materials that turn into works of art in skillful hands!

plant materials
chestnuts
Chestnut fruits have a bright brown color and a shiny surface, so they make excellent DIY crafts from natural material. The shell of a fresh chestnut is thin, easily pierced with an awl. Chestnuts are a fertile material for working with young children themselves. You can make many different dolls,.


It is better to store in a cool place in boxes.
acorns
Oak fruits ripen in autumn, in September-October. collected in various shapes and sizes.


At the same time, their cups (pluses) on which they are held are also collected. Plushs are very often used separately from the acorn, as an independent natural material for various crafts.

Acorn cups and balls knitted from wool
How to knit even balls of wool, see the video Olga Skibina:

Acorn buns and Christmas bells


You can store them for a very long time, after washing and drying thoroughly. But why just keep stones when you can play with them with the whole family?)


For another way to apply an image to river or sea stones, see the video from You Can Do It Craft. You will be surprised how easy it is!
shells
You can collect shells on the banks of rivers, seas, lakes while relaxing with your children. Many of them are original in appearance, in shape - oval, comb-shaped, elongated, etc.
Boil them for a few minutes to free them from living organisms. Shells are washed with a small brush (you can use a toothbrush), after which they are dried, sorted by type and size. Stored at any temperature.
You can also clean the shells in a solution of whiteness and water at a rate of 1: 1. The top layer will disappear after a while, leaving the shell with a nice shiny top.
Animal figurines are made from large shells.


Small shells make wonderful applications, garlands:

Shells can be used not only as the main material, but also as an additional decor (bird wings, dog ears, flower petals, etc.)


Sand
Very affordable material that can be collected in any sandbox. It differs in structure. Rinse and dry thoroughly before use. And then you can use it as a decor in your work:


Rules for the storage of natural materials
Crafts made from natural materials with your own hands will be flawless if, after collecting, drying, pre-treatment, you properly store these natural gifts. To do this, you must adhere to certain rules.
- A dark, cool, and well-ventilated area is the best place to store natural materials.
- You can buy plastic containers for storing each type of material; use cardboard boxes from shoes, tea, sweets; take ordinary glass jars with a screw cap. For seeds, as well as for beads, it is better to have a container with many compartments.
- Dried flowers are fragile and break easily, so they are placed in a tight box or container. Petals are stored separately from flowers. Flowers with a stem can be stored in a vase.
- Prepared leaves are also brittle. You can store them in large books. Also, for safety, put them in signed candy boxes, grab a little tape so that they do not accidentally open.
- Seashells are placed in glass jars or plastic containers with a wide neck so that they do not crumble.
Additional tools for crafts made from natural materials
To create a beautiful craft from natural materials, you will need additional tools and materials.
It can be:
- colored paper;
- cardboard;
- skin scraps;
- scraps of fabric;
- bird feathers;
- Styrofoam;
- plasticine;
- wire;
- PVA glue, "Moment";
- gouache;
- stain;
- varnish etc.
Paper very often used as an addition to natural materials. Children, bending, gluing it, make the work much more interesting.
plasticine fasten separate parts of simple toys at the initial stage of work. It is not very durable, but as a supplement it is often used in kindergarten and elementary school.

From wire most often they make the frame of a toy, the connection of its parts. Copper wire diameter 0.29-0.35 mm - soft, flexible and durable - the most comfortable. And for the frame, a wire of a larger diameter is used - 1-1.5 mm.
Threads it is better to take thick, multi-colored ones (No. 10).
Glue it is better to take white PVA, BF, etc. However, in kindergarten it is better to use PVA glue.
They also use foil, pebbles, pits from cherries, and bristles.
Additional material is best stored in a small box with cells for each type of material.
The use of additional material depends on the idea, the skill of the children, the degree of development of the imagination! Offer your options, but rely more on children's intuition and desire.

It is also additionally necessary to have certain tools for making crafts from natural material:
- artistic scissors;
- awl;
- jigsaw;
- tweezers;
- pliers and wire cutters;
- sewing needles;
- brushes for glue and paints;
- cotton cloth for wiping off adhesive residue.
Scissors for children should be with blunt ends, small, with rings convenient for a child's hand.
Awl you need to take from a durable material with a handle length of about 6 cm, a diameter of about 2 cm, a stabbing part - 3.5 cm
Needle need a large sewing machine. It must be kept in a needle case with a thread threaded into it.
Attention! Only adults use pliers, pliers, drills!
To draw the contour of the part to be cut out, a simple pencil. For example, dresses, hats for a doll, etc. It is better to take a soft pencil (2M).
Tassels(soft for drawing, harder for glue). It is better to buy squirrel brushes (No. 4 and 6). For glue take brushes with hard bristles.
Stack- a tool necessary for surface treatment of clay or plasticine. The length of the stack for children is about 12 cm.
Crafts from natural material for kindergarten
Toddlers are very fond of turning chestnuts and plasticine into toys in their hands that they can play with. Crafts made from natural material for kindergarten are not very complicated, so any child can do it with the help of an adult. Sometimes they are made from fruits and vegetables, but most often they are applications from leaves and animals from cones and acorns.
Crafts from leaves and maple "helicopters"
The easiest and most accessible work even for kids is the application of leaves. If this is the first time you are making a composition with your child, offer him a picture that will serve as a template. Do not rush to do everything yourself. Invite the child to choose the leaves as desired, so that the work turns out to be similar to the sample. This will develop your child's creativity.
Application material:
- colorful leaves;
- thick sheet A-4;
- brushes for glue;
- PVA glue;
- scissors;
- sample.
To make a simple composition, you need even, dry leaves. Put them under a press or in a book. In two days the material is ready. Cut out suitable parts with scissors and lay them out on a piece of paper.
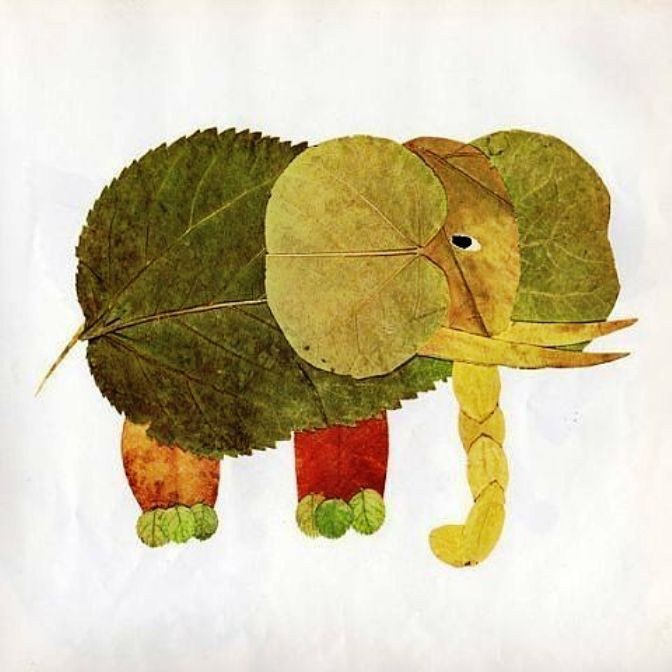
Now you can glue. First the background and bottom layers, and then the finer details. For example, if you want to make an elephant, then first make the body and head out of the leaves, and then glue the trunk, tail, legs. If there are not enough eyes, then they can be drawn with a marker or made from tree seeds.
It is not necessary to do everything according to a template. You can come up with a picture yourself and create an original composition of leaves.


Use colored paper, felt-tip pens, paints as an addition, so your applications will be even more interesting.
Along with the leaves, “helicopters” from maple are also ideal as a basis for crafts made from natural material for a kindergarten. Just look at this miracle!

Fairy wings from maple seeds

Dragonflies from maple helicopters
Now you are convinced how beautiful and original leaf applications can be. Use these ideas for leisure activities with children.
Simple master classes on creating children's crafts from acorns and cones
At the end of summer, acorns begin to ripen, and they make wonderful crafts made from natural material for a kindergarten or school. They are well preserved, and on long autumn evenings, together with children, you can do a pleasant and useful thing that develops the fine motor skills of the baby's hands, imagination and perseverance.
The most common acorn crafts are animals and various little men. From toothpicks, matches, thin twigs, you can easily make legs, handles, horns and other small items. An adult needs to help the children poke holes in the acorns.
To attach small parts, you can use a glue gun, Super Moment glue, but only adults should do this. And it is safest for the guys to fasten the parts with the help of plasticine.

Fly agarics from acorns are even easier to make! To paint acorns, you need to remove the hats from them, and after the paint has dried, glue them in place.


Acorns are very beautiful on their own, and if they are also painted with acrylic paints or nail polish, then such crafts will decorate any home.

And from the hats painted with silver paint, you can make an original decoration for the Christmas tree. The process of creating such an eco-toy is quite simple: we closely glue acorn caps onto a foam ball (you can take an old Christmas ball). And sparkled new.

We found another video for you, where Niki Junior tells what a wonderful craft will turn out from leaves, cones, twigs and a plastic bottle. Look, you will learn a lot.
Categories