Sleek hands and elegant nails attract attention to a girl, especially if they are beautifully and unusually designed. It can be difficult to guess that she did all this at home, having completed training in manicure lessons. It is worthwhile to independently understand the peculiarities of the execution technique and be inspired by interesting ideas.
Manicure ideas
The frantic pace of life does not leave time for a visit to a nail salon, but you can get a beautiful manicure at home. Mastering the technique, purchasing materials and tools is a chance to create an original decor on your nails. Obviously, there are ideas for implementation in photos of magazines and on websites. Try the following options:
- newspaper manicure;
- velvet sand;
- mirror - with small sparkles;
- marble - with tints of colors;
- a combination of two textures - matte, glossy;
- moon manicure;
- floral motifs;
- winter decoration.
Simple drawings
Gradually, you can gain experience and create masterpieces on your nails that are indistinguishable from professional ones, but let the first step be a simple manicure. At first, this will take time; as you acquire skills, the complexity of the patterns and the speed of execution will increase. To easily learn at home, beginners will be helped by video master classes and photos of beautifully designed nails. A simple drawing technique is an additional incentive for work.
For beginners, it’s easy to set up at home:
- graphic elements - dots, lines, stripes;
- on the main background, a second color with a hard brush;
- using a needle to make patterns from drops of varnish;
- a combination of peas of different colors and sizes;
- pattern using a set of stickers, stencils, stamps;
- ombre or gradient using a sponge - several varnishes with a soft color transition;
- mosaic, gradually sealing areas with tape;
- simple flowers;
- decor using special adhesive tapes.
Water manicure
At first, it will be difficult for beginners to perform water manicure at home. Experience will come, and creative design will seem easy and will help you create masterpieces. A fashionable marble pattern will decorate short and long nails for any occasion. According to the instructions, for work you will need:
- wide bath;
- varnish of several contrasting colors;
- toothpick;
- scotch;
- nail polish remover.
The secret to getting the job done is technology. To implement you need:
- apply foundation;
- cover your fingers with tape, leaving the nail;
- pour water at room temperature into the bath;
- apply sequentially a drop of varnish of different colors to the center - it will blur in circles;
- draw a pattern on the surface with a toothpick;
- dip your nail into the picture in water;
- collect excess varnish with a toothpick;
- remove your finger;
- remove the tape;
- remove excess varnish;
- repeat the operation for all nails;
- Do not perform finishing fastening.
With stripes
For beginners, an easy option is to use manicure strips with an adhesive layer. Shiny lines on a matte background, longitudinal and transverse, randomly located, look great. To implement the idea you need:
- apply base varnish;
- stick strips;
- paint with a contrasting color;
- remove the strips before the varnish is completely dry;
- fix the drawing.

French
A woman with nails decorated in this spirit looks elegant in any situation. The peculiarity of this style is a light beige or flesh-colored varnish with a white stripe along the edge - a “smile”. How to do a French manicure at home? According to the technology:
- shape the nail;
- apply the base;
- varnish the nail plate and its end;
- stick tape or stencil, leaving an edge;
- apply white varnish;
- remove the tape after drying;
- apply a fixing layer.
Mirror
Nails with a mirror shine look spectacular in a festive design. To implement the idea, you will need special glue and foil - silver, gold or black. How to make a mirror manicure step by step at home? At first, you will need to do perfect hygienic treatment - no roughness on the nail plate. Next, you need:
- apply foundation;
- paint with varnish to match the foil;
- cover the nail with glue;
- attach foil;
- smooth out with gentle movements;
- remove excess foil;
- apply finishing coat.

Gel polish step by step
Gel coating is easy to do, but you will need a special varnish and an ultraviolet or LED lamp. How to do shellac manicure at home? It will be necessary to wait an hour before applying varnish if you do it with a preliminary use of the bath. The process goes step by step like this:
- instruments are disinfected;
- nails and cuticles are treated;
- the plate is sanded for better adhesion of the varnish;
- the surface is degreased.
- apply the base to the end of the nail, plate;
- dried with a lamp - the recommended drying time is indicated in the instructions;
- a color coating is applied in two or three layers;
- each of them is dried;
- the final coating is performed - top;
- dried with a lamp;
- a degreasing composition removes the sticky layer of the top;
- cuticles are coated with nourishing oil.
Winter
For the New Year's party, you want a special, artistic design for your nails. Fantasy in this situation has no limits. It’s easy to do a New Year’s manicure with your own hands like this:
- combine white and silver glitter;
- paint snowflakes and Christmas tree decorations with acrylic paints;
- make lace patterns;
- decorate your nails with rhinestones and beads;
- draw a gift bow on a red shiny coating;
- combine the shine of blue ice with sparkling snow.

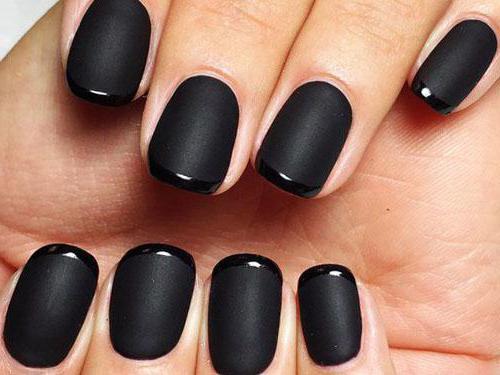
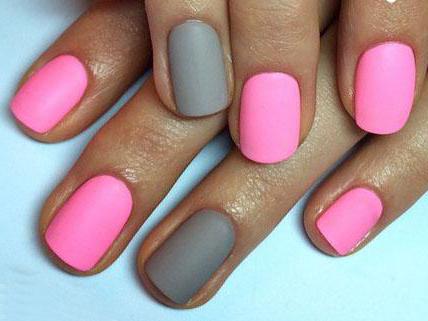
Matte
The opaque type of coating reveals all the defects of the nail plate, and therefore requires careful treatment. It looks advantageous when using rich, deep tones and their combination. Matte manicure for short lengths is done in different colors:
- sexy – red;
- luxurious - chocolate;
- elegant – burgundy;
- velvet-like – black;
- romantic – peach, lavender;
- uplifting – yellow, orange.
What manicure can you do at home?
Before you start decorating, you need to perform hygiene procedures - carry out the preparatory stage. It is necessary to decorate the nail plates and remove the cuticles. For this purpose, different types of home manicure are used:
- ugly - using a cuticle softener;
- hardware - using a special device;
- trimming, where the cuticle is removed with scissors or nippers.
Hardware
You can make the task much easier and reduce the time if you purchase a device for manicure and pedicure at home. Using special attachments, you can easily remove cuticles, polish nails, and smooth the skin. It is important that your hands are dry during the procedure. Step by step process:
- erase old varnish;
- degrease the surface;
- push back the cuticle;
- process the side rollers and it;
- adjust the shape;
- polish the plate;
- treat everything with an antiseptic.

Edged
The disadvantage of performing such treatment is the high probability of injury to the nail root and the risk of infection. A trimmed manicure at home dictates the following sequence:
- remove varnish;
- give shape to the nail plate;
- to soften the cuticle, make a bath, adding lemon and liquid soap;
- stand for 5 minutes;
- rinse;
- blot with a napkin;
- lift the cuticle with a spatula;
- dead skin is cut off with scissors, trying to do this in a continuous line;
- apply oil to the cuticle to improve nutrition;
- cream is applied to the skin of the hands;
- varnish coating is applied.
Unedged
A protective method of treatment that does not lead to injury is suitable for women with thin skin and closely located blood vessels. The peculiarity of the implementation is that the cuticle is removed using products containing acids. Two methods are used:
- dry – without preliminary soaking;
- wet - with steaming hands in a container.
Everything is done in the following sequence:
- old varnish is removed;
- a file is used to give the shape;
- with the wet method, keep your hands in water for 15 minutes and wipe them;
- a solution is applied to remove the cuticle;
- kept for 5 minutes;
- residues are removed with a cotton pad;
- the cuticle is moved to the root of the nail with an orange stick;
- a skin softener is applied.

How to do a manicure correctly
To make the execution process easy, you must first decide what the length will be. It is useful to familiarize yourself with the rules of implementation, prepare tools and materials. To work you will need, in accordance with the method:
- tweezers or scissors;
- files for creating shapes, polishing;
- bath;
- orange stick;
- nail polish remover;
- composition for softening cuticles;
- processing apparatus;
- tassels;
- set of varnishes;
- moisturizing cream;
- nutritional products.
For beginners
What points should we focus on for those who have decided to do their own manicure for the first time? First of all, before work you need to sterilize the instrument with alcohol or disinfectants. Use products without acetone to remove nail polish. It is advisable to follow the recommendations for the shape of the nail:
- brittle, weak, a square will do;
- for short fingers - elongated view;
- oval model – universal for everyone;
- A square looks beautiful on long fingers.
The process will be easy if you do it at home, considering that:
- the file for processing and polishing should not have a rough coating;
- It is preferable to file off split nails rather than cut them off;
- pre-soften the cuticle in a bath or with a special composition;
- try to cut it in one line, without tearing it off;
- make nails the same length;
- cut them from the edges towards the center;
- perform a manicure with good quality varnish;
- use a styptic pencil for cuts;
- Carry out hand care using creams.

For short nails
Short nails can not only be practical, but also look beautiful. For those who type at work or do a lot of household chores, short nails are best suited - they break less and look neat. When making designs on short nails, you should consider:
- It is not advisable to use more than 3 colors of varnish;
- the pattern cannot be made small, dotted, or, conversely, very large;
- you can make your nail visually longer by choosing the color and pattern;
- You should not use a volumetric design.
For long
On elongated thin fingers, nail design looks elegant and feminine. Unfortunately, only a person who is not very busy with manual work can afford this. Manicure is performed step by step using already mastered technology - edged, hardware or unedged. At the same time, there are features in the design of the nail. The plate shape is:
- rectangular;
- pointed;
- oval;
- with beveled edges tapering upward.
When decorating long nails, you can rejoice - there are a huge number of original ideas for this. Conditions to consider:
- if you increase them, constant adjustment is required;
- when one of your nails breaks, you will have to trim the rest;
- the design must suit the occasion and outfit;
- there should be no extravagant design for everyday life;
- Pointed nails look aggressive.

Design at home
It’s easy to create a beautiful manicure at home if you use your imagination or look at photos in magazines. Modern fashion dictates the design of nails:
- abstract drawings;
- with a two-tone color scheme;
- metallized coatings;
- sparkles, powder, rhinestones;
- stickers with a transparent base for a lace effect;
- a special design on one of all marigolds;
- with the effect of glass fragments;
- three-dimensional drawings;
- with a change in the type of “smile” in the French version of the coating – triangle, wave;
- applying it near the nail root.
Video
Nature has awarded each girl with her own shape of the nail plate, sometimes imperfect. The female sex strives to create an impeccable image, one of the components of which is well-groomed hands. Lucky women who have long fingers with square nails do not have to rack their brains over the question of what kind of manicure to do today. But for those who have a small plate size, it will be more difficult. How to make a manicure on small nails so that it looks no less worthy than nail art on an elongated plate?
Benefits of a small nail plate
It is believed that long nails are a sign of femininity and sexuality. But it is not always possible for everyone to grow them. It would seem that modern technologies in the form of acrylic or gel extensions can come to the rescue. However, the result of their use can please the owner of long claws for a short time. After a week or two, in order to maintain an ideal appearance, overgrown nails should be corrected, which will cost additional money and time. In addition, the extension procedure does not have the best effect on the condition of the plates. Natural nails are more practical, and with proper care they always look good. But extensions can break at any time and ruin the entire appearance.
Now very popular for small nails. Many fashionistas are happy to embrace this trend due to its main advantage - practicality. In addition, the design of small nails looks just as impressive as nail art on long nails. But there are several conditions for this: healthy looking nail plates, well-groomed hands, regular cuticle trimming and varnish without flaws or chips.
Basics of creating a flawless manicure on small nails
An effective manicure for small nails at home is possible if you follow the following rules:
- Selecting the right one Rectangular nails are suitable for those with long fingers; in other cases, you should give preference to the classic oval plate. A correctly selected shape visually lengthens the nail and finger as a whole.
- Removing cuticles, hangnails and rough skin. Trimmed manicures should be done weekly because they must have a neat appearance. Removing the cuticle helps visually lengthen the small plate.
- Giving nails the same length. This procedure requires special care, because on a short plate a deviation from the average of at least one millimeter becomes noticeable.
- Using nourishing hand cream. Daily use of this product is necessary, and a one-time application is not enough. You need to use the cream after each hand washing, massaging them to improve blood circulation.
Hygienic component of manicure
A manicure for small nails will be effective and fashionable only if the periungual area is properly treated. This procedure at home is carried out as follows:
- Remove the remains of the old coating.
- Give your nails the desired shape using a glass file.
- Make a warm bath for your fingers.
- Remove the softened cuticle by pushing it back with a manicure stick and cutting it with tweezers or scissors. Get rid of hangnails and rough skin.
After this procedure, your fingers will look gentle and neat. And it won’t take much time to apply the coating to your nails.
Basics of the decorative component of manicure
In order to make small nails beautiful and graceful, you need to choose dark or bright shades of varnish. Pearlescent varnish is categorically not recommended for use, because it contributes to a visual reduction in length.
When choosing a coating color, you need to pay attention to your skin tone. If it is pale or yellowish, you need to use dark varnishes. And if the skin has a dark complexion, it is recommended to use a coating of pastel or pink tones.
The choice of colors for nail art should be limited to two or three colors.

If the nail plate is too small and deeply recessed into the nail fold, it is recommended to use gel polish. To avoid being tied to one color for two or three weeks, it is better to choose a clear coat and use your favorite shades over it as often as you like. You need to remember this when doing this manicure on small nails. Gel polish, unlike extensions, does not require filing off the top layer of the nail. This means that after this procedure the plate will remain healthier.
Possible design options for small nails are described in detail below.
French manicure
Everyday French coating involves using a transparent tone for the nail plate and white for the “smile”. If you need to look solemn, then you should choose other shades for the components of this manicure.

Looks stylish on small nails. And when applying dark varnish to the edge of the nail, you can visually increase the length of the plate.
How to do a French manicure on small nails? Photos will help you cope with this seemingly difficult task.

It serves to add a natural shine to French manicures and helps keep the nails looking neat for a long time.

Plain coating
Today there are many varnishes, varying in color and texture, so it’s not at all difficult to choose a coating to apply to small nails. Photos of a possible design are presented here, but do not limit yourself to the proposed options.

For a more stylish manicure, you can give each nail its own shade, and the colors used can be from the same color range or contrastingly different from each other.
Both matte and glossy varnishes look good on small nail plates. You can use a variety of shades - from pastel to dark.

The highlight of the manicure can be highlighting the nail of the ring finger with a varnish of a different texture or even a different color.
Newspaper manicure
To do a manicure on small nails using a newspaper font, you need to proceed as follows:
Ombre effect
The ombre effect is a smooth transition from one shade of varnish to another, while the border of the color change should be invisible.

Using this technology, you can do a manicure on very small nails.
Indeed, with the correct arrangement of shades, you can achieve the effect of visually lengthening the plate. The lightest shade should be placed at the base of the nail, and the darkest at the edge.
The varnish application process is as follows:
- Cover your nails with a base shade.
- Apply the selected shades to the foam sponge in the required sequence.

Coating with a pattern
To get a beautiful manicure for small nails using a pattern, you should try the following options:
- Contrasting design. Using white at the base of the nail and black at the edge visually increases its length.

- Small horizontal stripes. This manicure looks bright and stylish. It is done using special nail stickers.

- Pastel diamonds with sparkles. This design gives your nails a delicate and original look.

- Multi-colored horizontal lines. To achieve maximum effect, their width should be unequal, and the colors of the coating should also be different.

If you have small nails, they must be well-groomed, without hangnails, overgrown cuticles and rough skin. In this case, design is not a problem. Manicure for small nails has a number of features, taking into account which you can achieve a stylish and impressive look for your hands. Without any fear, use the technologies of French manicure, monochrome coating, ombre effect, newspaper nail art and various designs.
The vast majority of girls pay special attention to their nails. Either we prefer to wear short nails, or we strive to extend them. Then we return again to short nails, then again we dream of an elegant long manicure.
Fashionable manicure
Many of us cannot afford to wear long nails. This may be due to both the health of the nails and the work we have to do. Never grow your nails if their condition is not ideal, if they constantly peel or break off. Give preference to short nails if you work in production, educational or medical institutions. But don’t think that in this case your hands will look less impressive due to the inability to get a beautiful manicure. In fact, there are a lot of manicure ideas for short nails that you can easily replicate at home.
fashionable manicure colors this yearIn addition, short nails have many advantages:
- Short nails are healthier. They do not need to be coated with special varnishes to strengthen the structure. After taking a shower or walking in the cold season, long nails begin to get damaged. They require extra nutrition to keep them firm and beautiful.
- Short nails look neater. You will never have problems at school, university or office. You will never be faced with the question: “Is it appropriate for me to appear in this or that place with such nails?” Even for special occasions, a manicure for short nails looks just great. You will never see aristocratic people with long nails. Celebrities have recently given preference to short nails and modest manicures.
- Dark shades of polish look much better on short nails. You don't want the first thing people notice when they see you to be your brightly painted long nails. Dark shades, which, by the way, are incredibly popular this season, are better reserved for manicures on short nails, otherwise you risk looking like an evil witch from fairy tales. On the world's catwalks you will not find a single model who would appear on the show with long nails.
- Short nails do not require additional care. All you need to keep in shape is a nail file.
- Short nails are more practical. Of course, many of us know how to type, cook, etc. with long nails. But admit it, it’s most convenient to do this when you have short nails. No broken nails, no additional inconveniences.
- Short nails save your budget. You don't have to go to the salon to give your nails an extra layer of treatment to keep them hard and healthy. Short nails will never break, and will look neat and appropriate in any situation.
Home manicure: step by step
There is nothing complicated about it. First, prepare everything you need: manicure set, dish, .
- Pour warm water or milk into the dish. Place your hands in the dish for a few minutes until the skin around the nail steams.
- Dry your hands with a towel and gently lift the steamed cuticle from the base of the nail. Using the spatula from the manicure set, repeat this procedure on all 10 fingers. Then very carefully begin plucking the cuticles using tweezers. Don't cut off too much skin or you risk damaging the delicate skin of your finger. If you do get cut while working on the edges of your nails, apply a cotton pad with peroxide to the cuticles to stop the bleeding and disinfect the surface. Do not forget that most often infection enters our body through cuts. To avoid inflammation, wipe all fingers with alcohol in advance.
- Dead skin around the nail should also be removed. Do this using the same tongs.
- Give the tip of your nail the shape you like best. Remember that you need to file your nails in one direction. By doing this in different directions, you can damage the structure of the nail, and it will begin to break over time.
- Massage the skin around the nail with vitamin oil (olive oil can be used), then degrease the surface with nail polish remover.
- Apply to nails. Home manicure is ready.
Home manicure ideas for short nails
This is the easiest way to make a beautiful manicure at home. Monochrome nails are always in fashion. However, you can not limit yourself to this and decorate your manicure, for example, with stripes or dots.
Manicure with dots
The dots are applied to the nails using a regular needle. You dip it into the polish and then lightly touch your nail.


If you make several points side by side at once, you can get a nice flower.

Manicure in different colors
A simple manicure is slowly losing ground. It is being replaced by a riot of beauty and the unlimited imagination of fashionistas all over the world. There is no need to think about which nail polish to choose; you can paint your nails with several colors at once. You can focus on just one or two fingers, or you can paint each nail a different color. Here are some ideas on how to do it beautifully.


Manicure with stripes
An ordinary strip gave us a great opportunity to decorate our nails in an unusual way. Some people use special strips from the salon, while others use regular tape or construction tape. In any case, the effect will be the same.
For beginners, you can stick to simple patterns, such as stripes. More experienced girls can choose a nail design based on unusual geometric shapes. You can decorate one nail, while the rest will be monochrome, or you can apply the design to all fingers without exception. It all depends on your desire and skill.
We'll show you how to make some designs on your nails. In this way, you can bring any of your ideas to life by cutting out the desired design from a strip.


Homemade French manicure
We have already written earlier, . You can choose not only classic combinations of white and pink nail polish as a base, but also try bolder shades. You can also paint the tips of your nails using strips. However, many girls do without them. It is worth noting that compared to long nails, short nails have an advantage here. You can color the tips not only in the established semicircular shape, but also experiment with other options. For example, as shown in the photo below.


The fashion for the length of natural nails is changing as rapidly as for hairstyles. Many fashionistas first trim the nail plate almost to zero, and then put a lot of effort into growing it. Some professions, due to their characteristics, require only short-cut nails: musicians, cooks, surgeons and nurses, people who constantly work with a keyboard. You can get a manicure on a short nail plate either in a salon or at home.
Features of performing a manicure for short nails at home
Short does not mean unattractive. Short nails have a number of advantages:
- long nails break and “cling” much less frequently;
- recover much faster than long ones, especially in the winter season;
- always have a neat appearance, appropriate for any formal and business event (wedding, business negotiations);
- favorably emphasize the advantages of dark varnishes;
- do not require painstaking care;
- practical at work and at home.
From a financial point of view, short natural nails also benefit from long or extended nails. They do not require regular correction or application of a strengthening coating.
You should not grow your nails if their condition leaves much to be desired (split ends, unevenness, grooves, increased fragility, etc.). Let the nail plate be minimal in length, but healthy, neatly filed and polished.
How to do a manicure on short nails yourself
To perform a manicure on your own for short nails you will need:
- manicure set;
- remover (cuticle remover);
- bath with warm water;
- soft towel or disposable paper napkins;
- essential oils (lavender, lemon, bergamot, ylang-ylang);
- disinfectant (medicinal alcohol, hydrogen peroxide);
- cotton pads or tampons;
- moisturizing hand cream.
Lavender essential oil softens cuticles, promotes healing of minor damage, strengthens nails
The manicure set should include:
- two pairs of scissors (with straight and rounded tips);
- wooden spatula;
- tweezers or nippers - for trimming manicure;
- several files with different grain sizes;
- polishing block.
Gel nail extensions at home:
- Warm water is poured into the bath, a few drops of essential oil are added, and hands are placed there for 5-10 minutes (to soften the skin around the nails).
- The hands are removed from the bath, the remaining moisture is carefully removed with a towel (do not rub your hands, but carefully blot them).
- We begin to correct the length and model the shape of the nails. Nails that are too long can be trimmed with scissors. After the nail plate is completely dry, it can be filed. First they work with the coarsest file, then move on to a medium-grain file, and at the end the sections are sanded with a fine file. . If before a manicure all nails have different lengths, you should match the shortest of them. The end of the nail should protrude at least 1 mm beyond the edge.
- The softened cuticle that has grown on the plate is carefully moved with a spatula towards the middle of the nail. In a trim manicure, it is removed using tweezers or nippers; in unedged - apply remover, and after 5-8 minutes remove it with a wooden stick.
- Wounds and cuts left after cutting the cuticle are treated with a disinfectant. If the wound is deep, stop the bleeding using a cotton swab with hydrogen peroxide.
- In addition to the cuticle, it is necessary to remove rough skin around the nails. Tweezers are used for this.
- At the end, moisturizer is applied to the skin of the hands with light massage movements. Areas around the nails with thin skin can be treated with vitamin oil. After this, you can begin applying the decorative coating.
Movements with a nail file should be made in the same direction: from the edge of the nail to the center. Chaotic filing leads to disruption of the structure of the nail plate and also increases its fragility.
Video: manicure at home
How to choose the perfect shape for short nails
Nails that are short in length often look shorter than they actually are. Therefore, it is necessary to carefully select the shape of the cut, taking into account the proportions and structure of the nail plate (concave, wide, narrow, etc.).
The most popular forms are:
- oval;
- almond-shaped (nails slightly narrowed at the ends).
When choosing the shape of your nails, you should adhere to the following rules:
- A rectangular shape with rounded ends will help make your nails visually longer. However, experts warn: this technique will “work” only on elongated fingers. A plump hand and short fingers with rectangular nails only lose. The hand seems more massive;
- the rectangular shape can be replaced with a square-oval one. The slanted edges give it a special grace. This one is ideal for business women;
- The oval cut can be made smooth, or slightly sharpened. In combination with rich shades of varnish, your hands will look very stylish, neat and feminine.
The ideal shape, according to some experts, coincides with the curve of the cuticle at the base of the nail plate.
Subtleties of applying conventional varnish
Regular varnish is applied to nails in several stages:
- Transparent base. It evens out the surface of the nail plate, protects it from yellowness, improves adhesion to the decorative layer, makes the manicure more durable,
- Basic tone. Apply in 2 layers. First, put a sufficient amount of varnish on the brush, place a drop in the middle of the hole (at the base), and then try to cover as much of the surface of the nail as possible in one smooth movement. Remains along the edges are painted over, if necessary, passing with a brush a second time. This method will require some skill, but the manicure will be neat.
- Second layer. After the first layer of varnish has completely dried, you can apply a second one on top of it. While the polish on your nails is drying, you can use this time to carefully remove any remaining coating on the skin around your nails. This is done with a cotton swab dipped in solvent.
- Consolidation of the result. To do this, completely dried colored varnish is coated with a transparent fixative (fixer or ordinary colorless varnish). It will help maintain the brightness of the color for a long time and also prevent cracking of the manicure. If you plan to apply any design on your nails, then the fixative is applied at the very end (after stripes, dots and patterns).
To make thickened varnish more liquid, the bottle can be placed in a bowl of hot water for 1–2 minutes. To make the varnish uniform, do not shake the bottle, but roll it, holding it between your palms.
The layer of varnish should be thin but even over the entire surface of the nail.
Features of applying gel polish
Previously, manicures with gel polish could only be done in a salon. Now this procedure can be successfully carried out at home. To do this you need to prepare:
- base coating, similar in principle to the base;
- top coat (analogous to a fixative);
- a primer that ensures the durability of the coating;
- colored gel polish;
- UV or LED lamp for polymerization (drying) of the gel;
- a special liquid that removes the sticky layer.
The thinner each layer, the neater the manicure will look.
Hand preparation is the same as before a regular manicure. The cuticle is removed and the shape and length of the nails are adjusted. When the nail plate is dry, carefully polish the thin top layer with a buff. After this, the nails are thoroughly wiped with a lint-free cloth, removing any remaining dust and sebum.
The sequence of application will be as follows:
- Primer in an even thin layer.
- The base, which is then dried under a lamp.
- The first layer of colored gel polish is applied to the nail plate, and the cut of the nail is “sealed” with it, then dried under a lamp.
- The second layer of gel polish followed by drying.
- Top coat with lamp drying.
When the top is completely dry, carefully remove the sticky residue with a napkin soaked in liquid.
The accuracy of the manicure depends on the thickness and uniformity of application of the layers of primer, base, gel polish and top coat. The thinner the layers, the more natural the nails look.
Video: step-by-step instructions for applying gel polish
Manicure design options for short nails
All monochrome shades look good on short nails: pastel, neutral, etc. This style of manicure is called nude, since it is as close as possible to the natural skin tone.
In contrast to nude, dark, rich tones look especially good: burgundy, lilac, brown, etc.
As for the original design, there are many options for decorating short nails. The simplest of them are dots of various sizes; they are drawn using a regular needle or a dot (a special stick for nail art with a ball at the end).
It is better to avoid large sparkles, as they visually reduce the size of the nails.
If it is difficult for you to apply a design on your nails yourself, then you can purchase special stickers. Applying them will take very little time, and in the end you will get a beautiful, bright and neat manicure.
Manicurists warn: short nails are very demanding regarding the length and shape of the cut. All fingers should look the same, the slightest deviation of 1 mm becomes noticeable to the naked eye.
Nails that are short in length require regular cuticle removal. The nail plate grows quickly, and along with it, a strip of thin skin, giving the hands an unkempt appearance. Without a cuticle, the nail looks larger and longer.
Particular attention is paid to the selection of patterns. When choosing an ornament for short nails, several rules apply:
- there should be free space on both sides of the pattern;
- vertical drawing is better than horizontal;
- they try to choose decorative elements that are small or medium in size: one large flower covering almost the entire nail will visually reduce it;
- On naturally wide nails, a special technique of applying varnish is used: an unpainted space is left along the edges, using a brush to draw a wide strip from the hole to the cut of the nail plate.
Sometimes the choice of design and color scheme for a manicure is dictated by the shape of the nails. The classic oval goes well with plant and floral motifs, as well as with all light shades of varnish. The laconic rectangular shape requires the use of rich, deep shades of varnish. But complex geometric patterns look great on such nails.
The choice of colors for varnishes is now huge. However, stylish nail art on modest-length nails is limited to only 2-4 shades. If you use more, it will be too much.
Video: nail design at home
You can easily do a manicure for short nails at home. This will require very little time and a minimum of tools. Particular attention is paid to the removal of the cuticle, as well as the length of the nail plate and the shape of the cuts. Short nails are not at all a reason to refuse bold experiments (bright varnish, intricate patterns). With a high-quality manicure, small nails can become a real work of art that fully meets fashion trends. In addition, they are more convenient in work and everyday life than long overhead or extensions. Well-groomed hands with short nails always attract the attention of others.
Everyone knows that short nails are not only convenient, but also attractive to people of the opposite sex. Classic oval, square shapes, decorated in pastel colors, will drive any man crazy and make you popular among your friends. We will tell you how to make a beautiful manicure at home: a step-by-step photo on short nails will demonstrate easy and beautiful nail art.

The first thing a good manicure begins with is nail treatment. Let's look at this process step by step:
- Start filing your nails on dry nails.. Cut off the unnecessary length and carefully use a nail file to create the desired shape. Carry out filing strictly in one direction: this will prevent injury to the nail plate and further delamination.
- Pour warm water into a bowl, add liquid soap there. Wash your hands and get comfortable: you will spend the next few minutes with your fingers dipped in the water.
- Remove your fingers from the water and wipe dry. If your cuticle grows evenly, then prefer an unedged manicure. Use an orange stick to push the skin towards the base of the nail. When trimming a manicure, after sliding, cut off the excess with nail scissors or tweezers. Pre-disinfect them over a match or wipe with alcohol. If you get a cut, treat the wound with hydrogen peroxide.
- Use tweezers to remove rough skin from the tips of your nails.. Wipe with peroxide.
- Rub oil or a special cosmetic product from the store into the skin around your nails. Do a circular massage of your fingers and arms.
- Apply decorative nail polish, according to your preferences.
Decorative manicure

Let's consider various manicure options for short nails. Believe me, it’s possible to create a beautiful manicure at home: just follow the instructions provided step by step.
Manicure with dots

The simplest type of decorative coating, after a plain one. Stock up on a needle or toothpick before dyeing.
- Paint your nail plates with a solid color optionally.
- Pour a drop of varnish onto a piece of paper, dip a toothpick in there.
- Place dots randomly on the nail or in an invented order.
Using a toothpick you can create a great variety of designs: waves, flowers, geometric shapes.

Use strips to create a beautiful manicure. They can be cut from tape for even stripes, or you can use store-bought ones. They come in various forms: zigzag, semicircle, oval. Schemes for a beautiful manicure with stripes are provided below.

Lunar

Manicure is extremely simple. Use semicircular strips for a French manicure. After applying the base coat and allowing it to dry completely, start decorating your nail plates.
- Place a strip at the base of the nail, retreating a few millimeters from it: the small side of the semicircle should look at the base.
- Paint the resulting hole with varnish of a different color.
- Wait until the varnish dries, then remove the strip.
- Cover your nails with a clear sealer.
Drawings on the water

This method is quite difficult - not all girls manage to achieve the desired result the first time. Follow the recommendations to make your nail design shine with splendor:
- Pour warm water into a glass.
- Shake one drop of varnish from the brush into the water.: It will spread out, forming a circle with jagged edges.
- Shake off drops in the center of the circle from brushes of varnishes of other colors.
- Insert a toothpick into the center of the colorful water circle and start creating petals on the varnish surface: make movements carefully, barely gliding across the surface. Penetrating the toothpick deeply into the water will blur the design.
- Coat the skin around the nail plates with cream. Dip one finger into the varnish film. Pull out slowly. The pattern previously formed on the varnish surface will remain on the nail.
- For each nail you need to make an individual varnish film.
- Finish the manicure by coating all the plates with topcoat.

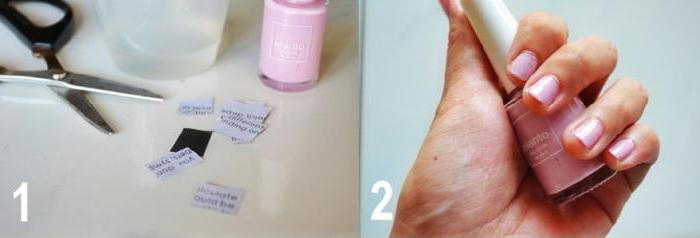
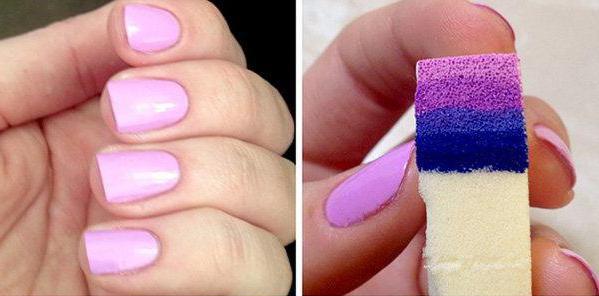
The simplest version of this wonderful manicure can be done using a cosmetic sponge.. It is important to take into account that the sponge must have a fine-grained structure. If you don’t have such an item, but really want a manicure, use a piece of sponge for washing dishes. Naturally, it must be new. Follow these steps step by step:
- Apply a colorless base varnish to the nail plate. It is better if it is a specialized base that has a healing effect. At your request, the base varnish can be colored.
- Apply rich cream to the skin around your nails so that the applied gradient does not stain it.
- Place two drops of varnish of different colors on a sheet of paper. It is important that the drops overlap each other.
- Using a toothpick, mix the crossed edges of the varnishes, combining them into a single whole..
- Blot the prepared polish with a sponge and press it onto the nail plate for a few seconds. Do the same with the rest of your nails, remembering to renew the polish on the sponge.
- Apply topcoat: it will even out uneven surfaces and preserve the gradient from abrasion.
Manicure with stickers

They have gained particular popularity among women who prefer to do manicures on short nails at home. decorative nail stickers. They can be bought at any cosmetics store, but the most varied options can be seen in specialized nail salons.
The stickers have a sticky layer. When creating a manicure composition on short nails, follow the instructions:
- Open the pack of stickers.
- Perform a manicure and apply a base color layer of decorative coating.
- Use tweezers to lift the sticker and tear it off the sheet.. Carefully transfer it to the nail plate and apply a sticky layer to the selected area.
- Press with a cotton swab.
- Secure top with clear varnish.
The nails to which you plan to transfer the stencil must be completely dry. It is better if the drawings are pasted a couple of hours after the first application.
Sequins

Glitter manicure will never go out of style. Use dry glitter to add evening charm to short nails. Paint your nails with the first layer of colored polish and, without waiting for it to dry completely, scatter the glitter in a chaotic manner. A beautiful option is a cluster of shiny dust particles near the base or tip of the nails. Secure the result.
Rhinestones

A very beautiful option would be to place rhinestones on one or two nails. This will add a special charm and make your image magical. As a rule, rhinestones come with special glue, with which they are fixed to the nail plate.
Using rhinestones on all nails at the same time is acceptable, but it will look pretentious. Remember: men don’t like this manicure, so if you’re looking for a soul mate, limit yourself to a minimum of details.
There are many manicure options for short nails. It looks better than long ones: careful execution will immediately make you a style favorite among friends and acquaintances. We hope that the article, a beautiful manicure at home: step-by-step photos for short nails, has turned you into a specialist who can easily treat the nails of yourself and your friends.