Hello! Glad to see everyone again.
This is a golden and wonderful time. The nights have become colder, the days are getting shorter. The harvest is in full swing, or may have already come to an end. And so now we all started making crafts from vegetables and, of course, fruits.
This is such a small tradition, which is always dedicated to the autumn theme. Every school and kindergarten must host such exhibitions or events, and each of you can take part in them.
Well, today I will surprise you again, and I will try to make this selection exciting so that you take first place at the holiday. And they were, as they say, the best.
To be honest, I am amazed by this and also extremely admired by the works that I found exclusively on the Internet. How cool and beautiful they all are. How great, I can’t find the words! Still, the kids love this activity, creating something so interesting and fun. You definitely can't pass by.
Well, let's start in order. What do you think can be created from ordinary potatoes? Let's look together and figure out what and who is being asked to do. Yes, that’s right, for example, funny pigs or pigs.

Clumsy hippos who scream, oh, their tummies hurt).

Or maybe you like lamb better?

Or this shy puppy who is so cute and resembles a poodle.

And here is a potato caterpillar, as expected, on cabbage leaves.

And also an ant and a spider in autumn foliage and flowers.


And even Masha and Misha can also live at such an exhibition with you. It turned out to be a whole fabulous picture, and even with a goldfish. Make a wish.

Or one little bear with a pot of honey, which is also made from potatoes.

A team of eight friends... Remember this children's song, so Thomas is the main commander...

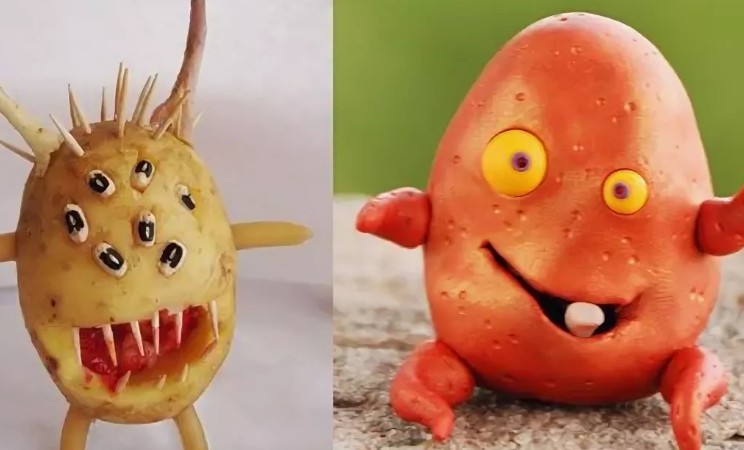
For adventure lovers and dreamers, I suggest making monsters.
Preschool children can build a duck with adults.

Or for example a kolobok. Moreover, you can draw eyes and decorate them in some unusual way. Among other things, if you find a suitable potato, a piglet will come out.


The same idea arose with this character, guess what? It's a cat.

Everyone’s favorite cartoons, namely the characters that children love so much, will also fit perfectly into this event. Watch this and Malyshariki with Kroshik and even Cipollino.


The simplest work is a hedgehog or monkey made from potatoes and toothpicks.

Make figures like this and it will be fun and interesting.

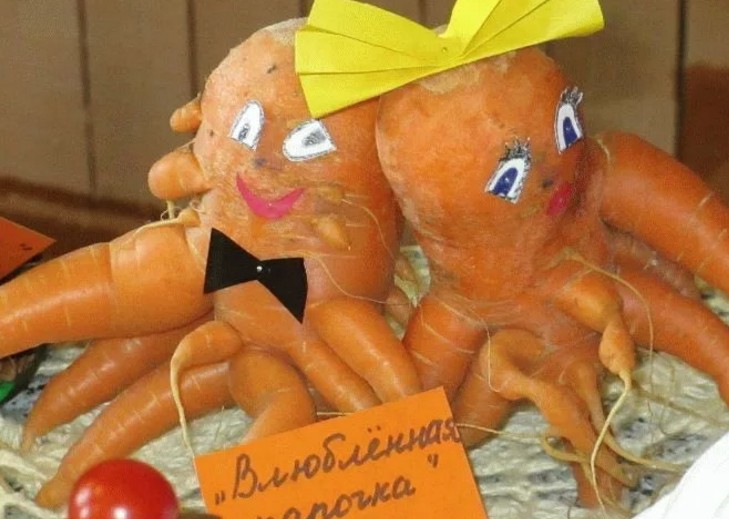
Now let's move on to the next vegetable. A well-known beauty is carrots. I also found a lot of interesting things from it, especially if it itself was born with various curvatures. For example, you see in this picture such a loving couple in the form of octopuses.

The simplest craft is a nest. Chop the carrots and place the birds. By the way, the chicken and cockerel are made from onions.

You can also learn how to easily decorate your interior with flowers, see these works. And it's all made from carrots. Can you imagine?

And they even made a bouquet. The main thing is to find a curly knife.

The house looks great, so log and powerful.

But they even made a horse on a board. The tail was made from onion feathers.

But the most popular carrot toy is the giraffe and other animals. Making them even without a master class will not be difficult. Look.

Well, if you still find it difficult, then this video will help you.

Here are a couple more ideas.


You can even make a palm tree or an island.

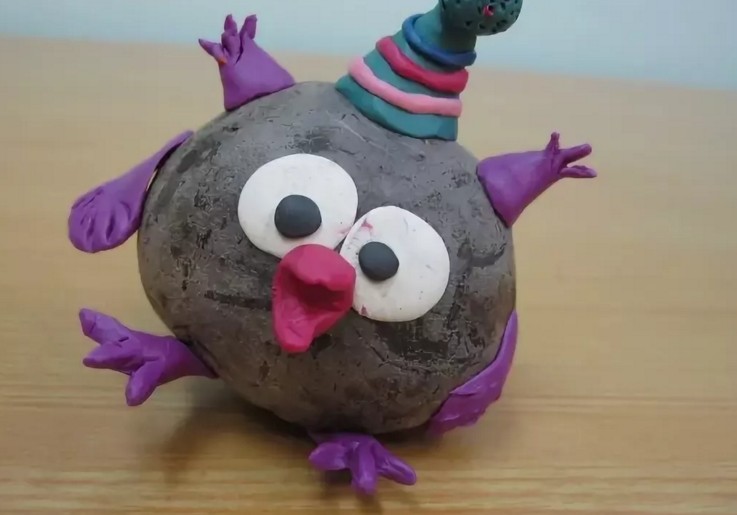
Now let’s take it and make crafts from beets. I fell in love with the owl at first sight. In reality, if you bring such beauty to a competition, you can definitely win.
Like carrots and cucumbers, beets are also served cutting, that is, carving. Usually they make roses or bouquets.


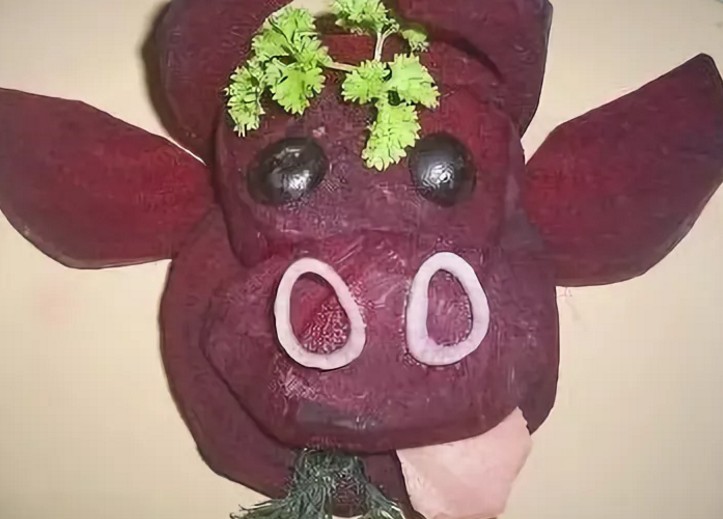
Or, if you don’t know how, you can cut the vegetables into pieces and lay out a cow or bull.
Or make a baby elephant.

Now go to the radishes and select the following pictures. Mostly they make mice, bees or mushrooms.


But what kind of musical heroes are the boy and the girl, as if they were performing on stage. And they light up the dance.

And of course, everyone’s favorite flowers from radishes or radishes also come out beautifully.

Or you can get by with slicing altogether.

Well, now I propose to consider souvenirs that will be made mainly from cabbage.
By the way, you can take absolutely any kind, iceberg, cabbage, and even broccoli or cauliflower. And create together with other vegetables.
This is what I had to get. This, as you probably guessed, is primarily a white poodle.

And here look at the whole composition of lambs and lambs.

Everyone's favorite bunnies or bunnies, and a perky puppy.

And this miracle won a prize at the competition last year.

Together with the frog princess and it’s not surprising. Who wouldn't like this?

And here, as you can see, is a Russian family, grandparents and granddaughter.
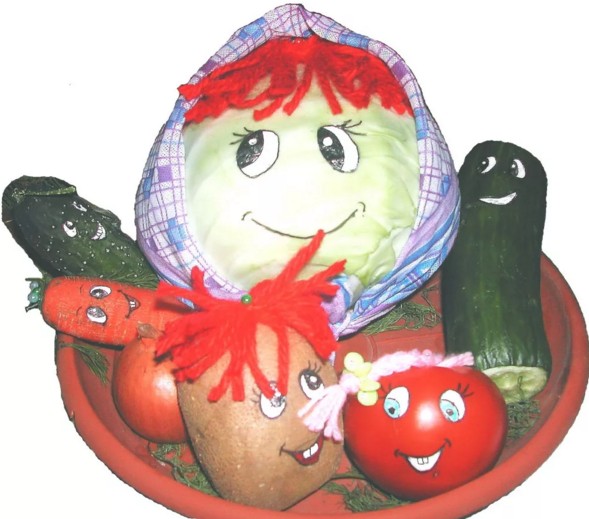
You can also make a sailboat from cabbage leaves together with zucchini or eggplant.

I liked the idea of a child sitting in cabbage, but unfortunately I couldn’t find such a composition. But I found a chicken. I think you can do it without instructions.

Now let's make figurines from eggplants. You can probably immediately guess that the first option will be a penguin.

Here's a hint:

And it turned out to be Pororo the penguin.

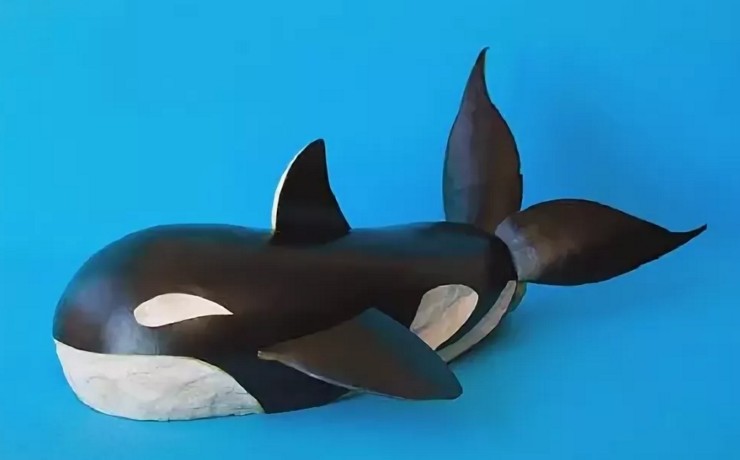
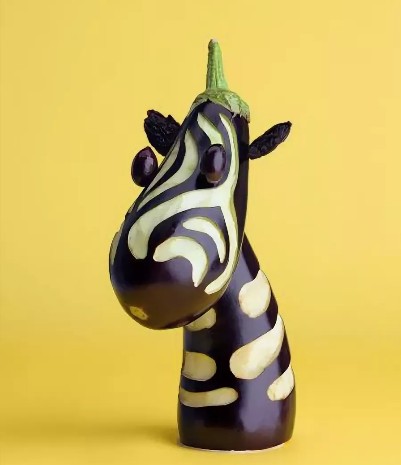
The same method can be used to make a dolphin (whale) or a zebra.
Among other things, any transport, for example a helicopter, a tank and many others. See it all for yourself.


And girls will appreciate the shoes.

But from zucchini or squash you can make a terrible beast, this is a shark.

Well, and other sea inhabitants or fish.


And also snakes and even a crocodile.


In general, there are a whole dozen animals, take your pick. And even the queen swan came here.


By the way, if you like acrylic paints, then paint minions or other cartoon characters.


Hmm, the old forest man would fit in perfectly here too.

Well, of all kinds, they are probably the most popular, since you can put all the gifts of nature and autumn in them. I will not dwell on them in detail, if you wish, you can go and read my separate note. Here I will show only a couple of photos.


Toys and souvenirs made from bell peppers are very little popular. But that’s in vain, because such a vegetable is also good for creations. Look at the cute frog creatures that came out.

Or this bright little dragon.

And here is a sea of flowers with tomatoes.

Well, in conclusion, let’s look at crafts made from cucumbers and tomatoes. I propose to make the muzzle or head of a cow or bull. And garnish with parsley or dill.

From cucumbers you can make such a charm, a shark.

In general, there are a great many such ideas, I will show you only a few.


You can make different faces of people and use different vegetables and fruits.

Now let's move on to fruits; first of all, you can make a caterpillar from apples.

Take tangerines or oranges and lay out your masterpieces. The stand is made of pineapple.

Or take pears, grapes, whatever you have, everything will do for such work.


All sorts of funny “products” made from bananas.


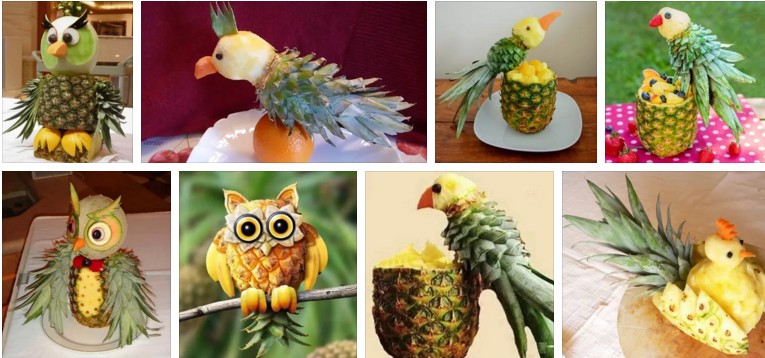
Of the pineapples, we mostly came across works in the shape of birds.
The tangerine people look just like cookies from the cartoon.

You can make something like this out of citrus skins, wow, take a look.

Maybe lemon is closer to your soul, I suggest making fish from it.

But from pears, the well-known hedgehog, here is its sequence of all manufacturing steps.

38 original and interesting ideas on how to make crafts from vegetables and fruits for kindergarten and school
In addition to all this, I decided to put together a variety of collections of pictures that may be useful to you. When you create your new creations. As you can see, the authors even made vehicles in the form of a stroller and a carriage (car), and managed to make a horse out of a carrot. The rest of the characters are also great, especially Cheburashka and that little mouse. What a beautiful caterpillar.


Boys can, of course, build a steam locomotive or a train with carriages. And girls, for example, Gena the crocodile made from a cucumber or a baby penguin made from eggplant.

Even watermelon rinds will produce a crazy beauty in the shape of a turtle.

But there are generally cheerful guys here, Smeshariki probably visited us. And here the zucchini car meets them.

How surprising, but even from cabbage you can create puppies or adult dogs.

They're pretty, but this first one in the picture doesn't even look like a unicorn.

By the way, here are all the ingredients and sticks, skewers, so that everything stays in place.

If your imagination is tight, here are some ready-made sketches for you. Cool, an ant rides in a car. It’s very simple and such a machine is waiting for you, you only need an eggplant and a couple of other vegetables.
As you can see, a spider was made from radishes, also quite easily and quickly.

A cool dog came out of the banana. Which is looking at you now and does not want to be eaten.

Beautiful children's crafts Gifts of autumn for school
Well, friends, I can’t count how many of your works I’ve already looked at. And now I want to invite you to watch these videos. After all, you can also make topiary from improvised means or natural materials, of course, together with fruits and vegetables. Or as they are also called ornamental trees.
And one more video, I was attracted by the fact that the tree is made of paper. In general, it’s also a super idea, you might find it useful.
Souvenirs and toys in carving style for the holiday Autumn has come (for beginners)
In fact, this technique can be mastered in a couple of hours, the main thing is to find the right tools and have patience. Unfortunately, you can’t do this without special knives.

I suggest you first master the simplest option and make a chrysanthemum from Chinese cabbage.
To do this, take the cabbage and cut off all the bad leaves.

Then you will need a grooved knife with any oval or triangular cross-section.

And where you see the veins, make cuts to the base.

Do not cut all the way to the top, leave 1.5 cm.

The end result will be a flower that you made yourself.

Or there is another option, carrot cones. Of course, these works are only for beginners; those who have a lot of experience in this matter can make more complex figures.

To start, take a carrot and cut a square stand at the base.

Then round the diameter a little using a knife, cut off the edge.

Now make leaf-shaped cuts.


This is what should happen.

Well, in the end, a pile of such cones.

There is a video on YouTube showing how you can create a rose from vegetables. If you are interested in this technique, you can watch it right now by clicking on the view button.
That's all for me, I hope you liked all the autumn crafts from vegetables and fruits and you already know what you will create. I wish everyone patience and perseverance. And of course victories!
In kindergartens and schools in the fall, around October-November, the Autumn Festival is celebrated. On this day, children bring to kindergartens and schools things they have made on their own or with the help of their parents.
On the Autumn holiday, exhibitions are held to show how children’s imaginations come true through crafts made from vegetables and fruits.
Very young children show simple children's vegetable products, school-age children are already able not only to show more vivid imagination, but also to make many autumn crafts from vegetables on their own.
Right now, in the autumn, in September-October, there is the largest number of various gifts of nature such as fruits, vegetables, natural materials that help create beautiful and interesting meadows, create a new “image” and “beauty” for vegetables and fruits and invent them different characters.
Crafts from cucumbers
For example, most often cucumbers are used to make Gena the crocodile from the well-known Soviet cartoon. Chestnuts can help complement the creation of Cheburashka.
So, look at the creativity of parents together with their children. How differently cucumbers and potatoes are decorated as crocodile and Cheburashka.
A crocodile can be made from one whole and long cucumber, or it can be made from several. You can decorate with a thin piece of carrot cut figuratively as a scarf and tongue. Cheburashka can be made from raw potatoes by cutting them into slices.

But how cute the frogs turned out. Just like the real thing! This “set” of a couple of frogs is similar to the fairy tale about the Frog Princess. You can play with such beautiful toys and then eat them with gusto. Cucumbers, carrots, and peppercorns were used.

Potato crafts
Potatoes are a fertile material. Using this product as crafts, you can come up with various images and figures. for example, you can pick up a round potato and attach eyes, hands, ears, paws from plasticine and you’ll get Smeshariki!
Potatoes can also be used in the form of a horse, look at what a beautiful horse it turned out to be.
In the fall, such a rich holiday is held to show the children how much nature and the earth have given us vegetables and fruits. Tell them about the benefits of these products and thus broaden the children’s horizons, train their imagination and fine motor skills when creating masterpieces.
When parents are informed that there will be a holiday of autumn gifts, some parents are puzzled by the question of how to make a craft from vegetables.
To make it easier for parents to come up with ideas about what to create and what to use in this creativity, we have selected several interesting ideas of what children did for the autumn holiday and demonstrated at exhibitions.

Hedgehogs
Probably the simplest and most interesting craft is hedgehogs! How to make and what to make hedgehogs from?! They can be made from almost any vegetable or fruit.
We choose a base, such as kiwi, apple (cut in half), potato, a piece of zucchini, beets or radish. And the baby can carefully prick the toothpicks, making needles for the hedgehog.
And on top of the needles, a hedgehog can pin dry autumn leaves, an apple, mushrooms and many different supplies that these little animals pull into their burrow.
Of course, everything needs to be done under the supervision of your mother or another adult. And such actions as, for example, cutting an apple are done by an adult, not a child.
In the process of creating an edible hedgehog, you can even come up with some kind of fairy tale with your child. Let the baby fantasize!

Crafts from zucchini eggplant
Zucchini will do a great job of serving as cars or piglets. Craftswomen also make shoes from zucchini or eggplant. And it looks especially beautiful with carvings on the skin in the form of a pattern.

Eggplants can be used to create very simple penguin characters.
Penguins are very easy to make. The skin is simply cut off and scored along the entire length of the eggplant, but the tail is not cut off at all. We make eyes from what we have, and if there is nothing, then plasticine is used.
Here is a collection of photos of simple but very cute vegetable ideas for creating cool characters.
The snake was made from a long cucumber, peppers and olives were used to create eyes and a “scarf”.
One machine is made using zucchini, zucchini, radishes, and carrots. Everything was connected using toothpicks or matches (of course, after breaking off the sulfur).
The second machine is based on eggplant. Here the wheels have different diameters and a small zucchini went on them.
Another penguins on the island are zucchini and skillfully carved sleighs, bows, and a hat made of carrots.
Little frogs are cucumbers. And snowmen are apples, they can also be made using radishes or radishes. Hats in the form of a lemon slice and a carrot bow and mittens.

Apple crafts
I really liked one idea that moms brought to life! Apples are taken, washed, and wiped dry.
Then mom makes the glaze: beat the egg whites with sugar and add a couple of drops of lemon juice.
We take a regular medical syringe, naturally NOT using a needle. And fill the syringe with our white egg-white mixture. And we draw on the skins of apples. You can draw anything: snowflakes, butterflies, simple drawings, decorative curls, arrows, faces, waves, dots, etc.
The apples look beautiful and you can simply eat them later!
You can also make a wonderful caterpillar by connecting apples of the same size together using toothpicks.
To do this, we prick our fruits on both sides with a toothpick, make paws using carrots and make antennae with grapes! You can draw a face with plasticine or egg white glaze (described above how to do this).
Polka dot apples! These fruits can be decorated like this. Take red and cut circles or triangles from the skin. Do the same with a green or yellow apple. Now, attach colored circles in reverse: green circles are attached to a red apple, and red circles are attached to a green apple.

Pumpkin crafts
The queen of autumn is, of course, the pumpkin. This product is wonderful both for its valuable vitamin properties and is suitable for pumpkin crafts for the fall holiday and for Halloween, which is also celebrated in the fall!
When creating figures using fruits or vegetables, you often need to fasten the parts together. Toothpicks are best and safer for this.
If you additionally use plasticine or, especially, markers or felt-tip pens for decoration, then of course you should not eat this product.
The wealth of nature is truly so diverse! Autumn is a great time for the development of children using natural materials. Because it is safe, accessible and simple.
Using autumn tree leaves, pine cones and plasticine, twigs, all the food gifts of autumn, you can develop children's creative imagination, stimulate their imagination and interest them in the world around them.
DIY crafts from vegetables and fruits made with the help of parents are perfect as a developmental tool.

DIY onion crafts
What can you come up with as a DIY craft for the holiday using onions?! It turns out you can make flowers!
If you cut an onion, peeled from top to bottom, in each layer without cutting to the very end and open the onion petals, you will get a real lotus! You can decorate with greenery.
But what wonderful onion daisies! The middle is a carrot circle, which is cut lengthwise and crosswise with a knife so that a small “fringe” is obtained. Decorate with greenery or green tree leaves or long leek leaves.

And here are some beautiful crafts made from onions that the children and their parents made for the exhibition. It turned out to be a real parade of onion men.
The bulbous piglets had ears and tails made from raisins, and matches were used for the legs. They decorated it beautifully and put it on display to show all the beauty of what you can come up with using the autumn harvest of vegetables.
These are the interesting crafts made from vegetables that the young craftsmen presented! These are all children's work.

Here is a selection of photos of beautiful and very interesting vegetable creations. Gorgeous palm trees can be made like this: large pitted olives are strung on skewers, “palm leaves” are put on the very top, and the whole creation is placed on an “island” of melon or any other fruit or vegetable.

Radishes are presented in the form of a beautiful decoration using the carving technique - cutting vegetables. Using the same technique, a gorgeous rose was created from real red beet. A bouquet of “roses” was created using black radishes or red radishes. You can decorate with a twig with leaves of a cherry or other fruit tree.


Mice and mushrooms can be made by carving enthusiasts in a matter of minutes. Very simple figures will turn out quite quickly - mice and mushrooms. The mice look especially touching and are very easy to make. To do this, take a clean radish and cut a piece from one, divide it in half and get mouse ears. We make eyes and slits into which we insert ears. The tails of the radishes serve as tails. And the mice look very real.

Bell peppers can serve as an excellent material for creating flowers from fruits. Look, just peel the pepper from the core and seeds and cut it into small “fringes”. And you will get asters or peonies. If you take three different colors of pepper, you will get a beautiful vegetable that is not only a craft, but also a beautiful decoration for a dish.

It is impossible not to show a bouquet of radishes and carrots, because it looks so natural and beautiful that you just want to admire it. Parents can easily make such a bouquet on their own.
Crafts made from vegetables can be not only tasty, but also beautiful, attractive and even funny!
And here is a huge hare made of radishes, eggplants, cucumbers, cherry tomatoes and added fruit. It looks simply gorgeous!

Here is another bouquet, but this time fruity. A whole set of vitamins. There are watermelon, oranges, bananas, pineapple, and this beautiful bouquet of vegetables is decorated with eggplants.
Such chic and healthy bouquets can be partially eaten and simply admire the abundance of vegetables and fruits and decorate banquet tables in restaurants or at home during holidays.

If you have ideas on how to make autumn crafts from vegetables with your own hands, share them in the comments or send us a photo via. And we will definitely publish them and share your ideas.
Autumn is the time of colorful leaf fall, ripe fruits and vegetables. Warm autumn days are good for walks, and on rainy days you can do handicrafts - make funny toys from vegetables with your children. For example, carrot chanterelle.
Autumn fox  To work you will need:
- three carrots;
- small orange bell pepper;
- 3 cloves;
- wooden toothpicks.

 And don’t forget to take a photo with the fox as a souvenir of this bright autumn day.
If you decide to make flowers from vegetables, you will need:
- one onion;
- one beet;
- knife with thin blade
- cucumber.
This selection depends on what specific vegetables you are going to cut from. It could be a carrot, a tomato, or any other object. Today we will show you how to make a rose from a beet and a chrysanthemum from a bulb. You will see that it is not that difficult. 
First we'll make a rose. Using a knife, cut a long piece from the beets in a circle. This is what happens when you peel potatoes in one piece. 
Cut it as long as possible. Then we roll it up into a spiral. 
From the remaining segment we cut off relatively small and low pieces - these are the petals. 
We slip them one by one under the first piece. Now the rose is ready. 
You can also cut out leaves from the cucumber to go with it. 
For chrysanthemums, take a medium bulb.  The larger the bulb, the larger and more magnificent the flower will be. When peeling, do not cut off the root, but only lightly peel until clean. If you cut it, the outer layers will fall off.
Take a knife and cut the top layer into thin strips, sharpening the edges. We do this around the entire perimeter and disconnect the cut parts. 
We repeat this step with the next layer and further, until the very end. The thinner the petals are, the more magnificent and delicate the flower will be. 
The finished flower can be sprinkled with lemon juice so that it does not cause watery eyes.
Vegetable bouquet

The strip of skin with pulp should be very thin so that it can be easily rolled into a roll. Roll the strip with the flesh inward, starting from the part that corresponds to the stalk. Fold back the last turn of the strip to simulate an open rose petal. Connect all layers using a toothpick. Place the rosette on a leaf of lettuce or place a few sprigs of parsley underneath it.
 Onion flowers.
- "Daffodils" can be cut from small white bulbs with a stem. To strengthen the stem, place a thin skewer inside the feathers. Make deep zigzag cuts on the bulbs, right down to the center. Using the point of a knife, separate the two halves of the onion and place them in very cold water. After some time, the “narcissists” will open up.
- Squeeze a few drops of mayonnaise onto a feather of green onion - you will get a “lily of the valley”.
- Flatten the green onion. Cut it on one side like a herringbone, and then cut it lengthwise and unfold it - the feather will turn into a “palm branch”.
Try cutting flowers out of radishes. To do this, cut one radish into thin slices. And cut the other one twice with a cross. Insert the circles into the slits. Isn't it beautiful?!
Multi-colored peppercorns. 
- Yellow bell pepper easily turns into a real “sunflower”. Using the sharp tip of a knife, carefully cut the pepper almost to the base into long, narrow “petals.” Cut the skin of each “petal”.
- Place the pepper in very cold water for half an hour to an hour until the “petals” open. Cut off the thick “butt” of the eggplant and cut the skin lengthwise and crosswise several times. Pull apart slightly to get the middle of the sunflower. Insert the cut eggplant into the middle of the flower. Place the sunflower on a lettuce leaf.
- The red and green fruits of bell peppers with shiny and dense skin are ideal for making “exotic flowers.” Divide each pod into four parts. Do not complete the cut. Use scissors to cut thinner “petals.”
- Trim the ends of the “petals” if the pods are too long. Place the prepared “flowers” in ice water for a while.
Cucumber bells.
 You can cut “bells” from a strong cucumber, carrot or beetroot. To do this, you need to carefully cut off the top layer from the end of the fruit to form a cone and roll the bell. Place carrot, tomato, and red pepper slices in the middle of the flower. Beautiful from vegetables and fruits They turned out very tasty! Of course, it’s not easy to immediately become an artist of vegetable crafts, and pumpkin baskets, so beloved by decorators, are of no use in everyday life. But try, learn - and everything will work out!
Culinary carving
The art of engraving on the surface of plants is represented by culinary carving. Carving - English curving (from curve, which means “to cut”) - “carved work”, “carved ornament”. Culinary carving - figured cutting of vegetables and fruits - is very popular today.  The variety of shapes, colors, different structures of the skin and pulp of the fruits of nature can prompt a child to create real masterpieces of art. Take a closer look: vegetables and fruits have different shapes - round, oval, oblong, flattened. This allows them to be used for the heads and torsos of real creatures and fairy-tale characters. Coloring also has a certain meaning. Potato tubers and carrots often do not have a smooth surface, but processes that resemble a nose, ears, and hands. Such samples, of course, need to be specifically looked for in vegetable stocks, but crafts from vegetables and fruits they turn out to be very interesting. The most unusual and daring decisions can be prompted by a certain plant structure, for example, the layering of white cabbage or the wavy, “curly” structure of cauliflower... Don’t be confused by the thought that high culinary technologies or the creation of sculptural and artistic masterpieces are available only to specialists. After all, the most famous masters of their craft were also once children. The one who walks will master the road!
 Parrot cucumber.
You will need: cucumber, sweet bell peppers of yellow, orange and red colors, radishes, onions, carrots, olives or green peas, 2 cloves.  Preparation:
1. Cut off the thick part of the cucumber and place it vertically on the cut.
2. Make slits on the sides of the cucumber and lift the skin into wings using toothpicks.
3. Wash the bell pepper and cut it into triangles.
4. Cut the triangles from the inside several times, without finishing the cut.
5. Place several fans of different colors on top of each other - get a multi-colored fan. This will be the parrot's rainbow tail.
6. Make slits in the top of the cucumber - insert the scallop and beak.
7. Using toothpicks or dry cloves, attach the eyes - circles of radishes or onions and halves of olives or green peas.
8. From pieces of carrots or red peppers you will make paws.
Camel Fil-potato.
Potatoes and carrots are easy to cut, it is convenient to dig holes in root vegetables, and therefore it is not difficult to make all sorts of interesting things out of them, for example, a baby camel.
You will need: carrots with a tail, 3 potatoes of different shapes and sizes, pieces of yellow and red sweet pepper, several olives or black peppercorns.  Preparation:
1. First of all, wash the carrots and potatoes well. And boil it if you wish.
2. Cut the carrots into pieces.
3. Cut one of the small potatoes in half in a zigzag pattern, cut out a corner from the second - you will get a blank for the baby camel’s face.
4. Cut a piece of yellow pepper into transverse strips, without finishing the cut - this is the mane. It will need to be inserted into the potato head cut at the top.
5. Also cut out the ears and nostrils from yellow peppers or carrot pieces, and from a strip of red pepper you will make a mouth. From halves of olives or black peppercorns - curious eyes.
6. Assemble the baby camel: attach the neck, head, legs, humps and tail to the largest potato using toothpicks.
Pumpkin horse.
A piece of pumpkin can turn into a wonderful red horse. It is very easy and simple to make.  You will need: pumpkin, greens.
Preparation:
1. Cut a large piece of pumpkin into thirds.
2. From the middle, widest part, cut out triangles on both sides - this will be the torso with legs.
3. One pointed part will serve as the head and neck, and the second - the tail. The pumpkin skin at the tail can be slightly cut and tousled.
4. Attach the head and tail to the body using toothpicks or salt straws. The mane can be made from curly parsley or dill. And let the horse go to graze on the grass.
Ostrich with hairstyle.
You will need: green radish, leeks, pieces of cloves and red pepper, parsley or dill.
 Preparation:
1. Trim the base of the green radish to stabilize it. This will be the body of an ostrich.
2. Cut the green leeks lengthwise, without cutting all the way through. Dip it in cold water for a while - the feathers will curl whimsically. This will be the bird's head.
3. Use a clove for the eyes and a corner of red pepper for the beak.
4. Attach the head and neck to the radish body using a long wooden skewer. Garnish the tail with curly parsley or dill. You can sprinkle a little canned corn around - our ostrich sat down to sunbathe on the sand.
Curly-haired lamb.
You will need: eggplant, cauliflower, bell pepper, lettuce, olive or black olive.
 Preparation:
1. Divide the head of cauliflower into inflorescences and rinse thoroughly.
2. Use raw inflorescences or boiled, sprinkled with breadcrumbs.
3. Cut a strip from the eggplant to stabilize it. Place the eggplant cut side down on the lettuce leaf.
4. Attach the inflorescences to the eggplant using toothpicks, imitating curls of wool.
5. Place a cut olive and a piece of red pepper cut out in the shape of a nose onto the lamb’s face.
6. Make the ears from a strip of eggplant cut in half; half rings of pepper will serve as the horns.
Princess Frog.
You will need: 2 fresh cucumbers, radishes, sour cream, herbs, yellow or orange bell pepper, rye bread, onions, carrots.  Preparation:
1. Grate fresh cucumber and radish, mix with sour cream and finely chopped herbs. Spread on a slice of rye bread or dry bread.
2. Cut a small, strong fresh cucumber diagonally. Place one half on the cut. Make slits and insert eyes - radish circles.
 3. Cut the other half crosswise into two parts and cut lengthwise into thin slices, without making the cut to the end, and then straighten it - you get frog legs. Place the legs under the frog's body.
4. Cut the top off the yellow or orange bell pepper in a zigzag manner. Trim the tip and place a crown on the frog's head.
5. Place an onion lily next to the frog on a lettuce leaf. To make it, cut the onion from the surface to the center - in a zigzag around the circumference. Separate the halves and disassemble into scales. Insert one scale into another, place a circle of carrots into the core of the flower. The Frog Princess sits on a green hummock, waits and waits for her royal prince and admires the water lily. Beauty! What kid wouldn't want to try this dish? 
DIY vegetable crafts are a very popular form of creativity. They are especially relevant in the fall. If you have a child, then various competitions at school have probably already begun. Choosing vegetables for your crafts is a great idea. And if you complement them with natural materials or the simplest decor, you can create real masterpieces.
Earlier we told you what carving is. If you have a special knife, you can combine it with vegetable crafts. Then they will definitely be unique. However, you can do without this. It all depends on how serious the competition is. If creativity is exclusively homemade, then overly complex patterns are probably useless.
We tried to make as complete a selection as possible. Potatoes, zucchini, eggplant, carrots, onions, corn and other vegetables - in this article you will find lessons on creating crafts from a variety of crops.
By the way, some ideas may be useful to parents of little picky kids. If your child refuses to eat vegetables, try surprising him with a cucumber or carrot animal or person that he can eat. There are also crafts for the little ones that can be made for kindergarten.
Vegetables need to be carefully washed and dried. It is best to prepare all the necessary details right away. Get inspired, harvest and go!
Snail: zucchini + pumpkin
Even a child of primary school age can make this craft. True, you will have to help him a little.

We will need:
- pumpkin;
- zucchini;
- rowan or other berries;
- corrugated paper and cardboard;
- leaves;
- toothpicks;
- additional decor.
Use a spoon to make a shell-shaped indentation on the pumpkin. We cut out circles from corrugated paper: for the cap and to hide the joint between the vegetables. We fasten the zucchini and pumpkin together with toothpicks. To make horns for the snail, we also use toothpicks and decorate them with berries.
A snail's face can be made from artificial eyes or made entirely from berries. It is best to place the snail on a cardboard box to make the structure stable.
There is no shame in bringing such a funny vegetable craft to a competition. She looks really great!
Boat: eggplant + onion
This craft can be done with your child in kindergarten. Just keep in mind that onions do not last very long, and therefore they may give off an unpleasant odor.

We will need:
- eggplant;
- 2 onions;
- colored paper;
- toothpicks;
- cardboard box.
Cut the eggplant in half and then scoop out the inside of the vegetable using a spoon. This must be done very carefully so as not to damage the peel or damage the integrity of the walls.
Take toothpicks and glue a piece of paper onto each of them to make a paddle. They will need to be stuck into the onion so that the vegetables are automatically fixed in the eggplant and the craft is stable.
You can add decor to the bow using colored paper and PVA glue.
Merry men: assorted
You can use any vegetables for this fun craft. The main thing is that one should be elongated, and another 3-4 should be round. You can make such a car with funny people with your own hands for a school competition.

We will need:
- zucchini;
- potato;
- toothpicks;
- plasticine;
- colored paper.
All small details and decor will be made from plasticine. True, it sticks very poorly to smooth peels, so it’s best to take rough vegetables.
We need to use one zucchini completely, and from the second we need to cut 4 round wheels. We attach them using toothpicks.
Some colored paper decorations can be glued with PVA glue. Do this only with vegetables that you do not plan to eat.
If your child is very small, put ready-made Kinder Surprise figurines in a zucchini car.
Carrot bunny
You can make a very cute bunny with just one carrot with your own hands. This craft is great as a trick to get your child to start eating carrots.

We will need:
- carrot;
- plasticine;
- paper.
Take long and thick carrots. We need to cut 4 identical circles from it. Divide the carrots into 2 halves on top - these will be the ears.
Cut out the legs from the circles using a sharp knife. We make a cut in the center of the carrot so that we can place paper there and form a semblance of teeth. We make the eyes and nose from plasticine. We attach all the parts to toothpicks or half toothpicks.
If you plan to eat a bunny, make the eyes out of berries or pieces of brightly colored vegetables.
Cucumber shark
This craft can be made to be eaten the same day. If you want to enter it into a competition, your best bet is to carve a shark out of a zucchini.

We will need:
- cucumber;
- radish;
- any decor.
You can make imitation algae from cucumbers or paper. You can prick our future fish on a fork (even a plastic one).
The cucumber should be slightly curved. We will need to take one more vegetable - we only use the peel from it. We cut out fins and a tail from it. We make deep cuts on the main part of the craft. We insert small parts into them.
Cut the front part of the cucumber deeply. So that you can insert half a radish, a piece of pepper or a tomato there - we need to form the mouth of a shark. It is very convenient to secure the fish on toothpicks.
This craft can be an excellent decoration for a holiday table.
cucumber cactus
This cactus is a craft for the little ones. For kindergarten or 1st grade - just right.

We will need:
- 2 cucumbers;
- large pepper;
- dill;
It will be great to find a cucumber with a flower. If you don't have one, take a decorative one. Cut off two parts from the pepper. Insert one cucumber into the center. Cut the second cucumber in half diagonally. Attach the two pieces with toothpicks.
To make needles, take dill or other herbs. Let's just take chopsticks. Stick them into the cucumbers from all sides.
You can decorate the pepper pot with onions or peppers of a different color. You can attach the parts to dill if the pepper is soft. If not, use toothpicks.
Such homemade cacti can also become a wonderful decoration for a holiday table. Especially at a children's party.
Corn flowers
It makes sense to make this craft edible. That is, to make it, it is best to take already boiled corn. Although, if you are planning to make something for a competition in a kindergarten or school, then the idea can be used independently or as an addition to a larger craft.

We will need:
- corn;
- zucchini;
- culinary skewers;
- flower pots.
Pots can be replaced with regular mugs. Insert the zucchini into the center. Thread the corn onto skewers and thread them as deep as possible.
If you have a vegetable cutter, you can easily make flowers from carrots, turnips or any hard vegetables.
Carrot pirate
Crafts made from vegetables can become very original if you come up with an interesting decor. Moreover, you can create it from ordinary threads and colored paper. A hat, a hairstyle, a funny outfit - you will end up with something completely unusual.

We will need:
- thick carrots;
- threads;
- cardboard;
- paints;
- insulating tape;
- marker.
Using a knife, form the nose, eyes and mouth of the future pirate on the carrot. Cut off the top so that the vegetable can be placed.
Draw eyes and mouth with a marker. We make an eye patch and a pirate hat from cardboard. We wrap the threads with electrical tape. The saber needs to be cut out of cardboard, and everything else needs to be painted with paints.
By the way, this craft can be used for a children's Halloween party.
Horse: zucchini + carrots
This craft is perhaps the most difficult in our selection. However, this is only in appearance. In fact, putting vegetables together and forming such a figure is quite simple.

We will need:
- 2 small zucchini;
- 4 carrots;
- 4 potatoes of the same size;
- 2 hot peppers;
- twigs;
- ready-made basket;
- cardboard box;
- wire;
- toothpicks;
- any decor.
First, let's prepare the zucchini. If they are too big, you need to cut off the excess. Take a closer look at the main part of the craft: the zucchini consists of two parts. They are held together by many toothpicks stuck into the pulp. We fasten the zucchini head to the zucchini body in the same way.
Prepare the carrots and trim them at both ends. We need 4 identical blanks. Make holes in the potatoes and zucchini, insert the “legs” using toothpicks.
We make the harness for the horse from twigs fastened with wire. We simply wrap the basket and place it on a small cardboard platform. We make wheels from carrots. We fill the beauty basket itself with various vegetables and natural materials.
This vegetable craft definitely deserves first place in the creative competition!
Eggplant penguins
This craft requires only one vegetable and just a couple of minutes of free time.

We will need:
- eggplant or zucchini;
- sharp knife;
- toy eyes.
We attach the eyes to the tail of the eggplant using superglue. Cut off the concave part of the vegetable to expose the “belly” of the penguin. We make two cuts on the side to form the wings. We cut off the round part from the second end so that the vegetable can be placed. We form paws from it.
This craft will certainly appeal to the youngest children.
Pumpkin house
This pumpkin craft is great any time, but it's especially special for Halloween. Its advantage is that it can be stored for quite a long time - the pumpkin almost does not rot at all.

We will need:
- large stable pumpkin;
- sharp knife;
- toothpicks;
- natural materials;
- any figures.
We have previously told you how to prepare a pumpkin for making crafts. Here we proceed in the same way. The vegetable needs to be carefully cleaned from the inside, washed and dried, and only then proceed to the craft.
We'll make a window out of toothpicks. We cut off the top cover and glue any branches, leaves or rowan berries to it.
We install the structure on the lid of a cardboard box, and place toy animal figures around it.
This craft is perfect for participating in a competition in elementary school.
Potato Cheburashka
You can make many different crafts from just one or two potatoes. It is enough just to supplement them with original details.

We will need:
- 1 large potato;
- toothpicks;
- plasticine.
Cut the vegetable into circles of equal thickness. We fasten the parts with toothpicks. We form the face from plasticine. You can decorate the craft with popcorn or a flower.
If you are afraid that the potatoes will darken, because the craft will have to be stored for more than one day, make it from whole tubers. Form exactly the same figure. Make ears and paws from halves of small potatoes, with their skins facing out.
This vegetable craft is good for both kindergarten and elementary school.
We hope you are inspired by this collection of ideas. Repeat them completely or come up with something of your own. Supplement crafts made from vegetables with fruits, leaves, and various decorations. Collect simple shapes from large vegetables if your child is very young. Or try carving if you're aiming for first place in a school competition. Have fun creating and have fun in the process!
Views: 2,297
The fruit season has begun, which means you can start making interesting crafts from fruits that can be taken to kindergarten or school - little children really like this, since everyone loves fruits. You don’t need to buy expensive toys to develop your baby’s motor skills; you don’t need to spend money on all sorts of things that develop thinking, imagination and perseverance. Just engage your child, be it a boy or a girl, in making fruit crafts with your own hands. Now you will find out what can be made from fruits quickly and beautifully, because it can be crafts in the form of animals, still life and much more. When a child makes crafts, he first of all remembers their name, learns colors and shapes, develops his thinking, imagination, and associations. One of the simplest crafts can be considered applique. Just show your child what you can put on a fruit plate. Make funny animals, a boat or a flower with it. He will really like to build and come up with new interesting compositions himself. If a child does not eat well, then such a game will interest him, and he will eat with pleasure! Well, if you don’t have time to read the whole article, I advise you to watch a video where fruit crafts are presented.
Owl made of fruit
An owl will be a very simple craft that you can make with your own hands together with your child. Such an owl can be taken to kindergarten, and most importantly, it can be made at any time of the year, even in the fall, because all the required fruit can be bought in the store. You can see detailed instructions on how to make such a craft. 
You will need:
- Pear
- Grapes (dark and light)
- Strawberry
Progress:
- Cut a piece of the pear almost halfway. This will be our foundation.
- Cut two circles from the kiwi and peel the peel with a knife. We place the circles on the wide part of the pear to make eyes.
- We cut one dark grape in half and attach the kiwi on top, like pupils, using a short toothpick.
- Cut the strawberry into 4 parts. We attach a sharp piece, more like a beak, to the pear.
- We divide the dark grapes in half, and then cut each half into 3 parts. These will be our legs and we attach them down the body.
- We cut out the edges from the same grapes. Divide the grape into 4 parts and prick two pieces above the eyes using toothpicks.
- We make small wings from light grapes. Divide the grape in half and make one cut in each half. We need 4 such halves, 2 on one side and 2 on the other. Using toothpicks, attach them tightly to each other on the sides. Our cute owl is ready.
Video master class owl made from fruits
Lemon mouse
For kindergarten-age children I would like to offer such a cute mouse that can decorate your holiday table. Such a craft will not take much time and effort, but will cause a storm of emotions among guests. To make the craft yourself, see detailed instructions below. 
You will need:
- Lemon
- Sprig of parsley
- Scissors
- Knife (small for carving and large for slicing)
- Toothpick
- Black pepper
Progress:
- Cut off a small side piece from the lemon for stability.
- From the cut piece we cut out thin and round ears.
- The mouse's muzzle will be on the side where the elongated tail of the lemon is located. Use a small knife to make indentations for the ears and insert them into the holes.
- We also make holes for the eyes and antennae. To make the holes more even, you can finish them with a toothpick.
- We cut the dill stem lengthwise and insert it in place of the tendrils, using a toothpick.
- Insert pepper in place of the eye.
- Cut the peel from the remaining lemon in a circle and cut out the tail using scissors. For the tail, we make a cut from the back of the mouse and insert our workpiece. Our wonderful mouse is ready.
Video on how to make a mouse out of a lemon
Hedgehog in the fog
You can make a funny hedgehog out of a pear; both you and your child will enjoy working together with your own hands. It’s good to make a hedgehog in the fall as a craft for kindergarten or school. You can see how to make such a hedgehog in our master class with detailed instructions. 
You will need:
- One pear
- Grape
- Toothpicks
Progress:
- Using a knife, you need to peel the pear from the sharp side. This will be the face of a hedgehog.
- Now take the grapes and insert a toothpick into each berry. This should be done so that the sharp end of the toothpick peeks out a little.
- Now the prepared toothpicks with berries need to be evenly inserted into the pear. It is in the unpeeled part of the fruit.
- We make a nose for a hedgehog, for this we take one black grape and string it in place of the tail of the pear.
- Eyes for a hedgehog can be made simply from matches or cloves.
How to make a hedgehog from fruits with video instructions
That's it, your funny hedgehog is ready. Please your baby with a fun and tasty toy. You can come up with a whole fairy tale and tell it to your child while eating.
Typewriter
You can make many of these cars for a child’s birthday and amaze your little guests. We are sure that more than one child will not refuse such a homemade treat. Fantasize together, and we wish you a delicious and entertaining activity. And to make such a machine very simply, your child can help you with this. 
You will need:
- Grape
- Banana
- Apple
- Toothpicks
Progress:
- Take an apple and cut it in half to make a semicircle.
- Now peel the banana and cut it into rings as well. Each ring must be cut in half.
- Take toothpicks and pierce the apple where the wheels should be. Do this evenly.
- All that remains is to place the prepared banana slices on both ends of the toothpicks and secure it all with a grape.
Banana dachshund dog
If your child loves bananas, then our funny dog can attract him. Please your child and for dessert present him with a craft you made yourself, or perhaps together with your child. In order to understand how to make a dog out of a banana, we will now tell you in more detail. 
You will need:
- Two bananas
- Toothpicks
- Peppercorns
- Black felt-tip pen
- Knife
- Carrot
Progress:

That's it, our funny dachshund is ready and can delight the whole family. Look carefully at the photo and follow the instructions, it's very simple. We wish you a fruity mood!
A simple children's craft made from apples - funny little people
It is very easy to make such funny little people with your own hands with your child. This craft will not take much of your time, but will interest your child for a while. These little people can be used to decorate a children's table or for exhibitions.
You will need:
- Green apples
- Apple seeds
- Toothpicks or matches
- Sharp knife
Progress:
- Take two apples, one should be larger than the other. Place the apples on top of each other so that the small apple sits on top of the large apple. Secure the craft with toothpicks or matches.
- Now take the third apple and cut 4 pieces from it. Two of which will be the legs of a man, secure them at the bottom of the body. And the remaining two are on the sides in the form of hands.
- Cut a small apple into two parts. One will be a hat for your little man.
- The seeds will serve as eyes; you can simply press them into the apple. The mouth can be cut out with a knife or made from leftover apple pieces. At your discretion.
Your simple and fun craft is ready. It will please the child; he can play with it or put it on the table during lunch. Enjoy yourself and make a small holiday for your baby.
Children's craft - rat Larisa made from radish
Quite an interesting craft for kids that you can make with your own hands together with your baby. It’s not difficult to make, the main thing is to apply imagination and skill. This craft can be made for a kindergarten exhibition.
You will need:
- Large white radish
- Lettuce, but better than cabbage
- One small radish
- Olives
- Sharp knife
- Toothpicks
Execution Process
- You need to rinse and dry the large white radish well. Remove all the roots, leaving only the tip of the radish, they will serve as tendrils. You shouldn’t remove the tops either, they will become tails. But if there is a lot of it, thin it out, tear off the excess.
- After this, you need to cut off the front part of the radish and use a toothpick to secure the radish at this place. This will be the nose of the craft
- We make the ears using notches, making them small. You need to carefully insert lettuce or cabbage leaves into them.
- Now all that remains is to make the eyes of our rat, for this we take olives. Cut the olives into circles and attach them to the radishes using toothpicks. Eyebrows can be made from the remaining radishes.
So the funny girlfriend is ready. Give it to your grandfather and make him happy for the holiday. After all, he already has Shapoklyak.
Original helicopter made from eggplant and carrots
If your child loves helicopters, then you can surprise him with a joint craft made from vegetables. This craft can be presented both for kindergarten and 1st grade school. With detailed instructions you will succeed easily and quickly, you can also watch the video master class. 
You will need:
- Carrot
- Eggplant
- Toothpicks
Progress:
- We take an eggplant and cut off a beveled piece of peel - this will be our windshield.
- Cut two circles from the carrots for the wheels, about 1 cm thick.
- Using toothpicks, attach the wheels to the eggplant. The tail of the eggplant should be facing up.
- Cut the carrots lengthwise into strips so that they look like blades. From the same carrot we cut out a cylinder with a small diameter, about 4 cm high.
- We attach the cylinder to the top of the helicopter using a toothpick. Part of the toothpick must be visible in order to attach the 4 blade strips to them.
- We cut a circle from the carrot, and from the circle we make a screw, cutting out 4 triangles from it. Our helicopter is ready.
Video helicopter made from eggplant and carrots
Crafts for little mice
If your child has trouble eating cucumbers, then we can offer you an interesting solution. Together with your child, make a quick and delicious craft called Little Mice from a vegetable. It won't take much time, but we assure you that your child will love eating cucumbers. Moreover, they contain so many useful substances and vitamins. 