Because they are easier to match to any felt. I advise you to use double thread, because... They are very thin and break easily when you tighten the loops.
- Any decorative elements with which you will decorate your personalized panel.
In my case, these are paper flowers, children’s themed buttons and “half beads” to look like pearls, and satin ribbons 0.6mm wide.
- A hot gun that will help us glue our decorative elements.
- Scissors.
- Filler.
To make our toys look “alive”, we will fill them with any filler at your discretion.
- Definitely a needle
And, of course, a lot of patience, perseverance and desire!!! 🙂
Let's start the master class on personalized garlands.
The first thing we need to do is transfer the pattern onto felt. Creating a pattern is not difficult.
You can choose any drawing and transfer it to paper (print it on a printer, or simply redraw the drawing by attaching the sheet to the computer monitor, the way we all did it in childhood, only through the window :))


Separately draw all the details and cut them out.

Please note that I have already “drawn” the eyes in this photo and the mouth using thread and a needle.

We decorate the doll with our beads and flowers. I also sewed a collar on her - now give free rein to your imagination 😉 and we get such a beautiful angel doll

Using the same pattern we sew letters and stars.
Then we sew letters and decorative elements to one part of the month, and only then we sew two parts of the month and stuff it. Because it will be difficult to sew letters onto a full month.

But the doll will have to be sewn on for the finished month. To do this, you will have to suffer a little to make the seams invisible. “Grab” the pupa in several places and secure the knots well.
We also sew the stars with a satin ribbon to the finished month. I glued pearls at the joints to hide the knots.
Well, I completely decorated the month and stars with the same elements so that our composition looked completely finished.
The bows at the junction of the satin ribbon and the stars are made of ordinary waxed cord (three small pieces are cut off, tied in the center with a thread, sewn to the satin ribbon, and then simply “loosened” with a needle and you get bows like this J)
To decorate your home, a felt panel would be a good option, which can be made by the whole family and even together with small children.
When starting to make handmade works, it is worth remembering that you will need maximum patience, as well as materials, time and just a banal desire to create your own masterpiece. Almost every person could encounter failures when working with fabrics and other materials, but if you approach the work correctly, you can avoid a negative result and get a quality product.
Felt is considered one of the most popular materials, as it is quite easy to work with, it is sold in any fabric store, and it is also sold in a large assortment and color palette. Before creating a unique and original work, you should pay attention to the material itself and the features of working with it, so that there are no mistakes and wasted fabric.

Felt is a type of felt, and its peculiarity is that this material is non-woven.
Working with it is a pleasure for both adults and children, since the edges of the fabric do not fray, which is one of its main advantages. On the fabric market, felt is available in a huge selection, among which you can choose a wide variety of colors to suit every taste and color, but felt with a pattern is quite rare.
This type of fabric is produced mainly in three countries:
- Korea;
- Italy;
- Russia.
It is these three states that produce material that can be used in handicrafts and even in tailoring, since it is of high quality and worthy.
Felt is made in three types:
- Woolen;
- Wool blend;
- Synthetic.
In the manufacture of toys or products such as panels with a name for a nursery, Italian-made wool blend felt is mainly used. If you plan to create a toy for a baby or a product with which there will be direct contact, then you should pay attention to whether the child has an allergic reaction to wool, and this should be taken into account when choosing a material.
Synthetic felt has less hairiness and has stronger edges.
Such moments should be taken into account as clearly as possible when making toys or a New Year's panel from felt. For example, a personal panel made of felt, a master whose class is quite simple and understandable, is best made from a synthetic type, but to create miniature copies of animals it is better to use wool mixture.
Felt can vary in hardness and softness, which is affected by the thickness of the fabric. It is quite easy to distinguish hard from soft, since it does not bend, but breaks, which allows it to keep its shape.

What you need to know:
- For the manufacture of toys, half-woolen felt with a thickness of 1.5 mm is mainly used, and if synthetics are required, then you should not choose sheets thicker than 1 mm.
- You can make a case from felt for a phone or tablet, but here you should choose a tougher one so that it can protect the device from shocks and scratches.
- When stitching even 3.5 mm felt on a machine, there will be no problems and you will not need to purchase a special needle.
- It is important to know that when sewing felt that is too thin, there may be problems with sewing the stitching near the edge; therefore, in order to prevent deformation of the parts for the panels on the hoop, it is worth gluing them to non-woven or dublerin beforehand.
These two materials are sold in different densities and colors, but they both have an adhesive side, and for gluing you will need to fold the felt piece with the adhesive side and iron it with an iron. In order to make more durable and clear patterns from felt, in most cases non-woven fabric is used.
When working with felt, you should pay attention to the choice of threads, since they will affect the appearance of the product. If the thread is too thick, it will leave unattractive holes in the places where the stitching goes, and if it is too thin, it will cause the edge of the material to break.
New Year's felt panel: master class (video)
Types of fabric panels
DIY wall panels are the best way to decorate a house or any other room, as well as hide some defects on the walls.

Decorating a room is the most wonderful process on which you can spend hours of your time and at the same time get the most unimaginable pleasure.
In order to make a panel with felt patterns, you may need a variety of additional materials, such as:
- Mosaic;
- Rhinestones;
- Beads;
- Glass;
- Buttons.
A homemade panel can be diluted with a variety of pictures and ideas, as well as methods of attaching to the main material, you just have to use your imagination and reveal your creative abilities. Felt canvases in the form of paintings began to appear quite a long time ago, and over time the manufacturing features and popularity were not lost.
In order to create a New Year's panel from felt, the MC of which exists in a variety of types and designs, you will need to select the material by color and thickness, as well as foam plastic and double-sided tape.
As a rule, the base of the picture is made of foam plastic, onto which adhesive tape is glued, and the background canvas is stretched on it.

It is very easy to attach small felt crafts, dry leaves and even beads to such a canvas or, in other words, panel.
Idea for a felt panel
Now there are a huge number of master classes, which reveal the most original and different aspects of handmade crafts. For example, there are thousands of ideas on how to make and decorate felt panels.

It all depends on the purpose for which the craft is being created, whether the work will be carried out with a child or only an adult, and whether a pattern and additional materials will be needed. Particular attention should be paid to the fact that the panel will look like a painting or like a multifunctional board for the development of a child.
From felt and Velcro, you can create various educational games that help your baby explore the world around him as quickly as possible.
For development, a panel made of wood may be suitable, the branches of which have buttons or Velcro. Separately from the tree, you will need to make felt flowers, snowflakes, birds, apples and yellow, red and green leaves. Thus, while studying each season with your child, you can gradually change the pictures on the tree. In the spring, everything melts, and green leaves appear on the trees; in the summer, you can add berries or apples, and so on.
Such crafts are both original and unique, since the development of a child begins from the moment the canvas is created and its subsequent study.
How to make a “Fairy Tale” panel with your own hands (video)
The most important thing is that if a craft is made for a child, then he needs to be involved in the work in order to awaken interest in future work in advance.
Examples of felt panels (photo)


Content
A panel is almost a painting, but more intricate, original, and unusual. I want to examine every detail of it, admire it, and abstract it. Modern interior decor often includes a variety of panel options, of which there are a great variety of styles and options. Therefore, many needlewomen try themselves in this type of creativity, creating small masterpieces, enjoying the process and the result.
A felt panel is one of the most common variations of such needlework for many reasons. Firstly, felt is a simple and pliable material that is easy to work with even for novice craftswomen or children. Secondly, the combination of multi-colored felt always looks beautiful and impressive, attracting attention and catching the eye. Thirdly, it retains its appearance for a long time, does not deteriorate over time and does not fade.
It’s not difficult to make a felt panel with your own hands. To do this, you just need to select all the necessary materials and tools, as well as arm yourself with a good detailed master class. Step-by-step implementation of simple steps will help you achieve the desired result and create a beautiful, original panel. Moreover, even if you follow the instructions, it will still turn out different, different and unique.
Personalized panel for a children's room
Recently, personalized panels for children, which are hung in the children's room, usually above the crib, have become increasingly popular. They are decorated with different animals, flowers or other attributes of childhood, which are easy to make with your own hands.
You can make a circle and letters from felt in any way you want and at your own discretion. How to choose the color of such a panel. Sewing animals will be more difficult, but if you have good and detailed patterns, the process will not take much time and effort either. The advantage of animals is that they can be used for a boy's or girl's panel.
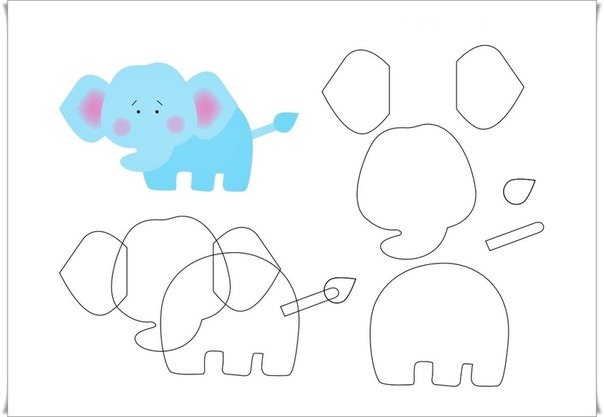
You can sew a funny elephant.
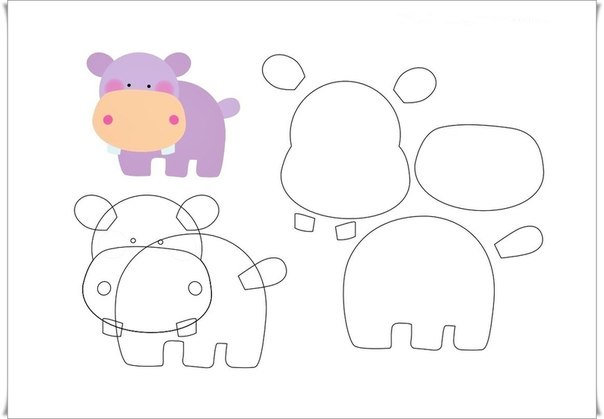
And place a cute hippopotamus next to the elephant.
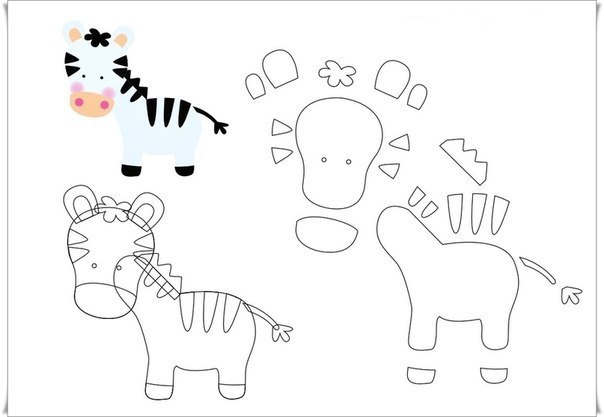
The zebra looks more complex because it consists of many small parts. But accuracy and consistency of work will allow you to make a beautiful striped horse.
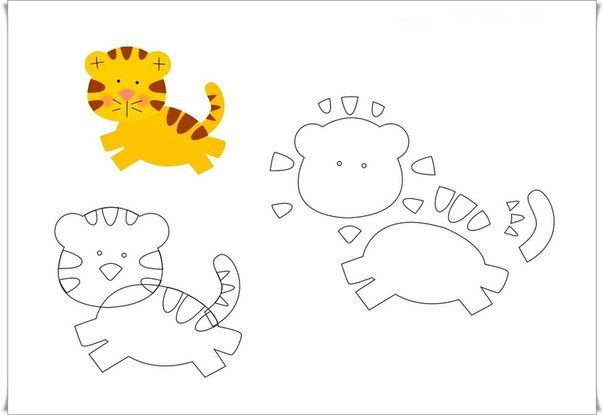
A small tiger looks just as fun and playful on a children's panel.
You can find or even come up with many other animal options that are easy to make from felt yourself. Children's panels are distinguished by bright colors and joyful pictures, so even the process of creating such a small masterpiece will bring pleasure. The sequence of actions using felt includes the following steps:
- Preparation of material and tools.
- Create a pattern on paper and transfer it to felt.
- Cutting out all the components of the future panel.
- Fastening them with threads or glue.
But perhaps the most important factor that will help you make a beautiful and unusual panel is the imagination of the needlewoman. After all, any pattern can be supplemented and changed according to your own taste and discretion, so that the result is even better. The main thing is to get started and give free rein to your creativity.
Delicate panel of flowers
The beauty and advantage of the panel is that simple, uniform elements, decorated in different ways, create an overall attractive picture. Of course, creating such a small masterpiece is a painstaking process that requires perseverance and the right attitude. But the result always exceeds any expectations, so it’s worth the effort.
To decorate a bedroom or living room, you can make a floral panel from felt. Thanks to the light tones of the fabric, it looks gentle and unobtrusive, and it’s easy and quick to do.

To create such an unusual picture you need to prepare:
- light felt in two shades;
- multi-colored threads for decoration;
- scissors, needle.

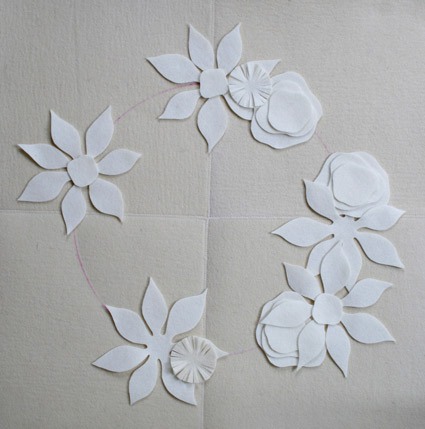
You can draw diagrams of flowers and petals yourself, it’s not so important what they look like. It should be noted that the panel consists of many similar and identical elements, but different decor creates a feeling of richness and variety. The sequence of its manufacture includes the following steps:
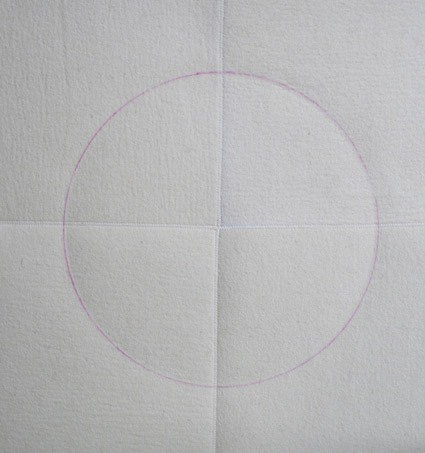
On a darker sheet of felt you need to draw the approximate diameter of the future flower wreath. Depending on the size of this sheet, it can be solid or sewn from several pieces. You don’t have to worry about the drawn line; after sewing on all the colors and elements, it won’t be visible.
The next stage is preparing paper patterns. You can draw flowers directly on the fabric, but if you want to make identical elements, you need patterns. Therefore, first all the details are drawn on paper, then cut out and transferred to fabric.
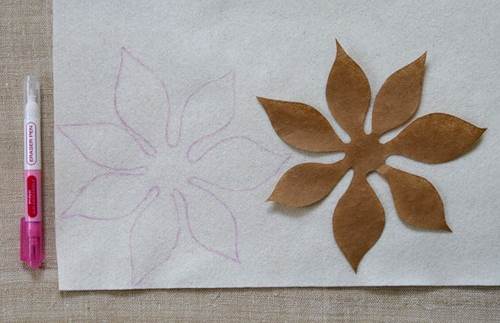
After the stage of transferring the patterns to felt, all elements need to be cut out. At this step, it is important to be careful and take your time so that the flowers have beautiful, smooth edges. Moreover, thin felt can tear, and then the work will have to be redone.
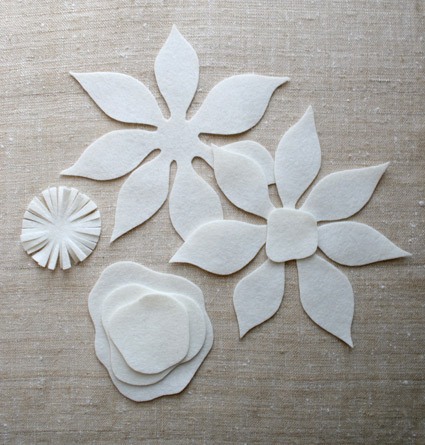
To create three-dimensional flowers, you need to take separate strips of felt. The picture shows how to fold and cut them correctly to make several convex buds.
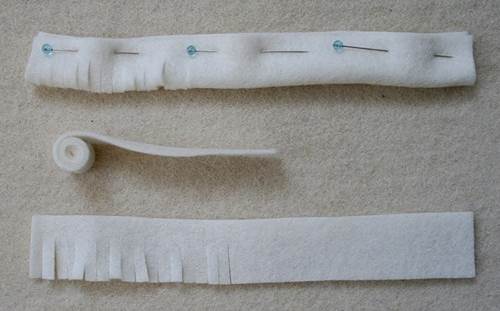
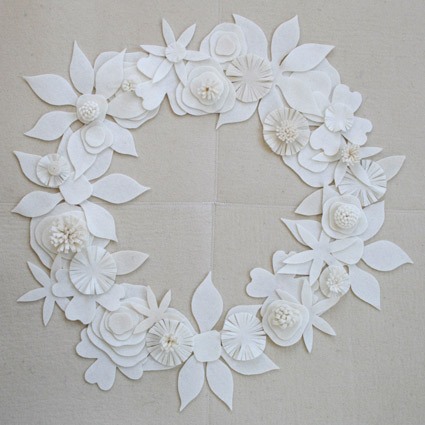
When finished, they look original and really resemble small white flowers.

When all the elements are prepared, you can begin the process of assembling the panel. However, before sewing on the first flowers, you need to lay out the entire picture, check whether there are enough flowers and petals cut, and whether all the elements look harmonious together. If necessary, you can add something, but be aware of a sense of proportion.
The final picture should be rich, but harmonious, so that every flower is in its place.
The process of sewing flowers and petals coincides with decorating the panel. That is, colored threads are used not only to secure all the elements together, but also to decorate them with small touches.
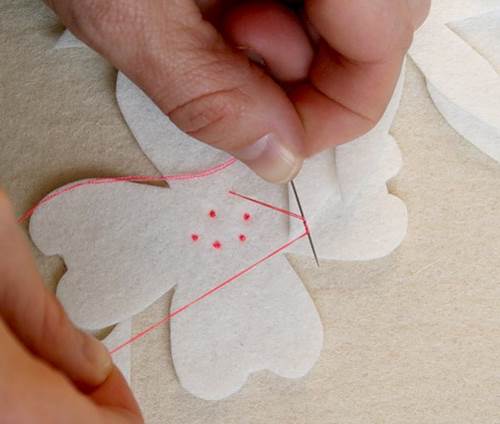
Decoration is much simpler than you might imagine. On one flower you can make small stamens, on another - several barely noticeable stitches.

Some flowers need to be attached only in the middle, others need to be sewn completely around the perimeter of the petals. Here you can use your imagination and do as your creative imagination wants. The freer your thoughts and actions, the more original the final result will be.
Making a personal metric panel from felt “Bear on the Moon” does not require you to have great sewing skills. All you need is a desire to decorate your baby’s room or make a wonderful gift with your own hands. And of course, a little patience, as well as some free time.
This master class shows how to make a panel for a boy.
Materials we will need:
- yellow felt for the moon, brown for the bear, gray for the muzzle, blue for panties and name letters;
- threads of floss and iris (you can use all the floss);
- blue ribbon;
— holofiber for stuffing, you can use any other filler, for example, padding polyester;
- scissors;
- pencil on fabric;
1. Print the pattern, or transfer it from the screen, attaching a blank sheet of paper. We increase or decrease the pattern to the size you need. On the pattern I indicated what sizes I had.


3. Print out the baby’s name, choosing the font you like best, I chose Comic Sans MS, size 110.
4. We decorate the face and embroider it.

5. Sew together the parts of the torso and panties using an overlock stitch. We sew all the details with this seam.
As we sew, we fill the part with holofiber.

6. We also sew together the details of the legs.
We sew together the details of the head, inserting the ears and neck (torso).

7. Sew the legs to the body, as in the photo. We put the bear aside for now.

8. Now we draw up the stars. We write the date of birth, weight and height in pencil.

9. Embroider with blue threads using a “back needle” stitch. Next, we sew two parts together and stuff them with holofiber. Don't forget to insert the ribbons while stitching. My ribbon lengths are 17cm, 17cm and 8cm.

10. Let's start designing the moon. Namely: we sew the name to one part of the moon. I sewed the letters using a needle-forward stitch, but you can also use the overcast stitch we used earlier.

11. We begin to sew together the details of the moon using our overlock stitch with yellow threads, not forgetting to stuff as we sew and insert ribbons with stars and a loop on top.

12. All that remains is to place our bear on the moon; you will have to try a little, grab the bear in several places with threads.


Well, that's all, our bear on the moon is ready!
This delicate personalized panel will perfectly complement the interior of a children's room.
I also present to your attention the same panel, only in a different color scheme, for a girl!


Quick navigation through the article
In this article, for the attention of creative parents, we present 3 master classes on how to make wall panels for a child’s room with your own hands in literally one evening.
- Decoration made of felt or fabric in the form of a cloud with a garland of drops;
- Canvas panel depicting the silhouette of a child;
- Interior wall letters made of fabric and cardboard.
In addition to the instructions, we have compiled a selection of other interesting ideas, which awaits you at the end of the article.
Master class No. 1: How to make a felt panel in the shape of a cloud
This cute felt panel can decorate a nursery for both a boy and a girl, and a schoolchild. You can hang it anywhere: above, above the crib, in the play area, etc. And you can make it yourself in just a couple of hours.

Materials:
- White felt;
- Pieces of colored felt;
- Sewing supplies (thick thread, needle, scissors)
- Ribbon for loop.
Step 1. Transfer this or a homemade template from paper to white felt, for example, using a soap that will not be noticeable on the white material. At this stage, also cut out drops of colored felt for the garland. By the way, instead of droplets, you can cut out stars or hearts.

Step 2. Cut out the cloud along the contour. If you want the panel to be voluminous, then you need to cut out two blanks, sew them together, leaving a small hole, then fill the cloud loosely but evenly with padding poly, helping with some kind of stick. Then, sew the product until the end.
Step 3. Now we will make the garlands. To do this, first calculate in advance:
- how many garlands will hang from the cloud;
- how long should they be;
- how many droplets need to be attached to each and at what distance from each other.

Next, we begin to sew and at the same time form the garlands according to this principle: we attach the thread to the edge of the cloud, sew the first droplet (on top) to the thread, cut off the thread. Then we attach a thread to the bottom of this droplet and sew the next droplet to it, then we cut the thread and sew the next part. We continue until you have a garland of the desired length, after which we begin making the next one.
Step 4. Now all that remains is to sew a loop to the back of the panel and hang it on the wall.
The following selection of photos presents alternative ideas for wall decor made of felt or fabric that you can come up with based on this master class.


Master class No. 2: How to make a panel depicting the silhouette of a child
Here is another master class on how to make a simple but very original panel for a nursery with your own hands.

Materials:
- Canvas on a stretcher (in this lesson we use a square canvas measuring 30x30 cm);
- Acrylic paint (red, white and blue colors are used here);
- Any Oracal vinyl self-adhesive paper;
- Foam rubber or any other brush.
Step 1. Buy a ready-made canvas on a stretcher in the desired size or make it yourself. If desired, the canvas can be repainted in the color you want, for example, with water-based acrylic paint.
Step 2. Decide on a photo that will become a template for the future image.
Step 3. Using Photoshop, Corel Draw or any other photo editor, resize the photo so that it fits on the canvas. You can also use a program (for example, the Magnetic Lasso tool, Pen tool, or eraser) to remove the background and leave only the desired image. How to do this, see the following video tutorial:
Step 4. Print the photo on regular office paper, cut out the silhouette and secure it to the canvas using pins or masking or double-sided tape (which will peel off easily and will not leave marks).

Hint: you can also transfer the outline first to the back of vinyl self-adhesive paper (copy paper will help here), then cut out the silhouette, glue the resulting template onto the canvas, paint it (more precisely, the background part of the panel) and only then peel off the paper. The result will be neat and the process will be fast.

Step 5. Carefully and very lightly trace the outline of the silhouette with a pencil.
Step 6. Now paint over the background and leave the silhouette unpainted. Or vice versa - paint the silhouette and leave the background the same. The third option is to paint both the silhouette and the background with different colors.

Silhouettes can be placed not only on canvas, but also on any paper (wallpaper is perfect), and then frame the picture with a beautiful frame, as in the following examples.


However, such a panel in a nursery cannot necessarily be made based on a photo of the owner of the room, but also on images of his favorite cartoon characters or animals.

Master class No. 3: How to make wall letters from cardboard and fabric
Interior letters have long been in fashion, why not make up the child’s name from such letters and decorate the walls of the children’s room with them?

Materials:
- Cardboard;
- Pencil;
- Scissors;
- Several pieces of beautiful fabric (if you don’t have fabric, you can use paper wallpaper);
- PVA glue.
Step 1. Choose a beautiful font and print the baby’s name (or any word) in large size so that each letter fits on a separate A4 sheet. If you don’t have a printer at hand, then you can simply place a sheet of office paper on the computer screen and trace the outline of a translucent letter. To make the letter shine through better, you need to increase the brightness of the screen and turn off the lights in the room so that it becomes dark enough.
Step 2. Now you need to transfer the outline of the letters onto the cardboard. You can do this in two ways:
- Carefully cut out each letter of the name/word using scissors or a utility knife, then place the resulting templates on the cardboard and trace them.
- Use carbon paper.

Step 3. It’s time to cut out the same blanks, but a little larger in size and from fabric. To do this, place a cardboard blank on the material and, making an indent of 1-2 cm from it, draw the outline of the letter by eye (right photo above), and then cut it out as shown in the next left photo.

Step 4. So, we have “patterns” made of fabric with allowances of 1-2 cm. All we have to do is “cover” the cardboard letters with them and fix the folds with glue, and then attach small loops and hang the panel on the wall.

Here is a selection of photos of other examples of decorative letters, including: letters cut out of plywood, cardboard letters with soft filling under the fabric, letters wrapped in thread, decorated with ruffles, pom-poms and other materials.


Other ideas
And finally, we present to you a selection of other ideas for children's panels that you can make with your own hands in 1 evening and use available materials for this, say, wallpaper, lids from cardboard boxes, toys, scraps of fabric, etc.


