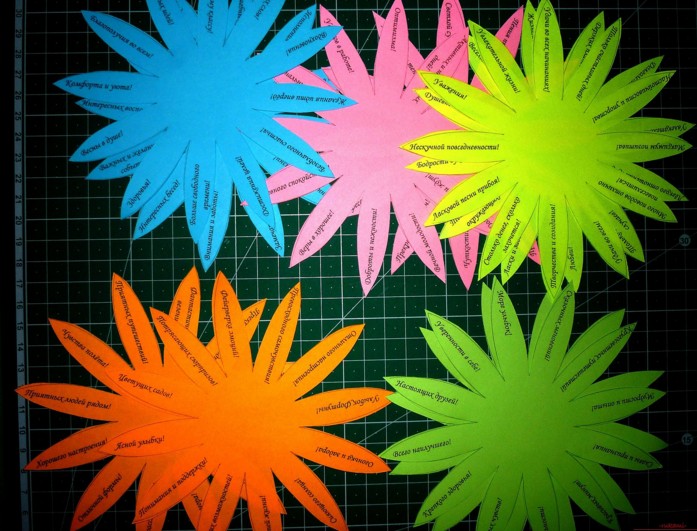
Flower stencils are always in demand when decorating various crafts. Take a look at this selection to reduce your time searching for the necessary decor. In this article you will find the most popular flower templates that you can easily draw or simply download and print.
We offer you beautiful stencils of the most common flowers: roses, lilies, daisies, tulips, poppies, asters, sunflowers, etc. Also in the selection you will find very unusual patterns: fairy-tale flowers and mandala flowers with fancy curves. However, we tried to avoid too small details, since cutting them out is always inconvenient.
Some stencils will be useful for scrapbooking or designing postcards, others will be excellent appliqués for decorating clothes or the basis for embroidery, and others will be suitable for decorating a wide variety of interior items. We offer you templates with large petals that do not require complicated cutting - these stencils are suitable even for children's crafts. We also selected pictures with fancy curves and more complex details that will appeal to even the most experienced craftsmen.
Any image can be reduced or enlarged and then printed. The simplest samples can simply be taken as a guide and copied from the screen.


Have a good and bright day everyone! Very soon, in a month, the first flowers will appear, I suggest not to wait for this and make your own flowers from paper. After all, you can give such lovely gifts of nature without a reason, but if you need a reason, then don’t forget to congratulate your mothers and grandmothers on March 8 or Happy Mother’s Day, because it is on these days that such crafts are always given.
Let them be paper, but they can be presented so cool and superbly that they will look even better than alive, and even more so they can stand on a table or shelf for a single year. And this certainly makes me happy. Take a look at this picture, do you like it? If yes, then I showed you step by step how you can do this.
In my opinion, today’s theme will always be popular, because this is the most beautiful and delicate souvenir that you can give for any occasion. So, I suggest you hang out with me for a while))).
Souvenirs that carry something unusual look unrealistically beautiful and original. I suggest starting with the seemingly simplest option, but just look at who. This is a daisy, but not simple and not fabulous, but with wishes, how nice it would be to give one, don’t you think?
Moreover, you can download ready-made templates directly from this site and print them on a printer. This is a very cool souvenir that will hook anyone. You can give it for any occasion, such as a birthday or Teacher's Day.
We will need:
- office sheets of different colors - 5 pcs.
- glue stick
- double sided tape
- rhinestones
- templates
- satin ribbon
- scissors
Stages of work:
1. Start by deciding on the shape of the flower. I suggest taking this seven-flowered flower. Print the blanks on the printer. The first template will be like in this picture, I will send all the rest to you by email, just write your comment below (there are 10 in total), or you can come up with your own words or messages.

2. Here they are handsome, now take scissors, or you can use a stationery knife and cut along the contour.

3. These are the cute and funny preparations you will get.
4. Cut out a circle of cardboard with a diameter of 5 cm and place the first flower and a satin ribbon and drop glue into the middle or smear it if you are using a pencil. So gradually glue everything.

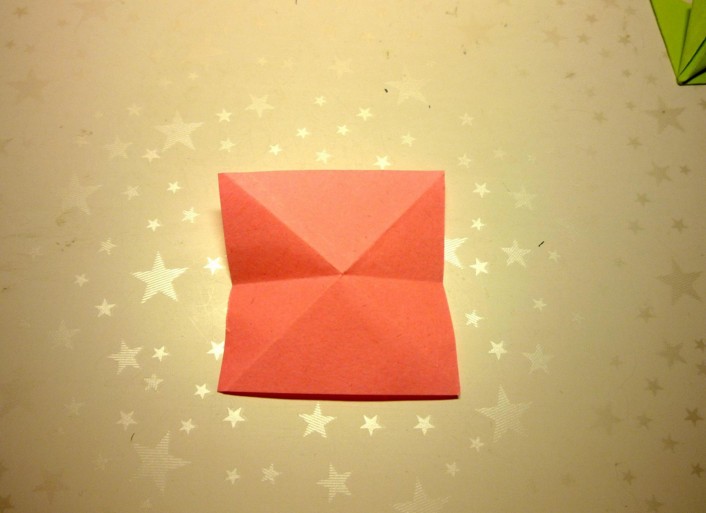
5. Now all that remains is to decorate the middle beautifully. To do this, take a square, approximately 3.5x3.5 cm. Bend it like this.
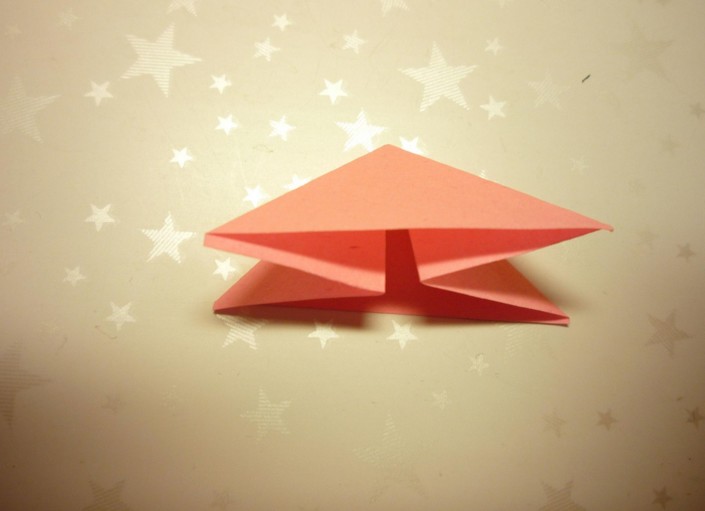
6. Then make a triangle as if you were making a frog.
7. Fold the ends forward.
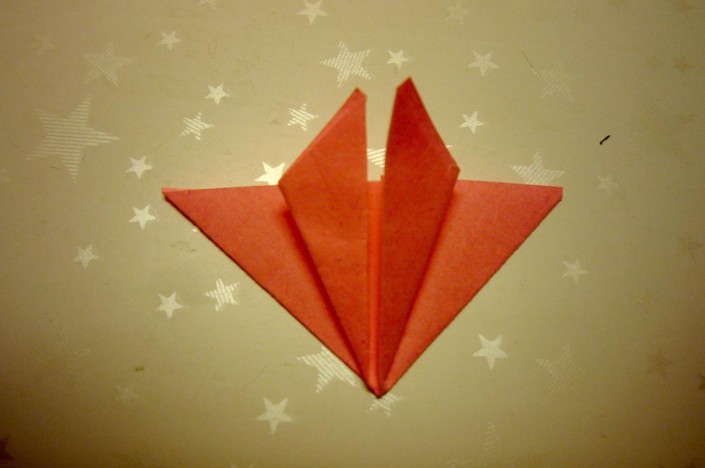
8. These are the butterflies you will get.
9. Which all that remains is to connect, glue to each other, and cover the middle with something interesting, for example, a bead or rhinestones. The result is a very original and unique craft, the person for whom you made it will definitely like it.

The most common and easy, especially for children, is the figure-of-eight flower using a hole punch and buttons.

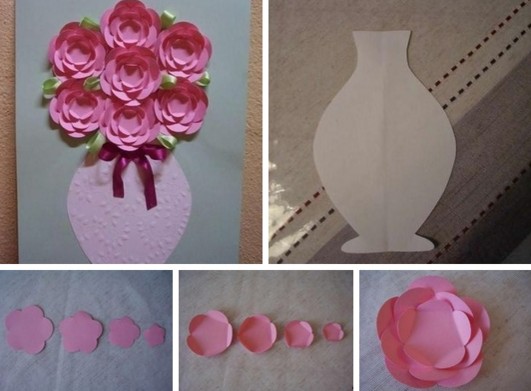
Undoubtedly, the king of all flowers are roses, how to make them, to be honest, there are a great many options. I will write about this in more detail someday. Now take this masterpiece as a basis.

Or here’s a sample, you need to draw 5 flowers from largest to smallest, and then arrange this thing in a vase.
I know many of you will be looking for roses, because these are the flowers that are customary to give in most cases. Well, here's your first briefing. Take corrugated paper and make petals out of it. First, cut out the strip, then fold it like an accordion and round the edges. After this, you should twist it onto a stem, which could be a stick or something similar.

Also decorate the stick with green corrugated paper.
You can make such a wonderful creation from plain paper, but it is better to use crepe paper or corrugated paper. Draw a spiral yourself in a circle, cut it with a knife, and then wind it onto a pencil or crochet hook.

Or use this usual scheme, you can do this in 5 minutes.


Their work steps are absolutely simple. Remember how you made bookmarks in childhood, the system is approximately the same))).

The flowers themselves can also be twisted to make them look more interesting, as if they had truly bloomed.

In general, quite a lot of models can be composed and made from paper, the main thing is depending on the shape of the petal.

Notice these features yourself and you can make daisies, chrysanthemums, dahlias, and even carnations, take a look at the following pictures. You can see petal templates for cutting out.

Or do you prefer lilies with peonies?

What kind of flower is this? Did you guess it?

You can make such a charmer in the form of a brooch).

Snowdrops, as we know, are the first to please us. Moreover, you can make the flowers themselves from pumpkin seeds.

And of course, I couldn’t pass by foamiran, use this material too.

Dandelions follow them. Make them from regular napkins using a stapler.

This bright option would also be an excellent solution to surprise everyone.

They remind me of asters.

This view completely captivated me, I fell in love with it at first sight. It really looks like a living or real dahlia.

You can make primrose. You will need squares from which you need to make figures that look like triangles.

Also roll the other side to form a triangle and a petal for the future bud. Then glue them together. Make the stem and leaves.

The next option looks great, as if it were real.

Making crafts from A4 sheet
Not so often, but you still have to make such products from ordinary large sheets. Of course, you can use such luxurious crafts anywhere; they look especially good if you decorate walls or a hall with them, that is, use them in the interior of premises.
Each leaf is a large petal that you will have to paint in the desired color.

Larger flower options can also be made in the form of a rose. Initially, you will need to use a template.

And then follow all the steps presented step by step.
Video on how to make paper flowers quickly and easily
You won’t believe it, but you can quite simply and in a matter of minutes twist a gorgeous bouquet, watch this video and you will also learn this interesting activity:
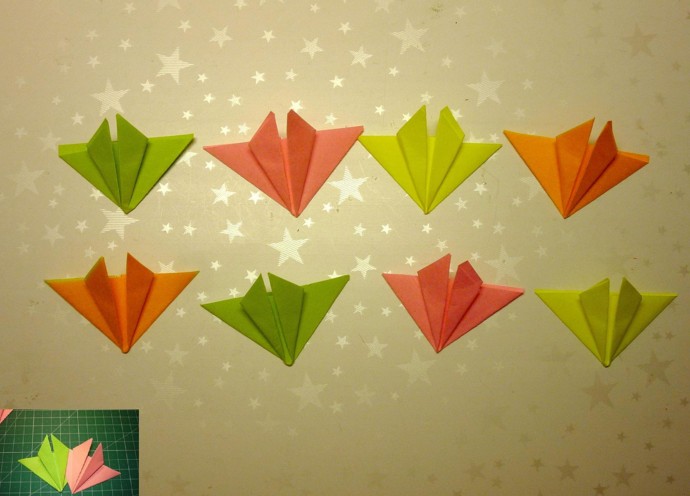
Master class on folding paper tulips
At some point in our childhood, we all folded different figures and used origami. I remember during labor lessons I really liked this activity. The tulip is usually done using this technique. It turns out voluminous and looks like the original.

You can also make an open type bud.

Or take another idea from corrugated paper as a basis and hide a candy in a bud. No one will refuse such a gift, that's for sure!

And here’s another great idea with disposable spoons. This gift can be given for a birthday or even a wedding.

Stages of work:
1. Prepare everything you need for work, all components are shown in this picture.

2. Cut scarlet rectangles from corrugated paper and then wrap the spoon with this material, as if slightly twisting it on a stick.

3. What does it look like? Of course, for the petals.

4. Mask the stick with green paper, while stacking the spoons towards each other (4 pieces) to form a stem and bud. Then cut the leaves into a specific shape.

5. Place the craft in a pot or cup. You can tie a bow or some other pattern.

Step-by-step instructions for beginners on how to make a flower for mom
Now let's learn how to make the simplest option, because for some the previous ones will seem very complicated, then this present will come to your aid.

We will need:
- square paper - 2 sheets

Stages of work:
1. Take a sheet of paper and fold it in half to form a triangle. Then again.

Then draw semicircular lines like you see in this illustration. Cut out according to the sample and follow further instructions.
2. Unfold, open the workpiece and glue a couple of strips to the middle.

This option is suitable for the youngest, for example preschoolers.
But with schoolchildren you can do something even more difficult. The meaning is the same, just bend the petals and glue them differently.

You can also make a red poppy or take a different color, but for this work you will need more wire.

I am very much in love with asters, do you love them?

Want to know how these can be made?
We will need:
- old magazine
- scissors
- kebab sticks

1. Take the magazine apart into pages, fold each page in half, then again and again.

2. Take scissors and cut with grass. To make a fringe.

3. Afterwards, wrap this beauty on a stick.

4. After this, fluff the product. Cover the stick with green paper.

Something similar can be done to a teacher or, for example, an aunt or grandmother.
1. You will also need napkins and corrugated paper, plus you will also need a disposable glass or a jar of sour cream.

2. Since the flowers will be large, you can make them smaller, take a napkin and fold it in half, then in half again, and again. Secure the middle with thread or a stapler.

Cut the petals with scissors and give them shape.
3. Now prepare a glass, cover it with corrugated paper, push crumpled newspaper or unnecessary paper inside, also cover it with corrugation and let it out as if it were grass.

4. There should be 10-12 pieces, it all depends on your abilities.

5. Using glue, attach the resulting flowers to the base. Quite modest, but at the same time bright and stylish, such a gift will please anyone, especially women or girls.

Learning to make voluminous flowers
What kind of crafts are they made from nowadays? They even adapted egg molds for this work. It’s a shock to me how and when it could have occurred to anyone, but it came and conquered everyone. At first it looks unattractive, but then it turns out amazing masterpieces.

The sample is painted with paint and placed on a wire or stick.

A wonderful souvenir, as they say, made from improvised means, and how beautiful and funny it looks.

You will agree that with such voluminous flowers you can quite easily and quickly decorate any interior of a room or hall, making it irresistible and unforgettable.
You can also use this chic flower garland.

After this, put each workpiece on a fishing line or thread.

You can also make unforgettable creations from paper bags.

Using the origami technique, you can fold and then glue the parts.
And the coolest volumetric look, which I really liked and I advise everyone to do it, is this one:
Do you like calla lilies? Then take note of this master class.
You can even make a masterpiece out of ordinary newspapers.

By the way, you can even make Pansies with your children.

Interesting gift idea Roses with sweets
I once showed you how you can make roses and hide candy in them, remember? Look how gorgeous the bouquet turned out, and we presented it for Valentine’s Day, if you forgot, I’ll remind you.

I also give you this diagram to help you.

You can easily jump in and follow the step-by-step instructions.
Or use this video, you can’t do without roses:
That's all for me, I wish you inspiration and great work. Come visit me more often, join my group in contact, write your reviews and comments. Good luck and see you again! Bye!
Sincerely, Ekaterina Mantsurova
Flowers, one of the marvelous creations of nature, are appropriate at different moments in life, including when creating various kinds of decor or crafts (such as vytynanka (vytynanka from Ukrainian - to cut). Stencils and templates will help you create simple and complex cute and useful crafts. The benefits of paper cutting for a child are undeniable.
Flower stencil for cutting, how to make a stencil from a printed vytynanka template
A stencil (a dense material (wallpaper, plastic, etc.) with slots that form one or another pattern. You can simply trace the corners of the sheet with a simple pencil. This is a simple process, but it requires care and patience.
To transfer a pattern to the surface, first, you need to stock up:
1. Whatman paper or a piece of wallpaper;
2. scissors or a stationery knife;
3. pencil, eraser, ruler and marker;
Secondly:
1. click on the picture you like;
2. choose a suitable template for flower protrusions;
3. download the template for yourself and print it (it can be roses, poppies, daisies, etc.);
4. cut with scissors or a knife;
5. apply the stencil to fabric or paper and fill it with paint, aerosol or even putty, and enjoy the beautiful result.
Next, decide on the size of the drawing. Outline the area on the sheet, without going beyond these limits. Decide on the size of the stencil - make it so that it is 5-10 cm larger than the area of the drawing, then it will be convenient to work with this form.
Then draw a grid, dividing the internal area of the future drawing into equal intervals. In this case, the pattern will be symmetrical and proportional, and this is the main task of the protrusion.
Decide on the direction of the pattern - the sinusoid drawn from the lower left corner will become a guideline along which you will then apply the pattern.
BY THE WAY: If you are not an artist, and for the first time you decide to make flowers, take templates with simpler shapes. Having cut them out of thick paper, apply them to the base and trace them with a pencil. To prevent the stencil from breaking and to make it more convenient to cut out the details, try to place the flowers randomly and not very close to each other.

If you have done everything as planned, use a contrast marker to outline each line that needs to be cut. And then you can easily navigate the cutting process. And then cut out the design along these lines with a stationery knife.
REMEMBER: Start with the larger pieces and the top. And if you have to work with a large stencil, put something under the base.
If all the parts are cut out, start using a stencil, securing it with masking tape, for example.
Important Tips
- The stencil is soft and will most likely be disposable. Although, if you use spray paint, it can serve you more than once. But hard stencils, say, made of cardboard, wallpaper, X-ray film, etc., last longer.
- The paint will not flow under the paper if, when painting the surface with the template, you use a foam sponge or roller and do not allow any excess.
How to make voluminous paper flowers from a printed template, step by step
Firstly, flowers can be created in different ways. Yes, a rose may seem difficult to work with. But it only seems!
To make a voluminous paper rose, stock up on:
1. thick cardboard
2. corrugated paper
3. with a simple pencil,
4. scissors,
5. thick wire,
6. green floral ribbon,
7. adhesive tape,
8. glue.
Step-by-step production of one flower
Step 1. Print your chosen template and apply it to thick cardboard.

Step 2. Cut out petals from paper in the form of a heart (there should be 15 of them) and in the form of drops (5 pieces).

Step 3. In order for the petals to take shape, the hearts must be slightly stretched to the sides, and the drops must be twisted with a pencil.

Step 4. Wrap 2 pieces of wire with floral tape; these are the future stems.
Step 5. Glue a piece of corrugated paper to them like a core.
Step 6. To create a bud, you need to glue the drops and hearts with adhesive tape.

Step 7. After cutting out a sepal from green crepe paper, secure it at the base of the flower with adhesive tape.

Step 7. All that remains is to cut out the leaves and attach them to the stem.
Useful video
Templates for large flowers
These paper flowers will decorate your interior, decor and can be a good gift.
Template options


 Flowers from A4 paper templates
Indeed, you can create simple or complex stencils and templates from an ordinary sheet of paper. And then create real compositions.
Template options


Leaf templates for vytynanka flowers
These can be leaves of a variety of colors - roses, chrysanthemums, daisies and many others.
Template options


Basket with flowers 2nd grade vytynanka templates
In the second grade, children can easily build baskets with flowers using a vytynanka pattern. There are as many options as there are basket shapes, colors, and designs.
Template options


Wall color patterns
Create a fairy tale of gorgeous flowers with your child using flower templates for the wall. These can be either compositions, or just flowers, accompanied by some kind of inscription. But first, decide on the material from which the template will be made, how to mount it on the wall, will it be a standard template or an adhesive, textured one, etc.
 The stencil is applied not only to a clean wall. You can “revive” plain wallpaper by applying it using stencils and templates. It is enough to put them on the wall, outline them and paint them inside the outline.
Template options


Autumn flower patterns
In autumn the leaves are very beautiful. Transferred to the walls in this or another way, they will create a special atmosphere.
Template options


Corrugated Flower Patterns
Imagination and patience will allow you to create real works of art with your child, giving ordinary things an unusual appearance.
Template options


Useful video corrugated flowers
Patterns of different colors of vytynanka
Exploring the world in this way, children will get acquainted with the types of flowers, and with the methods of making flowers, etc. Flowers can be not only from the store, from which it is customary to collect bouquets, but also from the field.
Template options


Flower vase template
Vases come in different shapes. They can be “painted” with a knife. In a word, to create a product no less beautiful than the flowers for which the vases are made.
Template options


Templates for volumetric flowers
Combine business with pleasure with your child by creating this type of paper flowers. And together you will decorate the interior, furniture, ready-made accessories, gift wrapping or postcards. Here are several options for making such flowers.
To do this you need to stock up:
1. materials (plain, colored or corrugated paper, whatman paper, etc.), from which soft ones will be used for small parts, and dense ones - for large ones;
2. high-quality scissors;
3. glue (universal, silicone, PVA - the thicker the paper, the more firmly it must be fixed);
4. diagrams and templates;
5. material for frames (wire).
Volumetric flowers can be made from corrugated paper, on the wall, in the form of postcards with volumetric flowers inside, etc.
Template options


 Volume flowers video
These flowers, designed by you, will become an original interior decor or a pleasant gift for any occasion.
Pull-out templates for appliques
With your own hands, under your guidance, a child can create delicate and delicate works as gifts dedicated to a variety of events. By cutting out flowers or patterns from them, you can add volume with the back of the scissors. Then, having secured the work on colored paper, secure the sheets at a distance from each other. Here's what you can do.
Template options


By creating flower protrusions with your child, and this is beneficial to do at any time of the year, especially in cold weather, you will receive double benefits. First, bring joy into your home. After all, even if they are not alive, they are very beautiful and, by the way, more durable than their real counterparts. Secondly, keep your child busy with useful work, during which he will explore the world, develop, and bring joy to others.
For many people, paper is one of the most common household items that can only be used for its intended purpose. In fact, paper is an amazing material that underlies many techniques and types of creativity and handicraft. There are more than 8 types of material, each of which has its own unique characteristics and opens up wide scope for creativity.
Scope of templates
 Stencils and templates of various shapes are widely used not just for decoration and improving scrap pages, creating original interior compositions, but also for interior decoration. Flower stencil templates for cutting out of paper serve as the basis for applying patterns to various surfaces with paint, aerosol, and even putty.
The advantages of using paper as the main material are its availability and convenience. In addition, with minimal skills and modest drawing abilities, you can easily create original drawings, which will be almost impossible to repeat. Another important advantage of using paper as a basis for a stencil is its scale. Using old wallpaper, you can end up with a rather large stencil. And although designers recommend using more durable material as a basis, there is often nowhere to get it in the required quantity.
How to make a large stencil
A stencil is a specific pattern, the internal parts of which are cut out and used to apply the corresponding pattern to the surface. To make a stencil with your own hands you will need:
- Whatman paper or a piece of wallpaper.
- Stationery knife.
- Pencil, eraser, ruler, marker.
- Printed patterns of flowers, such as daisies or poppies.
- Scissors.
- Net. First you need to decide on the size of the drawing itself and outline this area on paper. The drawing should not go beyond this frame. In addition to these boundaries, you need to determine the dimensions of the stencil; they should be 5-10 cm larger than the area of the drawing in order for this form to be convenient to use.
After this, divide the internal area of the future drawing into several equal intervals, that is, draw a grid. This is done so that the pattern itself does not turn out to be asymmetrical, disproportionate and skewed.

Once you are satisfied with the general appearance of the composition, all the lines that need to be cut should be outlined with a contrasting marker. This will make it easier to navigate the cutting process..
- Using a sharp utility knife, cut out the design along the marked lines. It's best to start with the top and large parts. If the stencil is large enough and you are working with it on the floor, before you start cutting, it is better to put at least several layers of newspaper under the base. Otherwise, you risk damaging the flooring.
After all the parts are cut out, the stencil can be used. It can be carefully secured to the wall with masking tape - it will not damage the surface and will not leave traces of glue, but it will not provide a very reliable fixation.
The resulting stencil can hardly be called reusable, but if you use aerosol paint, it can last quite a long time.
Stencils-simulators
 Many methods of preschool education insist on a playful form of learning. This definitely bears fruit, because this presentation of information is more interesting and understandable for the child. For various educational games, you can use stencils of letters and simple shapes, which the child must relate to each other.
The essence of the game is that the child is offered to start with 10 stencils of letters and objects, among which he must find, for example, the letter “A” and the picture that corresponds to it, circle them on a sheet of paper. The resulting picture turns into a coloring book.
This game will be useful for reinforcing material and training fine motor skills. The child remembers the outlines of letters, learns to write in printed letters, and develops memory and logical thinking.
Paper toys
 Cutting paper toy templates have long been used for children's creativity and children's educational games. Paper dolls with a whole removable wardrobe first appeared at the end of the 18th century, and in the 19th century they became widespread and gained popularity not only among children, but also among adult women. To this day, such dolls are popular and even collectible.
In addition to paper dolls, which can only be changed into clothes and played out simple scenes, there are other paper toys. The joint creation of which with a child - Great trainer for cutting skills and working with glue and paper.
How three-dimensional toys are made
To make an interesting three-dimensional paper toy with your child, you will need:
- A colored toy template printed on thick paper.
- Scissors and glue stick or Moment Crystal glue.
- Non-writing pen.
 All such toys have so-called gluing allowances; these are strips in key places that are glued to the inside of the toy. When cutting, you need to be careful not to cut them off.
As a rule, fold lines are indicated by dotted lines. They need to be drawn with the tip of a non-writing pen or other similar object. This is called “creasing” and is done to ensure that the fold lines are straight and there are no bevels or creases. This is especially true when working with thick paper, for example, for watercolors, or cardboard.
There will be no difficulties with simple toys - if we are talking about simple animals with exaggerated angular shapes. To interest your child, you can invite him to create characters from his favorite fairy tale, for example, a bear, a sheep, a fox, a wolf, a hare, a hedgehog, etc. To make it more interesting, you should respect the proportions. In particular, the bear should be larger than other animals, and the hedgehog, hare or mouse should be smaller.
For boys, it may be more interesting to cut and glue a toy car or bus with their own hands. The paper cutting machine template is a little more difficult to make, since many models offer rounded rather than angular shapes. To achieve the desired result, the gluing allowances are cut with teeth.
Dragon Fleet
For older children, you can suggest gluing together from paper... a dragon aviation regiment! There are about 20 volumetric dragon templates of varying complexity. The principle of their creation is no different from other voluminous paper toys, the only difference is the complexity of assembly. Some templates consist of several parts that are important to connect together correctly.
New Year's crafts
 Joint creativity with children on the eve of the New Year brings all family members closer and helps create a festive mood in the house. Templates for New Year's toys can be in the form of Father Frost, Snow Maiden, Snowman and other New Year's characters. In addition to them, you can make a flashlight, garlands and voluminous openwork spherical toys from paper.
The last option is too complicated for a children's craft, since the internal openwork is cut out with a stationery knife or a simple blade. However, they are very impressive and beautiful, although they require further careful handling due to their fragility.
Modular ball for the Christmas tree
H To make a beautiful colorful Christmas tree toy with your child, you will need:
- Thick colored paper, for example, from old postcards.
- PVA glue or Moment “Gel”.
- Scissors, pencil, small piece of cardboard, ruler.
- Thread for the loop.
- A compass or shape that can be traced.
- Non-writing pen.

3D - masks
When it comes to children's events, the use of costumes and masks is often suggested. The most common option is the “Incognito” mask, which covers a strip of the face around the eyes. Its variations for children are complemented by various attributes, depending on the character the child portrays.
A much more interesting version of a mask that covers the entire face is a 3D mask made of thick paper. What you will need for this mask:

The printed template must be transferred to thick paper using carbon paper. Carefully duplicate all fold lines with a non-writing pen, and only then fold. Cut the gluing allowance lines in rounded areas with teeth. If glue with a strong smell is used for gluing (for example, Moment), then the product must be aired for several days before the child puts it on. If you use PVA glue, it is better to take not the office version, but the construction version. They differ from each other in consistency; construction adhesive deforms the paper less.
Wedding stencils
Stencils and templates are widely used to make various wedding attributes and details. They are used for the design of cards and invitations, for the design of champagne bottles, room decoration, etc.
Decor for wedding champagne
To work you will need:
- Two bottles of champagne.
- Paint of any color in a can.
- Soap.
- Printable template of bride and groom silhouettes, hearts.
- Wide satin ribbon.
- Scissors.

Paper pigeons
 The dove is the bird of peace, everyone knows that. But it also symbolizes love and harmony in the family, which is why newlyweds are offered to release birds into the sky after the wedding. However, not everyone perceives such a proposal with enthusiasm, rightly fearing primarily for the cleanliness and safety of wedding dresses. In addition, birds often carry various infections no worse than mice and rats, and then there is no time or place to wash your hands... In short, not all weddings involve the newlyweds releasing doves into the sky.
However, doves can be made from paper, and such a simple but effective attribute can complement the design of a hall or photo zone. Cutting paper dove templates are not particularly complicated, and production does not take much time. What will you need?
Print bird stencils for cutting out of paper and cut it out as carefully as possible, removing the contour lines. Carefully bend along the marked lines and glue the wings to the back of the bird.
By preparing many of these doves of different sizes, you can decorate the bride’s room, tables for guests, or use them as an additional element for photo shoots.
Attention, TODAY only!
Paper flowers can be used for interior decoration, decor, and even as a gift! Let's try to learn how to make voluminous paper flowers with our own hands, look at examples and photos of beautiful finished works, and also watch a master class for beginners.
Simple products
The easiest way to make flowers is from colored paper - it can be corrugated or ordinary, and if you plan to make strictly decorative flowers, you can take paper with a mother-of-pearl or metallic effect. You shouldn’t make a tulip or a rose as your first experiment - try something very, very simple first.Decorative crafts

In order to make simple and spectacular flowers you will need:
- double-sided colored paper (corrugated paper is also suitable);
- thin wire;
- sharp scissors and a pencil for marking.
For beginners, the easiest way to do this is to fold colored paper several times so that you get a stack of squares approximately 6*6. Then mark the shape of the future buds on the top square with a pencil - it can be a smooth rounded figure, regular circles, or whatever your imagination suggests.
Then, with scissors, you need to carefully trim the stack according to the shape of the marked sepal and disassemble it into components - for each flower you will need three to five blanks. The wire needs to be cut into pieces of approximately 15-25 centimeters, twisted on one side so that a decorative center is formed, then the previously obtained “petals” are put on each wire, after which a stand is made at the bottom of the wire (a stable ring is twisted).
With such crafts you can decorate a table for a holiday, or use them for a photo shoot or interior decor, or you can simply attach them to the wall in the nursery or in the hall near the mirror - a good mood is guaranteed.
Or this simple option:


From what is at hand
Old magazines or newspapers are used to make these products. This way you can make large flowers out of paper - the technique is simple, and paper crafts turn out to be quite impressive.
What you will need:
- unnecessary magazines (absolutely any);
- green adhesive tape;
- sharp scissors;
- large barbecue skewers;
- paper glue or regular hot melt glue.
 By the way, these recommendations can also be used for beginners - they are done quite easily. If you want to make these flowers with children, then make sure that they have safety scissors, or cut the fringe yourself.

Decorative flower garlands
Want to make chic garlands? Use giant paper flowers for them. By the way, making paper flowers for garlands with your own hands is very simple - you only need beautiful, spectacular paper and a little skill. No flower templates for cutting out or diagrams are required; the main task of such large products is to look bright, unusual and attractive; large paper flowers do not have to be realistic.
What you will need:
- scissors;
- corrugated paper of two or three colors (it is better to take bright and light);
- thread or fishing line;
- stapler or glue.
You can choose the size of the rectangles yourself; you just need to remember that the flowers will be the same diameter as the rectangle on the narrow side.
Each pile is assembled into an accordion (look at the photo on how to make flowers from such accordions, if it is not too clear from the description).

Each accordion of five sheets of paper must be fastened in the center with a stapler or glued with a paper ring. It is best to round the edges of the accordion - cut out something like a petal.
Now each blank needs to be turned into a bud - straighten the buds from the accordions you made. The accordions need to be straightened in different directions, and you will see how you can create beautiful paper flowers in just a few seconds.
Then cut the required length of fishing line or thread, and string the buds - your garland is ready.


Another garland option:

Bouquets for decoration
Do you want to make a bouquet of flowers from paper? See photo:Do you want to learn how to make a tulip? Watch the video and step-by-step photos below on how to make tulips in different ways.
Useful information and several step-by-step master classes
At the very end of the article, download patterns and color templates for cutting. By the way, if you want to make origami out of paper, it is best to use special double-sided paper.Watch a detailed master class on how to make flowers and plants out of paper using the origami technique - it’s not only interesting, but also quite difficult, so don’t expect perfectly made flowers right away, you’ll have to try a little to make paper flowers with your own hands.
Also, flower stencils will be useful to you if you make large paper flowers of complex shapes - the same tulip or rose is more convenient to assemble from a special shape of petals.

Try to make large paper ones - just collect a huge rosebud according to this master class (see photo below on how to make flowers lush and beautiful).
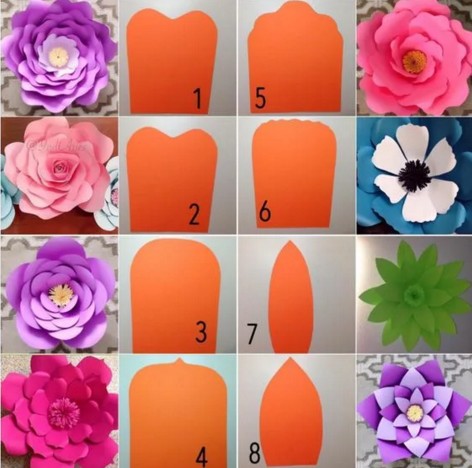
Here are templates of large flowers for cutting out of paper:

And here are the step-by-step photos:
How to make flowers for children? Try to minimize any risks - for example, do not let children work with adult scissors, prepare the wire in advance and make sure that children are disciplined.
Learn how to make paper flowers with your own hands using coffee filters or napkins - a thin and fragile napkin looks almost like a real petal, you just need to give it a shape and collect the bud.
This video shows how to make a paper flower for beginners.
A few inspiring photos - see how beautifully you can decorate your holiday with camellias or roses.

Try making voluminous paper flowers with your own hands using cardboard or thick paper - even a child can handle this technique.

Another option for a simple flower:

Leaf templates:


Learn how to make flowers out of paper, a master class on the technique of soaking paper - such products look almost like the real thing!
Now you know several ways to make spectacular and expressive flowers from colored or even regular glossy paper, which means you can easily put together a chic bouquet, make accessories for a photo shoot, or even just decorate a room for a party.


Use the diagrams to make a tulip or other flowers - you need to print them out, cut them out, and then trace them like a pattern.
Templates of leaves and petals for different flowers:


If you want to show your imagination, then try tinting the finished products with a thin brush using the watercolor technique - with veins, the flowers will look even more elegant and interesting.