What is Kirigami
Kirigami is a Japanese word that consists of two words: "to iru" - cut + " kami"- paper. This is one of the techniques for working with paper to create three-dimensional images of objects, which consists of cutting and folding the paper in a certain way to create a three-dimensional shape. Kirigami is similar to origami in that it is a form of paper art. The main difference between them is the following: in origami you only fold the paper, while in kirigami you not only fold, but also cut the paper.
One of the directions of kirigami is “pop-up” cards, or folding cards. When it is opened, the folded form between its pages straightens and becomes three-dimensional. This technique is often used in children's books, where houses, castles, entire landscapes and characters in the book appear as if out of nowhere as soon as you turn the page. Impressive effect!
To design kirigami, you need to understand the basic principles of creating such three-dimensional forms. We will talk about this in a separate article dedicated to this topic.
Kirigami is a hobby that doesn't require a lot of expensive materials, but the effect that can be achieved with minimal materials - paper and a knife - is amazing. Below you will find a number of free templates and designs for creating pop-up card style kirigami castles.
Kirigami castle patterns
Kirigami cards can be created on one sheet of paper. But you can also use two sheets of contrasting colors: one for creating the kirigami project itself, and the second as a base for the card, like in the picture below.
You can also tint the lock with pencils or a pen.

Below are 11 kirigami castle designs that you can print out. Below we'll discuss the principles of folding and cutting paper to create these locks.
Kirigami Castle No. 1.

Template for this castle:

Kirigami Castle No. 2.

Template for this castle:

Kirigami Castle No. 3.

Lock Pattern:

Kirigami Castle No. 4.


Kirigami Castle No. 5.


Kirigami Castle No. 6.


Kirigami Castle No. 7.


Kirigami Castle No. 8.


Several kirigami castle templates without images of the final result:


How to create a kirigami card with locks?
It is better to use thicker paper for printing templates. It’s easier to make the cuts by helping yourself with a ruler. Incisions can be made with a utility knife or scalpel. To fold paper, use the stylus as an aid.
Our templates contain two types of kirigami patterns: multi-colored with lines of different colors and black and white. Let's start with the first type of schemes - multi-colored. In these diagrams, different line colors represent different types of folding and cutting of paper, namely inward fold, outward fold, and size line. Since the diagrams belong to different authors, the colors responsible for different types of work with lines are different. But looking at the finished projects with a lock next to the templates, it’s easy to figure out what type of line a certain color is responsible for. For example, in project #7, the red line is the inward fold line, the gray line is the cut line, and the blue line is the outward fold. In project No. 8, the red dotted line is the cut line, the pink dotted line is the inward fold, and the blue dotted line is the outward fold.
In the second type of diagrams - black and white - the following lines and their designations are used:
- solid line—size line;
- dotted - bend inward;
- line of dots - bend outward.
After printing out the template with a lock, place the sheet on a piece of cardboard or cardboard, and using a utility knife, cut along the lines on the template that are intended for cutting. A more difficult stage is the folds. First, carefully fold the card along the center line without touching the lock itself. Then, along each line in the lock template, bend inward or outward, depending on the type of line. At the same time, place your finger or stylus under the bending element for support.
Kirigami is the art of cutting out three-dimensional objects from paper, which has some common principles with origami and zhenigami. Due to its characteristic features, kirigami is often used to create postcards. Postcards made in this way are distinguished by their originality and elegance of form. Making them is quite difficult, but to make this process easier for yourself, you can use ready-made kirigami templates.
Kirigami - the art of cutting out three-dimensional objects from paper
Even children can use simple patterns in their creativity; the main thing is to make sure that they follow safety precautions when working with a knife and scissors. One easy project for beginners is to make a birthday cake card.
For this you will need:
- stationery knife;
- double-sided cardboard - colors should be different on both sides;
- rubber mat;
- ruler.
Manufacturing technique:
- The finished template is redrawn using a pencil onto the cardboard chosen for work.
- The blank is cut from the sheet along the perimeter of the template.
- Using a knife, cut all the solid lines.
- All dotted lines are bent. Special attention should be paid to the candles - they should be turned upside down.
- Using this technique, you get a two-color cake.

You can decorate the completed postcard with various decorative elements. However, it is worth considering that they should not create a strong contrast, distracting attention from the main object of the card, made using the kirigami technique.
Gallery: kirigami (25 photos)


DIY 3D kirigami postcard (video)
How to make a New Year's card using the kirigami technique: master class
Kirigami is a technique that allows you to make a huge variety of cards, including for the New Year. In order for them to be as expressive as possible, it is recommended to use high-quality paper with prints or interesting textures. Kirigami allows you to cut both opening greeting cards and 3D ones.
Volumetric Christmas tree using the kirigami technique
One of the New Year's images is a Christmas tree. Therefore, as a postcard for the New Year, you can make a three-dimensional magic tree using the kirigami technique.

It is made from the following materials:
- double-sided green cardboard sheet A4;
- cling film;
- a silver or greenish napkin with an image of some background ornament, for example, polka dots.
Master Class:
- Cling film is placed on one side of the green cardboard, and a napkin is placed on top of it (the top layer is with an image).
- Then the made pyramid is ironed until the napkin sticks to the main cardboard.
- The diagram is transferred onto cardboard.
- The template is cut around the perimeter using scissors.
- Then, using a knife, all the solid lines are cut, and the dotted lines are bent.
- The Christmas tree is placed vertically so that both parts form a single whole.
- The cut out half of the heart is bent to the side.
What makes this card original is its double-sided feature: the Christmas tree can be bent so that it is green or napkin-colored.
Kirigami: Opening Christmas Tree Card
Using the kirigami technique, you can also make an opening card in the shape of a Christmas tree or an animal.
For this you need the following materials:
- 1 sheet of double-sided cardboard, A4 size. The two sides must be different colors;
- stationery knife;
- decorative elements.
Cutting principle:
- First of all, the stencil for making a postcard is transferred to cardboard.
- Then a general card shape is cut from the sheet.
- On the future postcard, wavy lines are cut, located at the bottom of each tier of the spruce tree, as well as the trunk. A piece of the Christmas tree is also cut out on a rectangular base.
- Then both the rectangular and semi-oval base are bent in half along the marked lines.
- Next, the inclined lines of the spruce and the trunk are bent.
- The card is folded so that when it is opened, the spruce becomes voluminous; for this, the central line of the tree is bent forward.
- A piece of a Christmas tree on a rectangular base is bent to the side.

This card allows you to use a large number of decorations on its front part, since the main object is located inside.
Pop up card: easy cutting template
Using the kirigami technique, or as it is also called - Pop up, you can cut out a spectacular, but very simple card in the shape of a butterfly.
To do this you will need:
- sheet A4;
- scissors;
- stationery knife;
- a sheet of cardboard of your favorite color;
- pencil.
How to make a paper butterfly:
- First of all, you need to print the finished template on A4 sheet.
- All solid lines are cut with scissors so that the wings are almost completely free of paper, with the exception of their base.
- The ornament on the wings should be cut right through with a stationery knife.
- Then the base is folded along all the dotted lines.
- A piece of cardboard is selected according to the size of the cut base. It is worth considering that it should have an allowance of 0.5 centimeters on each side.
- A sheet of cardboard is folded in half, opened, and a cut out base is glued into its center. The fold lines of both elements must match.
- After the glue has dried, the wings are inserted into the slots to create a three-dimensional butterfly.
- The wings curl slightly in different directions to make the card more graceful.
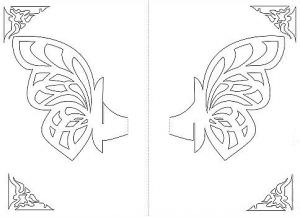
This cut out card can be presented as a card for any holiday thanks to the universal image object.
Kirigami: architectural diagram
Kirigami is not only easy cards, but also complex ones that can only be made by masters of their craft. There are a lot of complex patterns that can be used to cut out an image of a castle, cathedral, bridges and other detailed elements. One of the simplest kirigami architectures is considered to be the architecture of a cathedral or castle.. This template can be recommended for children who have already mastered the initial level of this technique.
How to cut out an architectural structure from paper:
- The first step is to transfer the template onto a sheet of thick paper.
- You should start cutting out SOBR from the dome: all vertical and semicircular lines are cut through. Horizontal lines remain for folding.
- Next, the side towers are cut using a similar principle.
- At the bottom of the cathedral, you should carefully cut the vertical lines of the columns using a stationery knife. You should also carefully cut through the triangular pediment.
- All rectangular, oval and round windows are cut through.
- After all the indicated lines have been cut, you can proceed to folding the remaining ones.
- The result is a three-dimensional architectural structure.

Many will appreciate a kirigami pop-up card featuring a delicious cake! This product is perfect as a greeting card for a birthday.
Let's take a closer look at the manufacturing process:
1. save the templates presented below on your computer:


2. Now we print out the templates, it is better to use thicker paper. The base itself is on white A4 paper, and the additional patterned details, which are blue in the image of the finished cake, are on blue colored paper.
You can also use white paper to print patterned parts.
3. place cardboard under the sheet of paper so as not to damage the surface of the table;
4. Using an X-Acto knife or other sharp knife, cut out the outline of the cake, blue patterned details.
If before this you printed patterned parts on a white sheet of paper, then you need to place colored paper under the bottom of the sheet with an outline, secure it on all sides with paper clips and cut immediately through the double layer of paper.
5. At the moment, our postcard in a collapsible state looks like this:


6. Bend the sheet along the lines marked with dots in the opposite direction from you.
7. Place the patterned pieces on the white base of the cake and carefully thread the candles through the slits in the blue paper of the top piece. Glue the patterned blue parts to the base cake, after which the cake will look like this:

8. Now all that remains is to glue the colored paper to the back of the sheet. You can use blue paper, as in our example. Pink paper is also well suited for these purposes.
9. The cake card is now ready.
Perhaps this will be interesting to you too.
"! Today we will talk about a new technique for making paper crafts - Kirigami. This type of paper art is related to origami (read). However, there is a difference between them, which is that in kirigami cutting and gluing of paper is used. This difference simplifies working with paper and allows you to create real works of art that are distinguished by their beauty and originality.
KIRIGAMI technique
For making crafts using technology kirigami, diagrams and drawings are used, on which symbols show which parts need to be cut (solid line) and bent (dotted line - bend inward to the center of the sheet, line of dots - outward).
It is better to use thick paper (see) in kirigami (150-220 g/m2), it is easier to cut and retains its shape well.
The tool used is a stationery knife. It is advisable to have a good supply of replacement blades for it, since the quality of the cuts in the paper depends on the sharpness of the knife.
In addition to a stationery knife, you will need a stylus (a ballpoint pen that does not write will work instead of a stylus). It is used to make bending easier.
We will also need an even ruler. It is better to use a metal ruler, because... it will be used not only for drawing, but also for making slits in paper with a stationery knife.
You will also need to use a pad at the workplace to avoid damaging the furniture with a knife. For this purpose, ideally, a special self-healing mat is used, but a piece of linoleum, a piece of plexiglass, or, at worst, a few old magazines may be suitable.
Crafts KIRIGAMI
And now we propose to make several crafts in the Kirigami style. To do this, you will need to print the diagrams on a printer and, exactly in accordance with the drawings, make the necessary slots and bends.
Cubic pyramid

Cubic pyramid scheme


Castle Scheme

Cathedral of St. Marcus

Diagram of St. Marcus's Cathedral
And now we invite you to watch a video about what kind of kirigami-style crafts you can make, if you wish.
Origami is the art of folding all kinds of crafts using paper. In most cases, the activity does not involve the use of glue and scissors. This trend arose in 610, when the secret of paper making came to Japan from China. The monks learned to fold figurines, which decorated temples and were used in rituals. In the Middle Ages, this decorative and applied art became an element of the culture of Japanese aristocrats. If you want to master this hobby, this article contains interesting origami paper patterns.
This skill is reminiscent of a magic trick - a beautiful figure is born from a simple leaf in a few minutes. The activity does not require large material costs and is absolutely safe even for small children. Origami allows you to create a whole world without special abilities. This hobby develops spatial imagination, fine motor skills, motor and spatial memory, concentration, communication and gaming abilities, horizons, and creative skills in beginners. The paper diagrams below will help you make original, unusual toys, gifts, and figurines.

What materials will be needed
Before you start doing origami, you should stock up on the necessary set of tools. First, you should choose paper, preferably office paper, since it is not too smooth and is thick enough for folding according to patterns. To attach small parts and gluing, you will need a glue stick or PVA glue, and aerosol glue is necessary if you need to glue two different-colored sheets of paper. The last technique allows you to create interesting crafts using a combination of textures and colors.
You can use a more convenient adhesive mass, with which any part can be easily attached inside or outside the craft, and then removed if necessary, without leaving any traces. If the craft is made from white paper, then it is then covered with spray paint. Sometimes several pairs of sharp scissors with blades of different shapes and lengths are required. In some cases it is possible to replace them with a cutter. This tool is necessary for trimming and cutting straight lines. The blade must be sharpened to obtain a smooth, neat cut.

To mark according to the diagram when folding figures, cutting out the base, maintaining a certain angle of assembly, and symmetrically placing a composition based on a panel, triangles, rulers, and protractors are needed. You will need a mechanical pencil with a replaceable thin lead. Additionally, needlewomen use ready-made eyes for toys, leftover yarn, ribbons, fabric, beads, seed beads, sequins for decoration, and thread and needle for connecting individual parts.
Paper selection
The result of the work depends on the correct choice of paper, since the entire process of creating origami according to patterns consists of folding and bending. The list below will help you decide which material is better and which is worse suitable for this type of needlework:
- Office white paper is thick, not too smooth, so the modules hold well when connected. It’s better to start practicing origami with such material, since it’s a shame to throw away a damaged model. Its disadvantage is that hairiness appears at the bend.
- Colored office paper - does not turn white when folded, is dense, and is used in modular origami.
- Stickers, note paper - can be painted in different colors, used to create kusudama, in modular origami.
- School colored paper is thin, friable, easily torn, and not suitable for this hobby. It wears off on the folds and white stripes appear.
- Foil paper is durable, does not tear, is used when creating complex patterns, twisted models, and modules. When straightened, the folds remain in tight stripes.
- The pages of glossy magazines are dense, bend well, and hold their shape.
- Banknotes are durable, do not wear out on folds, and are suitable for small modules and making gifts.
- Special paper for origami - sold in sets, with a variety of patterns, can be double-sided, monotonous.
- Rice, papyrus, craft, parchment, tissue, mulberry, silk and other expensive types of paper - each type has its own advantages and disadvantages, allowing you to create interesting crafts according to patterns.
- Drawing graph paper, tracing paper - suitable for first attempts at creating complex works.

Types of origami in pictures
Origami is a great opportunity to keep yourself busy with something interesting, useful, and have fun while developing new skills and abilities. In addition to the classical direction, there are many other alternative techniques:

How to learn to make animals - diagrams for children
Children's pranks and inability to sit in one place are often due to the fact that the baby has nothing to do, and energy needs to be directed in a certain direction. Invite boys and girls to do origami, which will calm them down, captivate them, and make them feel like little wizards working miracles. This is a useful hobby that develops attention, patience, artistic taste, and thinking. Learning how to make origami animals is simple: take a piece of paper, fold it according to the diagram below and get a funny little animal.


How to make a box with a lid

An origami box is an irreplaceable thing that will be useful for a gift. You can roll it up in a matter of minutes. To create, you don't need any glue or scissors, just a couple of pieces of paper. For the box it is better to choose beautiful colored paper. As you work, remember that the lid must be larger than the base. On top, you can decorate the box according to the occasion: with ribbons with New Year's prints, buttons, and other decorative items. Step-by-step instruction:
- We draw the sheet from one corner to the opposite corner diagonally.
- We bend one corner to the center.

- Let's do the same with the other corners.
- We bend two corners back, fold the remaining ones in half flush with the center line, as in the photo.

- Let's do a similar procedure with the other two corners. The result is a blank, as in the photo.
- We make cuts.

- We bend two corners to the center.

- Next we fold it as in the photo.


- This turns out to be the bottom part of the box. In the same sequence, we make the cap 5 mm larger on each side.
Beautiful flowers - paper rose

Origami rose is a popular craft using this technique. It is made quickly and easily from one square sheet of paper, painted red on both sides. Step-by-step instructions:
- Fold the sheet in half.
- Fold it in half again.

- Uncover and flatten the top layer.
- Turn the workpiece over and turn over the square.
- We repeat the third step.

- Bend two corners towards the top.
- Bend the triangles in half, marking the lines.

- Open and flatten the triangles by pulling the corners down.
- We bend the upper parts of the resulting pockets down.

- For the second side, repeat steps 6-9.
- Make a fold by bending the top corner.

- We open the lower part of the workpiece like a book.
- We take the places indicated in the picture, pull, flatten so that we get two triangles on the side.

- Turn the workpiece over.

- We raise the triangle.

- We bend the lower right square from top to bottom diagonally.

- Turn the product 180 degrees. We repeat the previous stage.

- We place the workpiece on the left palm. Using the fingers of our right hand, we grasp the walls of the craft and twist it clockwise until we get a rose. We curl the petals beautifully with a pencil or thin stick.

Modular 3D origami made of white paper - swan
Modular origami allows you to create very beautiful, voluminous crafts. This master class shows you step by step how to assemble a beautiful swan. This product can become a decoration for your home. Step by step instructions:
- According to the scheme, we make 458 white triangular modules. One orange or red for the beak.
- We take three modules, insert the corners of two into the pockets of the third.

- Let's add two more.
- Using the same scheme, we add two modules.

- We position the structure as shown in the photo.
- We insert the corners into the pockets.

- We assemble three rows in this way, each of which consists of 30 modules. We close in a circle.
- We put on the fourth and fifth row modules in the same way.

- We take the workpiece, gently press the center with our thumbs, turning the product inside out.

- We bend the edges up.

- We put on the sixth row, arranging the modules in a checkerboard pattern.
- In the seventh layer we make wings: put on 12 modules, skip two corners, attach 12 more. On the missing narrow section there will be a neck, and on the remaining wide section there will be a tail.

- In the next row we reduce the wing by one module.
- Similarly, reduce each row until one triangle remains.

- We make the tail according to the principle of decreasing by one module in each new layer.
- We make the neck and head 10 white and 1 red module, on which you need to glue the corners so that the beak is not forked. The neck is assembled like this: we insert the corners of one into the pockets of the other module.

- So we collect the rest, arching our necks.
- We place the neck in the right place.

What else can be made from paper: assembly diagrams
All kinds of origami techniques make it possible to make many interesting crafts. This is an ideal pastime for a child in the form of play. Such decorative and applied art does not stand still: it gradually gained experience and was transformed, as a result of which many schemes for assembling various figures of snowflakes, cars, airplanes, furniture, animals, etc. arose.
Fighter aircraft
Many in childhood folded airplanes from pieces of paper torn from a school notebook and launched them during recess, watching the flight. In the origami technique there are a lot of options and forms of this craft, from the simplest to the most complex models. The diagrams below clearly demonstrate the assembly of fighters, which will require a little patience and paper.


Cars
The next popular paper craft is a typewriter. Every boy loved to play with them in childhood. If you don’t know how to make one, the following easy diagrams of racing and regular cars, trucks, and police cars will help you. If you follow the instructions, assembling the model will not take much time, and the result will be excellent.


Minecraft
Minecraft is a sandbox construction computer game. It allows players to create, destroy various blocks, and use objects in the surrounding 3D environment. If you are familiar with the game Minecraft, you will be interested in creating its blocks and heroes using the origami diagrams below. You can use white paper and draw the desired image on it, or print out templates.


Furniture
It's very fun to make origami furniture using paper patterns. You can create a window, a sofa, a table, a bed, a desk, an armchair. Such crafts are suitable for future children’s games, creating a dollhouse, and appliqués. You can choose any paper of different shades. By creating several figures, you will get a whole set of miniature furniture. All patterns are easy, so even a child can do crafts.


Snowflake
Origami and kirigami paper snowflakes are a great way to decorate your home for the New Year holidays. You can hang such crafts near windows, on a Christmas tree, on a chandelier, make a garland out of them and hang them along the walls, or a children’s mobile. Each pattern allows you to create a unique, inimitable snowflake. You can paint the finished products with silver, blue and glitter colors using spray paint, or apply glue with glitter along the edges to make the decoration even more interesting.


A unique offshoot of the origami technique was the art of folding paper figures and cards using scissors and glue. The handicraft style accidentally invented by a Japanese architect is called Kirigami. This name is very suitable, because in translation from Japanese “kiri” means “to cut”, and “kami” means “paper”. Kirigami patterns for beginners are so simple that even a child can easily figure them out.

Partially, every person has practiced kirigami at least once in their life, because snowflakes cut out of paper for the New Year to decorate a room, or hearts for Valentine’s Day are also considered kirigami works. Using this technique, you can create a wide variety of shapes: from familiar flowers, animals, snowflakes and other contour objects, to complex and bizarre shapes of original architectural buildings, cars and ships.


To work in the kirigami style, just remember the simple rules for reading diagrams:
- solid lines are located in places where cuts need to be made;
- folds must be made along the dotted lines.

There are also color options for the schemes, which read as follows:
- along the red lines it is necessary to make a fold inside the sheet;
- in green - fold the sheet outward;
- The sheet is cut along the black lines.
As they say: “Everything ingenious is simple.”
Tools for work

The kit for kirigami is very simple: paper (both white and colored), knife, glue. The rest depends only on the perseverance and patience of the master. The latter is important in any business, but especially in kirigami. As for office supplies, Beginners will need:
- breadboard knife for obtaining thin and neat lines;
- ruler - for straight lines;
- a thick layer on the desktop to protect the surface from mechanical damage such as scratches and abrasions;
- paper clips or masking tape with which the template will be attached to the paper;
- cardboard or high density paper.
The simplest schemes can become training for beginning masters. It is better to make cuts along the lines on the substrate using a ruler, preferably a metal one.
If you are afraid to make a mistake, then the lines of cuts and folds can be painted in different colors using felt-tip pens.

After the preparation is completed, you can go online and download the scheme you like. It should then be attached to a piece of paper and cut out according to the appropriate marks. The postcard designs from our selection will be feasible even for beginners.
Try, try, experiment and you will succeed! In addition, you can always make an original and unique card in honor of any holiday.
Let's start simple
For the New Year
Postcards with Christmas trees are perhaps one of the easiest to make, but always in demand on the eve of the New Year. Due to the ease of production, such a postcard does not require much effort and time, but will look no less impressive.

For birthday
Don't know how to stand out from the crowd of people giving money in purchased envelopes? Make a kirigami card. It will not only surprise and delight the hero of the occasion, but will also be remembered for a long time, because people always appreciate it when they put their soul into a gift.

For Valentine's Day
A surprise for your loved ones in the form of a purchased valentine? Trite. But a hand-made postcard for this wonderful holiday will convey your sincere feelings, as well as attention and care.


Video on the topic of the article
The videos presented in this article will help you not only understand the principle of this art, but also highlight a couple of tips and recommendations for yourself, which in turn will contribute to the development of mastery in the field of kirigami. A video selection of master classes for beginners will help beginners understand as accurately as possible, allowing them to clearly appreciate the simplicity of working with elementary templates. Explanations in understandable language will contribute to even better results. No one promises that you will exceed your own expectations on the first try, but any effort will pay off. And remember - practice makes the master.