We bring to your attention some simple ideas for making Christmas toys from felt with your own hands. We chose three New Year's symbols that are not usually toys and made Christmas tree decorations out of them. These toys will become a bright accessory on the Christmas tree and will leave pleasant memories for a long time.
New Year's felt candy
First we will sew a toy, which we call a New Year's candy. We will need:
- Red beads and seed beads;
- White threads;
- Filler;
- Needle and scissors.
Let's start by cutting out the pattern of the future toy and tracing it on felt. We will need two white parts mirroring each other and one red part. We will make leaves for decoration from green felt.


We work very carefully on red felt, trying not to leave pencil marks. We need the part to remain clean on both sides. Then we cut the red part as shown on the pattern. Take your time and cut carefully. Try not to mix up the pieces, so as not to assemble them like a mosaic later.

Let's start stitching. Let's start at the bottom end of the caramel. We take the parts made of white felt and fold them inside out to each other, then, in the third layer, we apply a piece of red felt corresponding to this fragment of the product, and sew them together with an overcast stitch. 


When we come to the end of the red fragment, take the next one and apply it on the other side.


We continue to sew our caramel. Don't forget to apply the red parts, one at a time, from different sides. As soon as we reach the end of one piece, we take the next one.
Having finished stitching on one side, we proceed to the second side of the toy. The red parts are already all sewn into place and all we have to do is sew the edges and add filler inside.

It’s better to add filler gradually, sew a little, stuff the stitched piece, and so on.

When the New Year's felt candy is completely sewn and stuffed, we begin decorating.

We take our green felt leaves, fold them into a fan, fasten them and sew them to the caramel just above the middle. Sew the leaves together very carefully; the felt at the ends is very thin and can be damaged.

After the leaves are attached to the toy, we take beads and seed beads. We string one bead and one seed bead onto a thread.


Then we thread the thread back into the bead and secure it to the product. Before fastening, check the thread; it may have twisted under the bead. You need to sew the bead so that the fabric is adjacent to the felt. Beads will not only add beauty to our toy, but will also hide the stitches with which we sewed the leaves.

We do the same with the rest of the beads. Finally, we attach a loop to the finished caramel, using it we will hang the toy on the New Year tree.

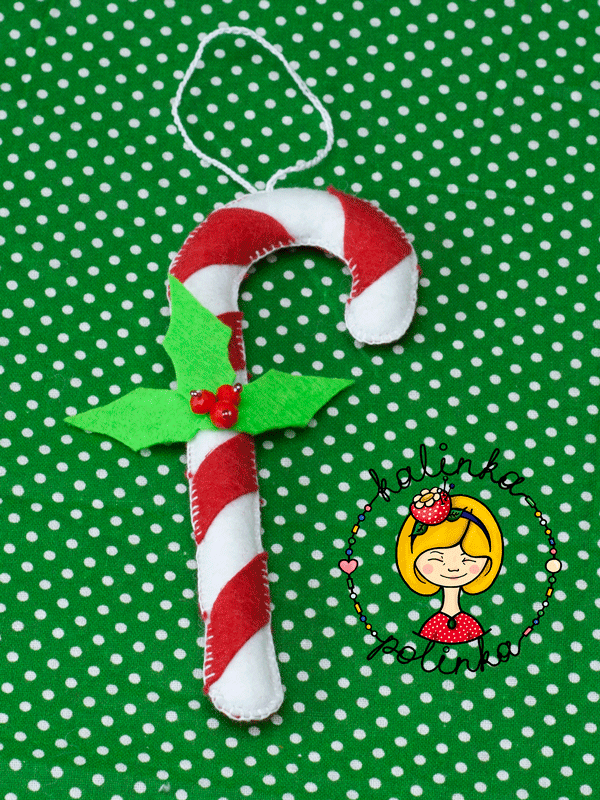
The felt Christmas candy is ready and will be a wonderful decoration for your holiday tree!
Felt mitten
To sew mittens we need:
- Felt in red, white and green;
- Red beads and seed beads;
- White and red threads;
- Filler;
- Needle and scissors.
First, as usual, we prepare the pattern (the pattern is at the end of this article). You can print it out or redraw it, then glue the pattern onto cardboard and cut it out. We apply the finished pattern to the felt and trace it. To transfer the pattern, you can use a chalk or pencil of any color, the main thing is that all traces remain on the wrong side. Of course, you need to be careful with white felt; marks can show through it.

When all the details of the mitten are cut out, we begin sewing. First, let's sew the white parts to the red ones. To do this, we use a regular basting stitch. Make small stitches, at a short distance from each other, so they will hold the parts together more firmly and will look more beautiful on the finished product.


Now let’s immediately sew our decoration onto the front part. We take the leaves, arrange them like a fan, fasten them together and sew them onto the mitten. When fastening the leaves, be careful not to overdo it. When sewing thin parts, felt can fluff or stretch, this spoils the appearance and strength of the product. For example, a carelessly sewn leaf may simply fall off over time.

Sew on the beads. After attaching the leaves, we do not break the thread, but simply bring it to the front side of the mitten and string the bead. After the bead we string a bead. We tighten the thread so that the bead fits snugly on the felt, and thread the corner with the thread back into the hole of the bead. Thus, the thread passes twice through the bead and once through the bead.

Now we fold the front and back parts of the mitten, with the wrong sides facing each other, and begin to sew. Sew along the edge with an overcast stitch. Try to make small stitches evenly spaced apart. Start sewing with the red parts, and when the red parts are sewn, fill the mitten with holofiber or padding polyester. Any other filler you have will do. We don’t stuff it too much, just to give our mitten some volume.
Change the thread to white and begin sewing the remaining upper part. Add a little more filler so that it is evenly distributed throughout the toy, and finish connecting the parts.

We attach a rope to the top part, in the middle, so that we can hang our New Year's toy on the Christmas tree.

The New Year's felt mitten is ready!

Felt boot
The process of creating a boot is similar to making a New Year's mitten.
We will also need
- Felt in red, white and green;
- Red beads and seed beads;
- White and red threads;
- Filler;
- Needle and scissors.
Cut out the pattern. You can change the dimensions of the pattern and make the boot the size you need: small, like a decoration for the Christmas tree, or large to put a gift in it. You just need to change the scale when printing the pattern. Don't forget that the details of the boot should mirror each other.

Sew the top white parts of the boot to the red ones. We use a basting stitch.

We decorate the front part with felt leaves and beads. You can place the decorative element according to your taste: at the top, bottom or even on the toe of the boot)


First we will sew the red part. Start from the top and move to the toe, it will be more comfortable. After the sock is sewn, we will add filling to it and continue connecting the two parts of the boot.

Then we change the thread and move on to the white part. If you are making a large boot for a gift, do not sew up the top part. Just finish the edges along the top with a blanket stitch, without joining them. If you are making a New Year's toy, when you finish sewing, attach a rope or ribbon at the top.

Now we can decorate the holiday tree with wonderful Christmas felt toys!


For convenience, we have prepared a kit for sewing felt toys. You can buy it by clicking here.
Have a great mood and creative success!
The material was prepared by Marta Lunkova, an employee of the KalinkaPolinka campaign.
We will send the material to you by e-mail
In the history of New Year's decorations of houses and apartments, there has been so much: they used paper, cardboard, illumination, and sparkling tinsel. It's time to go beyond the usual and make an unusual Christmas tree decoration for the New Year. The editors of the online magazine site have prepared New Year's patterns for toys made of felt, and assure that everyone can handle such products!
The nuances of work: how to make felt decorations for the New Year with your own hands
No matter how much you would like to download the first pattern you come across and plunge into the exciting work process, it is still worth getting acquainted with the nuances of working with a material such as felt.

The material is non-woven, which will be convenient when working: the edges of the product will not fray. You don’t even have to stop at choosing a color: the color palette is extensive, and there will always be something to suit your taste.
Advice! For making toys, the best option would be wool-blend Italian felt. But synthetic material is suitable for allergy sufferers and, moreover, is less fluffy.
If you are planning a voluminous toy with various small details, then it is better to take material 3 mm thick for the base, and 1 mm thick for decoration.

The products are stuffed with padding polyester or holofiber, and threads of medium thickness are used. If you take thin ones, the edge will tear, and thick ones will leave noticeable holes.
New Year's crafts from felt: decorating the interior
If you have already decided on felt New Year’s interior decoration, then when choosing colors, consider which ones will become a bright, original addition, and which ones will be invisible and will not create the right mood. The result depends on what kind of product will serve as decoration.
Felt garlands
Paper garlands are torn, and even the most beautiful ones rarely “live” for two years. But the felt beauty will remain pristine for many years.


The hanging thread can simply be sewn to the star right in the center.
Snowflakes and felt stars
Snowflakes and stars, in general, are prepared according to the same work scenario. Depending on the color wishes, we will prepare non-woven material.
To make a star, we take two colors of felt, floss threads to match one of the colors, zigzag scissors or braid, and filler (you can also take cotton wool).

Sequence of work:
- Cut out pieces from fabric.
- If you have curly scissors made of felt of a different color, cut out a carved strip to decorate the edge; if you don’t have them, use braid. If you want to decorate the star with decor, do it at this stage.
- We sew the two halves together, not reaching the final point with the seam, stop and insert the filler. Now the work can be completed.
Plump snowflakes are made using the same principle.


Related article:
DIY Christmas balls: corrugated paper, kusudama, origami, paper flowers; New Year's ball made of felt and fabric, decorating a New Year's ball for the Christmas tree using different means - read the publication.
Preparing Christmas toys from felt for the Christmas tree: patterns, master class, tips
You can involve your child in such an activity as sewing felt toys for the Christmas tree. He will be happy to sew a felt Christmas tree according to a pattern, help with decorating the products, and offer ideas for decoration himself. For the New Year they make snowmen, angels, animals, birds and even flowers.
Felt snowmen
A snowman is a great felt toy for the New Year. The white color of the non-woven material will look good on the Christmas tree, so don’t miss the opportunity to cut and sew a cute snowman.

The work process is simple:
- We make a template of two circles: the size of one is larger than that of the other.
- Trace circles on felt and cut them out. Two circles of different sizes for one snowman.
- We cut out scarves from felt of a different color using curly scissors.
- On a smaller circle we will create the face of the toy: beads or beads become the eyes, and cut out small carrots from orange material.
- Handles can be made by crocheting a braid. In the absence of such an opportunity, the braid will be completely replaced by black or brown braid. We cut out small mittens from a different color and glue them to the braid.
- Let's make hanging loops from braid or ribbon.
- We sew a larger circle, not forgetting to fill it with padding polyester or other filler. Then we sew the smaller circle, filling it as well. Before closing the hole on the toy's head, insert a loop into it for hanging. Now you can sew it up!
- Sew two circles together, one slightly overlapping the other. Immediately sew on the handles and tie the scarf.
This results in several snowman figures, which can also be used as a set for creating a garland.
Felt angels
To create the most delicate angel, we use pastel colors of non-woven material: cream, light beige, soft yellow, milky brown. It is not necessary to embroider the face, you can simply draw it: the eyes are painted with black acrylic paint, and dry pastels are applied to the cheeks.


The workflow can be described as follows:
- We cut out all the template parts, and then use them to prepare felt parts. We only need two of each, except the wings. They are cut out in a single copy.
- We begin work by sewing the legs together. Fill them with padding polyester and put them aside for now.
- It's time for the dress. Using threads to match the dress, we move in small stitches from one edge to the bottom. When we sew the bottom, we immediately sew the legs to the dress. We continue to trim the dress and, when we reach the neck, we make a knot and fill the body with filler. You can push it through with scissors.
- The head is sewn together with the hair. But first, a face is drawn on one detail. The blush is applied with a soft dry brush, and the eyes are applied with the tip of a toothpick. The head is filled from the neck side and stitched.
- Using superglue, glue the neck of the dress and the head of the figure slightly overlapping.
- We stuff the handles and sew them together with the dress, pointing them slightly downwards.
- We sew the heart, not forgetting to fill it, and glue it to the hands.
- At the last stage, we glue the wings on the back side, which will hide the junction of the head and the body.
If you want to use the toy as a pendant, it is better to sew a small button to the head, and then attach a thread through it for hanging.

Felt animals and birds
Wonderful New Year's toys that you make yourself from felt include various birds and animals.


Felt crafts for the New Year to decorate the festive table: patterns and master classes
The table is also decorated with felt crafts. For festive decorations, they make napkin rings, cutlery coasters, make Christmas trees and symbols of the coming year.
Napkin rings
To make a beautiful napkin ring, use strips of non-woven material and a decorative element. This could be a sprig of holly cut out of felt, the face of Santa Claus, or a Christmas tree.


Placemats
If in the fall beautiful leaves made of felt fabric are placed under the mugs, then in the winter snowflakes under the cutlery will give a wonderful mood.

Felt Christmas trees
Let's make wonderful little felt Christmas trees with our own hands to decorate the festive table?


Felt pigs
Creating a symbol of 2019 from felt material will be a pleasure. The main thing is not to rush and, before touching the fabric with a needle, attach all the elements in the right order and figure out what to sew and where.

Felt crafts for gift wrapping for the New Year: sock, mittens and box
The tradition of putting gifts in socks has long been wandering from house to house. Seeing a coveted stocking full of gifts over a real or artificial fireplace is true New Year's happiness for many. Let’s not disappoint our beloved household members and create fabulous beauty with our own hands by making a sock for gifts and a box for small gifts
The sock is cut out according to the template and one side is decorated first. The decor includes felt figures, buttons, beads and seed beads, lace and ribbons.


Save time: selected articles delivered to your inbox every week
Good afternoon - New Year's time is approaching and we all want to decorate this holiday differently than last year. I'm already tired of glossy New Year's balls - and I want to please the Christmas tree with something new, soft and cozy. Well... here you go NEW idea for Christmas tree decoration. We will decorate the Christmas tree with felt toys. In this article you will find a large selection of ideas and a demonstration master class on New Year's felt.
WHAT exactly – we will be making from felt today.
Let me tell you right away what kind of crafts I collected in this article…
- We will do many STARS- for decorating the Christmas tree.
- Cut from felt SNOWFLAKES...or embroider them.
- We will tinker – BALLS made of felt (similar to Christmas trees)
- Let's sew Santa Claus(different patterns)
- Making a Christmas tree from felt... and HOUSES.
- Let's sew small felt ones SKATES and MITTENS- to hang on the Christmas tree.
- Let's make New Year's OWLS and BIRDIES just like felt Christmas tree crafts.
- AND AT THE END OF THE ARTICLE... THERE WILL BE A SURPRISE PRIZE!!!!
That is, there will be a lot of ideas - and I also selected more ways for each idea... to awaken your imagination and inspire creative New Year's deeds.
TASTY PREFACE... decorative possibilities of bright felt.
And by the way... we can make not only New Year's toys from felt... but use the IDEAS OF THIS ARTICLE to create other New Year's crafts. For example, a felt craft can decorate gift tea jars...Or New Year's greetings postcard...

Or felt characters can position themselves on a Christmas wreath... Or a beautiful craft can serve as a decoration for chair back- as part of the overall New Year's table setting.

And a bunch of New Year's characters made of felt can become a FINGER THEATER- and during the Christmas season, your children can put on a variety of New Year-themed theatrical productions. And you will help them with the script and the main characters of the play.

Now let's talk about everything promised in order...
New Year's STARS made of felt - for decorating the Christmas tree.
And of course there should be stars hanging on the tree... lots of beautiful stars made of bright felt. They can be made in different ways.
You can sew a PLUGGY STAR cut out two parts of the star - front and back - sew them together and stuff cotton wool inside. Decorate the front side of the star with a snowflake made of felt - it can be sewn on with invisible stitches... passing the thread through the bead... Then the snowflake is sewn on and the stitches are invisible, because they pass through the beads. This star is in the left photo below.
Can you make a MULTILAYER star? – from felt of different shades (and even different thicknesses) cut into stars... circles... flowers. And put it all in ONE STACK - (as in the right photo below) ... decorate the middle of the felt multi-layer star with a button
Or do star-shaped blanks FROM PLYWOOD... or THICK CARDBOARD... Then cut out the same star silhouette from felt and glue them onto our rigid blanks. You can decorate the star with a snowflake or felt peas - as in the photo below.

Can the surface of a star decorate with STITCHES - that is, simple embroidery... Just make a seam from colored thick threads that follows the contours of the star.
Or try embroidering the outline of a snowflake in the center of the star and small snowflakes in the ray corners.

Felt SNOWFLAKES – flat and voluminous (master class).
And of course I want to make openwork snowflakes... a symbol of the tenderness of nature. It’s amazing how wind and water create such beauty - only if they are driven by TENDERNESS.
if you have fairly TIGHT felt– then you can simply cut out the contours of the snowflake and punch a hole for the ribbon tie.

You can just make a snowflake embroider with thread on a round felt... You can draw a snowflake on felt... cut it out with scissors - and that too stick as applique on a felt circle.
You can also glue the felt applique onto a simple round piece of CARDBOARD. Can you cut it out? two snowflakes of contrasting color (blue and white) and so that one is a little larger in size - and when we stack them on top of each other - the second will be laid out along the edges from under the first (as in the right photo below).

You can cut out THIN-RADIANT snowflakes different sizes... And fold them into a sandwich... Decorate the center with a button or bead or brooch. As we can see in the photo below, a hand-made snowflake

Here's another interesting way to create 3D felt snowflake– petal method.
It looks complicated, but in fact it’s even EASIER AND FASTER than cutting out the rays of a snowflake...

Here's how it's done...
We will cut out the PETALS (like a flower)... and then we will tighten the BASES of these petals (closer to the middle of the flower) with thread... This way the petals at the middle of the flower will SHRINK and there will be holes in the center...
OPTIONAL... you can decorate the centers of the petals with embroidery... bugles... beads...
You can also later (or immediately) make a FIGURATE CUTTING OF THE PETALS - so that they have teeth or steps...

And there is also a way to FOLD a snowflake from felt strips...Like in the photo below...

HOUSES made of felt - toys for the Christmas tree.
If you have THICK felt, you can simply cut it out SILHOUETTES little house in... make SLOTS-windows in them and hang a bell, a crystal or a tiny New Year's ball in each slot (small New Year's balls for mini Christmas trees are sold in the store.
But even if you don’t have thick felt, you can get it if glue two layers of regular felt. Layers of felt can be glued together with simple PVA glue... or glued with double non-woven fabric (dublerin) - this is an adhesive fabric, it is placed between layers of felt and heated with an iron, the temperature melts the dublerin and the layers of felt are glued together.
Or you can make a chubby house... sew it from two layers of felt... and stuff cotton wool inside...

Or make a three-dimensional three-dimensional house with four walls and a pyramidal roof.

Christmas tree toys made of felt - in the form of mittens and skates.
These skates are made very simply... First, a pattern is cut out - it looks like the SIDE WALLS of a BOOET molded together...
Then the fold line of this part is pushed under the paperclip.... And in this place - the folds of the part (the sides of the boot) are folded together and stitched along the sides... And it turned out that the paperclip ended up inside the boot.

The mittens are sewn from two halves - we put cotton wool or synthetic padding inside... We decorate the front part with buttons (of course, we sew them on before sewing the front and back parts together). We make elegant cuffs from any fabric - we also decorate them with a button. Without cuffs, mittens look like an unfinished craft, but with cuffs they immediately become more refined.
Felt cupcakes are like decorations for a Christmas tree.
So delicious It’s easy to make a cupcake-cake yourself... there is no complicated pattern here - everything is simply cut out by eye... The main thing is to do it seams to imitate the ribbed surface of a cupcake... decorate the top with a berry or a bead... and make it in the middle felt strip - a layer of cream. Candied fruits and rhinestones will complement the beauty of this culinary felt masterpiece.

Or you can make voluminous cupcakes from felt and also hang them on the Christmas tree. .

How to make a voluminous CAKE CAKE with your own hands.
To do this you need to cut a long strip of felt... in the form of an elongated triangle... Such elongated parts are needed 2 pieces– light and dark colors
We put both parts on top of each other and roll them up - like a carpet. We begin to roll up our “two-layer rug” on the side that is wider... and to the one that is already. This way we get a cupcake that has a top in the center...
We secure the roll with threads (so as not to unroll)… decorate with a paper cupcake tin… or lace
Christmas tree BALLS made of felt - for the New Year tree.
But these are the simplest felt crafts... We cut out the circles and decorate them with felt strips and rhinestones.

These felt Christmas balls can have a teardrop shape (as in the photo below)

They can be decorated with flowers and stars cut out of felt. Elegant braid, thin lace and sequins.

Oval shapes similar to an icicle also look good
Master class on sewing felt Christmas tree decorations.
But here’s a step-by-step microscope in the photo - where you can see the entire process of making such a toy - layer by layer...

Christmas tree toys made of felt WITH APPLIQUE.
You can also make a felt applique (or fleece) on such a round felt ball. For applique it is better to use thin felt.
For Christmas tree applique, it’s better to take three shades of green... so that each tier of the tree stands out beautifully (as in the photo below). And for the deer applique, you also need 2 shades of brown - one for the head and the other for the nose and antlers.

You can make a snowman or an applique of Santa Claus.
If there is no white felt for the beard of Santa Claus and for the snowman- You can use a cotton pad. Only the cotton pad needs to be strengthened with PVA glue (soak it in glue, level it and dry it so that it becomes denser and cemented).
You can make interesting as if staged scenes on such felt material... A snowman who rejoices in the snow... A bunny under the Christmas tree, birds circling and flowers blooming in the snow

DEER made of felt - like pendants-toys for a Christmas tree.
A felt deer is easy to sew... just a head with ears and horns... a nose appliqué in the middle... and beady eyes...
Or you can whole body carve a deer... Like in the photo below... and then the ribbons no longer need to be sewn to the head - but you can put them like a collar around the neck of a deer.

Santa Claus made of felt - and other characters for Christmas tree decorations.
Santa Claus may have a variety of patterns. It is very easy to do it yourself. You can simply draw a HEAD of Santa Claus - any shape - in the shape of a circle... in the shape of a bell... in the shape of a triangle...

YOU CAN make Santa Claus - WHOLE... with the torso...Moreover, the body can be completely SCHEMATIC...just teardrop-shaped...(as if he had hidden his hands in a long fur coat).
Or you can draw the outlines of the arms and legs on the pattern - make appliques of mittens on the tummy... and a black belt (as in the right photo below).

You can make Santa Claus with rope-shaped arms and legs k (the twine can be replaced with a chain of crocheted air loops). He will hang amusingly on the Christmas tree.
If you sew Santa Claus from THIN felt, then a beard can be made not in the form of a flat applique... but like a whisk made from cut strips of felt(as in the right photo below). This Santa Claus does not have to be hung on a spruce branch - you can simply place it under the tree

And here are some more funny New Year's characters - a flat penguin and a snowman to decorate the spruce feet.

And you can also make a HEDGEHOG... and a LADYBUG... they also turn out bright and will look good as decorations for the Christmas tree.
Felt TREE - DIY New Year's craft.
If you want your Christmas tree to CONTRAST against the background of the spruce, then it is better to make it from bright paired flowers - RED + WHITE... ORANGE + GREEN...

You can make this felt Christmas tree decorate with buttons– it is better to use buttons of no more than three colors (so that it is stylish and not chaotic). You can also add a small felt Christmas wreath to such a Christmas tree craft.

You can make several TIERS of a Christmas tree from different colors... layer them like pancakes on top of each other. You will get a voluminous effect.

Can you do it on a Christmas tree? mini flower applique– petals made of oval sequins and a center made of round ones. Or a paper applique in the shape of a heart... and sew a star button on the top.
OWLS and other felt birds - how to sew them yourself.
Here are ideas for what kind of big-eyed owls you can sew from felt - for a New Year tree.
The silhouette of an owl may look like a heart.- taper towards the bottom... and at the top diverge to the sides into ears...

Or an owl pattern can look like a PEAR-SHAPED OVAL... or be like a PERFECT BALL...

You can make your own felt birds to decorate the Christmas tree... These are simple ones... in the shape of a drop boat.

Or these tit birds with feathers... with an applique tail.

Birds on a Christmas tree are always lucky...
May your felt crafts delight you and your loved ones this year - and I'm sure next year too.
It will be so nice to take them out of the box every year and decorate the Christmas tree.
AND HERE IS THE PRIZE...
For those who read to the end... I'm serving a DELICIOUS IDEA... Christmas pancakes. These are the New Year's surprise breakfasts you can make for your children.)))
The Christmas tree is a stack of pancakes (folded into a triangle) ... a star is cut out of an orange ... berries decorate the Christmas tree like balls.
And the deer is created from three pancakes - one is the smallest for the nose. Horns can be made from crispy bread or golden-brown sausages. Or you can draw the horns with sour cream on a dark plate... or jam on a white plate...
Happy New Year to you!!!
Olga Klishevskaya, especially for the site ""
If you like our site, you can support the enthusiasm of those who work for you.
Happy New Year to the author of this article, Olga Klishevskaya.
With the New Year holidays approaching, we are all trying to diversify the interiors of our apartments and houses with all sorts of original decorations. DIY felt New Year toys can become not only a worthy decoration, but also a “cute” New Year gift for a loved one. In general, jewelry from the “handmade” category deserve special attention. After all, this simple gift carries with it a piece of your warmth, which is transferred during its making. In our article we will look at different ways of making toys, and also provide patterns and decorating tips.


DIY felt Christmas toys: basic properties of the material
Making various toys from felt has gained great popularity due to the undoubted advantages of this material. First of all, it is environmentally friendly - it is natural and non-toxic, does not cause allergic reactions. It’s very easy to make a variety of felt New Year’s toys with your own hands, since it has a large palette of bright colors and both sides of the material are the same, so you don’t have to be afraid to confuse the front side of the craft with the back.
The convenience of sewing products from this material also lies in the fact that it is easy to cut, glue and sew, and when trimming there is no fringe left behind that falls off. DIY Christmas toys made from felt are durable, as the material does not wrinkle, holds its shape perfectly and does not fade.
Beautiful DIY felt Christmas toys: what you need to make
The first thing you need to purchase is the felt itself. Buying it is not difficult - it can be done at retail outlets selling fabrics, as well as online stores. To make Christmas toys from felt with your own hands, you will also need the following supplies: cardboard, pencil, thread, needles, scissors, padding polyester for filling bulky toys, ribbons for loops and various little things for decorations (beads, buttons, rhinestones, sparkles, etc.).
The manufacturing process begins with a pattern. To make flat New Year's toys from felt with your own hands, you can draw the blanks yourself on cardboard and cut them out, since the dimensions here, in most cases, are not important. But the design of three-dimensional figures will require more precise blanks.


DIY felt Christmas toys: patterns of popular decorations
Dekorin has made for you a selection of simple patterns that will help you make cute dogs - symbols of the coming 2018, snowmen and Santa Clauses, which are integral attributes of the holiday.
Do-it-yourself felt Christmas toys, the patterns of which are in front of you, can be decorated as independent decorations, placing them under the Christmas tree, on shelves, on the windowsill, or you can sew on a loop and make them a wonderful Christmas tree decoration. Images can be printed or redrawn using transparent paper (tracing paper) from the monitor screen. Then they need to be transferred to cardboard, cut out and started working with the fabric.
While you yourself are busy with this painstaking process, trust the children to make a variety of decor for crafts. These can be a variety of bows, stars or snowflakes that will be used to decorate DIY felt toys. Draw the diagrams in advance on cardboard (they are also in our article), and then the children will do everything themselves.


Simple DIY felt Christmas toys
The easiest way to make your own New Year's toys from felt is flat, which do not require complex patterns or stuffing with synthetic padding. These can be various Christmas trees, mittens, snowmen and other figures. For example, to make a star, you will need to draw and cut out two identical shapes. Each of them can be decorated by sewing on sparkles, rhinestones or small mother-of-pearl buttons. Then we fold both sides with decorations up and sew the edges together with a side seam. The threads do not have to be the same shade as the material. On the contrary, in most cases, when sewing New Year's toys from felt with your own hands, they use threads of contrasting colors. You also need to remember to insert a loop when sewing. The Christmas tree can be made from two shapes, one of which is slightly smaller than the other and has a different color. Decor is applied to it, and then both of them are sewn together.


DIY New Year's toys 2018 from felt: how to sew the symbol of the year - a dog and other decorations
Flat toys look quite beautiful, but they can only be used as hanging decorations on a Christmas tree or garland. Bulk toys can stand. They can be made in different ways. One of them is to sew New Year’s toys from felt with your own hands. The photographs in our article show various templates that can be used to make a toy.
Initially cut out the parts from cardboard, then transfer them to fabric. Sew all elements made of fabric together and stuff them with padding polyester. It is better to do this manually using a side seam. Next, we decorate. You can make beautiful New Year's toys from felt in another way. Let's look at some examples.
DIY felt Christmas toys: dog patterns
A do-it-yourself New Year's dog toy made from felt will become the central figure in a fairy-tale composition under the tree or on the shelves of the room. It's not difficult to make. To do this, you can use the templates provided in our article. The eyes are decorated with large black beads. By the way, there is another simple way to make them yourself. Take the tablet packaging and place one bead into each cell. Cover the back side with paper, and then cut out the cells with beads - you will get real “moving eyes”. Since we are making Christmas toys from felt with our own hands, it is necessary to add appropriate decorations to the dog - sew a red cap, make a collar from tinsel, etc.


DIY New Year's felt boot toy
Beautiful toys-felt boots evoke thoughts of something outdated, but warm and comfortable. In ancient times, they served as an attribute of wealth, and now they decorate New Year’s interiors with decorative felt boots, using them as a bag for gifts to loved ones.
Let's look at how to make a New Year's felt boot toy with your own hands step by step. First, we make a template on cardboard: draw the outline of the felt boot in any shape and a long narrow rectangle for the loop. We apply decorative elements - snowflakes, artificial snow and half the body of a snowman with arms, a carrot nose and a blouse, as shown in the photo.
Then we transfer everything to the fabric, and there should be two felt boots patterns. A DIY New Year's felt boot toy should be colorful, so the base can be made from blue material, the blouse from red, and the rest of the elements from white. We sew the finished decor to one base, which we then sew to the second. Don't forget about the loop - you can use it to hang the toy on the Christmas tree, above the fireplace, or make a garland of several products.


DIY felt Christmas toys: pine cone
In order to make cones, we take two colors of felt fabric - brown and white, or its shade (cream, coffee, beige). We cut out identically shaped flowers of different diameters so that our DIY felt Christmas toys “cones” look more realistic. Then, using a needle, we pierce the blanks in the middle and string them onto a thread, having first made a knot. First a couple of small ones, then larger ones, towards the middle - we prick the large ones, and then again smaller ones and finish with the smallest ones. Pull the thread tightly and tie a knot. The toy is ready.
DIY felt Christmas toys: patterns of Tilda toys
The soft toys of Norwegian needlewoman Toni Finanger, called “Tilda dolls,” that have entered our lives, evoke tenderness, leaving neither children nor adults indifferent. We tried to collect some ways on how to make such New Year's toys from felt with your own hands.
Their patterns are not complicated - you can see this in the examples of the patterns of Tilda's Santa Claus, cute Dogs and Snowman. You can sew such beauty from any fabric, but it is felt that gives them a certain effect of warmth and naturalness. When making, it is worth paying attention to some features - all toys have symbolic facial features: there is always a blush, and the eyes and nose are dots that can be made from beads. Do-it-yourself felt New Year's toys Tilda dolls should not have external side seams - when sewing one or another blank, we leave a small gap through which we turn it inside out, stuff it with padding polyester and sew it up to the end. Be sure to take care of New Year's clothes for the toy - sew a colorful dress, bow, scarf, etc.


