Models for creating warm and cozy nightgowns differ not only in appearance, but also in the degree of complexity of tailoring and design. This article will consider several options for nightgowns that you can make yourself, among them there are both very simple and complex ones. After reading this article, each needlewoman will be able to choose the right shirt for herself, depending on her preferences, as well as the level of skill and experience in sewing.
We sew a simple model of nightgowns with adjustable straps

This model of a nightgown is probably the simplest. Its creation does not even require the construction of a paper pattern - it is enough to draw two identical trapeziums directly on the fabric with an allowance on top to create a drawstring. The two resulting panels are sewn along the side seams, and a ribbon is inserted into the drawstring from above, which will serve as straps. The length of the straps on such a shirt is easy to adjust - after all, they are not sewn, but simply tied with a bow. The bottom of the product can be decorated with lace or flounces - but you should remember the rule: inelastic fabric - inelastic lace and vice versa. Stretch fabric frills will look good only on knitted shirts. This model is very simple to implement, so it can be used as a training in labor lessons for girls. Sewing a nightgown is usually included in the school curriculum for grade 7.
Model with a cutout on the chest:
The shirt model shown in this photo is somewhat more complicated than the previous one. However, it also cannot be called complicated, and it is generally very easy to build a pattern - for this you need to know only two quantities: chest girth and product length.
First of all, draw a rectangle ABCD. From point A, we lay down a segment equal to the length of the nightgown and set point G, and to the right we set aside a value equal to the circumference of the chest + 2 cm for freedom of fitting and set point B.
From point A to the right, 7 cm is laid off and the mark D is put, and 2 cm is laid down and the point D1 is put. Between them, by hand, or with the help of a special pattern, a line is drawn that displays the neck of the back. From point A, 8 cm is laid down and the mark D2 is placed. Line AD2 shows the head of the front.
To build a sleeve, set aside 10 mi from point B down and set point K. At a distance of 16 cm down from K - point K! From K1 a perpendicular line is drawn to the segment BV. In the place where the two lines intersect, we put the point G. From the point G, they are deposited 7 cm to the left and down, denoted by E and E1. The last points are connected by a line.
From mark B, 7 cm are laid to the right (B1). Labels B1 and E are connected. From B1, 2 cm are deposited upwards (I). From point I to point B, draw a smooth line at the bottom of the product.
Such a model will look even more elegant if you decorate it with lace or sewing, and sew small decorative buttons next to the neckline.
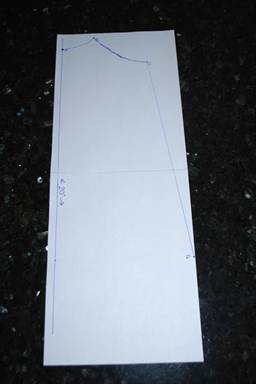
Model on shoulder straps on an individual pattern.This truly sexy piece will look its best when tailored to your own individual measurements. This will require a basic dress pattern, which you can build yourself or print on one of the specialized sites by entering your parameters in special columns. To model and sew such a shirt, you must have at least basic design and sewing skills.
After the basic pattern is ready, you need to change it in accordance with our instructions. First you need to cut the pattern as shown in the figure below, and at the same time mark a new bottom line.
We finish the yoke by smoothly drawing the line of the top of the product - in the figure below it is drawn in red. We translate the waist tuck into the side seam - as a result, it will turn out to be steeply concave inward. And since the nightgown should be free and not restrict movement, it is necessary to straighten the lower part of the shelf as shown in the figure below:

Having dealt with the description of the modeling of the shelf, we take up the pattern of the back. We mark the cut line, as shown in the figure below with a dotted line. After that, we slightly modify the intended line in accordance with our model, which is shown by the red line. Of course, we remove the tuck, draw a new bottom line and again straighten the side seam.
After all the changes made, we get three details:
 Thus, we got an individual pattern of an exquisite nightgown that will fit perfectly on the figure.
Video master classes on the topic of the article
We offer you to watch several videos with master classes on sewing nightgowns.
The stores are full of ready-made nightgowns. And to the floor, and mini, and old ladies. But we also want something different from everyone else. If we cannot surprise with styles, let's choose a fabric with which we would like to sleep always.
Nightgown fabric
We come to the Fabric store and choose the material, feeling it and applying it to the cheek. We are looking for one that would warm and caress. Chintz, calico, cambric, staple, linen ... we are looking for the fabric that is pleasant to the body.
How much fabric do you need to make a nightgown?
Found. Now the question arose before us, how much to measure it? How do you know how much fabric you need to buy in order to sew a full-fledged nightgown? We measure ourselves at the most voluminous place. Some have hips, others are proud of their lush breasts. If only this place was not at the waist.
Let's say the circumference is 100 cm. So, we need to buy at least two lengths.
We measure the length from the cervical vertebra through the bulge of the chest and to the place on the legs where the shirt should end. Got 150 centimeters. The material you like has a width of 140. So we ask the seller to cut us 151x2 \u003d 300 + 10 centimeters for the seams and hem. Total 310cm.
It happens that the fabric you have chosen has a width smaller than your size. For example, chintz is often produced in 80 cm wide canvas, and you wear size 52. This means that you will have to buy four lengths + 20 cm for the collar. By the way, do not forget to buy a slanting trim to match the fabric or, conversely, a contrasting one in the same store.
Style
We choose the simplest style with a minimum number of seams. Nightgowns should be absolutely comfortable, so that there is no sting anywhere, no rubbing, no interference. We take as a basis the simplest Russian women's poneva shirt.
By the way, you can also decorate it in the Russian folk style along the edge of the sleeves and neck. Now in stores you can buy a beautiful braid that imitates traditional embroidery.
Nightgown pattern
Let's get to the most important stage in our business. We cut and cut out. If you are completely new to this business, then rehearse everything first on a piece of wallpaper. For connoisseurs and docks, you can immediately grab onto the fabric you love in the store. We will cut such a nightgown. 
Fold it carefully in half. 310/2 = 155 cm. we get a rectangle 140x155 cm. It is unlikely that your house will have a table of this size, so you can lay out the fabric on a clean floor. Fold the segment again, but now along.
You have a rectangle with dimensions of 70x155cm, in which one single corner of the four has no edges. This is where the neck will be. Take a tailor's chalk in a contrasting color with the fabric and a ruler (you can use colored pencils, just remember to return them to the child).
Measure from this corner along the short side 9 centimeters, and along the long side 2 cm. Draw a smooth arc with chalk, connecting these points. This will be the back cutout.

Now let's take a look at the sleeve. From this short side, but from the other corner, we set aside 17 cm along the long side (sleeve width) and from this point along the edge another 8 cm. Put at risk. Now, from the risks deep into the fabric, we draw a line along the ruler.
We draw the hem. Before us is the fourth part of our nightgown. We must put a quarter of our volume into it (100/4 = 25 centimeters). It must be placed comfortably, so we add another 5 cm. We have a total width of 30 cm.
We set it aside along the lower short side and draw a line up to the intersection with the line from the risks. At this point, the armhole will begin. We connect it with a smooth arc to the point of the sleeve (17 cm). We slightly expand the hem along the bottom. We connect the points I and E with a straight line. That's it. We measured seven times, checked everything, now we will cut.
Attention! We cut not along the lines, but retreating from them by 2 centimeters, except for the neck. Here we cut straight along the line. Cut out and deployed completely to a length of 3 meters.
Now again fold along and change the scissors to a ruler and chalk. We deepen the neck on one side by 7 centimeters. We draw a smooth arc with chalk, drawing half of the future neckline, and immediately repeat the route with scissors.
Sew the side seams. Roll up the hem and sleeves. We attach a slanting inlay to the neck. Sew on your favorite decorative braid. All. Pleasant dreams.
In bedding stores you can find a variety of models of bedding in all colors of the rainbow. Many women consider the most comfortable sleepwear not a drop of Chanel No. 5, as Marilyn Monroe once joked, but a night dress, that is, a shirt, or a shirt made of soft and cozy fabric.
Nightgowns, as you know, do not happen much. Warm, light, puritanical and sexy, bought for the occasion, given as a gift by a mother or a friend - they all meet, or at least should meet one common criterion - they must be comfortable.
What is a regular nightgown pattern?
A nightdress is a loose dress of a simple style, decorated with lace, braid, flounces or appliqués. The length can be different - from products to the floor to an extremely short mini. If you carefully study the patterns of nightgowns that are found in magazines, you will notice that they do not differ in the complexity of the cut. The main details that make up these wardrobe items are a shelf, a back and a sleeve.
Try to sew a nightgown with your own hands. Patterns of the most complex models with yokes, polo fasteners, collars, cuffs, various ruffles and frills do not really require special skills in modeling, however, the implementation of these details requires a lot of time, great experience and skill.

Model with adjustable straps
A very simple pattern of a nightgown with straps consists of only two parts - a shelf and a back. This model has many options. One of the most successful - two trapezoidal panels with drawstrings along the upper edge. A ribbon is threaded into these drawstrings. The photo clearly shows what a nightgown with long ribbon straps looks like. The length of such elements is easily adjustable, because they are not sewn, but tied near the shoulder. On the bottom of the product, you can sew flounces, like our models, or lace. If you sew from non-elastic fabric - chintz, calico or silk, then select the appropriate lace. Elastic lace is only suitable for knitted fabrics.

Universal pattern
The pattern of the simple sleeved nightgown you see above is a one-size-fits-all pattern for all sizes and body types. It consists of two parts with a fold. The sleeve is one-piece, with a straight line of the shoulder. Nightgown patterns like this one are very handy for modeling. On the pattern, you can draw a yoke of arbitrary shape, cut it off, and increase the shelf by 4-6 cm. The yoke, as well as the collar, clasp and cuffs, is always made double. In some cases, one of the parts on the inside is additionally duplicated with a thin non-woven lining. This is done for the reason that the yoke carries a double load - parts of increased width are sewn to it, that is, heavier ones. So that the yoke and connecting seams do not deform, it is always strengthened.

If you don’t want to mess around with a yoke, but like spacious nightwear, then simply place the line of the middle of the front not on the fold of the fabric, but stepping back 2-3 cm. Trim the neckline with a drawstring into which you thread the elastic band.
In the same way, you can increase the width of the sleeve by adding an overlap from under the yoke in the shoulder area. At the bottom of the sleeve, you can make a drawstring, thread a ribbon into it and pick it up like a flashlight. The puffy sleeve ending in a frill looks very nice. No less beautiful is the free wide sleeve, along the edge of which lace is sewn. This option is especially well obtained from thin and softly draped cotton or silk fabrics.
Taking measurements
Tailoring a nightgown is a simple matter, since this thing does not require an exact fit. With a standard physique, it is enough to take only two measurements - the circumference of the chest and the length of the product.

The length of the product is measured along the back from the seventh cervical vertebrae to the bottom of the shirt.
The circumference of the chest is measured with a centimeter tape along the most protruding points of the chest and shoulder blades. To build a pattern, you need to divide the value of the circumference of the chest in half. Let's say the circumference of the chest is 100 cm, which means that half is 50 cm. The width of the shirt is 50 cm plus an increase in loose fit and seams.
An additional measure to improve the pattern for a corpulent figure
The pattern of a nightgown for overweight women requires one more measurement - this is the circumference of the sleeve. The measurement is made with a centimeter tape around the widest part of the arm. When measuring, the measuring tape should fit snugly enough to the body, but not pinch it. Our grandmothers' nightgown patterns often contained small rectangular or diamond-shaped pieces. These are gussets. They were sewn under the arm so that the sleeve did not tear in this place, because there the fabric experiences the greatest tension and breaks first. The sewn-in gusset significantly extends the service life of the shirt. Generally speaking, a gusset under the arm, even for a slender woman, will serve as a detail that provides additional comfort.

Calculation of the amount of fabric
For sewing a shirt with one-piece sleeves with a fabric width of about one and a half meters, two lengths of the product are required. If you plan to decorate with frills or ruffles, then when calculating, you should keep in mind: the length of this part should be three times longer than the one on which it is sewn. In addition, allowances for seams and hem should be added, as well as possible shrinkage if the fabric is made of cotton or viscose.
Knitwear or textile?
Before buying fabric, think about what material you want to sew your own nightgown from. The patterns presented in our article are suitable for all sizes and types of figures, however, the allowance for free fit depends on the type of material from which the item will be sewn.

Knitted fabrics tend to warp. During operation, after several washes, your shirt can stretch a lot in width. Therefore, do not make it too loose and short. As for static cotton fabrics, they are very resistant to stretching, however, the shirt will bring discomfort and will quickly tear if it is cut according to a pattern intended for knitwear. Therefore, patterns of nightgowns for women, which can be found in fashion magazines, are always built taking into account this feature of the material. Never use a static woven fabric if the model description indicates that it is made of knitwear.

When choosing a style, the composition of the fabric is important
For nightwear, fabrics made from natural fibers are most suitable. Silk, due to the silky structure of the threads, is often fragile at the seams. Patterns of nightgowns made of this fabric should not be replete with complex set-in elements. It is most correct to opt for one of the models that are described in detail in this article as universal, that is, consisting of one or two parts. One piece shirt in front of you. It is done with only two seams. The linen seam is the most durable, so it is most suitable for sewing the front and back of a nightgown made of slippery silk.

Linen seam technology
This seam is performed in the same way as the French one. The two parts are folded with the wrong sides inward, and the front sides outward, and grind. The seam is ironed. This is done in order to stabilize it. After the allowance is cut to a width of 3-4 mm. Then the part is laid out on the ironing board with the seam allowance up. Details are located on both sides of it. With the help of an iron, the seam is bent and ironed onto one of the parts. After completing this action, fold the part along the seam already with the front side inward, and the wrong side outward. Iron the seam. Lay a line, stepping back from the edge of 5 mm. Iron out the seam.

Linen seam for children's nightgown
This type of seam, made on the front side, was previously used when sewing children's clothing. It does not fray and looks very neat, and its main advantage is that it does not rub the delicate skin of the child. A nightgown for a girl (the pattern is suitable for one that has a one-piece sleeve), sewn with a linen seam outward, will be very comfortable, and the original seam will serve as an additional decoration for the shirt.
Instead of hemming along the bottom of the sleeves, you can make pseudo-cuffs and trim them with a piping from a finished cotton inlay, cut along an oblique thread and ironed along both sides. The hem of the shirt and the neck can be sheathed with the same inlay. A large neckline on a children's shirt is not a good option. It is better to make it almost under the neck, and to thread the head, leave a straight cut in the middle of the shelf. It should be processed with an oblique inlay. The same or contrasting trim should be sewn along the neckline, leaving the ends about 20 cm long to protrude. These are ties.

Flannel Exclusive
This fabric is a recognized leader among materials for home wear. Knitwear is currently the most popular fabric, but warm, soft and fluffy flannel will not leave the top positions in the ranking of options for pajamas and nightgowns. Bright colors and a variety of patterns allow you to choose the material for every taste.
When buying fabric, remember: it is most comfortable to sleep in linen made from natural material. Follow the recommendations given in our article - and your collection of nightwear bought in a specialized store will be replenished with an exclusive nightgown. With your own hands, make the patterns that you saw in our article in reserve, because they are considered the most suitable for making nightwear for both adult women and little girls.

Sewing a nightgown is very pleasant and interesting. Neither changeable fashion, nor the lack of special education can be an obstacle to the implementation of this venture, because the thing is not intended for prying eyes.
Regardless of the variety of clothes for a night's sleep, many women still prefer a regular shirt. It does not constrain movements and allows the body to completely relax, so that the rest is truly complete. Since stores do not always offer comfortable clothes at affordable prices, needlewomen opt for hand-made reproduction of a nightgown. In addition, a variety of styles and patterns easily allows you to choose the right option. Based on the instructions, which describe how to sew a nightgown with your own hands, you can get a convenient thing quickly and at no extra cost.
One of the easiest ways to sew a nightgown is to make it according to a finished pattern. Since most models have a free cut, one pattern can fit several sizes at once. Such a universal design is provided with a nightgown model with a one-piece sleeve.
The sleeve here is designed together with the base and also has a free shape so that the product does not interfere with the restriction of movements.

But such shirts were worn in ancient times, and most women still want to look modern. Therefore, preference is given to more feminine models that allow you to add a touch of playfulness to the product. Many people like a little thing that bares their shoulders and creates a flirty image.
A dream in a summer night
The proposed shirt with shoulder straps will be an invariable companion of a night's rest in the warm season. In order for the product to allow the skin to "breathe", it is recommended to select natural materials.

To sew such a nightgown, you need to prepare:
- Textile;
- Needle, thread to match the material;
- Scissors;
- pins;
- centimeter tape;
- Gum.
If there is no ready-made pattern, then you can create it yourself. With the help of a tailor's centimeter, the girth of the chest, waist, hips is measured, the desired length is determined.
The fabric is folded in half. Based on the measurements, a rectangle is built.

The width of the rectangle is calculated from the larger girth measurement, to which seam allowances are added. The length is increased by 8 cm. Now you should draw up the silhouette of the product. To do this, the lower part expands slightly, forming a trapezoid, as in the photo.
When making an armhole, an old T-shirt is perfect. Based on it, you can draw the armhole of the future product. The cut piece is cut out.

You should get two parts of the product.

The parts are folded together inside out and sewn along the side cuts to the armhole line. Next comes the processing of the bottom of the shirt. It should be bent and stitched. Then the edges of the armholes are sewn off.
The upper section of the product is folded and processed with two parallel machine lines. The width between them should correspond to the width of the prepared gum.

The rubber band is inserted. It is advisable to immediately measure its desired length in order to avoid excessive tightening. The product should be tried on to determine the length of the straps. They are sewn from the remnants of the material in the form of two strips. If desired, you can decorate the straps with ruffles from the same material.
As a decoration, a modest satin ribbon bow sewn to the front of the shirt is suitable.

This shirt is suitable for both women and girls. The only difference is in the choice of material. It is appropriate for a girl to make a product made of colored cotton, complemented by ruffles.
A woman, on the other hand, will look more elegant in a batiste shirt with lace. At the same time, you can replace the straps with lace, making them a little wider, as well as decorate the bottom of the product.

If you want to slightly open your shoulders, but the straps are too bold for this, you can use a shirt pattern with an additional top insert. To do this, it is enough to modify the basic nightgown pattern, while removing the one-piece sleeve.
The upper part consists of a rounded strip of fabric, for which it is quite possible to use an openwork fabric.

A nightgown equipped with a detachable insert, smoothly turning into wide straps, is called a shirt with a yoke. This model is attractive in that it allows you to easily combine different fabrics in the product and bring diversity to the product.

Sleepwear in the form of a nightgown is also widespread among girls. Lovers of elegant dresses do not want to part with a wardrobe item dear to the heart, even during sleep. Therefore, mothers go to different tricks, trying to please their daughter and sew an elegant and at the same time comfortable nightgown.
Handy materials in action
It is attractive that when making a nightgown for a girl, it is not necessary to stock up on a piece of fabric and select the appropriate pattern.

The product can be created from a pair of old knitted T-shirts. How to do this so that the baby is satisfied, the corresponding master class will tell you.
For work you will need:
- 2 old knitted T-shirts (contrasting colors);
- Pattern paper;
- Sewing accessories.
The product is designed for a girl 5-6 years old. 50 cm is deposited on paper. 1 cm is measured from the upper end of the segment and fixed with a dot.

A second point is laid aside by 2.5 cm, which connects to the previous one. 6 cm is measured to the right horizontally, and then 2.5 cm down vertically. The points are combined with smooth lines.

A line of 40 cm is drawn down, which then goes 20 cm to the right, forming a trapezoidal silhouette.
From the lower end of the initial segment, the next point is laid 3 cm to the side. It connects with a smooth rounding to the previous mark. The resulting uncomplicated pattern will form the basis of the future product.

One of the T-shirts is torn at the seams. The pattern is transferred to the material.
Large bra pattern. Under bust 100 and 105
Large bra pattern. Girth under bust 100 and 105 cm.
This model of a bra perfectly models a form of a breast up to the largest sizes.
The bra cup is soft, pitted, consists of three parts: the lower part - two parts and one upper part.
The straps are wide.
Patterns are given in natural size with seam allowances (at the rate of 0.7 cm for all seams, except for the front; for the front seam, an allowance of 0.5 cm).
Patterns are suitable for women whose parameters fit within the limits indicated in the table below.
|
Pattern |
SIZE |
Girth under bust |
Bust (by prominent points) |
|
blue line |
|||
|
black line |
In any case, it is recommended to first check the patterns on a cheap fabric: cut, sweep, try on, make adjustments if necessary, clarify the length of the side parts of the bra, taking into account the degree of elasticity and the type of fastener, and only then proceed to sewing.
It is advisable to sew large bras from dense fabrics, since a bra made of thin materials (guipure, thin knitwear) will not support large breasts well.
The back is preferably cut from a stretch fabric with a high cotton content for maximum support. The larger the size, the wider the back detail (barrel).
Clasp - wide, not less than 3 hooks in 3 positions.
In large sizes of bras, it is recommended to expand the width of the straps to 3-5 cm, since narrow straps deform the muscles of the shoulder, disrupt proper blood circulation in the hands, which leads to discomfort, fatigue, etc.
Bra cups are lined. For this purpose, fabrics are used that are combined in properties with the material of the top of the cup: elasticity, density, etc. And do not forget that the best option for the human body is natural materials that meet all hygienic requirements, improve the skin microclimate and do not cause irritation.
According to statistics, underwear created using a 100% cotton membrane is recognized by customers as one of the most comfortable.
 Stitch the front seam.
The upper sections of the cups of the bra can be processed with narrow lace, openwork elastic band or edged with an oblique trim.
The curve of the side of the bra is designed to use elastic fabric. To prevent this part from being small, add a few centimeters to the length of the barrel when cutting. The girth of the bra (the length of the barrels) is finally specified at the fitting, taking into account the elasticity of the material and the size of the fastener.
We connect cups with barrels. We close the stitching seam with an inlay. Fixing plastic bones can be inserted into the formed pocket.
The upper side cut of the cups and the back (barrel) is processed with a linen openwork elastic band or elastic band.
A linen elastic is attached to the bottom of the bra.
You can use a wide elastic band (see photo), it will serve as an additional support for a large chest.
We attach straps to the protrusion of the upper part of the cup.
Straps can be either combined (elastic band plus trim) or solid (only elastic or just inlay).
Also, straps can be sewn from the main fabric. In this case, the length of the straps will be 40.5 cm for a girth of 100 cm and 41 cm for a girth of 105 cm. Finally, specify the length of the straps at the fitting.
Don't forget about the existence of strap adjusters. They consist of a buckle-lock and a ring.
Lining details are cut according to the main details.
Sewing Tips:
First, we collect the lower part of the bra cup, which consists of two parts.
Then we connect the upper and lower parts of the cup.
Download pattern from here: