Every girl wants to be beautiful. Have a well-groomed appearance, beautiful nails and a chic hairstyle. Many women prefer beauty salons. But not everyone is ready to say goodbye to such finances. That's why many people practice beauty at home. So convenient and cheap.
Weaving is not a difficult task if you learn how to do it. It would seem that a spikelet is nothing supernatural. But it’s still worth learning the basics of weaving. This simple hairstyle looks amazing. Everything ingenious is simple.
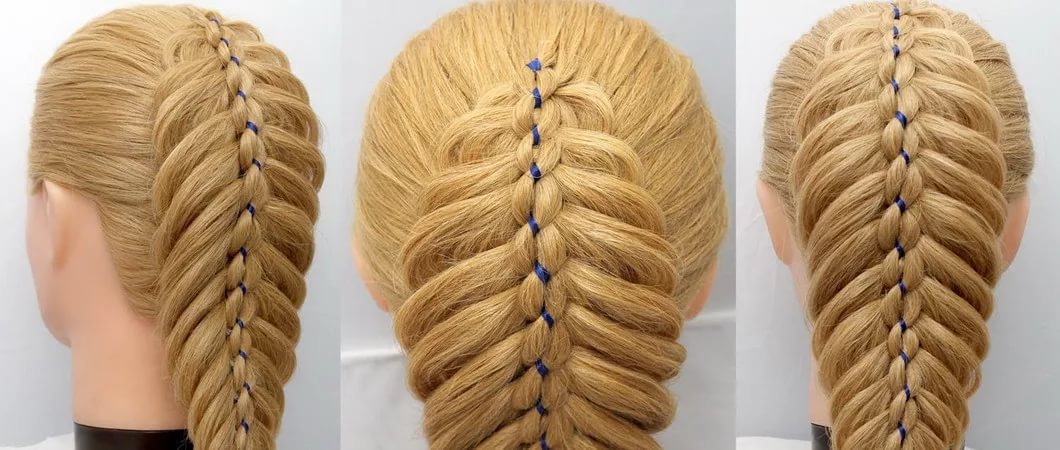
Spikelet weaving:

- Before braiding, hair should be clean and dry. To make them more manageable, it is best to apply foam or a special hair mousse to your hair. Then they will be straight and obedient.
- Brush well. At the very top of the head, select three strands. This will become the basis for starting to weave your hairstyle.
- Let's start braiding the braid. Literally 2-3 cm. Next, add curls on the left and right sides. Take curls gradually so that everything looks neat and natural.
- Be sure to monitor the thickness. The strands should be the same. Otherwise, it may be very noticeable.
- Gradually the hair on the sides ends. At the end, braid it like a regular braid.
- The spikelet is almost ready. Tie with an elastic band and spray with hairspray. You don't need a lot of varnish. The whole point is for your hair to last all day in perfect condition.
You can also weave beautiful ribbons or flowers into the spikelet. Then the hairstyle will be more formal and elegant.

Spikelet inside out
- Select large strands on the crown of the head.
- There should be 3 strands and no less. All the same thickness.
- Transfer the strands on the sides to the central one, the one in the middle. Repeat the movements first on the right, then on the left.
- After 2 weaves, add thin strands.
No matter how many strands you add. There are always only 3 of them left.


Zigzag
A fairly common braid made in a zigzag. It is done quickly and easily:
- Comb your hair well. If they are not obedient, then we treat them with mousse, gel or foam. If at the moment there is nothing like that at home. Then moisten it with ordinary water.
- We part it on the side.
- Divide into 3 strands. They should be uniform in thickness.
- Weaving is on one part head and to the other.
- When the weaving is completed to one piece. We continue to weave back to the other part of the head.
- If the hair is very long. You can make more zigzags.
- At the very end, secure with bobby pins. You can also use some beautiful hairpin. Who likes it more?

With ribbon
A spikelet with a ribbon is suitable for any event. It always looks stylish:
- We fix a ribbon on the top of the head. Select a strand and secure the ribbon under it.
- From the strand you chose. We make a loop that will look to the left.
- Wrap the ribbon around the strand. Do this carefully so that it does not become disheveled. Then the spikelet will last a long time.
- Picks up a strand of loose hair on the right side. We make a loop again.
- Place a ribbon on the loop and wrap it well. It should be well fixed.
- Pull the loops towards each other. It will look more impressive this way.


Three in a row
An elegant spikelet that always remains in fashion. Suitable for work, parties and just for every day:
- Select curls at the top of your head. We begin to weave like a regular spikelet. Weave up to 3-4 cm and secure carefully.
- Meanwhile, on one side, select 3 strands and also weave a spikelet. Secure with a hairpin.
- On the other hand, choose 3 curls and also weave.
- Braid all three braids to the end.
- At the very end of the braid you can connect and braid it in.


Basket
- Part your hair. Secure half of the hair with an elastic band. And the other half will be used.
- Weaving a regular braid with the addition of strands from the tail.
- The hair in the ponytail should be enough to cover the volume of your head. Don't take too big curls. There should be an even distribution.
- Having reached the beginning of weaving. Continue with a regular braid.
- Be sure to secure it with invisible ones.
- Any beautiful addition will do here. It could be a hairpin or a flower.


Spectacular lush spikelet on the side. Always looks very gentle:
- The beginning is like that of the most ordinary spikelet. Separate 3 strands.
- Weave a standard braid, carefully turning it to the side.
- Add curls on one side and the other.
- Twist into a rope.
- The braid and the tourniquet are connected on the side.
- You can add decoration in the form of hairpins.


For different hair lengths
For any hair length, you can choose a beautiful and elegant hairstyle. A braid is more suitable for long and medium length hair. A spikelet is also suitable for very short hair, but not in a simple version.
Hair headband:
- Separate hair from temples and forehead. Stab the rest.
- We divide those at the temple into 3 strands.
- Start weaving in reverse. Adding curls on both sides.
- Do it in the opposite direction. When you reach the ear, finish. Tie an elastic band.
- All is ready. The rest of the hair can be curled using a curling iron.
This option is suitable for any hair length.


- So that the hair is obedient. Treat with foam or gel. This will make it much simpler and easier to weave.
- A braid, like a spikelet, always starts with 3 strands.
- Follow the instructions strictly. Then everything will work out for sure.
- Trust your feelings. The mirror will only be a distraction.
- Before weaving, it is better to practice.


"Spikelet" is one of the best braiding techniques for everyday and festive hairstyles. This type of braid can be done on short, medium and long hair. There are a large number of options for weaving techniques. They are perfect for small children and teenagers. How to braid a spikelet for a child (step-by-step instructions) is described in this article. In principle, nothing complicated.
Varieties of "spikelets"
The following main types are distinguished:
A standard “spikelet” of three curls where all the hair is connected.
Not tight, where the strands are pulled out carelessly.
Reverse or, as it is also called, “reverse spikelet”.
Braids of two and four curls, the so-called “fishtail”.
- “Dragons” with the addition of ribbons.
Several “spikelets” smoothly turning into afro braids.
A braid that imitates a hoop, and much more.
Conditions for braiding
Some main features:
You need to know the technique of weaving regular braids.
The hair must be washed.
All strands are carefully combed to avoid tangling.
Start from the top of the head.
For a more original hairstyle, carefully pull out the strands to create a volume effect.
Unruly hair is lubricated with gel or water.
Tight braiding is only needed on short hair.
How to braid a spikelet for a child (step-by-step instructions)
1) Select a part of the hair from above (at the base of the forehead). In this case, the curls at the temples are not touched.
2) Divide this bun into three equal curls.
3) First, they begin to move the curls as in a regular braid. Literally three weaves.

4) Connect two strands. Take a thin curl from the sides one by one and weave it into a braid (the right one is crossed with the left one).

5) All hair should be included in the braid. When they are finished, they are braided like a regular braid, or gathered into a ponytail.

6) The pigtail is very similar to the spikelet. The hairstyle looks very attractive.
Now you know how to braid a child's hair. The step-by-step instructions (photos above) clearly and clearly make it clear how to do this. Nothing complicated.
How to braid two “spikelets” for a child (step-by-step instructions)
You can simply divide your hair in half with an even parting and braid it according to the description at the beginning of the article. But you can try an original weaving pattern that every mother can do on her own.
Standard scheme:
1) Clean hair is divided in half with an even parting.
2) One part of the hair is secured with an elastic band so as not to interfere.
3) Braid it in the same way as a regular spikelet. First - on one side, then - on the other.
A satin ribbon (of any color) will add a special highlight to this technique. How to braid 2 ears of corn for a child (step-by-step instructions, unusual option):
1) Washed hair is evenly parted in half.
2) One part is fixed with an elastic band, in the second part a strand is separated at the top.
3) Attach the ribbon with bobby pins so that it has 2 equal halves (this is the basis for braiding). It should look like: on the sides - a ribbon, in the middle - a curl.
5) This action is also performed on the second side.

For short hair
On short curls, such weaving brings some inconvenience. For beginners, experts recommend training on a tail that is tied with an elastic band. How to braid a hairstyle for a child - step-by-step instructions (for short hair):
1) Start from the top of the head. Gather all the hair and secure it in a ponytail with an elastic band.
2) Divide into two even strands.
3) A thin curl is separated from two parts.
4) They begin to shift the strands (from the right side to the left and vice versa).
5) Such manipulations are carried out to the end (along the entire length).
For long hair
If the owner has hair length of 20 cm or more, there is room for imagination to run wild. For example, an openwork braid looks very original and festive.

How to braid a hair for a child? Step-by-step instructions (for long hair):
1) The braid itself is created using the technique of pulling strands.
2) Braid a standard “spikelet” of 3 strands, do not tighten too much.
3) At the same time, the strands are pulled out a little.
4) Preliminarily think over the location of the base of the braid, since it will be intended for fixing the flower.
5) Braid to the end and twist the braid into a flower, secure with hairpins.
It will look original with woven ribbons of different colors. Or jewelry in the form of hairpins with beads.

Circular "spikelet"
After mastering regular braiding, it will not be difficult for you to make such a braid. Everything is very simple. So, how to braid a circular spikelet for a child (step-by-step instructions):
1) What are the features? To hide the base of the braid, it is recommended to start braiding behind the ear.
2) Make a strictly even parting on washed hair. Using a comb, draw a vertical line near the ear and separate the curls.
3) The separated strand behind the ear is divided into three even parts.
4) Begin to braid a regular braid. Literally a few spans. Then fold the two curls together.
5) Add hair from the sides one by one. On the right side, select a thin curl and lay it on the left strand.
6) The left side is laid on the right.
7) With such movements they weave in a circle until the second ear.
8) When all the hair is over, add a regular braid and secure with an elastic band.
9) Lightly pull the hair out of the braid (give volume). Then it is wrapped around the head and secured with bobby pins.
French "spikelet" in reverse
Extraordinary elongated braids are in fashion. The pattern of this weaving may seem heavy at first glance. But in practice everything is very easy.
How to braid such a spikelet for a child? Step-by-step instruction:
1) Gently comb washed hair.
2) Separate the curl from above and divide it into 3 parts.
3) Grab the left curl and bring it down (under the remaining two).
4) The third curl is placed under the first and second (weaving occurs inward).
5) Do this step by step, adding the remaining hair.
6) Large and small strands are taken.
7) To add volume, lightly stretch the strands.
This type of braid can be done in zigzags. Or braid two braids.
"Spikelet" on one side
1) Using a side parting, the hair is divided into two uneven parts. One should be significantly larger than the other.
2) Most of the hair is separated by a horizontal parting.
3) Select a curl from above and divide it into three parts. Braid the braid and add side hairs one by one.
4) The center of the braid should not be flat, but shifted to the side.
5) When the weaving has reached the ear, change direction and perform the manipulation obliquely.
6) Fix with an elastic band.

"Fish tail"
“Fishtail” is a simple and at the same time not quite ordinary weaving. You can decorate your hair with this hairstyle not only long, but also short.
How to braid such a “spikelet” for a child? Step-by-step instruction:
1) You will need: water (to make hair manageable), accessory (clip or elastic band, hairpins, optional ribbon).
2) Comb your hair thoroughly to prevent frizz and sprinkle with water.
3) The entire hair is combed back, and small curls are isolated at the temples. These strands are combined with each other (the right one is on top of the left one). Hold the crossed strands in one hand.
4) In turn, with the other hand, another curl is selected on the left side. It should be the same size, and combined with the right one (which remained in the hand). They do this so that it is on top of the right.
5) The finished weaves are pressed by hand.
6) On the other side, the same manipulations are done (the new strand is crossed with the braided curls).
7) Continue to the end of the braid, adding hair from opposite sides one by one.

Double volume braid
1) Pre-comb the entire hair. In the parietal zone, a strand is separated and divided into three curls.
2) Start weaving like a fishtail.
3) Small strands are added to the main weaves.
4) When a little of the braid has already been braided (fixed to the top of the head with a hairpin), select curls from the remaining hair for the second layer.
5) They make a pick-up and weave underneath. Continue weaving without picking up until the end. Loose hair should remain.
6) Return to the top. They are released from the hairpin and braided using a regular braid technique, gradually adding free strands.
7) Once the two braids are ready, connect them with an elastic band.
"Spikelet" in a zigzag
The weaving pattern is the same as that of a standard “spikelet”. For example, they start on the right side and finish weaving on the opposite side (left). There can be two or more turns in the form of a zigzag.
Over time, the standard “spikelet” braid was not forgotten, but changed beyond recognition. The options and techniques of weaving, following fashion, have become diverse. With its originality and originality, this hairstyle can decorate a child’s hair for both everyday and festive occasions.
Looks equally impressive on both medium length and long hair. With a few styling techniques, you can use a braid to create several types of evening and business hairstyles that will not go unnoticed by others.
Weaving itself is not a complicated process, but not everyone knows how to do it on their own. It’s easy to learn weaving, you just need to understand the technique and use the tools at hand. The main assistant will be mirrors installed opposite each other. By controlling the sequence and thickness of the strands, you can get used to it and subsequently do your hair without them.
Many variations on the theme of the spikelet have been invented, but the main distinguishing features are:
- parting shape;
- number of strands at the beginning of the braid (2 or 3);
- weaving method (from bottom to top and vice versa);
- thickness of the beams used.
What is necessary
To weave a spikelet yourself you will need only a few items:
- a comb with a thin handle and long teeth for separating strands;
- several hairpins;
- two mirrors to control the process.
You also need to be patient, because rush and bustle will not give you the opportunity to master the weaving technique.

How to braid a spikelet
Medium length hair is easiest to braid. The short ones are too unruly and difficult to fix, since the slightest turn of the hand causes the strand to fall out of the braid. Long strands are difficult to style due to constant tangling. It’s difficult to hold a heavy curl in your hand and redirect it in the right direction with your fingers, but you can still get the hang of it.
Step by step guide:
- Comb washed, dry hair;
- Starting from the bangs or other place on the top of the head, collect a strand, distribute it into three equal bundles (the base of the braid);
- Insert the first bundle between the second and third;
- Third beam redirect between the first and second;
- Correct the bundles during weaving, if necessary, comb your hair;
- Then the second beam is inserted between the third and first, complemented by a new strand on the side of the same thickness;
- Next, braiding is performed in a similar way, capturing the side hairs., alternately on the left and right sides;
- After weaving all the side strands of the braid braided without them to the required length;
- The remaining tail is fixed an elastic band or a hairpin;
- Curly hairs are styled with the help of invisible ones;
- Correct the spikelet links.

How to braid 2 spikelets
The hairstyle is being revived from yesteryear. True, then it was relevant for schoolgirls. Now modern girls and young women have taken the initiative. Appearing in society with such braids is considered very stylish and fashionable.
Weaving order:
- Comb your hair well and make an even parting, passing through the center of the head;
- Braids are braided separately on each side starting from the hairline;
- Divide the base into two identical thin strands, cross them together;
- Alternately weave the main bundles, complementing with loose strands (thin);
- There is no need to stretch or create a tight weave, a loose braid will look more voluminous and it will be easier to correct it;
- Fix the result obtained with an elastic band;
- Perform similar actions, but from the other side.
A side parting that divides the head from one ear to the other will create a braid around the head. The technique and principle of weaving do not change. An offset parting is needed when weaving. Separate spikelets are connected below the back of the head and intertwined with a continuous braid, or overlapped and secured with an elastic band, and the place of combination is cleaved with beautiful hairpins (hairpins, bobby pins).
There is a method of weaving two spikelets using three bundles, which is performed on the basis of classic weaving. This hairstyle will retain its shape in the most inclement weather. But to form beautiful links you will need thick hair.
 Individual spikelets are connected below the back of the head and intertwined with a continuous braid, or overlapped and secured with an elastic band.
Other hairstyle variations
"Fish tail"
A hairstyle made from thin buns looks impressive. Weaving stages:
- Separate from the left temporal part and the right one beam at a time and direct them towards yourself;
- Folding the strands crosswise, put them in your right hand;
- With your left hand, separate a new strand from the left side, pull out and connect to the right bundle;
- Use your right hand to fix the braid, and with the right one repeat the previous action, but on the right side;
- The braid is braided to the base of the head or to the desired length, after which it is fixed with an elastic band.
 A hairstyle made from thin buns looks impressive.
This hairstyle will be appropriate for a holiday and in everyday life. Keeps its shape very well throughout the day and is not afraid of wind and wet weather. Weaving around the head, but made not in a straight line, but with bends, can add originality. If you straighten the links on one side, you will get a real masterpiece.
The technique of weaving around the head is performed in the following sequence:
- Comb your hair, highlighting a strict parting in the middle of the head;
- Three strand base starts on the right side in the usual way;
- You need to braid, keeping to a semicircular shape.(go along the back of the head, adding new strands);
- Finish weaving approximately near the ear on the left side, secure the ponytail with an elastic band and hide it in the strands using a bobby pin;
- The process is then repeated, but on the left side;
- When docking with the first braid, you need to fix the second and hide the remaining tail in the spikelet using hairpins or bobby pins.
 Weaving around the head, but made not in a straight line, but with bends, can give originality
Purl
Ideal for fine hair. Weaving adds volume and creates a beautiful shape. The sequence is:
- Comb your hair carefully and highlight the bun on the top of the head;
- Split it into three equal parts;
- The left strand is placed under the middle and right beams;
- Place the right one under the left one and middle strand;
- The braid goes inwards, forming the reverse effect of a classic spikelet;
- Then the manipulations are repeated, but with the addition of free strands of the same thickness on each side;
- Following the principle, braid to the ends of the hair and secure the braid with an elastic band;
- Correct the links;
- To create volume you need to stretch each link.


Most girls love to experiment with their hair. Therefore, everyone tries to acquire skills in styling hair and creating new hairstyles at home, because there is not always time and money to visit a beauty salon.
One of the most common and practical hairstyles is considered french braid or as it is popularly called “spikelet”. Knowing how to do such a hairstyle will not only help you save money on the hairdresser, but will also save you from wasting time going to him. Well, the main bonus will be a great appearance for any situation. This hairstyle is suitable for office, party, formal dinner and everyday life, it will always make you look elegant and neat.
In contact with
Classmates
The second advantage of this braid is that it suitable for any age category: from small children to adult women and grandmothers. And the initial look will depend on the thickness of the hair, its length and the method of weaving.
 For a good result and a beautiful hairstyle, you need to remember a few nuances in weaving a French braid:
- The thinner the hair strands, the more beautiful and neat the spikelet will be. If you take a lot of hair in a strand, then such a braid will be practically no different from the classic one.
- When weaving a spikelet for yourself, the main thing is that all the strands are of the same thickness. Otherwise, the pigtail will curl to one side.
- The spikelet looks very good on straight and well-groomed hair. Moreover, different hair lengths do not particularly affect the quality of the spikelet, but on the contrary - a ladder or cascade haircut is perfect for such a hairstyle, and strands that stand out along the entire length will give the effect of negligence and elegance.
- “” will look very impressive on highlighted or colored hair. This hairstyle will have its own pattern.
- To prevent the locks from falling apart, use special products: gels, mousses, hair foams. They will help securely fix the curls and preserve the shape of the hairstyle for a long time.
- It is important to follow the braiding technique so as not to mix up the order of the strands and not get tangled in your hair. This hairstyle is suitable for both adults and children.
So, let's look at the options for spikelets and the technique of weaving them.
Classic spikelet
This method of weaving is popularly called “fishtail”. This is the simplest method of weaving a spikelet. Beginners should start learning with this type of braids. After this, you can easily make a spikelet on your own outward, to the side, around the head, or another type of spikelet.

How to braid a spikelet DIY fishtail video
Spikelet inside out
To create this hairstyle, you will need a comb with a sharp tip, a classic hair brush and two small rubber bands that will not be noticeable under the hair. This hairstyle will look great on both a child and an adult girl. Spikelet inside out You can weave in two ways:
- Gather your hair into a ponytail and begin braiding the base.
- Start braiding your hair from the frontal area, using all the hair on your head.
The first method is suitable even for beginners. After all, strands of hair with this method of braiding do not fall apart and you even the most unruly curls are under control. And in order for the spikelet to turn out inside out, it is necessary to place the strands from below the main working braid, and not from above (like a classic braid).
Weaving a spikelet


Fishtail inside out step by step:
- We comb our hair with a brush and divide it into two even parts - these will be the main working strands.
- From the right side, take a small strand and move it to the left side. Hold the main left strand with your hand.
- Then take a strand on the left side and weave it onto the right side of the braid, holding the main right strand with your hand.
- Repeat these manipulations to the ends of your hair. Secure your hair with a bobby pin, elastic band or crab tie. If everything is done right the result will delight you with its beauty and unusualness.
Inside out braid - video step by step
Zigzag braid
A very original method of braiding a braid is a zigzag spikelet. This hairstyle is perfect for both a small child and an adult woman. And braiding it is not at all difficult, the main thing is not to get confused in the sequence.
Step-by-step instructions and video tutorial for braiding braids with a zigzag:

This hairstyle will help you out in any situation: it can be done for a holiday and decorated with beautiful hairpins (it looks very formal) and in everyday life, when you want to diversify your look. Moreover, such a hairstyle will perfectly make you or your child stand out from the crowd.
There are many more options for creating hairstyles with spikelets. For example, a spikelet on one side, around the head, with three strands, a hairstyle with two spikelets and many others. But they are all based on the same weaving principle. It all depends only on the flight of your imagination and time for experiments.
In contact with