Despite the emergence of a number of portable media used to store large amounts of information, CDs are still considered one of the most durable and reliable in this group. They are less prone to causeless breakdowns, but are not protected from physical impacts and, as a result, mechanical damage. A couple of scratches on the surface of a CD are enough for the media to stop working correctly or be readable altogether, “burying” a significant part of the data important to the user.
But there is no need to despair: there is still a chance to repair the equipment. For this purpose, there are special commercial kits available for sale and a lot of advice on the Internet designed to help restore the original state of the disk.
CD/DVD preparation
Before removing scratches from a disc, its surface should be cleaned of dust and fingerprints, since dirt could be the root cause of the breakdown.
This can be done in several ways:
- Using non-abrasive products.
- Wipe heavily soiled media carefully with a soft cloth.
- Hold under running slightly warm water.
After shaking off the water from the CD, you need to dry it by placing it on a paper towel without getting wet. This is done in order to understand the extent of the damage: if the depth of the damage reaches the metal layer, the media cannot be saved on its own.
Removing defects on the CD/DVD surface
It is possible to cope with this task at home, the main thing is to know how. It is easy to remove scratches from a disc; various household products are used for this - from Vaseline to toothpaste.
Waxing with polish, car wax or other creamy texture works well when the polycarbonate coating shows signs of heavy wear. In this case, the carrier is covered with one of the listed products, the excess of which is then removed with a lint-free cloth. This method will help temporarily, since it does not help remove defects, but only fills in abrasions. After successfully using it, you should make a backup copy of the information from the damaged CD, the further use of which will remain in doubt.

The following method (how to remove scratches from a disc with toothpaste) is very simple. It consists of polishing the top layer of the CD, thinning it and thereby reducing the depth of damage. You should resort to it at the very last moment, if more gentle options do not work.
It is advisable to use a paste based on baking soda as it is the most effective. The substance is applied to a smooth cloth (a napkin for glasses is suitable) and with its help it is distributed over the scratch perpendicular to the digital tracks. This will protect the media from the appearance of new, more dangerous flaws.
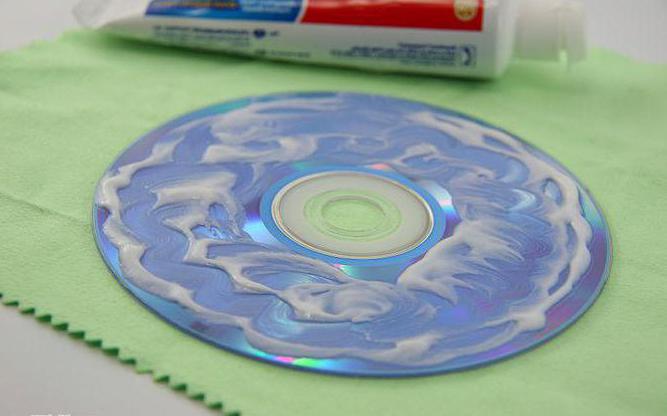
It will take about 2-5 minutes to polish the disc in a similar way, then the paste is carefully washed off under warm water and the CD is allowed to dry in the open air on its own.
Both methods are equally effective in dealing with the task described (how to remove scratches from an Xbox disk).
Damage to Xbox CD
If you find a defect on a disc for a game console, you should make sure that it is not the culprit of the problem. Xbox sometimes has a similar flaw, and if it was purchased recently, there is a chance that the unusable media will be replaced with a new one by technical support.
If exchange and compensation are not possible, then the main methods for removing scratches from an Xbox 360 disk are those already described using toothpaste or polish.
Caring for portable media
The best way to solve a problem is to prevent it from occurring. To delay the confrontation with the question of how to remove scratches from a disk, you should provide it with proper operating conditions:
- Heavy dirt must be cleaned with specialized means, using gentle movements in the direction from the central hole to the edge of the CD. Under no circumstances should you wipe the surface of the disk in a circle - this creates a risk of data loss.
- The media should be stored away from direct sunlight in a CD/DVD folder. This method will provide fragile disks with the proper level of security and take up minimal space.
- To remove media from an optical drive, hold it by its edges or inner ring.

By following these instructions, the user will protect himself from unexpected loss of information and may never face the problem of how to remove scratches from a disk.
This will rather be a story with elements of a guide to recovering a disk from your own experience.
So, recently a friend of mine bought himself Xbox 360 along with the bundle Gears Of War 2, and for our outback this is a very worthy and difficult to find game. Therefore, I immediately suggested to him that I would give him 3 of my games, and he would give me his Gears Of War 2. Everything came to an excellent agreement. The next day I decided to call him, but his answer did not make me happy at all, namely, he decided to play it yesterday, but without playing it, he pulled out the disc an hour later and it turned out to be scratched in two places. I already knew that there are such cases with such a bundle and that we are not the first such, I was partially disappointed, because. I got one, one might say, such a hard-to-find and popular game, and here it is.
Therefore, knowing that in M Video You can’t prove anything that it’s not our fault, but the arguments that it’s not the first, and that there are such problems with this bundle won’t give them anything, because Our M-Video is poorly developed in terms of consoles, because... with the same purchase Xbox 360, sometimes you have to tell them what goes where in the package.
So to the point, we have Gears Of War 2 Bundle Copy, by the way, who doesn’t know what this version is, here you go:

As seen Microsoft I even decided to save on paints =). At the moment I cannot show you the scratches because... I’m writing this article after restoration, but visually they looked like average-depth scratches in two zones of the disk, and there were several scratches in each zone. The zones were located on the last tracks of the disc, i.e. not near the center.
When inserting a disc into Xbox 360, he could not immediately recognize the disk, i.e. Xbox 360 I drove the head diligently for 15 seconds, and it was loud, it was even alarming, after which the Reading inscription changed to the Start game inscription, but without the game icon, and from that moment I began to overclock the disk, as is usually the case at startup, but in As a result, it again slowed down and stopped completely; when you clicked Start game, the screen went out, but soon a window immediately popped up with the message something like, wipe the disk with a cloth, etc.
As a result, we have a completely unreadable and unrecognizable disk. Let's start treating!
Many of you have many ways, from the most delusional ones, to support it in the cold, or to press it down with a lot of weight, also to lubricate it with glycerin, etc., but there is another option, the so-called grandfather’s one, which is to polish it with toothpaste, and I am now ready to confirm , this is not a joke, toothpaste is the best and most effective method of restoration at home, no matter what kind of toothpaste.
What causes the disc to become unreadable is damage to the transparent layer of the disc, i.e. its structure is disrupted, and accordingly the laser passes through it. i.e. the beam gets lost due to the unevenness of the surface, so we need to make it as smooth and reflective as possible.
What you will need: any toothpaste (in my case, domestic 32 Norma, there was no other, don’t take it as an advertisement =)), and two rags, not hard (I just used 2 handkerchiefs).
Now let's go to the bathroom, closer to the tap, I mean. We put something very soft on some flat surface, maybe even some kind of towel or rag, BUT it must be clean, i.e. without any hard crumbs, sand, etc. small but solid particles. And we put our disk on it, picture down, scratches up, and apply a little toothpaste on top.

Then we begin to rub it in a circular motion with another clean rag (handkerchief),
After rubbing for a minute, your toothpaste will begin to dry out, but we don’t need this because... Drying will only make things worse.

Therefore, we take the disk and rinse it completely under hot water, or simply moisten it slightly with water, and then repeat the entire procedure.

The first time I did it, I spent 10 minutes on all this, after which I dried it and decided to try it, but I still couldn’t read the disc, ALTHOUGH it was determined faster, i.e. I reached the Start game point, then I decided to try again and already did the procedures for 20-30 minutes.
And from that moment on I made the most important mistake. I was in a hurry and didn’t check the rag, whether it was already covered in dried paste or whatever had fallen on it, as a result there were solid particles on it, and then you probably already understood what happened, it’s comparable to taking a little sand, throwing it on the hood of a car and starting wipe the car with a rag, as a result of which the reverse MOST IMPORTANT AND BEARING SIDE OF THE DISC with the picture was covered with several small scratches, RIGHT ALL THE WAY, i.e. transparent, it was already 100% known that the disk was completely damaged, but I only found out about it after I finished this procedure. :"(

But in the end, the disc was immediately visible to the eye that it turned out cleaner, those scratches are now much less visible, and as if nothing had happened, although now the disc has become covered with very small but scratches everywhere, but they are not scary;), I’ll even add that as a result the disc began to have a painfully pleasant smell of mint =). At that moment, I already knew that everything was useless, but I still decided to insert it into the Xbox 360, when I inserted the Xbox 360 IMMEDIATELY identified it, I decided to try (there was nothing to do and in order to completely finish myself off) copy it to the hard drive, the disk seemed to overclock only just from the assembly line, but I knew that soon it would suddenly stand up, and so it happened, it suddenly stood up at 43%, and gave a message that the disk was damaged.
Therefore, be careful and do not be too lazy to rinse the rag again or change it.
But if somehow this happens to you, or the disc cannot be read, BUT it is still determined which game, i.e. there is a way out.
We just need to find the same game somewhere, from a friend or someone else, literally for an hour, take another one, insert it into our Xbox 360 and install it on the hard drive, then give this disc to the owner, and insert our scratched one, and indicate that the game from the hard drive, because when copying, the Xbox 360 does not copy the disk ID, its serial number, etc., it turns out that it does not compare at startup whether it was the same disk that was copied to the hard drive. This is how I play Gears Of War 2 now.
That's all, good luck!
Xbox consoles read information from the surface of the disks using a laser. If the disc is scratched, the laser will be refracted, causing the disc to be unreadable or read incorrectly. However, you can try to repair a scratched Xbox disc using scratch fillers. For example, you can use toothpaste or lip balm. Read this article and you will learn how to repair a scratched Xbox game disc.
Steps
Part 1
Using toothpaste- However, you will not be able to change the situation if the disc is delaminated or cracked. Cracked disks have damaged structure, and delaminated disks deteriorate due to delamination of the substrate and polycarbonate base with data.
-
Wipe the disc with a soft cloth. Use a microfiber or other soft cloth to wipe the disc after you rinse it. Wipe the disc from the center to the edge. Avoid circular movements. This will prevent any more scratches from appearing.
Buy regular white toothpaste. You will need the appropriate toothpaste to repair a scratched disc. The toothpaste will act as a grinding tool, which will remove the thin top layer along with the scratches. To get the desired effect, you will need regular white toothpaste containing baking soda.
- Do not use gel toothpaste or one that contains whitening agents.
-
Squeeze some toothpaste onto the scratch on the disc. Apply a small amount of paste directly to the scratched area.
Use a cotton swab to spread the toothpaste evenly over the surface of the disc. Take a small cotton swab and rub the surface of the disc in a circular motion. Do this exactly as if you were waxing a car. Treat the entire length of the scratch.
- There is no need to put in a lot of force. Do this gently in circular motions.
-
Continue sanding the disc until the scratch is completely gone or barely noticeable. New thin scratches from the toothpaste may appear, but the underlying deep scratches will disappear completely.
If this method doesn't work the first time, try the toothpaste option again before trying another method.
Wash the disc and dry it. Once you have removed all scratches, rinse the disc under running water and wipe it dry with a soft cloth.
Try starting the disk. After you remove the scratch with lip balm, try running the disc. Before installing the disc into the Xbox, you need to wipe off almost all the wax from it. A disc coated with a layer of wax may damage your Xbox console.
Rinse the disc. Before using toothpaste, rinse the disc to remove dirt and dust. You can rinse the disc with warm water over the sink.
Part 3
Using the Magic EraserBuy the Magic Eraser. To quickly remove deep scratches, try using a dry Magic Eraser. This is a special cleaning sponge designed to remove stains and scratches from various surfaces. You can purchase this product at a hardware store. Cheap versions of this product are also quite effective. The secret of this eraser is a material called melamine foam.
Use an eraser to remove scratches. Wipe the surface of the disc, starting from the center to the edges. Use enough force to remove the scratch. However, do not overdo it so as not to remove the entire surface layer of the disc.
Rinse and dry the disc. After you remove scratches with the Magic Eraser, rinse the disc under running tap water and wipe it with a soft cloth. Wipe the disc dry. Do this from the center outwards.
Try starting the disk. After you remove the scratch and rinse the disc, try starting it again. If it still doesn't work, you can try repeating the above process or try another method.
Part 4
Using the Disk Recovery ToolPurchase a tool to remove scratches from your disc. This tool can be ordered online or purchased at an electronics store. A device called SkipDr is designed to restore the readability of optical discs during their natural wear, in particular when the working surface of the disc wears out. Although you can also use other similar tools.
Rinse the disc with water and wipe it dry before using the tool to remove scratches from the disc. Rinse the disc with warm water to remove dust and debris, then wipe it with a microfiber cloth. As a rule, such soft fabric is already included in the kit.
Spray polishing liquid onto the working side of the disc. Before starting work, you need to treat the disc with a special liquid using the spray included in the kit. Apply the liquid in an even layer over the entire working side of the disc.
Insert the disk into the slot of the device designed for recovering damaged disks. Depending on the type of device you will be using, the disc loading process may vary. Make sure that the working side of the disc is facing the sanding attachment. Follow the instructions in the instructions so that you can insert the disc correctly.
Turn on the device designed to recover damaged disks. Press the button or turn the handle so that the disc begins to rotate. During the rotation process, the working side of the disk will be polished with special pads. You will likely have to repeat the process several times to remove deep scratches.
The working surface of optical discs is easily damaged - the protective layer becomes scratched even with not too intensive use. Deep defects often lead to the impossibility of extracting information from damaged media. Next, we will tell you how to restore a scratched disc by polishing using toothpaste, GOI paste, and also consider some “harmful” tips from the CD Resuscitation Network.
Rules for working with damaged optical discs
Let us say right away that an unreadable media with deep scratches can be restored in this way, at best, only partially. Moreover, you will have to act extremely carefully, otherwise the surface can be completely damaged. It would be better to first practice on old unnecessary media before restoring a disk with valuable information - this way you can evaluate the effectiveness of the method and, as they say, get better at it.
And do not try to immediately resort to using the method described below when a reading error occurs - check the disk on another computer - often it is the DVD drive that causes the problems. In addition, there are a lot of applications that allow you to extract maximum information from scratched blanks thanks to a modified reading algorithm. One effective solution is Durable Copy.
It is advisable to use the program to work with discs that have already been restored by polishing, because we have already noted that heavily damaged media can never be restored 100%.
How to polish a blank with toothpaste at home
The most affordable and safest way to polish is with toothpaste:

The movements during the polishing process should not be too intense so that the surface does not heat up quickly. There is no need to put pressure on the blank either. After 15-20 minutes, rinse the disc thoroughly in warm water. Its surface may become matte due to the appearance of many microscopic scratches, but deep damage will become much less noticeable, which should have a better effect on the readability of the disc.
Dry the optical drive, try inserting it into the DVD drive. If your goal is to retrieve photos, important documents, etc., use Durable Copy or similar app. Surely this time there will be noticeably more copied intact information.
If necessary, restoring the working surface using the method described above can be repeated, but it makes sense to carry it out for no more than an hour. As practice shows, polishing with paste for too long causes the opposite effect - there is less readable data on the media.
Professional polishing method
For truly valuable and expensive disks, such artisanal methods should no longer be used. To obtain an acceptable result, the polycarbonate base will need to be polished with fine abrasive GOI paste (sold in hardware stores) using an electric drill with a grinding attachment:

If you don’t have a power tool, polishing with GOI paste can also be done manually, but a positive result is far from guaranteed, and the process can take a long time.
How not to restore optical discs
Often on the Internet you can read a lot of alternative ways to restore scratched compacts. For example, sometimes it is recommended to polish simply with soft or denim cloth. It is clear that you cannot polish the surface with non-abrasive materials. It will simply overheat and the media will no longer be recoverable.
Another extreme option (real advice from “experts” on the Internet) is polishing with fine-grained sandpaper. This method can immediately ruin the surface without even making an effort. The same applies to heating the disk in the microwave, under a table lamp, etc.
Another popular tip from the Internet is to cover the scratch with “green paint” or even completely treat the surface of the compact with it.
